Fixing the faucet in the bathroom. How to fix a bathroom faucet. Leakage from under the lever
Specialization: master of interior and exterior decoration (plaster, putty, tile, drywall, wall paneling, laminate, and so on). In addition, plumbing, heating, electrical, conventional cladding and balcony extensions. That is, repairs in an apartment or house were done on a turnkey basis with all the necessary types of work.
In most cases, valve and lever faucets are used in bathrooms, where the water flow is controlled by faucets or cartridges. In my case, we will talk about valve valves, or rather, how to fix a leak from under a valve or spout on your own without resorting to the help of a plumber.
We repair the mixer
Today I want to talk about the repair, and not the replacement of the crane box.
Crane box

Before we start repairing shutoff valves, let's figure out how the crane box with a ceramic pair functions. There are two types of such constipation, but at present almost 100% of faucets are made with a ceramic couple.
Such a device is much more reliable, as it has a longer service life, and the crane is semi-reversible, that is, it is more convenient to use:

Ceramic pair consists of two plates - movable and fixed
- the ceramic pair itself consists of an input movable disk, which is attached to the stem (in the photo I hold it in my hand) and an adjustable fixed disk (it lies on the table on the right);
- the contact surfaces of these disks are polished to a state and easily rub against each other;
- the essence of the adjustment is as follows - when the holes on the two plates coincide completely, then maximum water flow is ensured. But when turning, the input disk shifts around its axis, gradually blocking the holes and the flow, respectively, weakens;
- with complete blockage, the holes of the plates do not match at all;
- the discs are pressed against each other by a sealing ring (in the photo it is red), which in turn rests on the inner wall of the mixer chamber;
- but over time, the rubber wears out, the stop weakens and leakage occurs.

The device of a crane box with a worm rod is much simpler. Here the stem is moved back and forth using a worm gear, raising or lowering the valve with a rubber seal:
- the worm gear itself is located in the fat chamber and, thanks to it, water does not penetrate through the gaps;
- the main problem is the wear of the rubber ring on the valve, which is easy to replace;
- but there may also be wear on the worm gears, in which case the axle box must be replaced.
Let's start repairing

Of course, first of all, you need to turn off the water, and you need to do this not only on the general supply, but also on the boiler or gas column in order to remove pressure from the system.
Then remove the decorative cap by prying it with a knife or screwdriver. You will have access to the screw that holds the valve.

Now unscrew the Phillips head screw (for this you will need a curly screwdriver). The plastic cover will also come off with this screw.
But if there is a lamb, then there may not be a lid, but this does not change anything. You also remove the valve itself - it is mounted on the stem, and you can dismantle it with a slight effort.

After you remove the valve, you will have access to the axle box - there is a grip on top in the form of a 14 nut for a socket, open-end or box wrench.

Now unscrew the faucet box counterclockwise and remove it from the mixer chamber.

Now we need to pull the stem out of the box body, but it will hold well there because of the salts. Therefore, first we remove the sealing ring, and then with a light blow of the screwdriver handle, pliers, wrench on the stem shank, we knock it out of the body along with the ceramic plates.
Wipe all parts with a natural cloth, preferably wool. But in no case do not use sandpaper - you will scratch the ceramics, and there will be no snug fit!

At the moment, our goal is to improve the quality of the seal, but we will not be able to replace the rubber ring (nothing), so only its displacement (advancement) remains.
To do this, we assemble the crane box back. And between the fixed plate and the rubber seal we put a washer - it will push the ring forward, therefore, the pressure on the steam will increase.
It is difficult to pick up a washer of this diameter, but it can be made from copper or aluminum wire with a cross section of 1-1.2 mm (I made it from tin solder).

The photo shows how the sealing ring has moved out - now the plates of the ceramic pair will fit tightly, and when closed, water will not seep through the gap between them. Reassemble the faucet in reverse order, open the water supply and test the faucet. I'm sure everything will be alright!
I think you figured out how to repair the mixer using my example. If you have any questions, I'm waiting for them in the comments!
The faucet is an essential element of every bathroom with hot and cold water supply. Thanks to him, the temperature of the water leaving the tap and its pressure are regulated. In addition, the mixer has a switch that allows you to redirect water from the tap to the shower. Like any mechanical device, the mixer is not immune from all sorts of breakdowns. Fortunately, its design is not too complicated, allowing, in most cases, to fix problems yourself. In the article, we will consider the device of a bathroom faucet with a shower, repair of a faucet in the event of any breakdowns, and list the causes of malfunctions.
Consider how it is arranged with a shower. This will help to understand the principle of its operation, depending on the design. All faucets that can be used in the bathroom are divided into 3 categories:
1. Touch. The control element of such a device is a photocell that gives a command to turn the device on and off. Self-repair of such devices is very difficult, so it would be most rational to refer it to specialists.
2. valve. The device of the bathroom faucet with a valve-type shower is quite simple:
- frame;
- spout;
- valves. Designed for manual control of the mixer;
- axle box crane. They control the flow of water. Older models are equipped with rubber gaskets, while new ones have ceramic plates.
Tip: Ceramic bushings are much more durable than older models, and they are much easier to manage, since the valve rotates a maximum of 180 degrees.
3. Lever. Recently, this type of mixer is gaining popularity. A typical lever model consists of the following elements:
- frame;
- spout (gander);
- a ceramic or ball cartridge in which water is mixed. Ceramic cartridges cannot be disassembled. If such a cartridge has become unusable, the repair of a bathroom faucet with a shower will consist in replacing such a cartridge;
- control knob that regulates the pressure of water and its temperature. Mounted on the cartridge lever;
- a nut that fixes the cartridge in the housing;
- a housing cover that covers the cartridge and is designed to give the mixer a more aesthetic appearance.

The main causes of mixer failures
If you carefully study the device of the bathroom faucet with a shower, its repair will not be difficult. It is only important to know the causes of breakdowns:
- Unsatisfactory product quality. This is typical for products of little-known manufacturers who use low-quality components and consumables in their work;
- Use of old consumables. For example, paronite or silicone gaskets last much longer than rubber products. In addition, they are less deformed and do not collapse from drying out;
- Dirty water in pipes;
- Increased water hardness affects the internal parts of the device, provoking the formation of deposits and cracking of the seals.
Major breakdowns and their elimination
Let us examine in more detail what breakdowns can occur during the operation of a faucet with a shower, as well as how to fix a faucet in the bathroom on your own. Faults may be of the following nature:
Leak at the junction of the gander with the mixer body
This is the most common failure, as the gander constantly rotates in different directions, which leads to wear of the rounded rubber pad. This gasket is located in the groove of the gooseneck, so the gooseneck must be disconnected to replace it.
Actions are performed in the following sequence:
- the fastening nut is unscrewed;
- gander is removed;
- the remnants of the old gasket are removed from the gander groove;
- a new gasket is installed;
- the goose is put in place;
- the thread on which the fixing nut will be screwed is wrapped with 2-3 layers of FUM tape;
- the gander fastening nut is tightened.
Leak from under the control lever
Such a failure is typical for single-lever mixers and is caused by a broken cartridge. The faucet needs to be disassembled and replace cartridge. In addition to this failure, there are several other signs of a cartridge failure:
- the lever became difficult to control;
- the temperature of the supplied water changes spontaneously;
- no supply of either hot or cold water;
- The valve does not close completely or does not open completely.
In this case, the cartridge needs to be replaced. Do-it-yourself bathroom faucet repair is carried out in the following order:

Important: There are protrusions on the cartridge body that must align with the recesses inside the body. Align them carefully. If they don't match, the mixer will leak.
Leaking valve of a two-valve mixer
The reason for the leakage of a two-valve mixer is the wear or destruction of the sealing washer located on the crane box. The destruction of the crane box itself may also occur. If the faucet in the bathroom is leaking - how to fix it quickly and inexpensively? Only on my own replacing the crane box or the washer on it. There is nothing difficult in this.
All work is carried out with the water supply turned off:
- the plug is removed from the leaking valve;
- the screw is unscrewed with which the valve is attached to the mixer body;
- with the help of an open-end or adjustable wrench, a crane box is unscrewed;
- the crane box itself or the sealing ring on it is replaced;
- a new or refurbished crane box is installed in the old place.
Faucet-shower switch leak
There is another gasket between the faucet-shower switch and the body, which can be damaged. How to fix a bathroom faucet whose switch is leaking? Just disassembling the switch itself:
- the button (switch) is removed, for which the stem is held in a fixed position with pliers;
- the valve with the stem is removed;
- the damaged seal is removed;
- in his place new seal installed;
- the switch is put together.
Repair of a faucet with a flag switch is shown in the video.
Malfunction of the button or valve "faucet-shower"
If the button does not return after being turned off, then its spring is faulty. It is necessary to disassemble the switch as described above, and then remove the broken spring. In her place new spring installed.

If the switch does not work, and water flows from the shower and from the tap at the same time, then the cause is cracked oil seal located on the switch stem. Necessary:
- remove the button (switch);
- remove the stem;
- replace the seal;
- assemble the switch.
Leak at shower hose connection
This problem occurs due to damage to the hose gasket. If the bath faucet is leaking, a do-it-yourself repair will consist in replacing this gasket. To do this, simply unscrew the hose nut by hand, and then remove the worn washer. In her place a new paronite washer is installed. Before tightening the nut, it is advisable to wrap a couple of layers of FUM tape on the thread. here.
Leak in the place where the watering can is connected to the hose
How to fix a faucet in the bathroom if there is a water leak at the junction of the hose and the shower head? Very simple. Under the nut located on the hose there is a round insulating gasket. It is easily replaced even without the use of tools.
Weak water pressure
If the water pressure through the mixer has noticeably weakened, while the neighbors have remained the same, one should suspect, first of all, aerator filter clogged located at the tip of the gander. You should unscrew it with your hand or pliers, and then check the pressure. If the pressure increased without an aerator, then the reason lay in its pollution. You need to gently rinse it under running water, and then screw it back into place.
Tip: It is often not the aerator itself that gets dirty, but the cleaning filter located at the entrance to the room. Therefore, if cleaning the aerator did nothing, then unscrew the filter and check the cleanliness of its mesh.
We found out how to repair a bathroom faucet with a shower with our own hands. If you use higher quality consumables, such problems will occur much less frequently.
Do-it-yourself bathroom faucet repair video
Even the most reliable faucets begin to leak water over time - they flow or drip. It is not always necessary to call a plumber to fix a faucet. Most breakdowns can be fixed on your own. But, before you repair a dripping faucet, you need to understand its design and workflow.
Repairing a faucet with your own hands is a task of medium complexity
Kinds
Let's start with definitions. There are faucets and faucets in the bathroom and not in the kitchen. Taps only supply water, mixers also allow you to regulate its temperature by mixing two streams - cold and hot water. In this article we will talk specifically about cranes and how to repair them. Repair of mixers is very similar, but has its own characteristics. By the way, you can read about the repair of single-lever mixers.
There are several types of taps for the bathroom or kitchen:
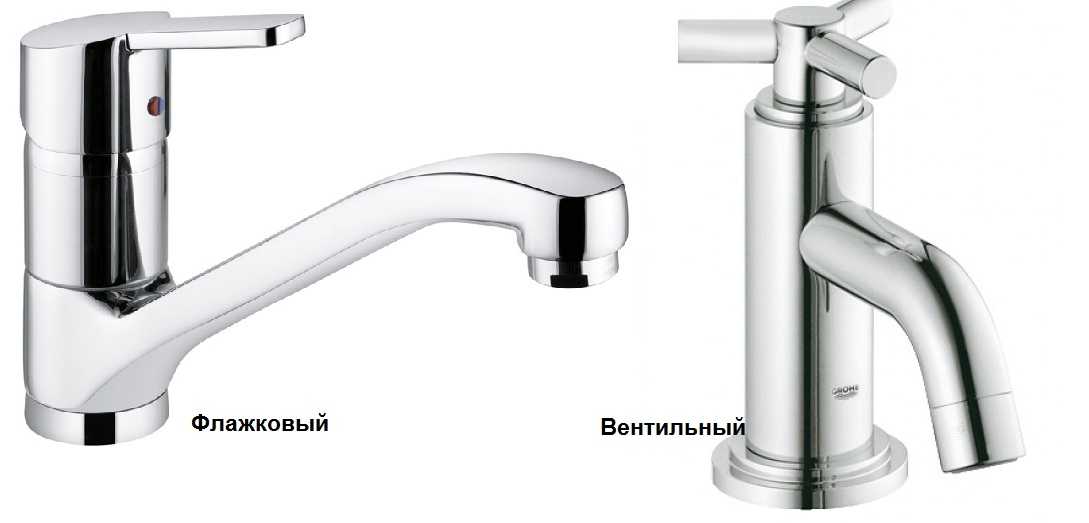
Their device is different, so that the repair, even with the same damage, is significantly different. Therefore, each of the species will be considered separately.
Self-repair of a valve valve
Valve taps can be called classics of water supply. And, although they are gradually being replaced by new designs, there are still plenty of them. Their internal structure has not changed over the decades. Only the design has changed - it has become more diverse and refined. Today you can find both the most common models and very exotic ones.
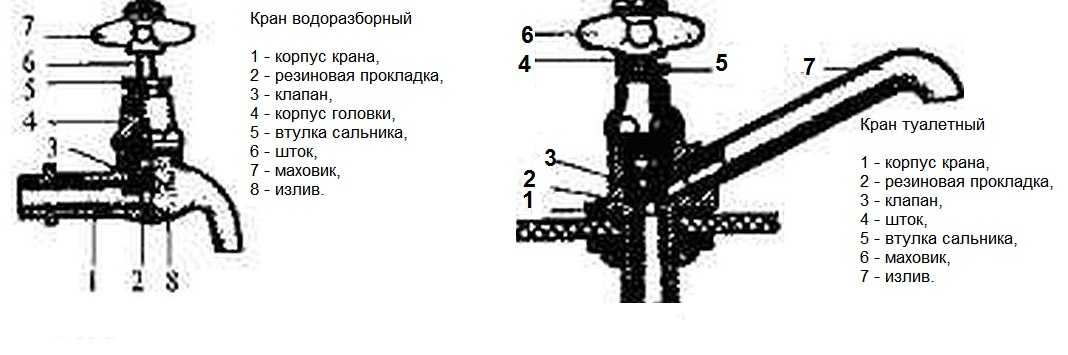
The structure of valve valves
Water taps of this type are still in use, as they are simple and reliable, they serve not for years, but for decades. If all the “stuffing” is of good quality, all that can fail during this time is gaskets. Replacing them is the main way to repair a valve valve.
Replacing the rubber gasket
If, with the valve completely closed, the faucet in the kitchen or bathroom continues to drip, most likely the reason is the gasket on the valve that has lost its elasticity (see photo in the next paragraph). She stopped snuggling tightly against the saddle, which is why the water continues to flow and sometimes the tap does not just drip, but even flows. Repair the faucet in this case - replace the gasket. To do this, you need a wrench, or better - an adjustable wrench and a set of gaskets.
Before you fix a dripping faucet, turn off the water supply (you can completely, you can only in this branch, if possible). Next, it is useful to make sure that the water is still blocked. Water does not flow - we begin repairs. You will need a wrench or adjustable wrench. They will need to unscrew the head housing (the upper part of the housing).
It is better to work with a wrench. In order not to damage the surface during the operation, wrap it with a soft cloth, and then apply the key. Unscrew the head, remove the valve. Now you can replace the gasket or install a new valve. You pry the old one with something sharp - you can use a screwdriver with a flat blade, you can - with an awl, etc.
When choosing a gasket, please note that its edges must be beveled at about 45 °, otherwise the plumbing will make noise during operation. If this is not in your arsenal, you can trim the edge with something sharp - a knife or scissors.

If there is no suitable gasket, it can be cut from a sheet of dense rubber (porous is not suitable). The thickness of the rubber sheet or gasket is 3.5 mm, the inner diameter is slightly less than the stem diameter, the outer one should not protrude. Don't forget the 45° beveled edges.
After installing the gasket, put the valve in place, twist the head. The new models do not require a winding on the thread. Moreover, winding is contraindicated - it can cause a crack in the body. If an old crane from the times of the USSR is being repaired, tow is placed on the thread, lubricated with packing paste, then twisted. After that, you can gradually turn on the water.
Sometimes the opposite story happens with this gasket on the valve - water does not flow or barely oozes. In this case, the gasket flew off the stem and blocked the flow of water. First, you can try to open / close the tap a couple of times, and if it doesn’t help, you need to repeat the operation described above, that is, repair the tap by replacing the gasket. Just remember to remove the old one stuck to the saddle.
Water oozing from under the stem
If water drips from under the valve, the seals are most likely worn out. There are two ways to fix a faucet with a leak from under the stem. To begin with, you can try to twist the head housing more tightly. They do it again with a wrench. It is undesirable to use pliers, as traces remain after them. Tighten the head as far as possible (just don't overdo it).

If the thread is tightened to the maximum, and water continues to ooze, it is necessary to replace the gaskets on the stuffing box. To do this, first tighten the tap to the limit, then remove the tap head again, pry something sharp and remove both rubber rings, replacing them with new ones.
Water does not shut off
If the gasket is changed, and the water does not shut off, when the tap is rotated, the thread is torn off, it is necessary to change the stem - the thread on it has worn off. There are two options here - replace the stem itself or completely the entire valve head.

If the threads are not worn, the gasket is new, but the faucet is leaking, inspect the seat. It may have a hole in it. It is formed gradually - it is washed out by water supplied with high pressure. If the gasket is not pressed tightly in some place, a sink will form in this place. Sometimes water undermines the entire circumference, forming sharp edges, which quickly damage the gasket. The gully and sharp edge must be removed. Take a regular screwdriver and run it along the edge to dull the sharp edge. The same operation can be done with a nut file or a piece of fine-grained sandpaper. The main thing is to achieve a smooth (as far as possible) and non-sharp edge.
How to fix a cartridge faucet
Most often, taps with one lever are installed in the bathroom or in the kitchen. They are also called flag or single-lever. For opening / closing the water in it, a special device is responsible - a cartridge, because they are also called cartridge.

Inside the cartridge there are two plates with holes. The lower one is fixed rigidly, and the upper one is movable. A rod is attached to it, and it, in turn, is attached to the handle. Turning the handle, we move the rod, and it shifts the movable plate, which opens / closes the water and changes its pressure.
If there are problems with such a faucet, it can only be repaired by replacing the cartridge. The main problem in them is that they start to flow - water oozes or drips from under the handle. To repair a leaking or dripping cartridge faucet, the cartridge must be replaced. The only way.
Cartridge replacement
First of all, you need to turn off the water, then remove the handle. To do this, first remove the colored plug - it closes the screw. Having unscrewed the screw, the handle is pulled up, separating it from the stem. After the handle is removed, unscrew the clamping ring - it holds the cartridge. Now it remains only to take it out.
Then, along with the cartridge, you need to go to a store or market, buy exactly the same. The new one must match in size, the holes in its lower part must have the same shape and location. In general, you need to find an exact copy.

Assembly is in reverse order:
- we put the cartridge (strictly vertically, scrolling a little around its axis so that the protrusions in the case fall into the recesses on the cartridge),
- tighten the clamping nut;
- install the handle
- screw in the fixing screw;
- insert a plug.
An initial check can be made after the pressure ring has been installed. You can open the water and check if the faucet is flowing now.
If the flow of water has become too weak
Most modern faucets are equipped with a mesh on the spout that traps solid particles that may be contained in the plumbing. If gradually the stream of water became not so elastic, and the pressure on other taps did not change, the reason is the clogging of this very grid. In this case, you can fix the faucet in a couple of minutes.

Unscrew the nut with the mesh, which is located at the end of the spout. Rinse it, clean the clogged holes (you can use a needle or an old toothbrush). Install the cleaned mesh in place.
A bathroom is a room where a large number of plumbing and household appliances are concentrated. For comfort, a modern person needs not only, but also a sink with a washing machine. All these devices are quite reliable, but as you know, nothing can work flawlessly forever, so sooner or later there will be any leaks.
In an emergency, it is important not to get confused, quickly figure out what to do if the faucet in the bathroom is leaking. According to experienced plumbers, every homeowner should know the algorithm of simple steps, as well as have the necessary tools to help repair the current faucet or faucet.
Causes of leaks
So, you have noticed that a faucet is leaking in the bathroom, a shower or faucet is digging in, or maybe water is oozing through another place. A leak is a dangerous situation that needs to be quickly detected and eliminated on your own or with the involvement of professional craftsmen. The most common causes of various kinds of leaks are:

Important! When a bathroom faucet leaks, it is important to determine the nature of the leak. If there is a lot of water leaking, then the situation is emergency, then you need to urgently turn off the water, and also call professional plumbers. You can repair a slightly leaking one with your own hands.
Consequences of leaks
Often people simply turn a blind eye to the dripping faucet in the bathroom for years without taking any action. In fact, "chronic" leaks tend to lead to much bigger problems. Therefore, a leaking shower faucet or faucet can lead to an emergency and a massive leak. The most negative consequences of plumbing leaks in the bathroom are:

Remember that in the event of a leak, you must first accurately determine the location and cause of the breakdown, and then promptly shut off the hot and cold water supply to reduce water loss. Then you can quickly purchase all the necessary parts and replace them yourself. If you have determined that the faucet is dripping in the bathroom, but you don’t know how to fix it with your own hands, it’s better to call the master.
Actions in case of a leak
Any plumbing fixture has its own service life or margin of safety, so sooner or later it fails, and bathroom taps are no exception. In this situation, it is important not to panic, but to clearly understand what needs to be done to quickly eliminate the emergency. The service life of the faucets is indicated by the manufacturer, but it also depends on the intensity of use, the correct installation and the quality of tap water. When answering the question of how to fix the faucet in the bathroom, we recommend that you proceed according to the following plan:

Please note that if, before you repair the faucet in the bathroom, you dismantled it and found several problems at once, for example, cracks in the body and a clogged cartridge, then it would be better to replace the device completely, since most likely it just worked out its resource.
Preventive measures
If you have determined that the faucet in the bathroom is leaking, but you don’t understand how to fix it yourself, and the leak is of an emergency nature, just turn off the hot and cold water, and then call an experienced craftsman. In the future, to extend the life of plumbing fixtures and prevent leakage, it is better to apply preventive measures to protect them. To keep your faucet and faucet as long as possible, follow these tips:

Important! According to statistics, most often leaks from a faucet occur precisely due to improper installation of equipment, in particular, due to a mismatch in the diameters of pipes and seals. Therefore, before you do the installation yourself, think about whether you can cope with this task with high quality.
Video instruction
It is always useful to know how to repair a bathroom faucet with a shower, do it yourself, without resorting to the services of specialists. After all, sooner or later any faucet in the bathroom stops working properly. The main causes of failures: wear of cartridges, gaskets, seals and fasteners. With simple instructions, anyone can figure out how to repair a bathroom faucet with a shower on their own.
Types and mixers and their designs
In order to repair a bathroom faucet with a shower, it is not at all necessary to call a plumber. Any crane is easily disassembled into parts. If a person understands his device, then repairing a bath faucet with a shower will be quick and efficient.
To find out how to fix the mixer, you need to figure out which parts of a particular design are responsible for malfunctions.
There are three main categories of bathroom faucets with shower:

Bathroom faucets differ from others in the presence of a bath-shower switch, which are also divided into several types.
Types of bath-shower switches
The part, the failure of which is typical for the repair of a faucet in the bathroom, is a shower switch. He is responsible for switching the water supply to the faucet spout or watering can. There are 4 main varieties:

The main causes of failure
Do-it-yourself mixer repair will not take much time if you correctly determine the cause of the malfunction. Any device will eventually fail. The mixer is no exception.
It can break due to wear of the components. The lower the quality of the materials, the shorter the service life of the components and the more often you have to repair the faucet in the bathroom. How to repair a faucet in the bathroom with your own hands?
1. Leakage from under the lever
Usually caused by a broken cartridge in a single-lever faucet. The following signs will indicate that the cartridge is out of order:
- the handle is difficult to rotate;
- the water supply is not completely shut off;
- the water temperature changes arbitrarily;
- cold water flows from a hot faucet, and vice versa.

To replace the ceramic cartridge:
- remove the plug, painted blue-red;
- unscrew the fixing screw with a Phillips screwdriver or a hex wrench;
- pulling the handle up, disconnect it from the body, after which the cover is unscrewed;
- with an adjustable wrench, unscrew the nut that fixes the cartridge in the housing;
- replace the damaged cartridge.
After replacing the defective element, you need to align the protrusions on the cartridge body with the grooves inside. If you lose sight of this, the faucet will leak.
2. Valve leakage
In two-valve mixers, the sealing washer often wears out. Sometimes the crane box becomes unusable. Such breakdowns lead to leakage. To replace the faucet box or rubber ring:
- remove the plug from the faulty valve;
- unscrew the screw securing the valve to the mixer;
- with an adjustable wrench, disconnect the crane box;
- replace the crane box or ring.

3. Leaking shower diverter
Before repairing the bathroom faucet switch, be sure to turn off the water in the room. A leak from under the switch indicates that the gland between the repaired mixer and the switch has become inoperative. To replace it:
- remove the button by clamping the stem with pliers;
- remove the valve with the stem;
- pull out the damaged seal.

4. Broken shower switch button
If, after water procedures, the button cannot be returned to its original position, then its spring has broken. In this case, the switch is disassembled according to the algorithm described above, the faulty spring is taken out and a new one is put in its place.
Sometimes the shower switch does not work, and water flows into the shower head and faucet at the same time. This is due to a crack in the stuffing box, which is located on the stem. To fix this problem, you need:
- remove switch;
- get a stock;
- replace the damaged seal.

Many apartments still use the old cork switches. Over time, the button moves away from the body, resulting in a leak. To eliminate it you need:
- disconnect the screw;
- remove the handle;
- unscrew the nut;
- remove the lock washer;
- get a cork;
- wipe the cork and the inside of the case with kerosene;
- to grind the cork to the body, use abrasive paste, paraffin or petroleum jelly.
In spool switches, the gasket may wear out. To replace it, you should:
- disconnect the hose;
- remove the spout;
- unscrew the adapter;
- unscrew the valve;
- get the gold plate;
- replace rubber rings.
The repaired button will last a few more years.
5. Hose leak
Over time, the gasket at the attachment point of the hose to the faucet wears out. A leak is formed. The easiest way to fix such a breakdown: you just need to unscrew the nut of the shower hose, remove the damaged washer and insert a new one in its place.
6. Leak between watering can and hose
To eliminate this malfunction in a mixer that has broken down, it is also not necessary to use tools. It is only necessary to unscrew the nut that secures the watering can to the hose and replace the insulating gasket.
7. Blockage in the watering can
When troubleshooting bathroom faucets, repairs are not limited to replacing gaskets and cartridges. With prolonged use, the holes in the shower head become clogged with sand, limestone and other hard deposits.
In order for the shower to work as expected again, the mesh must be disassembled and washed. In some models, the screw is located under a plastic cap in the center of the watering can. Sometimes, in order to disassemble the grid, it is necessary to turn it counterclockwise.

8. Weak pressure in the mixer
An aerator is attached to the end of the spout. It retains solids and increases water pressure. If the water flows in a thin stream, the reason lies in the blockage of the filter. To clean it, unscrew it with pliers, carefully disassemble it into its component parts and rinse them under running water.
Other malfunctions
Specialists also face other types of breakdowns:

Do-it-yourself bathroom faucet repair does not require special skills. This craft can be mastered not only by men, but also by women. Regardless of the type of faucet in the bathroom, repairing and replacing parts is not difficult.
Video instruction