Do-it-yourself wiring in the apartment. Installation of electrical wiring in the apartment. Ceiling cable management
It is worth saying that the electrical wiring of any room is strictly individual. Therefore, we will consider the main points of installing electrical wiring in an apartment. So, first you need to enter the input cable into the switchboard. The electrical panel contains a device for recording electricity - an electric meter and protection devices - circuit breakers, ouzo, differential. automatic machines, etc. The electrical switchboard can be located in a niche (internal installation) or on a wall (consignment note). The most optimal placement of the electrical panel immediately near the entrance of the apartment hallway.
Optimal placement of the electrical panel immediately at the entrance of the electrical panel - wiring for the apartment
Video. The secrets of assembling the electrical panel and wiring in the apartment
You need to lay a copper wire with a cross section of at least 6 mm 2. The installation of the electrical switchboard is placed at a level of 1.5 m from the finished floor. This provides access to various devices for their inspection, taking meter readings and preventive maintenance. The operation of protection devices is optimized depending on the power consumption.
Hidden and open wiring in the apartment

Now most apartments use electrical wiring hidden under plaster. In drywall partitions, the wire is pulled in a special protective sleeve. External wiring in the cable channel does not look aesthetically pleasing; this method of laying the conductor is more suitable for office space. In the apartment, the cable channel is laid as an exception.
Wiring in the cable channel

To install hidden wiring in the wall, a recess of up to 2 cm is made. Such an action is carried out only when the wall is completely marked. Along with this, recesses for sockets and switches are made vertically above these installations, but not diagonally, in an attempt to shorten the path of the conductor. The conductor for consumers must be laid straight - perpendicular. Preliminary fastening of the wire is carried out using dowels - clamps, and after that it is plastered. An excellent option when the wire is pulled in a protective sleeve, but this leads to an increase in the cost of electrical wiring. The protective sleeve allows you to stretch the wires without disturbing the plaster in the future, if you need to replace or repair the wiring. Along with this, the use of a protective sleeve or pipe creates protection for electrical wiring.
Electrical wiring in a protective sleeve

Basically, for electrical wiring in the apartment, a copper wire in PVC insulation is used. The conductor must be single-core, it oxidizes much less along with stranded copper wire.
The installation of special boxes for sockets and switches should be flush in the wall and should not stick out, otherwise they will cause a lot of trouble when installing electrical installations. The fastening of the socket boxes is carried out using a mixture of alabaster or rotband.
Power lines should be laid, starting from the shield, which is installed at the entrance to the apartment separately for sockets and lighting. After that, electricity is distributed throughout the room through junction boxes. In the junction boxes there is a small supply of wire up to 10 cm for subsequent disconnection. It should be noted that this type of wiring has been used for a long time, and in most old residential premises it has been preserved to this day.
Junction box for disconnecting wires

Automatic protection for electrical wiring in the apartment
Modern analogues of apartments have several groups of power lines. In such a scheme, the installation of an RCD is mandatory, which will protect the family from electric shock. In modern wiring, more protection devices and wires are used, so its cost increases significantly. Such expenses are justified by increasing the level of reliability of the power supply network. Thanks to this wiring, independent lines are formed, which later lead to easy troubleshooting.

Wiring for electrical installations

Any of the rooms should be equipped with a standard type of lighting, which can be supplemented by local lighting in the form of a floor lamp, wall lamp, table lamp. Most experts believe that it is enough to use 1 outlet per 6 square meters. meters of room area. For computers and TVs, you can provide a block of sockets. In the kitchen area, homeowners have many different household appliances, which include a microwave oven, dishwasher, juicer, etc. therefore, it is prudent to provide a sufficient number of outlets and conductors.

The location of the switches is often determined not far from the door at a distance of 10 cm from the doorway and 90 cm from the level of the finished floor. The main thing is that when the door is opened, access to the switch is not blocked. The level of sockets should reach 30 cm from the floor level. Most experts recommend purchasing ceramic-based switches and sockets with copper contacts.
Immediately before the installation of sockets in the premises, it is necessary to determine their location, as well as the relevance of their installation, the cable laying route, the volume of wires, and the location of the junction boxes.

For optimal connection of sockets, a copper cable of the VVGng brand is used. This element is necessary for internal laying, as it is covered with special insulation that prevents combustion. The size of the cross-section of the wires in the cable is directly related to the results of the power of electrical appliances. Basically, this figure reaches 2.5 mm. It contains several cores in the form of a phase, zero and earth. In old building structures, where there is no grounding in the electrical distribution panels, a two-core cable (phase, zero) is used.
The geometry of the wiring in the apartment

It is always correct to lay electrical wiring in horizontal-vertical lines, regardless of whether it is in a cable duct or under plaster. But still, it is often possible to find wiring laid by the shortest path, arbitrarily. Such a trick is used for several reasons: due to the saving of electrical wiring, ignorance of the rules of electrical installation, negligence of the electrician, in order to save time and effort. Why is it so important to observe the geometry of the electrical wiring?
Scheme of incorrect wiring

They made repairs, rearranged the furniture in the house, decided to hang a new picture in the resulting space, outlined it, take a puncher, drill and get exactly to the place where the sparks fly out. Such a scenario is not contrived, this is a common occurrence, I myself once landed in such a place, although there was a choice to drill a centimeter to the left or a centimeter to the right. I had to correct the mistake and repair the damage.
So, improperly laid electrical wiring increases the risk of de-energizing part of the line one day. After a good repair, it is not always so easy to fix a broken wire.
The wiring rule for laying electrical wiring is very simple: where a socket or switch is installed, the wiring must go down strictly vertically to electrical installations. If you need to hang a picture in the future, the risk of damaging the electrical wiring is reduced to zero.
Wiring must be laid strictly vertically or horizontally

Such elements are laid along corrugated plastic pipes in order to protect against insulation damage during finishing. The laying route should contain only horizontal and vertical zone types. It is not recommended to use diagonal zones. In addition, cable turns and intersections with other cables must be made at right angles. The distance from the ceiling should reach a maximum of 15 centimeters.
Correct wiring diagram.

Vertically laid wires must be at least 100 mm away from door and window openings. Near the heating pipes, the laying should be carried out at a distance of at least 150-200 mm, at a perpendicular intersection, the electrical wiring should be protected with asbestos gaskets. Parallel laying near pipelines with combustible substances (gas) is carried out at a distance of at least 400 mm. It is also necessary to follow the sharp corners of concrete, metal parts and shrinkage of the building.
At what height from the base of the ceiling is the electrical wiring laid? Minimum 150 mm, (depending on ceiling height), i.e. the principle is this: if you plan to install a suspended or stretch ceiling, the wire must remain in the accessible area. If the new ceiling is lowered by 300 mm from the main ceiling in an apartment with high ceilings, the electrical wiring should be laid at a distance of 400 mm. You need to take into account such a rule even if you are not currently planning suspended ceilings.
How to lay electrical wiring in a panel house?
Most often, in panel houses, electrical wiring to sockets is laid in special technical channels not vertically, but with a slope, on average, under 45 0.
Wiring diagram in a panel house

If you need to move or lower the switches and sockets to another convenient place, it is enough to make a small recess in the panel to drown the wiring. If the previous place of the outlet at a height of 1 meter does not suit you, and you decide to move it lower, at a distance of 300 mm from the floor and slightly to the side, the principle remains the same - we lay it straight perpendicular.
Electrical wiring in a panel house

How to lay electrical wiring in the floor and ceiling
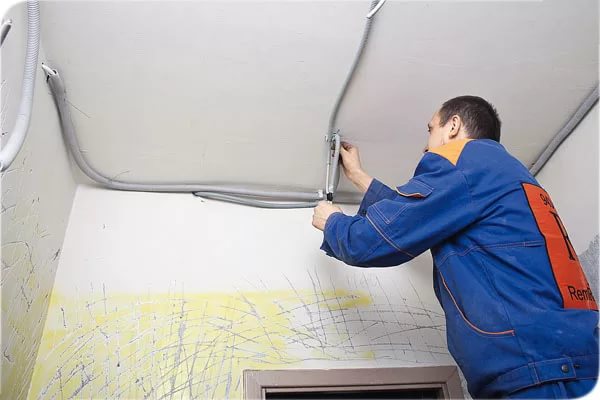
If a stretch or suspended ceiling is planned, the electrical wiring can be laid on the ceiling arbitrarily, in the shortest possible way, for example, the NYM cable does not require additional protection, as it has triple insulation and does not support combustion. The cable VVG, VVGng, is laid in PVC corrugation. The cable is fastened to the ceiling on the dowel clamps or special holders (clips) fixed in the corrugation.
Electrical wiring in the floor

Under a wooden floor, they are also laid arbitrarily, in metal-corrugated or metal pipes. If in a screed, then the wire is laid in PVC corrugation, arbitrarily.
There should be no junction boxes on the ceiling and in the floor, i.e. connection of wires and wiring of conductors should not be. All laid wires must have continuity, from the switchboard to the consumer or from the junction box installed in the wall to the consumer. If the box were in an inaccessible place, then in the event of a failure in the contact connections, it is impossible to eliminate the malfunction. Junction boxes must remain accessible for repair or maintenance work.
Corrugated ceiling wiring

Electrical safety during the installation of electrical wiring

It is also worth mentioning the safety rules when connecting sockets and laying cables. Most experts do not recommend laying the cable when it is energized. This is due to the fact that a person can get an electric burn or even die. Therefore, before working with the cable, it is necessary to check whether it is de-energized. This will require the use of a special device. To increase the level of reliability, the cable must be disconnected from the electrical panel. You need to know that all electrical work in the apartment is carried out after the mains is de-energized. And the wires are brought to power at the last stage. Such actions can be carried out independently, but for this you must adhere to the established rules. However, this work should still be entrusted to trained people.

Video. How to lay electrical wiring in the apartment?
Modern requirements for electrical wiring have taken a high bar, as the number of electrical appliances has increased in apartments and houses. Therefore, the wiring must withstand possible loads and comply with safety requirements.
During construction or major repairs, a new wiring diagram in the apartment should be developed, which will take into account the increased human needs for electricity.
According to the new standards, wiring is often thrown along the ceiling
The wiring, which was done in apartments 40 years ago, was calculated for the operation of a small set of appliances - a TV, refrigerator, lighting. The maximum loads were given by electric stoves, kettles and boilers.
Today, people are buying computers, video surveillance systems, powerful home appliances, wireless devices, and more.
At the same time, the principles of designing electrical wiring have not changed, but the network has become more complex and extensive.
Advice! It is important to provide for the optimal number of outlets for appliances that will be used by residents. Otherwise, tees and extension cords will be used, which leads to an increase in loads on individual sections of the wiring and overheating.
 The number of electric outlets has increased
 An additional difficulty in drawing up a wiring diagram lies in comparing its operating parameters with the power of the devices.
Therefore, you need to know in advance what and where it will stand, and what loads it will exert on the network.
The second point is the correct lighting of the premises, which is carried out in accordance with the standards
Along with the power network, low-current is also used in the apartments. These are television and telephone cables, computer equipment, fiber optic networks, and acoustics. Physically, they cannot be separated, since the devices are connected to them at the same time, which means that the position of the tracks is taken into account when drafting the project.
The amount of cable needed to connect all devices has changed significantly. This also applies to lighting.
Previously, rooms were illuminated with one chandelier, and today spot lighting has come into fashion, which allows you to evenly scatter light over the area of \u200b\u200bthe rooms, as shown in the photo below. Each lamp requires a wire.
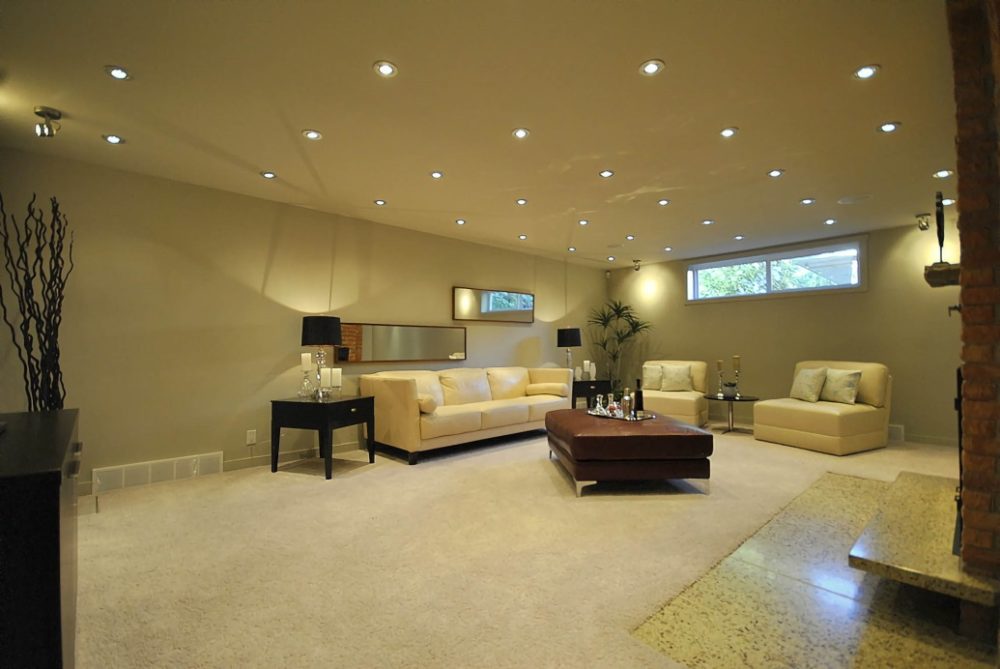 spot lighting
 Interesting to know! Modern electrical appliances are not as voracious as they used to be. Instead of one incandescent lamp, 10 LEDs can work at once, giving much more light. This fact allows not to overload public networks.
Why do an electrical wiring project in an apartment
To ensure safety, the wires are additionally laid in a corrugated PVC hose, which takes up much more space.
Laying 10-15 cables correctly in a row and spreading them around the apartment is an art. And only a professional electrician acting according to the scheme can cope with the task.
 Someone will say that an electrician is a perfectionist, we will answer that the work was carried out according to the project
 The second point is the need to finish and mask communications. After that, it will be impossible to deal with the location of a large number of conductors, without partial damage to the repair.
When the developer has a plan, there are no problems of this kind.
 Apartment wiring plan - example
 The electrician takes into account the wishes of the client regarding the location of household and heating appliances in the premises, after which he begins to draw up a diagram.
Its task is to break the cables into groups so that they do not intersect, do not interfere with each other, and it is also possible to distribute the load in the network evenly.
He thinks over the protection system (some devices require grounding and the presence of separate RCDs) so that the wiring meets safety requirements.
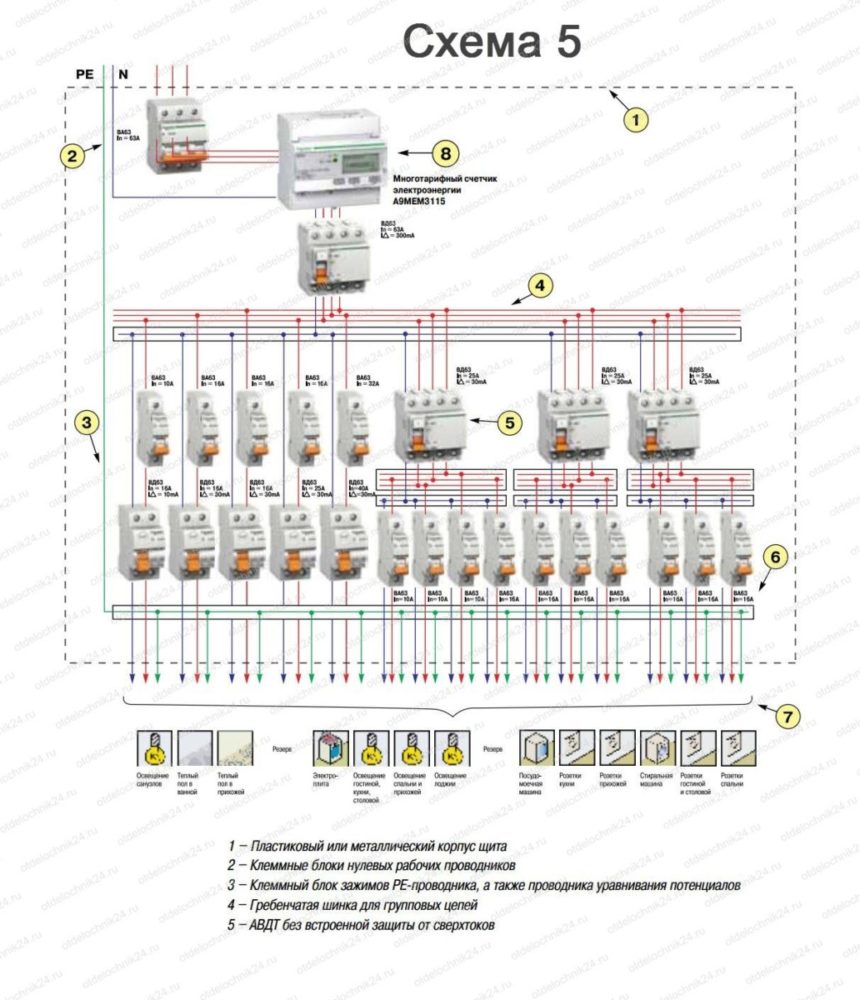
The electrical wiring diagram includes the following elements:
- Distribution board, which can be intra-apartment or common.
- Electric meter to control the consumption of electricity.
- Automatic protection devices responsible for cutting off the power supply in the event of leakage, human electric shock, short circuits.
- Cables and wires, with the help of which wiring is carried out to electrical outlets.
- Switches and sockets for lighting control and connection of household appliances.
The principle of separation of the intra-apartment network - why is it needed
An introductory machine is installed in the switchboard of a private house or apartment, to which a power cable is connected. This element manages the intra-house network.
When the switch is turned off, electricity is no longer supplied to all points. This is convenient when you need to quickly and indiscriminately de-energize the wires, but it is extremely inconvenient when the light needs to be turned off only in a certain room.
For this reason, the intra-house network is divided into several groups.
 Branching of the intra-house network
 More often, the distribution is done by premises, but there are other principles of division:
- Separate group for lighting.
- Connecting powerful household appliances.
- Separate kitchen line.
- Separate toilet and bath.
Moreover, the network can branch out at several levels, for example, a separate RCD is placed on an electric oven, which will allow other household appliances and lighting to be left in the kitchen if the protection works.
Read also
Layout of houses from a bar
Let's analyze the connection of each group separately.
line for lighting
The light can be turned off separately or by one common switch.
 Multi-level separation of the power circuit
 Important! If there is one chandelier in the living room, and low-power lamps are used in the rest of the rooms, it makes sense to power them together - this will not create a high load on the network.
If the lighting includes a scattering of devices of various types and purposes, then it is worth breaking down into groups - separately the main light source, separately additional spot lighting, and so on.
According to the same principle, it will be possible to separate the premises in which the most powerful equipment is installed. They also act if step-down transformers and various power supplies are installed in the room.
Powerful household appliances
This term refers to those devices that heat something. For example, an electric heating and hot water boiler, an electric stove and an oven. When turned on, they create a high load on the network - 10 Amperes is far from the limit.
 Heating element from the oven can consume up to 4 kW
 The socket and wiring should be able to handle this load, as they are designed for loads of 16 amps.
But, firstly, not all sockets and wires, and, secondly, other devices can work in parallel with them.
Turn on the electric kettle at the same time as the oven, and the protection in the shield will probably work, and the line will be de-energized. For this reason, manufacturers of large household appliances recommend a separate connection.
If such a device breaks down, if it is connected independently, it will be convenient for the master to work. You don’t have to look for and reach for the plug, which is usually located in hard-to-reach places.
Kitchen appliances
The reasons are the same as in the case described above. The kitchen network is the busiest. There is a high concentration of powerful electrical appliances.
This includes: washing machines and dishwashers, toasters, microwave ovens, multicookers, bread machines, hoods, grills, meat grinders, water heater, lighting and so on.
 This equipment creates serious loads on the electrical network.
 Therefore, the kitchen stands out in a separate line, and especially powerful devices have their own RCDs, powered by an introductory machine.
Such a number of devices requires a thoughtful arrangement of outlets. The group is located in the working area so that it is possible to connect mobile devices. Separately, sockets for large household appliances are taken out.
Rooms with high humidity
Previously, sockets were not installed in bathrooms and toilets, but today many devices have been invented for this room.
Using them in a humid environment is dangerous.
For this reason, the room needs other protection devices. The wiring diagram in the bathroom has its own requirements:
- The room junction box must not go inside the room. It is installed in any convenient adjacent room or corridor.
 Junction box on the wall in the hallway
 - Each device that will be used in the bathroom should only be connected to a separate outlet. The use of extensions and tees is not allowed.
 Separate outlet for washing machine
 - The switch for controlling the lighting of the room is installed, like the box, outside the room. The most convenient place is near the door.
- The electrical cable is laid as close to the ceiling as possible. Be sure to use an insulating corrugation.
 Installation of electrical wiring in the bathroom
 Important! Increased safety requirements are also applied to fittings. The degree of protection must be at least IP 44. In this case, it is recommended to take sockets with a cover that acts as a splash protection.
Interesting to know! This problem remains unsolvable for old-built houses, in which grounding is not provided in principle.
Many people ground equipment to water pipes, but this is not allowed, because of the risk of electric shock, not only to you, but also to your neighbors.
In old houses, sometimes a complete reconstruction of electrical networks is carried out, which allows you to mount an external ground loop. If so, then the residents are lucky - it remains to replace the internal wires.
 Replacing electrical wiring requires a major overhaul
 Do-it-yourself wiring in an apartment is actually not such a laborious and long process. For proper installation, it is enough to study the literature and familiarize yourself with the requirements and rules for the work. The development of modern technologies requires energy costs. Now the installation of modern electrical wiring is considered an urgent issue, because 35 years ago people did not use such a volume of electrical appliances. Today, every home has appliances such as a washing machine, microwave ovens, electric stoves, toasters, mixers, coffee grinders, coffee makers, steamers, bakers, etc. Such devices are high technology and require sufficient mains voltage.
The laying of cable wires includes the following stages:
- development of a plan with the designation of the points of localization of the main elements;
- a list of necessary fittings to ensure the quality of the scope of work;
- marking routes and preparing the surface of the walls for conducting electricity to the apartment (strobe, cable channels);
- fixing the cables;
- installation and fastening of materials;
- installation and assembly of the electrical panel structure;
- system testing;
- setup and launch.
Important: The technological modern interior design of apartments does not provide for the installation of electrical cables by the external method, they mainly use the hidden type.

General rules for electrical wiring
Many people are concerned about the question: “How to make electrical wiring with your own hands?” For this you need to follow the rules:
- Wires must be located in a vertical or horizontal position relative to the floor;
- In case the wires need to be turned, then the turn must be made at an angle of 90 degrees;
- In the upper part of the wall, the wires should be located at a distance of 25 centimeters from the ceiling. If the wires run along the bottom, then you will need special skirting boards with wire channels;
- The switches are placed next to the doorway at a distance of about 80 to 150 centimeters from the floor, depending on who uses the device more often (children or adults). The installation parameters of devices are regulated by the rules of SNiP;
- Sockets are mounted at a height of 30 centimeters from the floor, the number is determined with the calculation of 1 piece per 6 square meters. For the kitchen, the number of sockets depends on the number of electrical equipment. The gaps between sockets and door and window openings should be more than 10 centimeters;
- An individual junction box is installed in each room;
- When drawing up project documentation, it is necessary to take into account the placement of furniture in the apartment in order to exclude interference from connecting cords to sockets;
- Approximately 2 sockets should be installed in the bathroom: for a washing machine and a hair dryer.

Important: When working with a project, it is necessary to take into account the location of the 30 mA residual current devices. In bathrooms, it is recommended to install devices with ten mA.
The project of electrical wiring in a three-room housing
The scheme has several features:
- For each room, it is mandatory to install a junction box, from which cables are subsequently routed to electrical devices (sockets, etc.) located in the room;
- In the kitchen, you need to install three sockets above the countertop (hob, kettle, microwave), one in the area where the refrigeration equipment is located. When drawing up a project with your own hands, you can easily take into account your needs, and if you need additional outlets for exhaust, ventilation or dishwasher, etc., provide and mark this on the drawing;
- If you need electricity on the loggia, then it is necessary to provide for cable wiring from the junction box located in the next room on the diagram.
Placement of localization points is best done on a copy of the apartment plan, which is attached to the technical passport of the apartment.

For the convenience of drawing up project documentation, it is recommended to divide electrical consumers into groups, for example:
- the first group of lighting will include light in the toilet, bathroom and living room;
- the second group will equip the bedroom, bathroom and children's rooms with light.
Wiring diagram in a two-room apartment
In order to correctly distribute sockets, switches and boxes, you need to consider some points:
- for the rational use of electrical wiring, it is necessary to divide consumers into several groups: lighting in the corridor and bathroom, the next group - in the hall, kitchen and bedroom;
- the height of the sockets and switches in Khrushchev is not standardized, so you can arrange them as you like;
- in each room there must be a junction box, except for the bathroom, since there is usually a little more humidity than in living quarters;
- if you need electricity on the balcony, mark on the diagram the location of the junction box in the room next to the balcony for the convenience of bringing wires to the balcony;
- RCD, circuit breaker are placed in the switchboard.
The choice of fittings and tools for electrical wiring
For proper wiring, you need to determine the method of placing the cables, and accordingly, decide on the choice of the necessary additional materials:
- for lighting, wires of the VVG brand with a cross section of 1.5 square meters are used. mm, for sockets use a three-core cable with a cross section of 2.5 square millimeters;
- residual current devices (RCD) and circuit breakers. RCDs are used to protect the system from current leakage, and automata prevent short circuits;
- distribution boxes;
- the electrical panel is chosen depending on the number of machines, RCD. If you intend to mount a large number of elements, then you need to purchase a large shield. According to the structure, metal and plastic structures are distinguished, experts advise installing metal ones, as they are more durable and are used for a long time;
- connecting insulating elements (PPE) - electrical tape, liquid nails, clips, dowels.

Installation of electrical wiring
Carrying out in an apartment does not pose any particular difficulties, the main thing you need to know is the installation rules, as well as being able to use the tool. At the initial stage, you need to decide on the chosen method of electrical wiring: external or secret, using special channels.
The hidden method has recently become more and more popular, although it is the most time-consuming and “dusty”. For laying wires using a secret method, wall chasing is carried out, that is, channels about 10 millimeters deep are prepared on the wall surface. Wires are laid in them, and then plastered.
Installation of electrical wiring in an apartment by the external method requires the use of a cable channel, electrical skirting boards and special boxes.
The secrets of the secret wiring method are that the walls need to be ditched, if you plan to lay the wires on the floor, you will have to open the flooring. The hidden method is usually used for major redevelopment and renovation of an apartment, when all rooms are free from furniture.

For using a wall chaser, puncher or grinder. The work is very dusty, so to prevent dust from entering neighboring rooms, it is better to cover the passage with a damp cloth. The depth of the strobe is calculated in accordance with the wires used, but not more than 1 centimeter, since deep channels are poorly plastered, the width may be different, at the discretion of the owner.
Socket holes and openings for the junction box are cut out using a crown of a certain design.
Important: In load-bearing walls, the depth of the channels must be treated with special consideration, since a violation of the design of such walls can lead to destruction.
In panel houses, there are cavities between the ceilings in which wires can be laid. Panel buildings are a thing of the past, today houses are built from integral durable structures with brick floors, in such apartments chasing can be carried out on all walls.
An economical option for hidden wiring is laying wires under the floor. In these cases, the wire must be masked with corrugated foil. The corrugation serves as insulation and protection against voltage surges.

After preparing the channels for the wires, a switchboard is installed and the wires are laid. Shield designs according to the method of fastening are overhead or built into the wall surface. In houses of modern design, a special niche is adapted for the shield, and in houses of domestic construction, the shield is attached to the wall with self-tapping screws.
Circuit breakers and residual current devices are mounted in the shield body. To do this, wires of the VVG brand are brought to the shield, and then they are bred to the lighting system, sockets and switches.
At the connection points, it is necessary to make an allowance of wires (about 20 centimeters) in case of repair work. When connecting wires to a switchboard, experts recommend marking the wires in order to know exactly which one is responsible for what.
After a set of works on electrical wiring, the system is tested. If the functioning of the system is in full force, then the installation is completed with the installation of electrical devices.

Laying by the external method is carried out on wall and ceiling surfaces. At the initial stage, it is necessary to outline the route for laying the wires and drill holes in the places where they are attached at intervals of 50 centimeters. At the request of the owner of the apartment, the wires can be laid in cable channels or clips. Junction boxes are installed at the branching points of the wires. The advantage of the open wiring method is to provide easy access to the wires, and the only drawback is that such wiring does not always fit into the interior of the room.
Types of fasteners for cables and wires with open wiring:
- porcelain rollers or insulators;
- staples;
- corrugated pipe;
- cable channels;
- electrical skirting boards.
Advantages of the open wiring method:
- providing easy accessibility to monitor the status of the system;
- most often used in wooden rooms.
The disadvantages are expressed by the following parameters:
- the location of the wires in plain sight, which leads to a violation of the aesthetics of the interior;
- rarely combined with the design style of the rooms.
The final stage is the process of connecting to the electrical network, this requires the presence of electricians. Connection of meters can only be carried out by specialists with permits for electricity.

Laying the route of electrical wiring
Wires should be bought with a margin of about 20 centimeters, since this allowance is used to connect the wires to each other. When connecting wires to sockets and switches, the cores are exposed by about 7 centimeters on each side.
Then the wiring is fastened with clamps or diluted alabaster. The wires are placed in the channels and fastened with a lump of alabaster at a distance of 30 centimeters.
Important: It must be remembered that the alabaster mixture hardens almost instantly, so you must first lay the wires in the strobes, and then fix them with lumps of diluted alabaster. After fixing all the wires, take a picture of the laying route in case of repair work.
To install sockets and switches, socket boxes are mounted in prepared channels and fixed with alabaster mortar. Alabaster quickly and firmly grabs the equipment to the wall.

Installation of RCDs and machines
The complete set of the introductory shield is considered the final stage of electrical wiring in the apartment. Residual current devices and circuit breakers are installed in the switchboard housing. The wires for connecting the RCD are installed at the top of the shield.
After connecting all electrical devices, the entire system is called using a special device - a multimeter. If the entire system is installed correctly, then you can safely turn on the equipment and carry out tests.
Before deciding to conduct electrical wiring, experts advise drawing up a competent wiring plan, taking into account the planned changes in the interior or redevelopment:
- Approximately mark on the diagram future changes in the layout of the apartment;
- Indicate the location of sockets, switches, junction boxes and lighting fixtures.

Proper planning should ensure safe and comfortable use of electricity.
Expert Rules:
- all electrical devices (meters, junction boxes, lamps, switches and sockets) should occupy a convenient place for human operation;
- lighting in the bathroom is carried out through an isolating transformer, which is mounted outside the room;
- sockets should be removed from gas, electric and water pipes at a distance of approximately 45-50 centimeters.
Conclusion
Electrical wiring in apartments most often occurs along the walls or ceiling and is not particularly difficult. After marking the places for laying wires, holes are drilled for fastening, observing a distance of about 45 centimeters. Then boxes or cable channels are fixed to the wall or ceiling.

After carrying out all the above works, the process of work on electrical wiring can be considered completed. It remains only to check the system and connect it. Do-it-yourself wiring in an apartment can be done without much difficulty if you follow all the installation rules - from planning to connection. Checking the wiring system is carried out in steps.
The installation of electrical wiring in an apartment is a rather large-scale event that requires an appropriate approach, so if you are not confident in your abilities, it is better not to attempt to do this work yourself. For those who decide to take such a serious step, we will try to greatly facilitate the task by describing in detail all the stages. Unfortunately, within the framework of one article it is problematic to state everything necessary without compromising perception, but the missing information can be found in other publications on our website.
Main steps
This type of installation work is usually carried out in three stages:
- Preparatory stage. It includes:
- choice of wiring type;
- drawing up a working scheme;
- markup.
- calculations for the selection of equipment and cable;
- buying everything you need.
- Mounting. This is the most time-consuming stage of work, taking up most of the time. It includes:
- preparation of tracks (or installation of a box);
- creation of seats for electric points;
- installation of junction boxes and cable laying;
- installation of the shield (if it has not been done before).
- The final stage, which includes:
- installation and connection of electric points (sockets, switches, lighting fixtures, etc.);
- and connection of internal lines to it;
- input connection;
- check all internal lines one by one.
Now in detail for each section.
Preparatory stage
The most important part of this stage is planning. First of all, you should decide on the type of wiring. That is, choose what it will be, internal or external. The first option is more time-consuming, and practically cannot be reconfigured without a major overhaul (carried out before finishing work), but it looks more aesthetically pleasing. In the second option, everything is much simpler, it can be performed without a major overhaul. Wiring can be reconfigured within certain limits, such as laying an additional line or moving (adding) outlets.
As practice shows, external wiring in apartments is not popular, there are several reasons for this: firstly, the living space begins to resemble an office, and secondly, the box is an excellent dust collector. In addition, such wiring indirectly indicates permanent repairs, which reduces the cost of the apartment when selling. Be that as it may, such an option has the right to exist and in some cases is uncontested, but since the hidden type of wiring is mainly used, we will focus on it.
We draw up a plan
Having made a choice, we proceed to drawing up a diagram. This is necessary for the following reasons:
- the scheme will allow you to determine the amount of equipment needed and calculate the approximate footage of the cable, taking into account the cost of the latter, to purchase, for example, an extra 50 meters of copper wire will not only be expensive, but also offensive;
- the installation process will take a lot of time, and you can simply forget or not take into account some points, and after finishing work it will be impossible to make adjustments
- the planning process allows you to choose the most optimal option for cable runs and electrical points.
You need to start by drawing up an accurate plan with all the rooms, if you don’t want to practice with a tape measure, you can take a drawing from the technical passport of the apartment as a basis. Next, we make a photocopy from the drawing, as an option, we scan or redraw. Since we are making the scheme for ourselves, the requirements of GOST can not be adhered to. Places for electric points are indicated approximately.

We choose the optimal place for lighting fixtures and determine their number. Having decided, we indicate these places on the diagram. We do the same with the switches. Next, we draw the routes of lighting lines and junction boxes on the diagram.

It is undesirable to make one line for all lighting, because in case of an emergency you can stay in the dark. It is also not advisable to get carried away with zoning, leading a separate route to each room. This increases the cable consumption, requires more circuit breakers, that is, leads to an increase in the cost of the project.
In the plan presented above, two zones were made, one included two rooms and a corridor, the second a toilet, a bathroom and a kitchen. Ideally, lighting should be planned in such a way that if any of the lines fails, the electrical panel always remains illuminated.
Now let's move on to the power part. We select places for electric points (in this case, these are sockets) and draw routes, if necessary, add junction boxes. All this should be done taking into account the future layout, so that there are no “frozen” (unclaimed) sockets, for example, covered with furniture. The reverse option, in which there will be a shortage of electrical outlets, is also undesirable (extension wires are not the best decoration for the room).

Here it is necessary to make some explanations. In the circuit shown in Figure 4, four separate lines per socket are involved. This is done so that when the protection is triggered on one of the lines, only one room remains de-energized. Actually, the number of zones can be halved by combining rooms and a corridor into one chain. As for the kitchen, it is recommended to make a separate line for it.
Now it remains only to draw separate routes for the stove and boiler on the plan.
 The final version of the wiring diagram in the apartment
Markup, calculations and purchase
Having finished with the plan, we arm ourselves with a pencil, a ruler with a level and a mounting (chopping) cord, and proceed to marking. We start by specifying the exact locations of the electrical points.

Here it is necessary to make a digression and talk about the basic norms and rules:
- It is recommended to install sockets in residential premises at a distance of 30 cm from the floor. The exception is the bathroom and kitchen. In the first case, a place is chosen about 50 cm above the level of the washbasin and bath (at the same time, as far as possible from them). In the second, it is selected depending on the features of the kitchen set and the location of the equipment.
- It is rational to place the switches at a distance of 90 cm from the floor, next to the entrance to the room.
- The wiring route, as well as electrical outlets, should not be located close to heat sources (batteries, electric stove, etc.), the minimum distance to them is 50 cm.
- Tracks in the walls should be laid parallel or perpendicular to the floor.
- From the windows, it is necessary to indent at least 10 cm, from the ceiling - 15 cm.
If you plan to install a false ceiling, then the main one can be done above it, this greatly simplifies the task, but creates a problem with access to the junction boxes.

You can start wiring on the floor, but in this case you will need to increase the thickness of the screed. In apartment buildings, this option is practically not used.

Calculations, equipment selection and purchase
Having finished with the markup, we make calculations to select the cable cross-section and the characteristics of protective equipment (circuit breakers, RCDs or difautomats). All the information you need to solve this problem can be found on our website. There are also recommendations for equipment.
Since the rules for installing hidden wiring require that it be replaceable, the cable in the gates must be laid in pipes or made of non-combustible material, so do not forget to add them to the estimate.
Next, we make an estimate for equipment and cable. The footage of the latter is calculated along the routes, the number of sockets, switches and junction boxes is calculated according to the drawn up scheme. The number of circuit breakers corresponds to the number of lines, it is mandatory for separate routes (boiler, electric stove). In addition, we take into account the introductory machine and the fire protection RCD, if required, we add another electric meter.
With the purchase, everything is simple, we take where it is cheaper, while we do not forget to be interested in the availability of the necessary certificates for the equipment.
Mounting
The most difficult thing in organizing hidden wiring is the gating of routes, especially in panel houses. This process is laborious and dusty. You can make your task a little easier by using special equipment for this purpose, namely a wall chaser.

In addition, we need a puncher, a special nozzle for chasing and a flat chisel nozzle, drills and crowns for concrete.
- install a crown of the appropriate diameter on the perforator;
- we make a filing with a depth of 5 mm;
- change the crown to the drill;
- we make holes along the furrow, a little more deep than the cup holder;
- change the drill to the crown and work with it;
- insert the chisel nozzle and knock out the concrete.
Having prepared the seats, we proceed to gating, that is, we make grooves in the wall somewhat wider than the outer diameter of the corrugation or pipe by about 20-25 mm.
We install the cable (do not forget to place it in the corrugation or pipes). The easiest way to "grab" the cable in the strobe is with a thick gypsum mortar.
At the same stage, the switchboard is installed if it has not been installed earlier.
At this second stage is completed, you can start finishing work.
Final stage
This is the easiest part of the job, we install sockets, switches, lighting fixtures and connect them to the wiring. Next, we assemble the switchboard and connect internal lines to it. All information on these processes is available on our website.
The input is being connected, this procedure is performed by employees of the electric company with which an agreement on electricity supply services has been concluded.
After connecting the shield, turn on the machines one by one and check.
As a rule, do-it-yourself electrical wiring in an apartment is carried out during repairs with the replacement of existing electrical equipment. Wiring can be done by a person who has an idea about the methods and types of electrical work, skills in working with materials and tools, and also understands electrical networks.
Design
The basic requirements for electrical wiring are presented in SNiP and PUE (rules for electrical installations). Compliance with these standards is very important in apartments to ensure their fire safety.
So, before you install the wiring in the apartment with your own hands, you need to familiarize yourself with how it works. As a rule, the wiring diagram is standard, there is nothing complicated in it.
Main elements
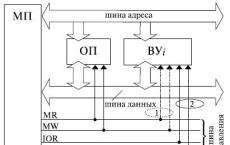
The most important element in the apartment wiring diagram is considered to be the in-house shield. It is to him that from the main power shield located on the landing, it is directed, passing through the fuse, an electric cable along the way.

It is equipped with an electric meter, residual current devices and several circuit breakers. All these elements are assembled into a single unit and secured by means of a mounting rail and an auxiliary bus (one or more).
The number of internal power lines will depend on the number of rooms in the apartment. This is also affected by the power required for the operation of some devices. They may require an additional dedicated line. In most cases, there are two wires: "zero" and "phase", in some cases a third is added - "ground".
Calculation
Do-it-yourself wiring in an apartment can be done after certain calculations. They are produced in two main ways:
- According to the formula: P: U \u003d I, where the current strength is directly proportional to the power and inversely proportional to the voltage in the network.
- This option is much easier than the previous one. It is necessary to separately add up the electricity that is consumed by devices located on the same line. An additional 10% should be added to the resulting number.
Channel search
In a panel house, as a rule, the wiring is hidden, namely hidden in a strobe or behind drywall. Therefore, do-it-yourself wiring in an apartment should begin with a search for channels. To begin with, let's find out what is a channel in the walls, designed for hidden wiring. In most cases, this is a tube made of polymeric material, having a depth of approximately 30-50 mm, equipped with corrugations in places for leading out and rounding.
Location of outlets
In Soviet old apartments, electrical outlets were usually located where necessary. Sometimes at the height of an outstretched arm, and for someone at a level of 1 meter from the floor surface.

To date, the correct location is considered to be 400 mm from the floor level. At first it may seem strange, but there is logic in this: such sockets behind the furniture are almost invisible, when connected they are closer to the target, you won’t accidentally touch them, and most importantly, such wiring in the apartment, made by yourself, consumes much less cable. Perhaps the only nuance is that when you connect a vacuum cleaner or an iron, you have to not bounce, but bend over.
If you continue this logic, you can install an electrical outlet near the baseboard. In this case, the minimum height causes a risk of water ingress during flooding or mopping. That is why, when installing new wiring in an apartment with your own hands, according to the standard, sockets should be located at a height of 400 mm from the floor level.
Cable management options
Self-installation of electrical wiring in the apartment is not an easy task. However, in this case, you will be absolutely sure that everything is done correctly. There are three main ways to lay an electrical cable:
- Under plaster.
- In a plastic box.
Any of the above options is considered correct, so the choice is yours. At the same time, it is worth remembering that it is important to have an exact idea of \u200b\u200bwhere the cable passes, otherwise any clogged nail can cause the TV to turn off (in the best case), in the worst case, an electric shock.
What's the best way to wire?
Hidden wiring is carried out inside the walls, under decorative trim or other decorative structural elements. Do-it-yourself wiring in the apartment under drywall is considered the safest, as it is reliably protected from any mechanical damage. However, this installation option is the most time-consuming and requires the ability to handle several tools at the same time.

The combined version of the installation of electrical wiring includes its installation in boxes and skirting boards with a cable channel. This method combines the advantages of closed and open laying at the same time - safety and aesthetic appearance.
Repair or replacement?
If you suddenly began to smell burning plastic, noticed sparks from the junction box, or sockets began to get very hot when used, then it is time to find an electrical wiring project in your apartment and start repairing it immediately.

This phenomenon has many reasons, from standard physical wear and tear to elementary obsolescence of the power supply system due to the appearance of modern electrical appliances in your household.
The wiring of electrical wiring, the scheme of which has long outlived itself, is carried out in several main stages:
- The first step is to figure out the number of changes required.
- Calculate the amount of material and equipment required for installation and carry out their subsequent purchase.
- Next, the preparation of the premises is carried out by dismantling the old obsolete electrical wiring.
- Laying a new cable and then testing it for normal operation.
Another reason that can serve to repair old electrical wiring in an apartment is the lack of elementary grounding. Of course, its absence is not critical, but it is necessary for the safe and proper operation of many modern electrical appliances.
Tools required for installation
If you decide that the wiring of electricity in the apartment with your own hands should be done, then you should purchase a serviceable and reliable tool. In places where metal and body come into contact, the insulation must not be broken. At a minimum, you will need the following:
- Tester.
- Perforator.
- Wire cutters.
- Pliers.
- Screwdriver.
Mounting materials
As soon as the wiring diagram is ready, the power of each individual branch has been calculated, it will be possible to start acquiring the necessary material.
Try not to buy too cheap products and cable with a reduced cross section. So, in order for the wiring in the apartment to be done with your own hands (photo below), you will need the following:
- Sockets and switches.
- Copper wires.
- Installation boxes in the form of plastic cups.
- Additional insulation if necessary.
- Clips, if you plan to do the wiring in the apartment with your own hands along the ceiling.
- Connecting terminals for cable.
Cabling
Once you have acquired all the necessary materials and equipment, you can proceed directly to the installation.

- In the old apartment, you need to dismantle the old wiring.
- In pre-marked places, recesses are drilled for junction boxes and sockets.
- Further, in the walls, we cut a groove to all switches and sockets for the subsequent laying of wires. We lay a cable of the appropriate section in them and fix it with dowel-nails.
- After that, the strobes and holes must be puttied.
- Wires for the lighting system are laid in the voids of the slabs and on the ceiling.
- As soon as the do-it-yourself wiring in the apartment (diagrams below) is installed, all lighting fixtures, switches and sockets are installed.
Calculation of the nominal value of machines
In order to properly perform the wiring, it is necessary to determine the ratings of the machines installed in the switchboard. To do this, you need to sum up the power of all devices that you plan to connect to it. Then convert kilowatts to watts, and then calculate the current strength using the formula: P: U \u003d I.
There is the following line of machines: 6A, 10A, 16A, 20A, 25A, 32A, 40A, 50A and 63A. Thus, the value of the selected machine should be greater than the value you received.
Installation and connection of the electrical panel
Directly in the electrical panel, the distribution of electricity into groups is carried out:
- For lighting.
- For sockets.
- Other equipment.

The shield is fixed to the wall with dowel-nails, and then outgoing wiring and a supply cable are laid to it. After that, the power cable must be stripped. The outer insulation is removed from it to the required length, then the cable is inserted into the shield, where it is connected to the introductory machine.
A bus is installed at the top of the electrical panel, to which the neutral wire is connected. In a similar way, a bus is mounted on the lower bar, a wire is connected to it, which leads to a protective ground.
Conclusion
Thus, after going through all the stages - from acquiring the necessary equipment and materials, laying the cable to installing and connecting the electrical panel - the electrical wiring in the apartment will be done by hand (the diagram is presented above).
The consistency, reliability, uninterrupted operation and continuity of the operation of the electrical system as a whole directly depend on professional installation, the quality of components and materials, compliance with all rules and regulations, as well as the correctness and literacy of all related calculations. This is a very responsible and serious matter, if you have any doubts, then it is better to entrust this work to specialists, for whom everything related to electricity is a profession.