Rules for mounting and tightening screw piles
Building a house on certain soils requires the use of a pile foundation. A wide range of screw piles are now available, which are not driven, but screwed into the surface. Screwing screw piles under the foundation on your own allows you to save on the rental of expensive special equipment without losing the quality of the foundation.
But there are a few nuances on how to screw the screw piles with your own hands.
List of required tools
Before starting work, in addition to the piles themselves, you need to take care of the following tools:
- shovels;
- magnetic level;
- hydraulic level or level;
- roulette (regular or laser);
- scrap;
- two pipes with a diameter slightly larger than scrap, each about 2 m long;
- twine or rope;
- marking elements - pegs.


Depending on the situation, you may need: a garden drill, a welding machine, a power source (generator or connection to a local network) and a grinder saw with metal discs. If there is no desire to manually tighten the screw piles, manual labor can be replaced with a powerful 1.5 kW drill and a geared wrench attachment.
Pile field marking
The process of screwing screw piles always begins with marking the pile field for the future foundation. It is necessary to mark the field in order to accurately record the number of required piles and correctly place them so that in the future the structure does not sink and collapse.

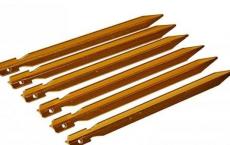
There is a wide range of ready-made screw piles on the market, the specifications of which indicate the maximum load that they can withstand. The caliber varies from 47 to 108 mm. Under the construction of a one-story house, 108-mm structures are used, each of which can withstand a maximum load of 3.5 tons.
It is necessary to choose piles from trusted suppliers. Saving is undesirable, it is fraught with loss of foundation strength and collapse of the entire structure.

The formula is: S = M/N, where S- number of piles, M- projected mass of the building, N- bearing capacity of one pile. If a fractional number is obtained, it is rounded up.
Then you need to draw a field diagram on paper or in any suitable program. Mark the location of future buildings. Piles are necessarily brought under the foundation in the corners and along the perimeter of the building. The maximum distance between adjacent points is 3 m.
Then the field is marked on the territory. The installation points of screw piles under the foundation can be marked with metal rods or pegs driven into the ground. To avoid mistakes, a twine is stretched between the marking elements, aligning it with a tape measure and a level.
Installation of piles manually
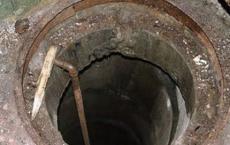
After marking the field, the twisting of the screw piles begins from the corners of the future foundation. With a garden drill (if its diameter is less than the “caliber” of the pile) or with a shovel, you need to make a pit 0.5–0.7 m deep, so that the metal pole enters it tightly and holds on its own.

After that, using a ladder (if the support is long), you need to insert a strong crowbar into the technological holes on the top of the pile. On the ends of the scrap, on each side, a piece of a metal pipe with a length of at least 2 m each is put on. These are shoulders of a lever design, designed to facilitate the process of screwing in screw supports. The longer the shoulders, the easier it is to twist.
To twist the piles under the foundation, the efforts of 2-3 people are required. Two rotate the lever structure, moving around it in a circle, the third from time to time checks the angle of deviation of the metal column from the vertical on the magnetic level. The support must enter the ground strictly vertically, without the slightest deviation, otherwise the strength of the foundation will be at risk.
You can do without a third person if you fix the magnetic level on the pile.
After installing the corner supports, the remaining foundation supports are screwed in around the perimeter.
Installation with a hand tool
If the process is tight, and the above-ground part of the column does not exceed human height, you can ease the work using a powerful hammer drill with a power of at least 1.5 kW. You will need a nozzle - a gear wrench, which increases the force by reducing the number of revolutions.
To the upper part of the support, you need to attach a structure made of a large-caliber bolt welded to a powerful flange base. This flange is bolted to the top. Using a drill with a wrench mounted on the head of the bolt, the pile can be screwed into the soil alone. So that it does not go to the side, a channel is used as a support.

Immersion depth
The pile is screwed into the ground until it stops, until it stops entering even with the application of maximum effort. This means that a layer of such density has been reached that will withstand the support with the load. You can build a foundation.
After that, the supports are cut off, maintaining the cut height along the level.