Do-it-yourself technology for the manufacture of building concrete blocks
For the manufacture of homemade blocks, only a few molds are required for casting them, as well as cement, sand and filler - slag or broken brick. Other types of fillers (gravel or crushed stone) will make the block very heavy, and in addition, a wall made of such material will heat up faster in summer and cool down in winter. If expanded clay is used as a filler, then, although it has almost the same thermal insulation properties as broken brick and slag, it will cost several times more.

Forms for the manufacture of building concrete blocks
For self-production of building blocks at home, you will need special metal or wooden molds, the internal dimensions of which are different: 150 X 150 x 300 mm, 175 x 175 X 350 mm or 200 x 200 x 400 mm. With small blocks, it is more convenient to carry out masonry, and with large blocks, construction is carried out faster.

For the manufacture of a metal collapsible form for one block, four rectangular iron plates 3-4 mm thick are required (the height, width and length of the plates will depend on the chosen size of the form). Mounting grooves must be cut out on the sides of the plates, and handles must be welded to the end parts of the mold. For a four-block mold, you will need to make two rectangular plates and five smaller plates to separate future blocks in the mold.

For the manufacture of concrete blocks with their own hands, compaction and the creation of bubbles in them are required, for this purpose it is necessary to make a special device. It will require one rectangular iron plate (according to the size of the mold), a small piece of wire rod with a cross section of 10 mm and three pipe cuts with a diameter of 50 mm and a length of 150 mm. At one end of each pipe, four triangular “teeth” must be cut to a depth of 50 mm. Then these teeth must be connected to each other so that a cone is obtained. The seams between the teeth must be carefully welded. Then, a wire rod handle must be welded to one of the planes of the plate, and pipe trimmings with a blunt end must be welded to the other.
 Wooden collapsible form
  Wooden collapsible form
To make a wooden collapsible form, you will need four trimming boards with a thickness of 35-50 mm (the dimensions will depend on the size of the selected form). Of course, wood is a weaker material for molding, so boards of high quality and strength are needed. All connections in the wooden mold must be secured with tie-down screws. Otherwise, the design of the wooden mold is the same as that of the metal one. Handles for the form can be made from a wire rod with a section of 10 mm, flattening its ends and drilling holes in them with a diameter of 6-8 mm.

To make building blocks with your own hands, you need to make a solution of cement, sand and aggregate (slag or broken brick) in a ratio of 1: 4: 6. When adding aggregate to the mortar, care must be taken to ensure that it is viscous and sticky, but does not turn out to be liquid or crumbly. Next, the solution is poured into molds, in which in hot weather it will solidify for 2 hours, and it will acquire the final strength in 1-1.5 days. In cool weather (+7 ... +18 C), the hardening and complete drying time increases by 3-5 times, and at temperatures below +7 ° C and during precipitation, it is not recommended to make blocks at all.
If slag is used for mortar together with cement, sand can be completely abandoned, and then the ratio of cement and slag should be 1: 6 or even 1: 8.
Before pouring the solution into the mold, it is necessary to moisten all its details, regardless of the material of manufacture, with water. You should work on a flat surface and fill the form with a solution of 2/3 or 3/4 of the volume (the exact amount is determined empirically after using a device for making voids).
After the block has completely hardened, it must be freed from parts of the form. The raw block must be left to dry completely, and the parts of the mold should be filled with water.
It is possible to make blocks directly at the construction site, i.e., fill on the spot. In this case, the dimensions of the mold for pouring can be increased to 330 x 300 x 600 mm. This will further speed up the construction process.
The consistency of the cement mortar and the pouring method are the same as in the previous case. You can weld several forms into a working structure (3-4 forms are enough), and then the masonry will go even faster.

So that the cement mixture does not stick to the walls of the mold, before pouring, its inner cavity must be abundantly moistened with water or lubricated with used machine oil. After the mixture has set, the mold plates are peeled off from the walls of the block. In the process of erecting walls, it is necessary to verify the horizontal and vertical rows. In general, the laying of corners, the bandage between the blocks are fully consistent with the methods of bricklaying in half a brick.

 Saman - a mixture of clay and straw, for making homemade blocks
The cheapest building material for self-made concrete blocks at home is adobe - a mixture of clay and straw. Cheapness is not the only advantage of adobe - it is a durable material with high thermal insulation properties, easy to "manufacture". For the manufacture of adobe blocks, collapsible metal or wooden molds are also used. It is better to make blocks of small size, maximum 150 x 150 x 300 mm, since larger blocks are heavy and inconvenient to work with, and besides, voids cannot be made in them.
On a note!
Lack of adobe - instability to humidity. Before erecting walls from adobe, it is necessary to ensure reliable waterproofing of the foundation, and finished walls require plastering with cement-sand mortar, covering with any available polymer or metal mesh, and performing a fine finish.
Home production of concrete blocks for construction
The order of work in the construction and manufacture of concrete blocks is standard: first you need to choose a place, then make a foundation - here you need to build a slab foundation, you can use foundation slabs, connect communications, build walls, build a roof, install windows and doors and perform facing work and interior design summer kitchen.
The walls are laid out in half a brick, for a summer kitchen the thickness of the wall can be one brick - and that will be enough. As the laying progresses, it is necessary to align the walls vertically and horizontally, using a plumb line and a cord stretched horizontally from one corner of the house to another.
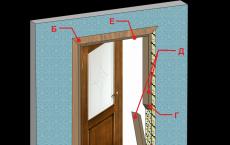
Home production of building blocks allows you to reduce the cost of laying openings with the subsequent installation of windows and doors. During construction, door and window openings must be made in the box of the building. It is necessary to establish the location of windows and doors at the planning stage. It is possible to leave openings of the required width in the process of laying walls at the places where doors and windows are installed, as well as insert wooden plugs, to which the stretcher boxes will then be attached. Wooden corks must be inserted in the second row relative to the bottom of the box and in the penultimate row relative to its upper part. At the top level of the box, a reinforced jumper 120 mm thick or a bar 70 mm thick should be installed. The ends of the jumper must be brought to the walls by 20 cm. If the planes of the next row of masonry and the upper part of the frame are at different levels, you will need to catch them up to the desired height using parts of the blocks and mortar, or assemble the formwork, tie the reinforcement and fill it with cement mortar.
After erecting the walls, the boxes should be installed on the places allotted for the windows and the door, having previously wedged the corners. Next, you need to align them horizontally and vertically, and only after that you can attach the side parts of the box to wooden corks using nails or screws. The remaining space between the walls, foundation, lintel and box must be filled around the perimeter with acrylic mounting foam.
The second way of arranging door and window openings is when door and window frames are installed in the right places, and then lined with blocks. Typically, this method is used for decorative masonry, when further wall decoration is not provided.
In this case, so that the door frame does not lead during the laying process, it is necessary to clamp it on both sides with blocks during the laying of the first row, after inserting the supports into the corners. After the second row, you need to align the box vertically and horizontally, fix it with nails or screws on the sides to the wall. It is also necessary to leave the outlet at 10 cm. Then, the solution must be applied to the outlets and clamped with a block of the next row, once again making sure that the box is level. The same must be done in the upper part of the door frame, as well as on the fourth and sixth rows with the window box. Jumpers are installed here in the same way as in the first method.


