Do-it-yourself brick fence construction
A brick fence gives solidity to the home area, indicating the owners' own well-being. The main foundation of the building is the foundation and brick pillars (supports). The spans between the supports are erected from the same brick or in combination with other materials. Currently, a popular solution is a combination of brick pillars with metal and wooden sections, corrugated board, forged elements. For construction, facing bricks of different textures are used: smooth, rough, aged. Non-standard geometric shapes, a variety of colors of the material allow you to equip the territory in any style. Despite the complexity of the structure, you can still build a brick fence with your own hands, which we will consider today.
Before construction begins, the territory is prepared: grass is mowed, garbage is removed, trees and shrubs are uprooted. After cutting trees, their roots must be removed. They will interfere with the construction of the foundation, and over time they will give new growth under the fence.
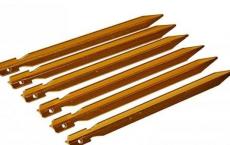
The next stage includes drawing up a drawing of the building with measurements. This measure will help calculate the required amount of building materials and the upcoming costs of their purchase. With the help of a tape measure, a construction cord, wooden stakes, they begin to mark the territory:
- Stakes are driven in at the location of the foundation, pulling a cord between them.
- Stakes are driven in along the line of the cord in places where intermediate posts, gates, and a gate will be installed.
- Inspect the correctness of right angles. Theodolite checks the marks of the lower reaches at the corners and intersection points of the foundation.
- The marking of the length of the spans is carried out depending on the thickness and height of the walls of the fence. Typically, the posts are placed at a distance of 3 m from each other, although the width of the span can reach 2.5-5 m.

Features of the arrangement of the fence
At the initial stage of construction, there are always questions related to the size and arrangement of the structure:
- around the perimeter it is necessary to lay the foundation for the building. The choice of the type of foundation depends on many factors: the level of groundwater, the location of the building, the size, the material used. The standard height of the fence is from 1.8 to 3 m. It must be remembered that a large building height increases the consumption of material, and also puts more pressure on the foundation;
- the perimeter of the brick support is made with a section of 1.5 bricks. But there are pillars built in 2 bricks;
- we must remember about the upper caps that protect the brickwork from the effects of negative natural factors (rain, snow). Caps are installed based on aesthetic preferences: concrete, wood, ceramic or metal. Under the caps, a waterproofing layer of roofing material is necessarily laid;
- the number of supports depends on the shape, size and topography of the fenced area. Less windage of spans makes the building more stable;
- a metal profile or pipe inside a brick support increases its reliability, evenly distributing the load of the span, gate, gate. It is installed before pouring the foundation at the locations of future supports.
Construction of a strip-column foundation
This design will withstand a brick fence in combination with wooden spans or corrugated board. The combined version of the tape-column base is formed from concrete with holes for the pillars. The width of the base, the diameter of the supports are selected based on the height and mass of the building. Reinforcement of the concrete base allows you to evenly distribute the load. The construction of the foundation is carried out in the following order:
- By marking, they dig a trench with a depth of at least 50 cm. The ideal depth can reach 1 m. The width of the trench depends on the width of the masonry and the height of the fence. Usually the laying of the span is made in half a brick, and the height of the structure is about 2 m.
- Under the support posts, pits are dug 80 cm deep, in increments of 1-2.5 m. These dimensions are determined individually. The heavier the structure, the smaller the step between the supports and the greater the depth of the pits.
- Formwork is installed along the perimeter of the trench.
- The bottom of the trench is covered with several layers of roofing material. Support posts are installed in the pits, driving them into the ground by 20 cm. The posts are connected to each other with 8 mm reinforcement at a depth of 10 cm from the soil surface. A mesh is knitted from the same reinforcement throughout the trench.
- Concrete mortar is poured in layers around the entire perimeter of the trench. The fill is left to dry for 5 weeks, wetting it with water in hot weather.

Installing a column base
The column foundation is easy to install. Well suited for light fences with spans made of wood, mesh, corrugated board. For work, you will need a garden drill and concrete mortar:
- Along the perimeter of the entire fence, pits are made with a drill from 1 to 1.5 m deep. The diameter of the pits should be 25 cm larger than the diameter of the supporting posts. It is desirable to maintain a distance between the pits of about 2 m. Although, depending on the type of soil and the mass of the fence, the step between the supports can be changed.
- The bottom of the pit is covered with a mixture of sand and gravel 20 cm thick, carefully tamping the layer.
- The columns are installed in the pits at the same level, pouring them with concrete mortar.

The device of a columnar foundation for a fence with brick pillars
Arrangement of strip foundation
Reinforced base, poured with concrete grade 200 or higher, is the most common structure for fencing. For heavy metal spans, the tape is buried up to 1 m into the ground. Under light spans, where it is supposed to install corrugated board, wood or mesh, a depth of 50 cm is sufficient. The procedure consists of several stages:
- According to the marking, they dig a trench with a depth that depends on the weight of the ground structure. The width of the pit depends on the width of the masonry and can be from 30 cm.
- The bottom is covered with a mixture of sand and gravel 15 cm thick, tightly tamping the resulting pillow.
- Having maintained a distance from the bottom - 7 cm, side walls - 10 cm, a mesh of 8 mm reinforcement is laid.
- Having fixed the formwork around the trench, the pit is poured with concrete mortar. It is left to freeze for 1 month.
Having dismantled the formwork, the base is ready for further construction.

Foundation on a gravel bed
A similar design is used to install large, heavy fences. It is not advisable to use such a base for light spans of corrugated board or wood.
The construction of the foundation consists in backfilling the dug trench with a gravel cushion. Concrete is poured on top of it in layers, ramming each layer. Pillars for spans are installed on a poured foundation.
Stone base
The stone base is considered the most reliable. To build it, stones of different sizes are used. They build such a foundation for a heavy fence in combination with expensive forged spans. The construction process consists of the following steps:
- The trench is dug according to the individual characteristics of the fence. The bottom is covered with a layer of rubble, tightly tamping it.
- Formwork is installed around the perimeter. Stones are laid inside, filling the voids with concrete mortar.
- The base laid out 50 cm above ground level is left to harden for 1 month, after which the formwork is removed.

Pillar construction
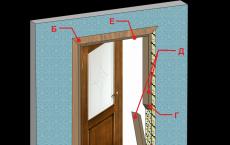
The construction of supports is carried out in 2 or 1.5 bricks around a pipe concreted into the foundation. The brick is laid taking into account the dressing of the joints on the cement mortar, constantly checking the supports with a level or plumb line. The resulting void between the pipe and the inner wall of the support is poured with concrete with the addition of stone. Mortgages are inserted into the supports to which the gate or lintels for spans of corrugated board, wood will be attached. These metal plates are welded to the pipe and led out of the brickwork of the support. A protective decorative cap is installed on top of the post, the seams are embroidered with a spatula. The structure is left to dry for two weeks.

Installation of mortgages in brickwork
Brickwork spans
The construction of brick spans is carried out with cement mortar using a trowel. For the convenience of masonry, a cord is pulled along the level between the supports. A uniform layer of mortar is applied with a trowel and a row of bricks is laid along the cord. Having finished laying out the row, the cord is lifted up along the support to the next row. Thus, the process is repeated until the completion of the construction of the top row. Protective caps are installed at the top of the span. With a special spatula, they begin to embroider the seams.
Installation of spans from other materials
To install spans of corrugated board, wood and other materials between brick pillars, you need to make a frame. It is welded from a profile pipe with a section of 20x40 mm. Two horizontal jumpers are welded to the mortgages on the support in level. Welding seams are cleaned with a grinder, and the profile is treated with a primer and painted with enamel. Corrugated board, wooden planks or any other elements are attached to ready-made jumpers with galvanized self-tapping screws. It turns out inexpensive, beautiful and durable spans, finished with corrugated board. It is attached to the frame through one wave with a self-tapping screw with a rubber gasket in the lower part of the corrugation.
Expensive, but very beautiful spans are obtained from forged gratings. Also, forging can decorate spans covered with corrugated board.
Making a gate
For the gate, a frame is welded from a profile pipe, taking into account a gap of 10 mm from the feigned post. The structure is attached to the support with hinges, welded to the mortgage and side post of the wicket frame. The frame is painted with enamel, then sheathed with corrugated board. It is the corrugated board that is well suited for these purposes. From the other side of the gate, a lock with a latch is cut in. From above, a gate made of corrugated board can be decorated with forging elements.

Having built a brick fence with your own hands and made an unusually shaped gate from corrugated board, you can show off your craftsmanship to friends.
In contact with