Veranda attached to the house: how to do it yourself
The veranda attached to the house allows you to expand the habitable area, get a place for a comfortable stay. Closed (glazed), it still reduces the heat loss of the house. The best part is that you can make it yourself. And there are options that require solid costs, there are inexpensive ones. There are a lot of varieties both in structure and in the materials used, you can decorate in any style.
What are
According to the method of arrangement, the veranda attached to the house can be closed - with glazing - or open. The open ones are used mainly in the warm period, the closed ones can serve as a place for recreation all year round. The veranda attached to the house can be of two types at once: part can be glazed (closed), part can be open.
There are also walkways - this is when in order to get into the house you pass through it. Such extensions are located from the front of the house, sometimes from the side of the courtyard, if there are two exits from the house. Entrance to impassable only from the house. It is impossible to get outside from such a veranda.
An extension can cover one, two or more sides of the house. If it covers two adjacent parts of the house, it is called a corner. Some of them occupy only part of the wall.
The forms are different. More often it is a rectangle, less often - a hexagon, a semicircle, other non-standard shapes (it is more difficult to build such ones). In short, these are all types of verandas attached to the house, but without taking into account materials.

An addition around the perimeter gives the house an extravagant look.
What materials are they made from
Most often in our area they make wooden verandas. It is easier to work with wood, and it is not as expensive as in other countries. In areas where wood is very expensive, the structural elements are made of metal, and the sheathing is selected to your liking. It can be glass (double-glazed windows), polycarbonate.
They build the walls of the veranda from brick, shell rock, rubble stone, building blocks. Just like a house, they are then finished or not, depending on the design of the main building. They can just make a fence, as in the photo above.

If the tree is expensive, or reluctant to regularly work with its processing, the frame of the veranda is assembled from metal. For this, a profile pipe, corners or channel is most often used - it depends on the material and size of the extension. It is easier to attach glass packs to metal, you can make not glazing, but use polycarbonate. This material can be of different colors and different degrees of transparency. Despite the apparent fragility, there is a fairly durable material that is used to build greenhouses. And if so, then in the veranda, if it is closed, it will keep warm well.

Veranda attached to the house: construction stages
First of all, you need to decide on the type - open / closed, from what material, choose the type of foundation. You also need to decide what size it will have, where and how to be located. All this is desirable to draw on the plan. Even better - order a project. Construction according to the project is rather an exception for us, but at least a plan with dimensions and an indication of the location, binding to paths, etc. you should have.
Do-it-yourself construction of a veranda to the house follows the following plan (we build it from wood):

These are just general steps. To have a better idea of how to make a veranda to the house, then we will consider the most problematic moments of construction in more detail.
Perhaps you are interested in building a gazebo?
Foundation
If the veranda is attached to the house, the foundations are very rarely made connected. Firstly, the house has already settled, the shrinkage has passed. If a “fresh” building is rigidly attached to it, problems will inevitably arise. If it is possible to tie them, then only on stable, reliable soils, on which there are no movements. Secondly, heavy foundations are rarely made for extensions of this type. The building itself turns out to be light - especially open from wood or frame - and the bearing capacity is enough.
In general, they put verandas on the same foundations as at home. Another thing is that most of them stand on columnar bases: the costs are small, it takes a little time. And although all architects and designers claim that it is much more difficult to put up the correct columnar foundation than (although the tape one is much more expensive), people put the pillars.
Column and pile foundation
If you decide to attach a veranda to a wooden house, you can put a columnar foundation. To make it yourself, you need to find out at what depth and at what distance the supports are placed. The distance between the posts depends on the material from which the extension will be built. If these are light materials - wood or light frame construction - you can set them in increments of 1.5 meters. For heavier ones, the distance should be from 1 meter.

Columnar foundation for the veranda - the columns are made of bricks. This open veranda is attached to a wooden house. The house stands on a strip foundation. The foundations of the extension and the house are not connected
When choosing the depth of columns, there are two approaches:
- Bury below freezing depth. This is done on water-saturated soils prone to heaving. In this case, the veranda will stand on the same level, without changing its position, regardless of the heaving forces. For a columnar foundation, this only makes sense if the freezing depth is not more than 1.2 meters. At great depths, it is easier to make a pile foundation (better -). Pile holes are not very difficult to make even if you need to drill 2 meters. For the construction of columns for each of them, digging a pit of the same depth is difficult and time-consuming.
- Make a shallow foundation: 20-30 cm below the fertile layer. In this case, get a floating veranda, which will be understood and lowered during frost heaving. It is much easier to build such a structure, but every spring you will have to deal with the consequences of heaving. Different pillars will “walk” in different ways and you will have to somehow rectify the situation. But this is on heaving soils (clay, loam). On stable soils that are not prone to heaving, there will be no such problems.
What is good about this option for a foundation for a veranda to a house? Quickly built, the cost of work and building materials is small.

The veranda is attached to a brick house on a strip foundation. They put it on . It differs from the columnar one in that the piles are either screwed in / hammered ready, or poured into the formwork and turn out to be monolithic
Disadvantages: It is difficult to predict its behavior. And both deep and shallow. With a shallow foundation, everything depends on the winter and the degree of saturation of the soil with water, which is impossible to foresee and calculate. With deep laying, there is also a problem: it is not known what is under each of the piles. After all, you cannot do a geological survey at all points. And in those areas where the soil has a complex layered structure, it is quite possible to get into some kind of pocket, because of which the pile will not behave as expected. Also in the case of piles or deep-buried columns, it is necessary to remember the lateral heaving forces. They may well break long and thin piles or poles. Therefore, on problematic soils for piles, a strong formwork (metal, asbestos) is taken and they are also reinforced: in the manufacture of pillars, a steel pipe coated with a primer is inserted inside, around which masonry is carried out. It is also possible to lay reinforcing belts. In the manufacture of bored piles, three or four reinforcement bars are necessarily inserted inside, which add strength to them. Attaching a veranda with your own hands on a pile foundation can be quick and inexpensive, but the risks on heaving soils are high.
Monolithic: tape and slab
If you are going to build a veranda from brick, rubble or other similar heavy materials, and even with heavy cladding, you need a monolithic foundation. You will either have to pour the tape, or make a plate. They are made according to all the rules without any exceptions: with formwork, reinforcement, vibration, etc. Fully tech.
When building such a foundation, it can already be connected with the main one: you will have to make it to the same depth and, most likely, it will behave stably.
Advantages: high reliability and stability. Disadvantages: significant cost and duration of the construction process.
bedding
If the house is located on dry soils or in a region where frost heaving is just a scary tale, if it does not have a plinth, a veranda attached to the house can do without a foundation. In this case, the fertile layer is removed along with the vegetation, the bottom of the pit is rammed, then rubble is poured, rammed, then sand, which is also compacted. Flooring can already be laid on this base: wooden, paving slabs or slabs.

The veranda attached to the house can be without a foundation
One “but” of the racks on which the roof will rest still needs to be strengthened in some way. For them, small piles are made or columns are folded (from about the same depth where they started laying rubble under the flooring).
How thick should the bedding be? It depends, firstly, on the thickness of the fertile layer, and secondly, on the choice of floor covering. If these are wooden boards (as in the photo), you need to choose the layers so that they lie flush with the ground. If you plan to lay paving slabs, you will have to consider its thickness. Although, it can be slightly raised above ground level to separate it from the yard. But then a curb is placed along the edge.

In this photo, an open veranda is attached to the house without a foundation - it is rather a summer canopy with a polycarbonate roof and an open wooden fence
How to attach the rack and bottom harness
Work on the construction of the veranda frame begins after the foundation concrete (if used) has gained some strength. Enough 50% of the calculated, and this at a temperature of + 20 ° C, will occur in 4-5 days. Then, on top of the concrete, in those places where the racks or strapping will be attached, waterproofing is laid in two layers. It can be roofing material, roofing felt, folded twice. You can double coat with bituminous mastic or use other modern materials.
Then there are two ways:
- fix the racks and then the strapping;
- first strapping, racks to them.
If the first option is chosen, special holders are inserted into the foundation for racks during pouring. These can be different devices (see photo), but the most convenient is a metal plate in the form of an inverted letter "P", to the bottom of which a stud is welded, which is walled up in the foundation. A rack is inserted into this plate (the end must be treated with an antiseptic), its level is verified, fixed with bolts or nails.

How to fix the racks to the foundation
After all the racks are exposed and fixed, strapping bars are nailed between them.
In the second option, the situation is different: the racks will have to be attached to the harness. The strapping bar is attached first. It is more convenient to do this if studs are embedded in concrete with some step. Then holes are made in the beam in the right places, it is put on studs and fixed with bolts. Then, using one of the methods suggested in the photo, racks are installed.

Options for attaching racks to the strapping beam
Any of these methods does not exclude the use of metal corners. They make the mount more reliable, which is very important in this case. After all, the roof will be held on the racks, and the walls or the fence.
Fastening the lag to the harness
They can be mounted on top of the harness, or on the same level with its upper edge. It is necessary to decide exactly how you will do this at the very beginning of the work: it will depend on what level it will be necessary to attach the support burs to the wall of the house (the height of the lag is taken into account or not). Methods for fixing the floor lag are shown in the photo below.

How to attach the floor logs to the strapping
Veranda roof connection
The veranda attached to the house is usually covered with the same type of roofing as scrap. There may be several options and the organization of the adjoining of the roof depends on how and to which wall you attach it. If the roof will be a continuation of the roof slope of the house, you need to splice two truss systems. In this case, they say that the roof of the veranda adjoins the roof of the house.
Then the procedure is:
- Top trims are attached to the veranda posts.
- Transverse ceiling beams are nailed to the strapping. The ceiling is then hemmed to them.
- The long rafter legs of the house are shortened. They should not protrude beyond the wall.
- The rafters of the veranda are made from a planed board, which are cut off at an angle from the side of the roof so that they adjoin the existing ones (see the photo below). To make it easier to work, you can make a template, according to which you can then prepare the rafters on the ground. Rafter legs are attached to the system of the house through nails, you can put metal reinforcing plates on the side.
- To increase the rigidity of the structure, spacers (anti-snow supports) are installed between the rafters of the house and the extension. They are shown in the photo explaining the design.

If the width of the veranda is more than 2 meters or heavy roofing material will be used, spacers are installed so that the support beam does not sag. It is better not to nail them on the side, namely, to insert them by surprise between the ceiling beam and the rafter leg.

In order to prevent sagging of the roof, spacers are installed between the ceiling beams and rafters.
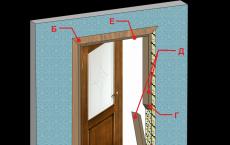
More often it turns out that the roof of the veranda attached to the house adjoins the wall. In this case, a strobe is made in the wall, a special wall profile is laid into it, which is laid on the roofing with the second side. The place where it adjoins the wall is sealed with sealant.

The second option differs only in the shape of the wall profile: it can be made independently from a sheet of roofing iron. This design is distinguished by the presence of a beam, which allows you to move the bend away from the wall of the house and cover up possible errors when laying the roofing material at the junction. Also, in this embodiment, the apron is not attached directly to the wall material, but to a beam with a beveled edge mounted in a strobe.

The second option for adjoining the roof of the extension to the wall of the house
Some questions may arise on how to attach the rafters to the outer upper trim, because its dimensions do not allow making cuts, as on a Mauerlat. The usual solution: with the help of corners (see photo). Instead of corners, small cross-section bars can be used.

Maybe not the most elegant solution, but reliable. After everything is covered with roofing from above, the lining will be lined from below, they will not be visible.