Rubber tile installation technology
Rubber facing tiles (pavilastic) is a relatively young finishing material for facing horizontal surfaces. The long-term problem of recycling worn-out car tires was solved in a rational way - by mechanical processing of rubber into raw materials, followed by the manufacture of a finishing material from it with high technical and aesthetic characteristics. Let's consider what this material is, and how affordable is the laying of rubber tiles for do-it-yourself work.
Pavilastic PUZZLE is the optimal solution for playgrounds and sports grounds
Manufacturing technology
Car tires are made from high quality rubber containing up to 50% natural or synthetic rubber. Taking into account the high technical characteristics of this material, a technology was developed for the manufacture of facing rubber tiles from it. Old tires are processed into rubber crumb of a given fraction (0.4-10 mm), cleaned of textile or steel cord.
The resulting raw material is mixed with polyurethane adhesive and dye, then the mixture is laid out in molds and compacted by vibration. Rubber tiles are produced by one of two types of vulcanizing pressing - hot or cold, after which the molds filled with the mixture, depending on the technology used, are subjected to appropriate heat treatment.
Technical characteristics of pavilastic
Rubber tiles have many advantages over other finishing materials, which allow them to be widely used as a protective and decorative coating for facing horizontal surfaces that are subjected to aggressive use.
Rubber flooring can be produced in the form of tiles or rolls of various thicknesses.
- The high durability of the coating (up to 15 years) is determined by:
- strength and wear resistance due to the high density of rubber;
- high resistance to mechanical damage associated with high elasticity of the material;
- frost resistance;
- resistance to oils and most chemicals;
- the possibility of making spot repairs with your own hands.
- The safety of pavilastik is ensured by:
- anti-slip effect of the front surface of the rubber tile;
- ease of daily care, including cleaning from dirt and ice;
- low risk of injury in a fall;
- high noise-absorbing properties;
- environmental friendliness, resistance to the formation of mold, moss and fungi on the coating;
- The aesthetic appeal of pavilastic is justified by:
- variety of colors, shapes and sizes of tiles;
- resistance to ultraviolet (does not fade in the sun).
General performance characteristics of rubber tiles: durability - more than 10 years of operation
The use of rubber tiles
Based on the high characteristics of pavilastic, its use is more than justified on such objects as:
- sports grounds, stadiums, gyms;
- footpaths of country houses and suburban areas;
- garage floors;
- car parking spaces;
- playgrounds for games;
- areas adjacent to pools, fountains, artificial ponds and skating rinks;
- dressing rooms;
- kitchens (tiles made of relin - smooth dense rubber up to 8 mm thick), bathrooms;
- flights of stairs;
- warehouses and workshops.
In each case, the technology for laying rubber tiles has its own small features, but we will consider the general rules for installing pavilastik on horizontal bases with our own hands.
Methods for laying rubber tiles
Pavilastik surface finishing technologies can be divided into two types:
- laying rubber tiles on the ground;
- installation on a solid base.
Laying pavilastic on a soil base
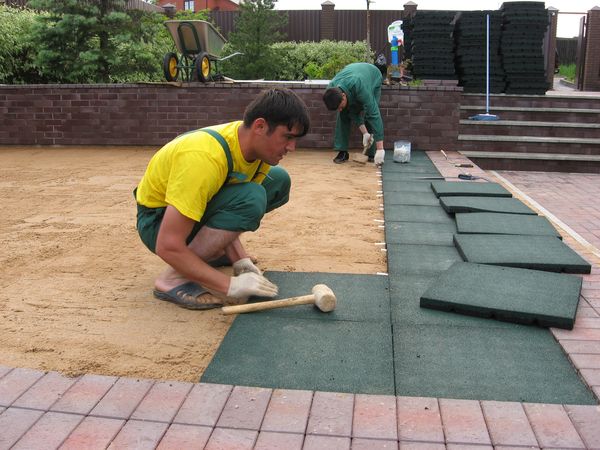
The technology of mounting rubber tiles on the ground is used in the arrangement of country house paths, floors of gazebos and summer kitchens, car parks, children's playgrounds, etc. The thickness of the applied lining must be at least 30 mm, the tile format is selected in accordance with the geometric features of the equipped area.
Foundation preparation
First, a tape measure is used to mark the paths and areas, marking the boundaries of the areas with pegs driven into the ground with a marking cord stretched over them. Then, inside the contour, over the entire area, excavation is carried out to the depth of the shovel bayonet (≈25 cm), the resulting base is leveled and tamped with an electric vibrating plate or a self-made rammer.
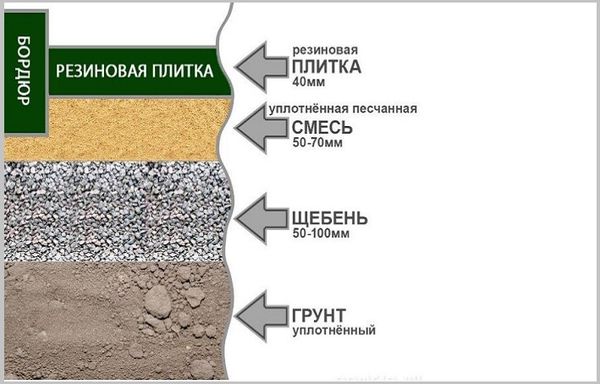
The soil base is carefully compacted, after which a layer of sand is added
A layer of crushed stone with a fraction of 20-40 mm is poured over the compacted soil with a layer of 10-15 cm, leveled and also compacted by tamping. Then, sand is poured on top of the rubble with a layer of 5 cm and it is compacted to partially fill the cavities in the rubble.
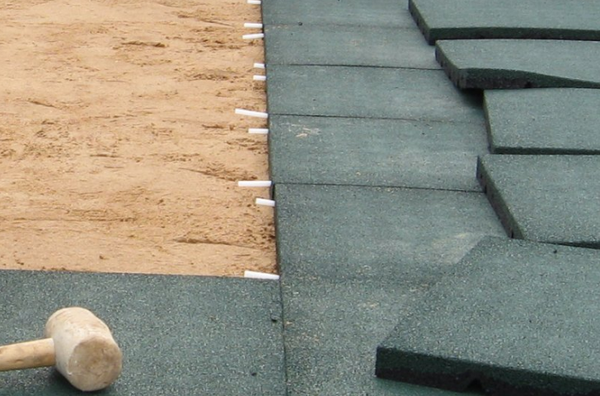
If it is planned to use rubber curbs, then their installation is carried out along the control cord on top of this layer of clean sand, connecting the elements to each other with mounting bushings.
With their own hands, a dry mortar is prepared from cement grade M 400 and sand in a ratio of 1: 6, which is laid with a layer of 5 cm on top of clean sand, leveled and rammed. This composition, due to its hygroscopicity, will harden in a week, and will serve as a solid concrete base for the rubber coating.
After completing this operation, the base is ready for the installation of rubber tiles.
Rubber tiles are a versatile finishing material that can be laid on various types of substrates.
Installation of rubber lining
A pavilastic of a rectangular format can be laid, like a tile, in a straight way, with an offset or diagonally. Laying products of a more complex shape, such as puzzles, can also be oriented differently relative to the borders. The installation of the coating is carried out horizontally, without a slope device, since the proportions of the dry cement-sand mortar under the pavilastik will ensure sufficient porosity of the base after curing, and water will go into the ground through the tile joints of the tile.
Do-it-yourself rubber coating elements are attached to each other with connecting sleeves or end locks provided for by the design, the horizontalness of the lining is controlled by a bubble level. It is convenient to cut pavilastik when fitting with an electric jigsaw or a manual hacksaw for wood with fine teeth. Small voids between the tile and the curb are filled with pieces of trim, which can be attached to the main cladding with epoxy glue.
After the laying is completed, the coating is gently watered with water from a garden watering can, and in a day it will be possible to walk on the tile.
Laying on a solid base
Installation of a rubber coating on a solid base differs from laying it on the ground only in the technology of preparing the floor for finishing and in the method of attaching pavilastik to the surface to be veneered.
Depending on the base material (asphalt, concrete or wood), a primer is selected, with which the surface to be coated is covered in two layers.
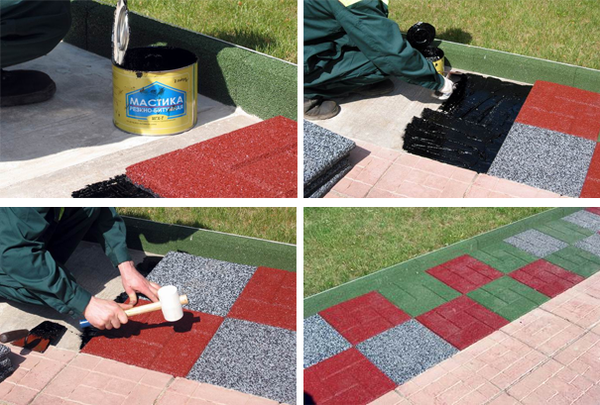
When laying rubber tiles, it is better to use a polyurethane-based adhesive, since mixtures based on polymers are used as a binder in the manufacture of pavilastik.
An example of the installation of rubber tiles on a solid base is the pavilastic finish of the bathroom floor, which differs from laying on the ground only in the preparation of the surface and the method of fixing the cladding. The use of this material as a bathroom flooring is fully justified due to the high hydro, sound and heat insulating properties of pressed rubber. But laying it on the kitchen floor is undesirable because of the porosity of the rubber, which will accumulate fat and other food contaminants.
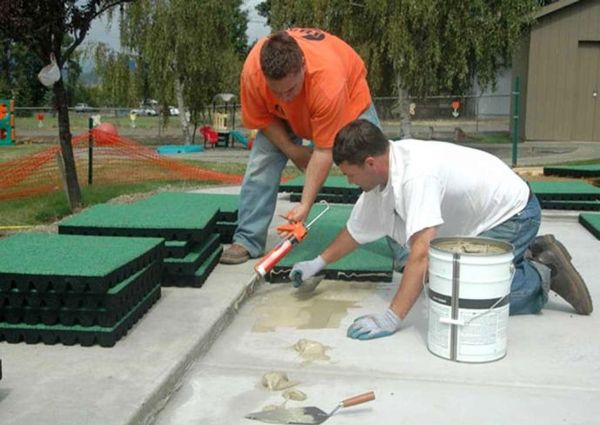
Laying pavilastik on a solid base using an adhesive mixture
If the bathroom room has axes of symmetry, that is, the correct shape, it is better to start installation from the center of the room, having previously laid tiles on the floor without using glue.
Instructions for the use of glue are usually available on the container with glue, and it should be followed strictly. The adhesive mixture is applied with a brush, roller or spatula with your own hands on the surface of the base with the layer specified in the instructions and the required time is maintained. Pavilastik is laid on the project site, pressed against the base and tapped from above with a rubber mallet. The adjacent tile is laid in the same way, but with the use of connecting sleeves. There should be no air bubbles and non-glued places under the tiles, and no gap between the products.
The drying time of the adhesive mixture depends on the type of adhesive and can range from one to several days.
Conclusion
Due to its high technical characteristics, laying rubber tiles is impractical or impossible except in hot shops of metallurgical enterprises or in rooms whose status does not correspond to the class of this finishing material. However, it is precisely the presence of numerous advantages that determines the high price of pavilastik and, as a result, the limited popularity of it. And yet, the presence of a number of features and advantages of pavilastic over many materials makes manufacturers work towards reducing the cost of its production, which will eventually make it available to a wide range of consumers.