The technology of laying mosaic tiles on walls or floors
Mosaic tiles are always a good choice. It is aesthetic and effective. One question: how to make high-quality laying of a very small mosaic? But do not worry - the tiles are not glued separately. It is assembled in large modules, which are easy and not difficult to stack.
What materials and tools will be needed?
Mosaic is attached to a grid or paper - therefore, the modules are bent, which allows gluing tiles on surfaces of any shape. It can be cut with scissors, adjusting to the required size.
There is a wide variety of colors, shapes and sizes of mosaics, after deciding on a design, the only thing left is to lay it down.
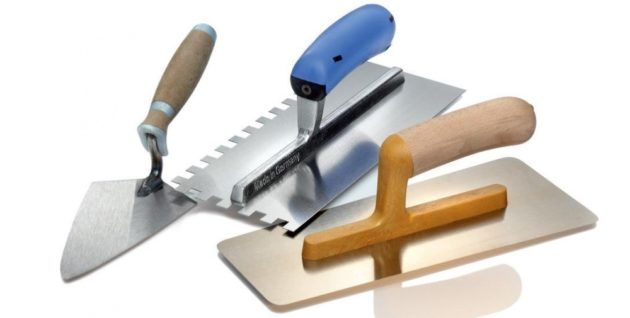
The following materials and tools will be needed for work:
- Primer. If you plan to lay mosaic tiles in the bathroom or in the kitchen, then you should purchase a waterproof product with protection against fungus.
- Glue should be chosen special - for mosaics.
- Grout for seams.
- Spatula for leveling the surface of the mosaic tile (when choosing, remember that it bends).
- . The smaller the module, the smaller the teeth.
- A brush with which it will be necessary to apply a primer.
- Mixer for mixing the adhesive mixture. It is possible without it - then you have to work very carefully with your hands. Lumps are not needed.
- Capacity for glue - a bucket or basin.
- Trowel spatula. Preferably rubber.
- Skin. It will need to sand the surface of the wall.
- Cement.
- Rag. Kitchen sponge or rags - to remove the remnants of consumables from the tiles in time.
It is not necessary to buy cement - only if the surfaces are very crooked. It is necessary to level the wall or floor. Due to the flexible base, mosaic tiles will lie on any wall. An uneven wall under the tiles is noticeable. And it's not pretty.
How to lay out mosaic tiles?
Mosaic modules are different, today they are made of glass, ceramics, polymeric materials - this should be of little interest to the end user. The durability of the product and its price depend on the raw materials. You should choose a mosaic based on your own taste and the planned design of the room.
The only thing to pay attention to is the base. The tile can be fixed on a grid or on thick paper. Some nuances depend on this - how to smear glue, and which side to attach. The main thing is not to confuse.
Installation steps:
- surface preparation;
- performing the necessary measurements;
- glue preparation;
- applying glue to the surface;
- gluing the module;
- alignment;
- grouting.
Surface preparation and adhesive preparation
The surface must be cleaned of the remnants of the previous finish, degreased, sanded. If necessary, it is necessary to pre-align and go through the primer.
It is necessary to carefully take measurements, draw markings on the surface. Many people are too lazy to do this, but the initial stage, done conscientiously, just speeds up the work.
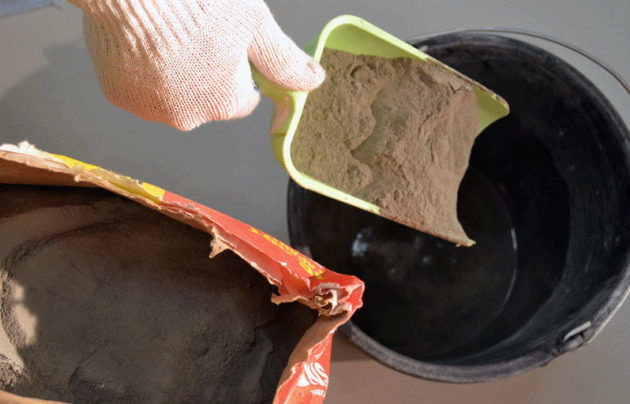
When preparing the glue, it is necessary to mix the dry mixture with water in the proportion indicated on the package. To begin with, you should cook a little - so that it is enough for an hour of work. The glue dries quickly.
If a composition is purchased where the glue and thickener are packaged separately, it is necessary to knead both dry components at once. Mixing one thing with water first, then the second, and then pouring everything into one bowl is the right way to get the wrong consistency.
Module bonding process
The adhesive should be applied with a relief spatula. In which direction to make grooves - it does not matter.
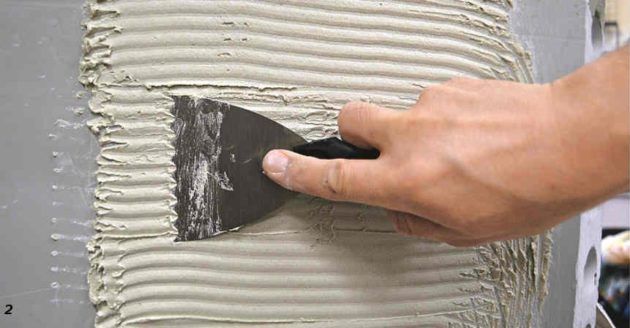
Important! If the surface of the adhesive has taken on a film, you need to smear it again - otherwise the tile will not last long.
If the tile is paper-based, the adhesive should be applied in “dots”. Five are enough: four in the corners and one in the middle. The amount of glue should be such that when pressed, it spreads over the entire area of \u200b\u200bthe tile.
Module sticking:
- it should be carefully straightened and pressed: a small amount of glue should come out;
- mesh-based tiles are fixed with a mosaic outside;
- the paper-based module is attached with a mosaic inside. The paper is then removed. To separate the base, it is enough to wet it.
Attention! Peel off the paper cover half an hour after the module has been glued to the wall. If a few squares fell off with paper, it's not scary. They are easy to smear with glue and put back into place.
Like tiles, laying a mosaic on a wall should start from the corner. Experienced builders-finishers are advised to choose the corner that catches the eye first.
Ordinary tiles are allowed to be fixed directly on wet putty. Is it possible to do this with a mosaic? Yes, only if you plan to finish it, for example, in a bedroom or living room. This method is not suitable for wet rooms.
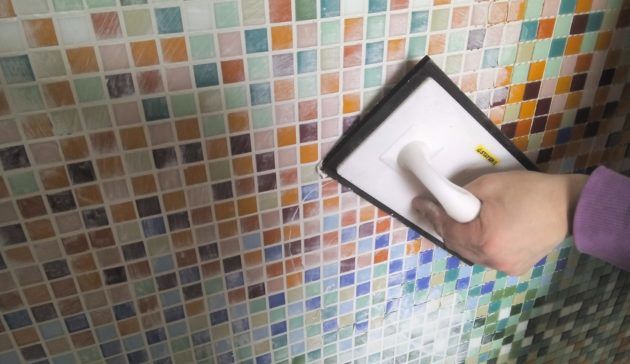
Next, you need to carefully smooth the glued module with a grater and remove unnecessary. Use a damp cloth to wipe away glue stains and other debris. You should not leave it for later: the dirt will harden and it will be difficult to get rid of it.
Grouting
You can start after a day or two, when the glue has completely hardened. This should be done in half. It is allowed to wash the tiles and start cleaning off the excess grout after 20–30 minutes, otherwise they will dry out. For washing, special alcohol solutions are sold, but you can get by with water. You can overwrite with glue, only by adding less fixer.
Laying mosaic tiles on the floor
Laying tiles on the floor does not require special knowledge and skills. Working with floors has the same principles as with walls. A cement screed is desirable. Laying mosaic on the floor is a simple process:
- mix glue;
- apply to the surface;
- attach the module;
- clean and wipe the seams.
Tips for laying mosaic tiles:
- Lay the tiles with a suitable adhesive.
- To achieve maximum strength and durability, experts recommend laying tiles in the cold (ideally - +5 degrees).
- Mosaic tiles are cut. To cut, you need pliers. When working with them, you should wear a mask and goggles: fragments fly off, falling into the face.
- It is advisable to apply waterproofing or a special protective agent for seams to the seams - even if the materials themselves are moisture resistant.
- If the details of the mosaic tile are glass or metal, you should refrain from hard sponges: they can leave scratches.
- In addition to these tools, you will need a ruler, level, crosses. Before starting work, you need to make markup.
Glue must be selected on a latex basis. A good choice is an adhesive that matches the color of the tile. You need to look at the expiration date and quality of the material. Not every expensive glue is good, but quality is never cheap.
The answer to the question of how to lay mosaic tiles correctly so that the result pleases the eye for a long time is simple: you need to follow a few simple rules and select high-quality consumables.