Do-it-yourself piggy bank for paper bills. Do-it-yourself piggy bank from a tin can with locks. Piggy bank from a jar or box
At home, you can make a piggy bank with your own hands. It can be perceived not only as a children's toy, but also as a temporary means of storage.
If you make a decoration, you get an interesting decorative element that will complement the interior.
Needlewomen can use different materials at hand, use their imagination, invite a child and spend time together.
To put your house or apartment in order, collect scattered small things, you can make a piggy bank out of cardboard or paper.
It is easy to make and does not take much time.
- Cardboard.
- Laces for decoration.
- Scissors (large and small).
- Pencil.
- Ruler.
- Nails.
- Stationery knife.
- Elastic.
The piggy bank is created in several stages. The main condition is to follow a simple instruction:
| Stages | How to do |
| Stage 1 | First you need to make a blank from paper or cardboard. It is necessary to draw the material into 4 squares horizontally, and 3 squares vertically. The optimal size for a small piggy bank is 7x7 cm |
| Stage 2 | The workpiece must be folded into a square. Take a large nail and make holes where the lace will be inserted. If the piggy bank is made of paper, at the stage of creating the blank, 1 cm should be left along the side edges. In the process of forming piggy banks, they are bent and glued with clerical glue |
| Stage 3 | With the help of a clerical knife, a rectangular hole is made where small coins can be folded. For large items, you can cut a large hole |
| Stage 4 | The workpiece is fastened with laces |
Important! To prevent the lid from opening, it is necessary to fix the elastic band.
To do this, it is tied inside the piggy bank to a cord. Then it is threaded into the opening of the lid, a strong knot is tied.
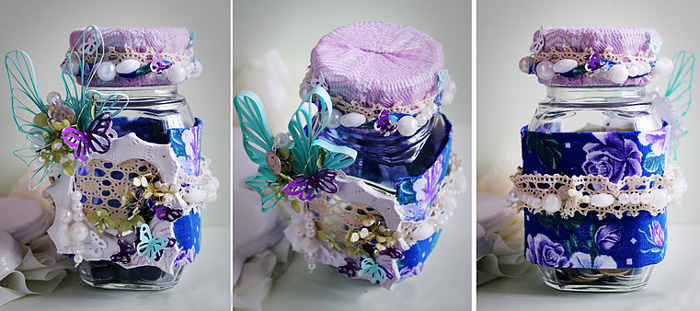
Piggy bank from a jar or box
To create a piggy bank, take an ordinary glass jar. It can be of different sizes. Be sure to screw the lid on top.
It will have a slot for coins. The main condition is beautiful and original decoration. The square box looks great.
Step-by-step instruction:
- Two strips are made of cardboard. One piece should fit the width of the can. The second blank is equal to - 1 height, the diagonal of the can and one more height.
- The strips are attached to each other in the place where the bottom will be. A stapler is used for secure fastening. It turns out the part for the frame.
- Next, another blank is formed. The first part is applied to the bottom of the cardboard, circled around it.
Additionally, leave 1 cm for allowances on each side. The second blank is cut with a clerical knife.
- In the central part, a circle is indicated, which corresponds to the diameter of the lid. The workpiece is cut out.
- Next, the resulting blanks are put on the jar. The container is placed in the central part of the first blank, the edges are raised, another blank is put on the second part. They are fastened together with a stapler.
- To provide additional strength, the entire structure is wrapped with tape.
- Take paper towels and cut into thin strips. PVA glue is diluted with water in a ratio of 1: 1.
The strips are carefully impregnated with glue, laid on the base in waves. According to this principle, the bank is decorated on each side. It is recommended to make several layers.
Before applying the first layer, the adhesive must dry thoroughly. Each layer is carefully painted with acrylic paint. Color or shade can be selected at your discretion.
Note! The first layer can be made darker so that there are no gaps.
The rest can be done in light shades. Next, they take a strong glue that dries quickly, coat the neck and the places where the surface of the workpiece ends with it.
Packing rope, burlap or woolen thread is laid in a circle. The same glue can be used to decorate the lid using a rope.
On the sides, you can decorate the piggy bank with buttons, rhinestones, bows and other materials.
You can make a piggy bank out of a shoe box. To do this, you can make a hole of any size from above. At your discretion, you can come up with decor and design, decorate as desired.
Ideas of what else you can make a piggy bank for coins and paper bills
Piggy bank for coins and paper money can be made from a plastic bottle. You can take a container of different sizes.
Before starting work, you need to prepare the following materials and tools:
- Plastic bottle.
- Water.
- Knife or scissors.
- Glue and brush for application.
- Medium size black buttons.
- Marker, tape.
- Paper towels.
- Pink cardboard paper.
- Bottle caps or wine corks.
To make a piggy bank with your own hands, you need to cut off the top of the bottle. These materials make beautiful and useful craft in the form of a pig.
She is sure to be loved by the kids. The top of the bottle serves as the head. The lower part is the body.
After forming the blanks, it is necessary to mix paint and water, PVA glue. The edges of the head and torso are carefully processed and aligned. They are connected to each other using adhesive tape.
With a clerical knife in the upper part, next to the head, make a hole for coins or paper bills.
The piggy bank is carefully covered with the resulting solution of glue and paint. Napkins are applied on top in several layers, be sure to coat the layers with glue.
Note! Each layer, before applying a new one, must dry thoroughly.
When the surface of the pig is even and smooth, you can screw the cap onto the neck of the head. She serves as a patch.
A tail, ears are cut out of pink cardboard, the parts are fastened with quick-drying glue. Eyes are made from buttons.
From the remaining covers form the legs. Thanks to such a simple instruction, a beautiful home piggy bank is obtained.
Using this technology, you can make a dog or other animal. There are other ideas from which you can make such a useful craft.
It can be plaster, wood, salty dough. Any handy tool will do.
Useful video
Few people do not have a piggy bank at home. Someone uses it for its intended purpose and collects small things there, for someone the piggy bank serves as an element of decor. But few people know that the history of this item originates in ancient China, where donations were collected for it. The first prototypes of the modern pig for collecting small things were in the form of an ordinary cup with a lock. On such a piggy bank it was necessarily indicated what the collected funds would go to. Then piggy banks appeared in Russia and in Europe. The piggy bank symbolizes well-being and prosperity among all peoples. So, among the Germans, the wish for wealth sounds like “pig happiness”. Let's try to make such a “pig happiness” with our own hands. There are many ways, following which you can get a very original piggy bank from a jar with your own hands, as well as from a plastic bottle, a cardboard box. Do not count all the options. Let's dwell on the most interesting in our opinion.
Piggy bank from a plastic bottle
You will need:
- plastic bottle;
- spray paint;
- toy eyes;
- scissors and glue.
Operating procedure:
- Cut off the middle part of the plastic bottle.
- Put the lower part on the upper, for better adhesion they can be glued together.
- Paint the craft with spray paint in several layers. The color can be whatever you like.
- When dry, you can glue the eyes. They can be borrowed from some unnecessary toy. Cut out ears from the remaining middle part of the bottle or from cardboard, paint them light pink and glue them on.
- The bottle cap can be painted black with a marker, and you will get quite a nice snout.
- Make a small hole in the top so that you can push change and paper bills through it. This can be done with a knife.
- Pig legs can be made from plastic or bottle caps.
Your piggy bank is ready! You can feed her, and we wish you "pig happiness"
Important! The first piggy bank appeared in medieval England, it was there that the first copies of pigs were released. Well, the Japanese, as always, distinguished themselves and released a kamikaze piggy bank. Its goal is not only to raise money, but also to teach young people to be responsible and punctual. If you do not throw a coin at a certain time, then it will crumble.
Bank piggy bank in the style of Superman or Batman
If your son is a fan of superheroes, you can make a Superman-style piggy bank with him or any other hero that can be easily made from a can. How to make such a superhero piggy bank with your own hands from a jar? Very simple:
- Find a pretty jar with a metal lid.
- Spray paint it several coats in a color suitable for your superhero and let it dry well.
- Cut out an emblem from colored paper or you can simply print the one you need on a color printer.
- Glue the pattern onto the jar.
- Make a hole in the hole right size with a knife.
Making a piggy bank from a glass jar
Take an ordinary glass jar of a suitable size and screw the lid on it. On this cover, make a slot for money. In principle, the do-it-yourself piggy bank from a glass jar is already ready. It remains to decorate it.
For greater originality, we will make a square-shaped piggy bank. For this we need cardboard:
- Cut out two strips of cardboard. One stripe is the width of the can. The second is 1 height + can diagonal + 1 height.
- These two strips must be combined with each other in the place where the bottom of the can will be, and fastened together with a stapler. This is the first blank for the frame.
- We make the second preparation. To do this, put the first blank on the cardboard and circle it, adding 1 cm to the allowances from the sides. It does not need to be made so long, leave 3 cm on each side. Cut out the second piece.
- In the center of the second blank, draw a circle equal to the diameter of the lid and cut it out.
- Now you need to put both blanks on the jar. We put the jar in the center of the first blank and raise the edges, and put the second blank on top of the lid and fasten them together with a stapler.
- For strength, you can fasten the entire structure with tape.
- We dilute PVA glue in water in a ratio of 1 to 1. Cut paper towels into strips. Dip the strips in glue and lay them in waves on the base. Thus, we decorate the jar from all sides, preferably in several layers.
Important! Before applying a new layer, the old one must dry completely.
- Each layer needs to be painted acrylic paints. You can choose the color according to your taste.
Important! Paint the first layer with a darker color without gaps. The next layers are painted with lighter tones.
- Now take the “Titan” or “Moment” glue, coat the neck with it and the places where the workpiece ends. Lay a wrapping rope, woolen thread or burlap on the glue in a circle. Using the same glue and rope, decorate the lid.
Important! On the side, you can decorate the piggy bank with bows or buttons or other decorative elements.
Other ways to create piggy banks with your own hands:
- Do you still have empty coffee cans? Do not throw them away, because you can use them to make a piggy bank. How to decorate such a piggy bank? Find on the Internet a beautiful ornament, drawings of flowers or another picture you like and print the picture on a color printer. Cut out the pattern based on the size of the jar and paste over it.
Important! From above, you can decorate the piggy bank additionally with rhinestones, beads, buttons, bows or flowers.
- You can make a box of cardboard and colored threads. Just make a sketch of the box, cut it out of cardboard and fasten all the parts with colored threads. You can download the finished blank from the Internet, print and use as a stencil. Make a hole in the lid for coins.
- Cut the plastic bottle to your desired height and sew a drawstring cover that can be loosened or pulled back on. Put it on top of the bottle. You can put anything inside: money or just small items.
How and from what you can make a piggy bank for money with your own hands - these questions are of interest to creative individuals. After all, they can decorate their apartment using only improvised means and their multifaceted imagination.
Let's start with the fact that a person who considers himself financially literate is simply obliged to have a piggy bank in his house. Or maybe two
Why do you need to make a piggy bank for money with your own hands? Because, putting aside your wonderful money in a piggy bank, you most likely collect it for something specific. For your "American" dream! And if you are building your future - dreams, desires, goals, then you need to make a piggy bank for money on your own.
In this article, we will show you examples of shoe box piggy banks.
This article is also about how to make a big piggy bank! We have big dreams and desires! Accordingly, if you make a piggy bank for money, then you need to make it big.
Piggy bank decor with newspaper and pictures

In time, such a piggy bank is made for about 1 hour.
In order to do it, you will need:
- box,
- newspaper,
- PVA glue,
- stationery knife,
- Pictures.
Making a piggy bank:
1. We find a box, a newspaper, PVA glue and pictures.
Not only modern prints can be used as pictures. Well suited to bookcases in the form of banknotes, inserts, brochures etc. You can also take real banknotes! Not the point. The main thing is that a home-made piggy bank for money should be pasted over with money. And money will go into your piggy bank.
2. Paste the box with newspaper (walls and lid), then paste the banknotes. The box for the piggy bank inside can also be pasted over, or you can leave it as it is.
The most important thing remains! Where to throw money? This will require a utility knife.
3. At this stage, you should be extremely careful and attentive. With a knife, you need to cut a rectangular line a little less than 1 cm thick and about 10 cm long. Then you can safely throw both small change and banknotes into such a piggy bank.
If you need to make a piggy bank with your own hands only for small things, then we make the appropriate rectangle.
The piggy bank is pasted over, there is a hole for money in the piggy bank. What is missing?
It lacks a frightening inscription on the piggy bank so that you from there did not steal money.
4. We make an inscription like “Do not steal from yourself”, “Do not touch me”, “Your duty is my enemy”, etc.
5. And, of course, you need to throw money there right away! At least 5 cents!

Decorate the box with paper and ribbons
In addition to newspapers and pictures, there are 100,500 ways to decorate a piggy bank. You can use buttons, rhinestones, ribbons, fabric.
 To decorate this box, we need:
- colored paper (plain and velvet),
- glue,
- scissors,
- hole puncher,
- ribbon (string),
- Pictures.
Making a piggy bank:
1. Take the lid and glue it with velvet paper.
At will, we glue pictures, make applications from them. We glued a flower from plain paper. You can make the same out of fabric.
We decorate the lid and the box completely.
2. Since this is not just a gift box, but a piggy bank, then the lid should not open.
To do this, we make holes (hole punch) along the rim of the box and the lid at the same level. We insert a ribbon or lace into these holes and tie it.
The edges of the tape must be treated with fire so that they do not fray.

Cardboard chest
This chest can be used for various purposes. It can be both a piggy bank and a box, as well as an ordinary element of decor. For the chest we need:
- box,
- scissors,
- cardboard,
- glue,
- acrylic paint,
- paint brush,
- napkins.
The size of the chest directly depends on the size of the box. Therefore, do not foolishly take huge boxes!
So, do:
1. From the box we make the shape of a chest using glue, scissors and cardboard. We make additional walls from cardboard so that the chest has the desired look.
2. We make a hole for money in the lid. This can be done in advance so as not to wrinkle the craft.
3. Additional walls can be pasted over with paper, fabric, wallpaper - to your taste.
5. We cover the box with acrylic paint. In the photo, the piggy bank is covered with black paint. You can also use gold, red colors.
6. Outside, the box can be decorated with completely different techniques. This can be plastic modeling, stained glass painting, carving on cardboard, etc.
The main thing is to cover with acrylic paint. Then the piggy bank will look rich.
7. After the chest has dried, cover with gold paint in special places.
If you cover it with gold over black, the box will look like it is expensive. So it makes sense to do so.
8. Dry the piggy bank and take a picture 🙂

Why is she in the house
Homemade things are generally very good for gifts.
In the 21st century, it's hard to surprise anyone with gifts. After all, all goods are available in stores, online stores, from intermediary friends, etc. Therefore, fashion is returning to DIY crafts.
A piggy bank is such a thing that will never interfere in the house. We very often shake out a trifle from the pockets of a jacket or bag, throwing it on such.
No matter how ridiculous it may seem, but if this little thing is thrown into the piggy bank for an ode, then you can collect a small amount to go to the cinema, bathhouse or Eve.
Some collect so many small things in their pockets that at the end of the year they have enough for such people on underwear from Victoria Secret.
How to behave with her
 There are several rules for keeping a piggy bank, described in the books of Stephen Covey, Bodo Schaefer and other financial experts.
We will describe them briefly especially for YOU:
1. Constantly unload the change into the box.
2. Every day replenish the piggy bank, regardless of the amount.
3. NEVER take money from there before the due time. This time, day, year you choose initially independently. And no matter what happens, you can’t pull from the piggy bank.
You yourself must understand that it will be possible to collect money only if these rules are strictly followed.
Money box- a special container where you can put money so as not to spend it in the near future. Often this is a closed container with a small hole so that you can put money in it. In most cases, this is just a jar where people put small change from their pockets so as not to rush about with it, and after a while, when the jar is full, please themselves with some kind of gift. There are many ways to make a piggy bank, and today we will talk about some of them.
Before that, we told, now consider other types of piggy banks!
How to make a piggy bank with your own hands?
We have prepared for you the simplest and fastest ways, the materials for which every home has, it can be a cardboard box, a can or a plastic bottle. The choice is yours. Let's get started!
How to make a piggy bank out of paper?
Very interesting craft, available even little child. Great idea for various lessons and activities for kids. Having made a piggy bank, they will have a very good time and receive a useful gift.
In order to make such a piggy bank, print out the following diagram:

In the upper left corner you can see the fold pattern, that's where you need to glue it.
How to make a piggy bank from a bottle?

Everyone has unnecessary plastic bottles. Encourage your child to do original craft, learn something new and acquire a valuable thing.
Let's prepare the materials we need:
Plastic bottle.
. Stationery knife.
. Pink paint.
. Corrugated paper in pink and black.
. Glue gun.
. Piglet eyes.

1 . We take a bottle and cut it into three parts. Make sure all cuts are neat and even.
2 . We connect the lower and upper parts of the bottle together. You can drop the middle one.
4. Paint the shape pink. It is advisable to use a can. Then we decorate our pig with eyes from black cardboard and cut out a nose, legs and tail from pink materials.
The principle of accumulating money is liked not only by children, in whom it develops responsibility and economy, but by adults.
Throwing a few coins into the piggy bank, over time, a round sum is collected that can be spent on the necessary items.
Things handmade always appreciated: they cause delight, warm the soul, and are also individual and unique.
A beautiful piggy bank made with your own hands will be a great accessory for your home, as well as a gift for friends.
Following step by step simple master classes, ideas, you can make the product yourself at home.
The simplest is the manufacture of a homemade piggy bank from a jar or box: all that is required is to make a slot and beautifully decorate the product. To create an original piggy bank, it is worth showing imagination.
Modern craftswomen offer a selection of the following ideas for independent creativity:
- From Lego. Take a designer kit and make a box or product of the required shape out of it.
At the top, leave a hole for the coins. To extract money, it is enough to disassemble the constructor. Even banknotes can fit here.
- From a tree. This material lends itself perfectly to processing, so the creative process will bring pleasure. It is really possible to make the most unusual shapes of piggy banks out of wood.
- From salt dough. The material is considered one of the easiest to work with - you can sculpt any shape from it, and then paint it with acrylic pigment.
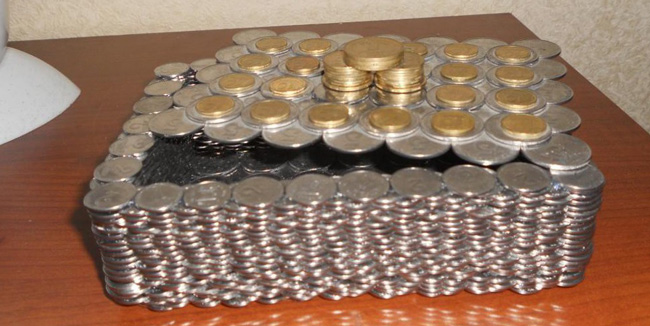
- From wine corks. With the help of hot glue, all corks are glued into one structure, forming a box. From above, you can make a hole for paper money and for coins separately.
Ordinary and polymer clay performed well when sculpting: it is convenient to make a variety of products from this raw material. Do not forget to bake the finished piggy bank in the oven, and then decorate it.
Step by step paper making
The most affordable option for making a piggy bank is considered to be its production from paper. Improvised tools can also be used for work.
Cardboard options involve designing a box with a hole on top.

In this master class, we will consider the manufacture using the papier-mâché technique:
- To work, you will need a balloon, an egg carton, newspaper, glue, scissors, a needle, paints and brushes for decoration.
- The finished piggy bank will be made in the shape of a pig, so to create it, inflate the balloon to the required size.
- Start pasting over the ball with finely torn newspapers, pre-wetting them with plenty of glue. In total, 3 layers of newsprint should be obtained so that the work is strong.
- Leave a hole for the coins on top, the cardboard cells from the eggs will protrude with the paws of the pig.
- When the entire ball is pasted over, leave it to dry completely. After that, take a needle, pierce the ball - it will deflate.
- At the last stage, you need to decorate the pig at your discretion.
As you can see, the manufacturing technology is so simple that even a child can handle it.
Important! For the last layer, it is better to use not newsprint, but tissue paper or one that will give the final smoothness to the product.
The finished piggy bank will decorate the interior of the children's room well and instill in the child a sense of economy.
Piggy bank from a bottle and a jar
Since ancient times, people used the bank to store and save money. It is very convenient to pour coins out of the jar, in addition, it is transparent, you can immediately see how many coins have already accumulated.
Note! For the manufacture of the bottle option, both a plastic bottle and a glass bottle are useful.
You should not take a large container if the product is intended for a child.

It is better to take a liter jar or a bottle of 750 milliliters:
How to make a piggy bank out of plaster?
by the most simple option making a piggy bank from gypsum will become a rounded shape of the product. For example, in the form of a dog, a pig, or just a big smiley.

To work, you will need alabaster, water, an inflatable ball, paints, brushes and strong but careful hands to make a slot:
- Gypsum is bred in plastic bottle, put a ball on it and pour the mass inside.
- The ball is picked up and gently rotated: as soon as the gypsum has seized, the ball is placed in water and continues to be rolled to distribute the mass.
- After the homemade piggy bank has completely solidified, the ball is carefully cut with a knife.
- The piggy bank is painted with acrylics and decorated.
- Using a screwdriver, cut a hole.
According to this scheme, you can make a New Year's piggy bank in the form of a ball and give it to loved ones and children.
Important! When working with plaster, use gloves, and also lay a protective oilcloth on the workplace.
Such a craft will become a good gift for friends, and can also claim the idea of industrial production.
unusual shapes
If standard piggy banks - pigs and crafts out of the box have already become boring to many, then there is always a demand for unusual shapes of products.

The original ideas for creating piggy banks of various shapes include:
- Safe - made of boxes or plaster, even an adult will be delighted, especially if it comes with a lock.
- House - can be made of cardboard, make a slot in the roof for money.
- Piggy bank owl - made of gypsum in a special form.
- Cylinder hat - for work you need a disk, cardboard.
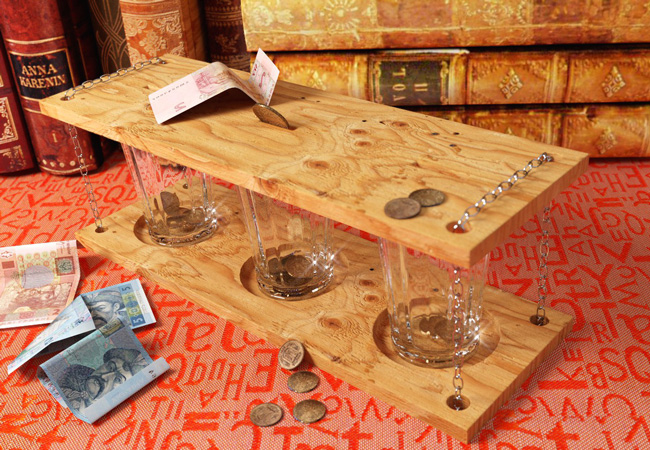
- With a secret - a mirror is placed in a plywood box at an angle, decor items are mounted under it: when a coin is placed inside, it visually disappears.
Such simple and original ideas will help you create creative piggy banks for any occasion: as a gift and for yourself.
Handmade things always warm with the warmth of human hands and the soul invested in the work.
Useful video