Tool for sharpening knives. Self-made machine for sharpening knives. Conditions for the correct sharpening of knives
Currently, there are several types: a machine for sharpening knives, for a hairdressing machine and others. This article talks about how to make a knife sharpening machine at home: detailed drawings with dimensions, photos and videos (2-3 videos) are presented.
Often, when sharpening knives at home, households use abrasive whetstones. However, in order to use them in practice, you need the necessary skills and experience with them. After all, if the knife is sharpened at the wrong angle, then the blade remains dull.
Scheme of the location of the block to the blade.
Before the direct manufacture of the machine, you need to listen to the advice from the sharpeners.
When sharpening a knife, the master performs the following actions:
Defines the angle between the working area of the blade and the block. Moreover, for each model, the angles are different;
The knife is located at an angle of 90 degrees to the direction of the bar. The grooves that are formed when the razor blade rubs against the bar should be at 90 degrees to the knife line. The angle in such a situation is equal to half the sharpening;
Typically, the angle is 25 degrees;
The locksmith starts processing from the beginning of the foot blade;
When adjusting the grinding angle, the master paints over part of the foot blade with any marker. As a result, the mechanic directly controls the work area.
As a rule, after sharpening, the working blade has non-uniform deformations. Therefore, with self-processing, the “reference point” should not be the sharp part of the knife.
The choice of whetstones for sharpening a knife

The main indicator of a bar is granularity.
The block is the main component that makes the blade thin and sharp. As a result, before choosing a design, you must select the desired bars.
When self-sharpening knives, the household uses these types of bars
which have a high grain size. By using such bars, the shape of the foot blade is corrected.
with medium grain. With the help of such bars, the locksmith removes the grooves that form during the initial processing of the knife.
whetstone, which is covered with GOM paste. In such a situation, the locksmith polishes the blade.
When processing knives for the kitchen, two types can be used - with medium and high grain. And also in this case it is necessary to use a touchstone.
Base
When making a sharpening machine at home, you can use various parts. In particular, you can use laminated box plywood 12 mm thick, which was previously used to create radio equipment cases.
When building a machine at home, the household performs the following actions:
Selects a base for such an installation, which must weigh at least 5 kg. Otherwise, the machine will not be able to sharpen cutting devices and tools. Therefore, in the manufacture of such equipment, the tenant uses various steel corners measuring 20x20 mm;
Further, he cuts 2 parts from plywood with a jigsaw, which have a trapezoidal shape, the base is 170 by 60 mm, and a height of 230 mm. When cutting, the locksmith makes an allowance of 0.7 mm for sharpening the ends: they eventually turn out to be straight and fit the markup;

Installs between the inclined walls on the sides 3 parts - an inclined surface made of plywood of such dimensions 230 x 150 mm.
In such a situation, the trapezoidal sides are on the side on a rectangular surface.
The result is a base - a wedge. In such a situation, a protrusion of an inclined surface with a size of 40 mm is formed in the front;
Then, along the side wall ends, the locksmith marks 2 lines with a thickness gauge. At the same time, it retreats by half the thickness of the plywood;
Drills the ends of the inclined surface and for some time connects the details of the base;

At the back of the structure, the locksmith connects the side walls with a 60x60 mm block, which is attached to the end with two screws from 2 sides; - makes a 10 mm gap in the bar.
In such a situation, it recedes 50 mm from the center - 25 mm from the edge. To maintain a vertical position, it is first drilled with a non-thick drill from 2 edges, and then expands;

Then, at the top and bottom, two threaded fittings-futors are screwed into the slot, and in the fittings - a stud 10 mm in size, the length of which is 250 mm.
If the threads do not match the studs, the lower futorka is adjusted.
Handpiece device
In the manufacture of the handpiece device, the following actions are performed:
Removes an even inclined part from the base, refines it and installs a fixation device on it, as well as a clamp of the device used;
He measures 40 mm from the edge in front and, using a garden saw, cuts a groove at this mark, the depth of which is 2 mm;
Using a shoe knife, the top 2 veneered layers are chipped from the end of the board. The result is a sample in which the locksmith inserts a 2 mm steel plate flush with the common surface;

The armrest has in its composition 2 strips of steel with dimensions of 170x60 mm and 150x40 mm. The machine operator connects them along the large end, which has equal marginal indents, and makes 3 through slots of 6 mm.
With the help of bolts, it tightens the slats along the slots made. In such a situation, the machine operator leaves the bolt heads on the side of the large top plate;
Then he removes metal defects in the weld in the form of sagging and grinds the plate until it has a smooth surface;

Attaches a small reciprocal bar to the edge sample, transfers the slots with a drill and fixes the handpiece with bolts.
fixing device

Second important detail a handpiece is considered a clamping bar. It can be made from 2 parts.
L-shaped bar measuring 150x180 mm, the width of the shelves of which is 50 mm (upper);
Reciprocal plate in the form of a rectangle measuring 50x100 mm (lower).
In the manufacture of the clamping bar, the machine operator performs the following actions:
Sets the bottom bar on the far edge of the top;
Makes 2 holes in the center and retreats 25 mm from the edges of the part, connects the parts through the holes with two 8 mm bolts;
Screws in 8mm bolts on 2 sides. In a similar situation, the hat of the near bolt is located near the top bar;
Welds the caps of the bolts to the plates and pre-grinds until roundness is formed;
Yes, the inclined board retreats 40 mm from the edge and draws a line with a thickness gauge;
Makes along the edges at the bottom and at the top one 8 mm slot in 25 mm;
Using markings, he connects the edges of the slots and makes a cut with an allowance with an electric jigsaw. File expands the groove to a width of 8.5 mm;

It fastens the planks by means of a groove, which is in the board, tightens the top bolt with a nut and, thus, firmly fastens the plank.
Then tighten the connection 2 with a nut;
When pressing the lower bar (in the niche of the base), he screws a wing nut onto the second bolt.
Sharpening angle control
When adjusting the sharpening angle, the locksmith performs the following actions:
On the stud, which is located in the bar of the machine base, he throws a large washer and tightens the nut.

The rod does not turn in the futorka makes a block for adjusting the grinding angle from a small carbolite bar, the dimensions of which are 20x40x80 mm.
At 15 mm from the block edge, it drills a 20 mm end from 2 sides, expands the gap to 9 mm, then makes a thread inside;
50 mm retreats from the axis of the new slot and drills another one in the flat part of the workpiece - 90 degrees to the previous one. Such a gap has a diameter of 14 mm. In such a situation, the locksmith strongly flares the hole using a round rasp;
Screws the block onto the spire - sets the desired eye height without the use of fixing screws;
Fastens the block from 2 sides with M10 hex nuts.
The use of interchangeable blocks and the manufacture of the carriage
In the manufacture of a grinding carriage, the machine operator performs the following actions:
Welds 30 cm M10 threaded studs with a smooth rod, the thickness of which is 10 mm;
Uses 2 solid bars 50x80 mm and the thickness of which is 20 mm. In all the bars in the center and on top, 20 mm recedes from the edge, and then makes a gap 10 mm wide;
Screws a wing nut onto the bar, then a large washer and 2 bars, then a nut and a washer;

Between the bars, he clamps rectangular grinding stones or makes several interchangeable grinding stones.
As a block base, the machine operator uses a rectangular tube from a profile or a piece of cornice, the width of which is 50 mm;

It sands the flat machine part and cleans it of grease, glues strips of sandpaper with a grain size of up to 1200 grit with Super Moment glue.
The sandpaper should have a fabric base, and on 1 of the bars you need to glue a strip of suede to apply polishing to the blades.
A simple homemade machine
The most common version of the machine design are 2 pairs of wooden rails, which are fastened together with screws. Between such parts, the machine operator sets the bar.
The main reason for the popularity of the usemanual homemade machine for sharpening various knives is its stability. During operation, the machine structure does not move along the workbench.

When fixing the bar, the locksmith uses support strips that are located between the wooden elements.
However, such homemade machine has the following disadvantages:
The master exposes the blade to the stone manually. With prolonged work, it is difficult to keep track of the sharpening angle;
In the manufacture of such an installation, it is necessary to use a fixing unit. The machine structure must be stable, so it must be firmly fixed on the workbench;
In the process of work, the screeds weaken and the location of the bar changes.
Another advantage of such a scheme is the ease of manufacture. Such a machine design is more often used when sharpening knives for a jointer and for the kitchen.
Wooden slats can be of various thicknesses. With the independent manufacture of a simple grinding machine, you can use various improvised components.
During the initial study of all the nuances of manufacturing, you need to watch thematic videos that describe in detail how to make a machine at home.
If you thought that self-sharpening knives existed, this is a myth invented by marketers to sell their products. Any knife will dull sooner or later. So, you will have to look for solutions to correct this situation. Today, the editors of the site will tell you what methods and tools you need to use for this and in general what to do when your knife is dull.
Read in the article:
Types of devices for sharpening knives
Stone has existed since the earliest days of modern civilization. And almost the same amount of metal. That is why the grindstone became one of the first devices that came to the rescue of a reasonable person. A simple, and most importantly, affordable tool has been successfully coping with its task for many millennia.

However, in the modern world, only a simple hunting knife can be sharpened with a whetstone. In other cases, the quality will leave much to be desired. In addition, only soft metals are sharpened with a stone, and if the cutting part of the blade has a hardness above 55 HRC, then you cannot sharpen it with improvised means.
Consider the types of devices for sharpening knives. If we talk about what kind of abrasive material is used, then the tools can be made in the form of bars or grindstones. By type of drive: manual or electric. Usually in home kitchens you can find a simple mechanical machine.

And it is this angle of sharpening that must be maintained. However, not all household tools are able to sharpen a knife correctly. And that is why in this article the editors of the site will tell you what options can be used in order to sharpen a knife for specific purposes.
Important! Each type of blade has its own edge angle, and during sharpening it must be held along the entire length of the workpiece surface.
Master grinders even conduct special master classes on sharpening knives using natural stone. Breeds of real natural whetstones cannot be bought in a regular store. Interestingly, before the processing process, it is soaked in water, sometimes with soapy water, and dried after work.
Blades for sharpening knives
Knife sharpeners are one of the most affordable devices for any housewife. Usually they are special rectangular bars with a special abrasive coating. Such bars are useful for sharpening carpentry tools in the garage, as well as household utensils.

Grinding stones, depending on the material, can be either natural or synthetic. Their wear resistance and type of grain size depend on this. And that means the quality of sharpening. Consider the main types of materials that are used in the manufacture of whetstones:
- natural stones, such as novaculite or Japanese water stone. Working with such a tool is not very easy. They require certain skills and craftsmanship;
- diamond coated bars. Synthetic, have a high degree wear resistance. Differ affordable price;
- ceramic. Relate to more modern look sharpening bars. Combine the strength of diamond coating with the hardness of natural stone;
- artificial: electrocorundum or carbide. Fast grinding abrasive, low quality and the same price.
On the other hand, artificial abrasives are much cheaper than their natural counterparts. They are created by mixing diamond powders of different fractions, as well as electrocorundum and carbide.
Important! Of great importance in this case is the material used to glue the rock, as well as the percentage of all elements. The stronger and better the composition (this also applies to the particles themselves), the more resistant the grinding abrasive will be.

Bundle variations can be soft type and hard type. In the first case, the crystals are glued strictly on the surface of their base, made of nickel alloy. In fact, the crystals are located in a very thin layer on the bar. A soft bond is a chaotic arrangement of bonding and abrasive elements. The second type is less durable.
Sharpening stones for knives
As we noted earlier, more effective means knife sharpeners are natural natural stones. Their effectiveness has been proven at all stages of sharpening. Artificial analogues, although they are distinguished by wear resistance and affordable price, however, cannot boast of ideal sharpness. Natural whetstones require special care, because the most important rule masters - a perfectly flat surface of a grindstone.

Expert opinion
Tool selection consultant LLC "VseInstrumenty.ru"
Ask a specialist“To check the degree of evenness of a stone, use a simple method. Wet the timber and place it on the paper sheet on a flat surface. The print will allow you to assess the degree of evenness of the stone.”
Novaculites, or "Arkansas", "Turkish", "Belgian" stones are natural slates and chalcedony interspersed with the smallest particles of garnet and quartz. Today, both natural stones and their artificial substitutes are used.
Musat for sharpening knives
Musat from the side is somewhat reminiscent of a file. In any case, such a comparison comes at first glance. The peculiarity of this tool is that its surface is magnetized, which means that metal flour will not fall on you.

Each type of musat is designed for sharpening a certain type of tool, and has a different degree of versatility. So, for example, a round musat weighs a little, but an oval sharpens better, since its edges provide more complete contact with the surface to be treated. Tetrahedral - more versatile, here you can better refine the required sharpening angle.
Household manual knife sharpeners
A variety of options for sharpening knives allows you to choose the tool that you need. These are the usual home mini-sharpeners, known to almost everyone, and more specific devices with a polishing wheel. Like more professional, household systems, knife sharpeners can use a moving or stationary abrasive. The sharpening angle in this case depends on the position of the cutting tool. Hand tools of this type, despite their simplicity and relative cheapness, are laborious in operation.
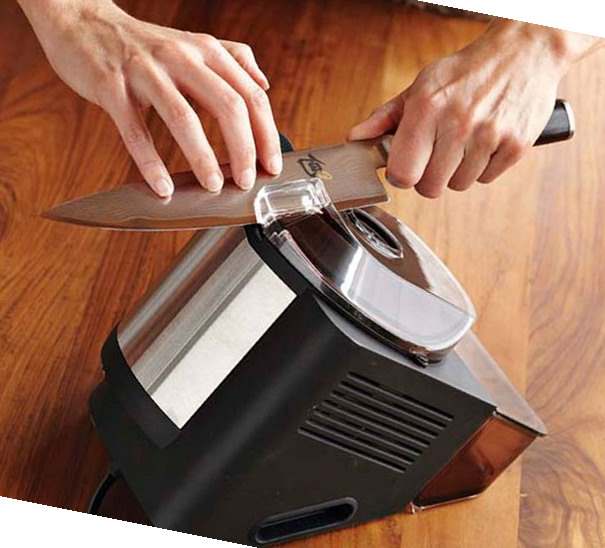
Household electric knife sharpeners
Electric grinders are more convenient. Working with them saves time. Most often, such drive machines have various modes of operation, which are controlled by switches.

Inside the sharpener is a grinding disc with an abrasive coating. When electricity is applied, the disk begins to rotate. Grinding wheels hidden inside protective cover. Despite the presence of a disk, such machines are quite compact. And the angle of sharpening is regulated by a special spring, which completely eliminates errors in sharpening.
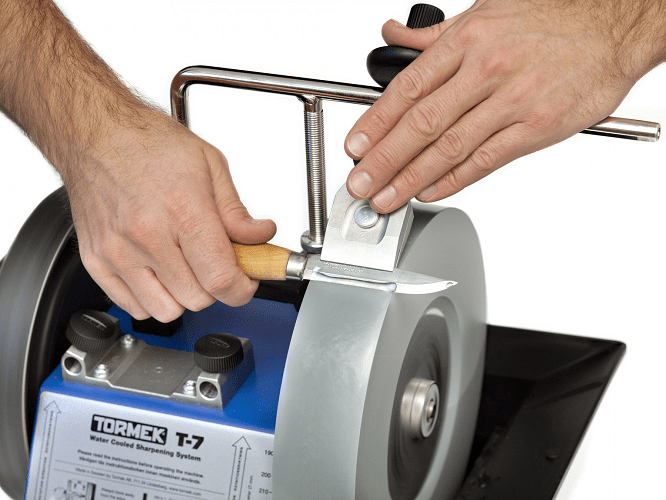
Professional manual knife sharpeners
A professional hand tool is a bit like a carpenter's vise. The subject of sharpening, in fact, the knife, is clamped with special clamps.
Further, the master, by means of a certain movement, begins sharpening, moving along the abrasive plate. The grinding machine itself is installed on the stop. Here it is very important to properly fix the machine and avoid slipping of the device during sharpening.

Such manual grinders allow you to use different abrasives, it is possible to adjust the sharpening angle in a wide range.
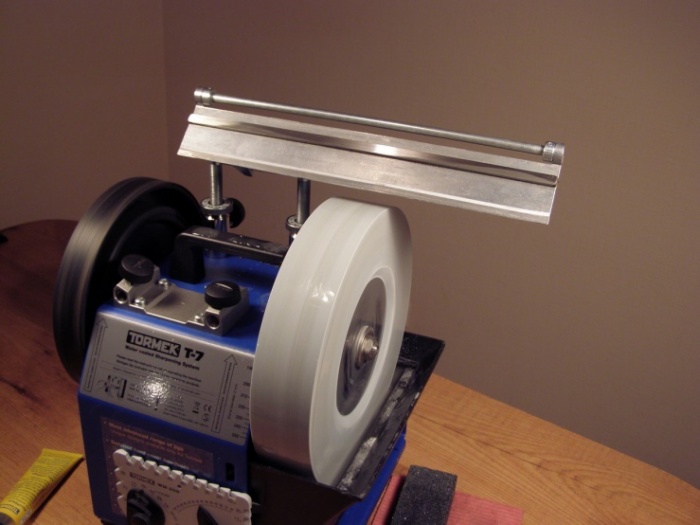
Professional electric knife sharpeners
The professional tool provides a large number of nozzles and interchangeable discs. The electrocorundum stone and the finishing leather disc rotate at 90 rpm, with the former placed in a tray of water. The combination of low speed and continuous cooling results in high-quality workpiece processing already at the stage of incisal formation.

Professional machines are distinguished by their versatility. Usually this is a machine with a massive abrasive disc. Such tools allow you to sharpen not only knives, but also metalwork tools, for example, planers and chisels. And at the final stages of work, they provide the blade with razor sharpness.
How to sharpen a knife
However, before starting the blade sharpening process, it is important to understand the sharpening technique. And the basics.
Optimal sharpening angles and sharpness for kitchen knives
There are dozens of types of knives for different purposes: these are kitchen knives, knives for metal work. In general, the sharpness of a blade depends on the shape of the blade. And it, in turn, must correlate with certain clear correspondences between the blade and the blade. Consider the correct sharpening angles for different tools.
For your information! Some types of knives can be so sharp that they can cut through metal. Blades with a sharpening angle of 50 ° are considered the sharpest of them - such versions with a certain steel grade can cut nails.
How to sharpen a knife at home with a bar
This process is simple, but rather painstaking. Without sharpening experience, trying this process is pointless. Typically, craftsmen use two whetstones with different abrasive densities - with coarse grain and fine.
Advice! The knife blade must always be wet. You can use special oils or grinding lubricants.
The next step is to choose the angle of sharpening. Here we are guided by the table above and take the range from and to. Remember, the smaller the sharpening angle, the faster the knife will dull. For a beginner, it will be difficult to maintain the same angle. In order to successfully pass this stage, it is important to hold the knife with both hands.

Gently place the blade on the blade, lower its corner to the grinding surface and begin work. We start work on a coarse-grained bar, and then, when the stage of edge grinding comes, we continue with a fine abrasive.
How to sharpen a knife with musat at home
Sharpening passes on weight. The blade is carried out along the entire length of the tool, usually several such “rides” are enough.
The process of sharpening with musat is quite simple. The tool is held in one hand, the knife in the other.

How to sharpen a knife on an electric grinder
The sharpening process is practically the same as manual sharpening. The only difference is that in this case it is not the blade that is wetted, but the grinding disc itself. Most often, a special tray is used to cool the disk. And the whole process is automatic.
Common mistakes when sharpening knives with your own hands
Everyone knows that it is better to prevent mistakes than to correct them later. That is why the editors of the site have prepared a list of the most common mistakes newcomers make when sharpening knives:
- Incorrectly maintained sharpening angle level.
- Blade regrinding. Occurs when excessive pressure is applied to the sharpener with a blade, due to which it can be damaged or even cracked.
- Sharpening an unprepared tool or a worn grinding wheel.
- The use of musat at all stages of work.
- As we remember, musat is used to finish the cutting edge. Use of fine grit abrasive.
All these subtleties are important to take into account already at the stage of organizing work. For information on how to sharpen a knife with a bar, see this video.
Do-it-yourself machine for sharpening knives
Buying a ready-made knife sharpening machine is not always necessary. For domestic needs, you can do it yourself. Whether mechanical or electric machine you will create - be guided, as mentioned earlier, by existing diagrams and drawings.

What tools do you need to make a do-it-yourself knife
For the manufacture of the simplest machine, we need: an ordinary chipboard bar, you can use elements of old cabinet furniture. Prepare for work: a metal rod, a small piece of sheet steel 1 mm thick., A few screws for fixing the structure, any abrasive material, a jigsaw and a screwdriver.
Do-it-yourself step-by-step instructions for making a grinder with your own hands
Consider assembling the simplest do-it-yourself knife sharpener from improvised materials.
| Illustration | Action Description |
 | As we can see, the base here is quite simple - a regular chipboard 65 × 25 mm |
 | Bar for fixing the base. Don't forget to sand it down. |
 | We mark the places of fastenings. |
 | We fix the bent pin at a certain angle. Guide angle from 65 to 70° |
 | We cut out a pressure plate from fiberglass. We mark the places of fastenings for countersunk bolts. |
 | We fix the plate on the base. Press with a hex wrench. |
 | From the same material we grind a plate for fixing the guide. |
 | We press the structure with the help of an ordinary lamb. |
 | We grind an ordinary steel bar, attach a handle from an old file to it. Length 57 cm. |
 | From the plumbing clamp we take fasteners-corners for the grindstone. We also use a bunny with a clamping screw for its further fixation. |
 | Sharpening stones can be made from a regular piece of laminate. We cut it into strips 2.5 cm wide, 20 cm long. Next, paste the sandpaper on double-sided tape and you can work! |
So, our grinder is ready to go. We hope that our story will be useful to you. With the help of them you can make the simplest sharpening knives.
General issues
Any cutting tools require proper care, as they gradually begin to lose their former sharpness, and working with such products becomes painful, almost unbearable. The biggest irritant is a dull knife that turns into an absolutely useless item. To avoid such situations, it must be sharpened periodically, and sharpeners help a lot in this, which are not a problem to buy at all. However, not all owners are inspired by this option, because high-quality devices cost a lot. An elegant and logical way out of the situation is a device for sharpening knives with your own hands. Functionally, home-made tools are in no way inferior to competitors - factory models, but they allow you to achieve significant savings.
Acquaintance with the concept of "sharpening angle"
The purpose of the process is known to all - to sharpen the blade. However, for each type of instrument, this operation is slightly different. The reason is the purpose of the knife - household, hunting, for fishing. The difference between them is not at all visible at first glance, but it determines what the tools are used for. This is the sharpening angle, but it can only be seen and compared with those knives that have not yet been sharpened at home. The following values are accepted:
- 8-12° - for scalpels, straight razors;
- 10-15° - for fillet knives (filleters);
- 15-20° - for cutting food;
- 20-25° - for general purpose tools;
- 20-40° - for hunting knives;
- 30-50° - for massive special knives (for example, for machetes).

Smaller angles are designed to work with soft materials, larger ones - with solid substances.
There is no single standard for all tools. Some Western manufacturers of hunting weapons consider the ideal angle of sharpening 23 °. In America, there are companies that sharpen similar and combat knives at 40 °. There are tools with different angles of sharpening parts of the blade. A serious military example is the Russian checker (40 and 30 °). Such a weapon becomes universal, but for home master there is a minus in this sharpening - a lot more complexity of the work.
In order to be able to sharpen knives correctly, making an almost professional device for sharpening knives with your own hands, it is necessary to provide for the possibility of changing its angle. This task is the most difficult: both in design and during manufacture.
Grain of grindstones

Abrasive whetstones are gritty. There is a conditional division: stones are small, medium and coarse products. The accepted classification - numbers - the number of grains per unit area. Some manufacturers (for example, Chinese) make duplicate inscriptions in English for the convenience of buyers.
- Extra coarse: 200-250 - extremely coarse. They are absolutely not suitable for sharpening knives.
- Coarse: 300-350 - rough. These stones are used only for severely blunt or damaged blades.
- Medium: 400-500 - medium. Without an abrasive of such grain size, you can quite easily do without.
- Fine: 600-700 - fine (thin). This is the most popular type of whetstones for sharpening knives, including at home.
- Ultra/extra fine: 1000-1200 - very fine. They are used to finish the blade, which they want to bring to a shine.

Grinding bars should have a comfortable shape. It is optimal if the length of the stone significantly (1.5-2 times) exceeds this blade parameter. The most practical are those products that have different grain sizes: large on the one hand, fine on the other. For ordinary household knives, a modest set of whetstones will suffice. It consists of 2 bars of medium grain (different) and the same number of stones of small grain, one of them can be ultrafine.
The bars differ in origin. Natural whetstones (corundum, slate) have several drawbacks - fast grinding and, as a rule, the absence of fine-grained products. These materials are soaked (or only moistened) in water before work. After such a procedure, an abrasive paste is formed on the surface, it guarantees greater sharpening efficiency.
How are knives sharpened by hand?
Without mastering the techniques of manual sharpening, the master will not be able to correctly sharpen the knife, since any device for sharpening knives with his own hands will only slightly facilitate his work when pointing the edge of the tool. This process looks like this:

- A bar of medium or coarse grain is laid on the desktop, and then fixed.
- Calculate the angle of sharpening. They begin to sharpen the knife away from themselves, keeping the angle constant. The movements are uniform and smooth, strong pressure is not required here.
- In one movement, the tool is carried to the end of the stone. The processed edge of the knife should always be perpendicular to the axial line of the bar, therefore, when approaching the rounded part (to the tip), the blade is turned, trying to maintain the required perpendicularity as much as possible.
- At the end of the movement, the tip is not removed from the surface, but a “walk” begins in the opposite direction. The actions are repeated until a thin solid “burr” appears on the back of the blade, which is checked with a finger, it is carried out perpendicular to the edge. If it is even along the entire length of the blade, then this part of the operation is completed. Otherwise, work continues along the entire length until the ideal is reached.
- They change the bar for a second product - with a finer grain size. Sharpening continues away from you, but without a reverse movement. The second side is treated in the same way.
- They switch to another pair of grindstones - a small one. On the first of them, the process with movement only from oneself is repeated.
- When the burr edge is almost not palpable, they switch to the last whetstone - the smallest. On it, movement from oneself is done only once on each side, while minimizing pressure.

The remaining mini-defects are fought with a belt glued to a beam, rubbed with GOI paste. Do this by alternating sides, turning the edge back. Many have seen such a simple process in old Soviet films.
Homemade machines
A device for sharpening knives with your own hands makes it relatively easy to solve the main task - to guarantee a constant angle of inclination of the blade relative to the bar. Some simple devices make elementary. Those sharpeners that provide more comfort are already more demanding on the master.
Elementary vertical device

It consists of a corner frame and a touchstone. Despite the primitive design, the prices for these store goods are quite high, besides, replacement grindstones have to be bought separately. To make this device for sharpening knives with your own hands is within the power of any master who has on the farm:
- four bars of the same size;
- grindstone;
- drill, drills;
- protractor;
- bolts, nuts.
Such a sharpening device allows you to hold the knife strictly vertically, which will greatly facilitate the work with the cutting tool. The process goes like this:
- First of all, two wooden corners are made from a bar, the elements of which are placed at an angle of 90 ° to each other.
- Accurately connecting both parts, and fixing them, make marks for the holes corresponding to the diameter of the bolts. Then they are drilled.
- The parts are connected with bolts, the elements are slightly attracted with nuts.
The device is ready for use. The most important thing in it is the correct determination of the required angle for sharpening the blade. This is done with the help of a protractor. After setting the angle of inclination, the bar is inserted, and the nuts are tightened until the touchstone is securely fixed. If you modify the tool a little, then the grindstone and knife can be swapped. The device has a minus: it is the inability to smoothly adjust the angle of inclination of the touchstone.
Sharpener from mounting brackets

To make this sharpening tool, you need to prepare:
- metal corners (material thickness - 6 mm, size - 90x90 mm);
- touchstone;
- 2 small rectangles made of metal (sponges for clamping a stone);
- threaded stud M6, length - 160 mm;
- a knitting needle, electrode or other thin rod;
- drill, screwdriver;
- file, hacksaw for metal, pliers;
- bolts, nuts.
The work itself is performed according to the following algorithm:
- Holes are made in the corners in which threads are cut.
- Grind bevels on the sponges, which are designed to fix the blade. Otherwise, they will become an obstacle to the movement of the grindstone.
- All sharp edges and corners are filed.
- Holes are drilled in metal sponge rectangles, then a thread is made for the connecting bolt. Fix the donkey.
- A needle bent at an angle of 90 ° is inserted into the hole in one of the jaws, then fixed.
This spoke detail will play the role of a fixer for the angle of inclination of the whetstone. The advantage of this model is the ability to change the angle of inclination in a wide range, which will be an additional plus for processing various knives, as well as other cutting tools.
Plywood sharpening machine

Most parts of this fixture can be made from improvised materials, but in this case plywood was taken for its manufacture. The master is free to take polished or laminated material. You will need:
- plywood sheet, its thickness is 8-12 mm;
- wood (hardwood), carbolite or textolite for adjusting block (20x40x80 mm);
- sheet steel, thickness - 1 mm;
- grindstone;
- timber (60x60 mm);
- metal hairpin (diameter - 10-12 mm, length 250 mm);
- hacksaw (jigsaw, grinder);
- shoe (sectional) knife;
- drill (screwdriver);
- 2 threads for hairpin ( internal thread- M10);
- rasp;
- thickness gauge;
- self-tapping screws, bolts, nuts (plus M10 wing nuts), washers.
Plywood - material is light. In order for the base to be stable, it is better to make it heavy enough. This task will be able to cope with "horseshoes" from a metal corner 20x20 mm.
Base

Work is carried out according to the following scheme:
- Parts are made from plywood - 2 sidewalls and an inclined plane. Having drilled three holes in the side elements and 6 in the ends (3 in each) of the inclined part, they are temporarily connected with self-tapping screws.
- In the back, between the sidewalls, four self-tapping screws (2 on each side) fasten the beam. In it, stepping back from the edge of 25 mm, holes are made for the stud: first, they work from above and below with a thin drill, then they are expanded. Futorki are screwed on both sides. Insert the adjusting pin.
handcuff

The upper part of the base is removed, since it is necessary to build a device for pressing and fixing the cutting tool on it. The armrest is assembled from 2 steel strips: 60x170 and 40x150 mm.
- Stepping back from the front edge of 40 mm, a groove is cut with a hacksaw, its depth is 2 mm. With a shoe knife, they get rid of the top two layers of plywood so that a steel plate 2 mm thick fits into the sample.
- Metal elements are folded together (smaller at the bottom), making equal indents along the edges, then 3 through holes (6 mm) are drilled. The plates are tightened with bolts, the caps of which are placed on top. They are welded to the plate, they are removed, they are polished.
- Holes are marked and drilled in the sample of the inclined part, then the handpiece is fixed with nuts.
clamping bar

The fixing mechanism also consists of 2 parts: the upper bar is L-shaped (80x150 mm, width 45-50 mm), the lower one is a rectangle (50x100 mm).
- The smaller part is placed below, at the far edge of the larger one. In both, 2 holes are made: 25 mm retreat from the edges of the lower bar, then the upper plate is drilled. Both elements are tightened with bolts (8 mm), they are brought in opposite directions. Hats are processed in the same way: they are welded, then polished.
- On an inclined part, stepping back from the edge where the adjusting pin is located, 40 mm, using a thickness gauge, draw a line. At a distance of 25 mm from the top and bottom end, holes are made (8 mm). Connect their edges with lines, then make a cut with a jigsaw, expand it with a file to 8.2-8.5 mm.
- Both planks are connected through a groove, the elements are tightened with bolts, a lamb is screwed onto the bar from below.
Adjustment system

For fixing, a washer is thrown onto the stud, a nut is screwed on, which is tightened so that the rod cannot turn.
- 15 mm recede from the edge of the block, a through hole is drilled at the end on both sides, which is expanded to 9 mm. Then a thread is cut into it.
- Stepping back 50 mm from the resulting axis, a hole is drilled (approximate diameter - 14 mm) in the flat part of the part, it is perpendicular to the first, vertical one. It is well flared with a rasp.
- The resulting block is wound onto a hairpin. To ensure its fixation, it is controlled from below and from above by lambs.
Sharpening carriage

It is made from a 30 cm stud and a bar, the thickness of which is the same 10 mm. They are welded together. To fix the bar, 2 elements (20x50x80 mm) are cut out of solid material. A hole is made in the central part of each of them, indented from the upper edge - 20 mm, diameter - 10 mm.
First, a lamb is screwed onto the carriage, then a washer, bars, a washer again, and then a nut. In such a bar, you can easily fix whetstones, however, the masters strongly recommend that you also make a set of interchangeable bars yourself.
The basis for them will be a rectangular aluminum profile, the width of the flat side of which is 40-50 mm. It is skinned, degreased, then Moment is applied to the surface, then sandpaper of different grain sizes is glued on. The material is better to take on a fabric basis. Suede fabric can be glued to one element from the set in order to be able to edit the blades with GOI paste.
"Rules of correct" sharpening
- The blade is fixed parallel to the edge of the handpiece, then it is pressed with a bar. After inserting the template, adjust the angle between the plane of the working tool and the grinding block.
- If the blade is already very far from ideal, sharpening begins with a rough bar (400). When the descent strip gets rid of waves or meanders, the graininess is reduced by working the sides in both directions with minimal effort.
- The final stage of the operation is straightening with a bar with suede fabric and abrasive paste applied to it. In this case, the movement can be done only in one direction - towards yourself.
It is not difficult to make a device for sharpening knives with your own hands, especially if you choose a very simple model. More advanced devices will take much more time, but they certainly deserve every minute spent, because the savings are serious. What models you can create on your own, you can see in the photo and in the videos. One of them is here:
Every housewife sooner or later begins to dull the knives with which she cuts bread, vegetables or butchers meat. Using a dull knife is not only inconvenient, but also unsafe. At any time, it can break off the cut product and cause injury. Therefore, periodically the tool should be sharpened, using a special device for sharpening knives.
Such sharpeners in a wide range are available in stores. But for one reason or another, they do not always suit the consumer. In this case, you can make a device for sharpening knives with your own hands, having previously studied the types of stones for sharpening, the features of the tool and the proposed drawings.
Sharpening knives - prerequisites
For effective and long-term operation of the knife, the most important factor when sharpening it is blade angle. In the process of sharpening, it is necessary to restore the previously set angle, which will fully comply with technological standards and quickly, freely and efficiently cut the material.
For each blade, its optimal angle is selected:
- for a razor and a scalpel, the sharpening angle should be 10-15 degrees;
- knives for cutting bread, fruits and vegetables are sharpened at an angle of 15–20 degrees;
- multifunctional knives for various products are processed at an angle of 20–25 degrees;
- hunting and hiking knives - at an angle of 25-30 degrees;
- knives for cutting hard materials - at 30-40 degrees.
Without a special device, it is difficult to sharpen the blade at the right angle. Holding the knife with your hands, it is quite difficult to provide required angle of inclination cutting tool. To facilitate this process, there are special devices that you can make with your own hands. Their designs are quite simple, and the production itself will take not so much time.
There are many types of sharpeners for knives, among which you can choose the one that best suits your needs.
All devices consist of two parts:
- a bar of abrasive material;
- stop for attaching a knife.
As a bar, you can use ready-made special stones or make it yourself.
Sharpening stones - types and manufacture
On sale you can find several types of stones:
Aquatic instruments. When working with them, water is used, which saves the surface of the stone.
Oil the stone resembles water in structure and shape, but its surface is the most oily.
Natural instruments are made from natural stones undergoing industrial processing.
artificial stones are made from non-natural components.
Rubber tools can also be found on sale, but working on them is not very convenient.
For self-production of an abrasive bar, you can use small rectangular glass plates and a thickness of 4-5 millimeters. On the surface of the plates with the help of double-sided tape, you need to stick sandpaper of different grain sizes. The cost of such bars will turn out to be quite small, and sandpaper can be replaced at any time.
However, when using a glass bar, you should be very carefully tighten the nuts otherwise the glass may crack. In addition, no water is used in its application, so the abrasive wears out quickly. For the same reason, when sharpening knives, fast movements should be avoided, which can lead to overheating of the material, and, therefore, to loss of blade properties.
Tool for sharpening wood blocks
It is enough just to make a sharpening tool from two wooden and two abrasive bars, which should be the same size.

For greater stability of the sharpener to its lower surface, it is recommended attach a piece of rubber.
Do-it-yourself sharpener from mounting brackets
The Lansky sharpener is taken as the basis for such a device, the drawings of which can be easily found on the Internet.
- metal plates measuring 4x11 centimeters;
- standard aluminum corners;
- metal rods about 15 centimeters long;
- a set of nuts and bolts;
- grinder with a vise or file;
- file.
Instead of a grinder, you can use a file, since this tool is only needed for grinding sharp corners from the corners and cleaning the places where the metal is cut.
Steps for making a sharpener:
- According to the drawing, markings are made for future holes in the plates.
- Holes are drilled and threaded into them.
- With the help of a file, all sharp corners and edges are rounded. This will allow you to comfortably use the made knife.
- Holes are made in the corner in accordance with the drawing.
- The hole for the spoke support is expanded with a needle file.
- The holes for the studs are threaded.
- The rods are inserted into the extreme holes and fixed with nuts of the appropriate diameter (M6).
- An M8 bolt is screwed into a wider hole, the length of which should be about 14 centimeters. A wing nut must first be screwed onto it, on top of which two ordinary nuts are screwed. The bolt in the structure will be used as a support post.
- Bolts are attached to the remaining holes, with which the knife will be clamped.
- Nuts are screwed onto the ends of the rods, a corner is strung, which is fixed with nuts. By lowering or raising the rods, it will be possible to adjust the sharpening angle.
- From a thin metal rod in the shape of the letter G, a rod with an M6 thread, two holders and a wing nut, a device is assembled that will hold the stone for sharpening. The end holder should be with a through hole for the knitting needle.
Such a device for sharpening knives has a fairly wide range of degrees of pressure angle and is most convenient to use.
Massive sharpener with stand
With your own hands, you can simulate a knife sharpener from Apex, the drawings of which are easy to find on the Internet. Such a knife sharpener is presented in the form of a stand, on which a platform is installed at an angle, and a support for the end of the nozzle in the form of a rod is placed on the side. This is very convenient fixture, with which you can sharpen any cutting tools very high quality.
Required materials and tools:

Stages of work:

The angle of sharpening on such a device adjustable with bar and lamb, which fixes the part at the desired height.
Each of the described devices has its own advantages and disadvantages. When choosing a suitable option, you need to proceed from your needs and skills in such work that you will need to do with your own hands.
The process of sharpening a knife or any tool does not require any outstanding skills or knowledge of special movements. In most cases, sharpening a knife, even the most original and expensive one, can be done with ordinary abrasive stones or sharpeners. But under one condition - it is necessary to try to follow the recommendations of specialists involved in sharpening tools in an industrial environment.
How to sharpen a knife
To the question of how to sharpen a knife, there can be several answers:
- You can restore the tool using a whetstone or a set of triangular files with a fine notch;
- Use a knife sharpener. The main difference between this method and the previous version is that the lodgement under the blade allows you to maintain a stable edge sharpening angle;
- Use a knife sharpener.
For your information! Whatever hand sharpening enthusiasts say, a properly set up machine or miniature machine will do a much better job of shaping the edge angle than a hand whetstone.
For ordinary people sharpening knife edges is an everyday affair, and if there is a choice between using a do-it-yourself knife sharpener or sharpening a blade with a hand-fit cutting edge for several hours, then it seems that common sense will choose a sharpener.

How to get a sharp edge on a kitchen knife

The movement and tilt of the blade relative to the bar is not as obvious as it might seem at first glance. To properly understand the sharpening technique, you can use the video about sharpening knives:
For your information! Modern knives are made from a wide range of carbon and alloy steels. Hardened forged steel must be sharpened with an abrasive stone, and relatively viscous stainless steel only with a trihedral file.
Blades made of soft and tough steels with low chromium and carbon content can be sharpened with a file, while at the same time they clog the surface of the abrasive bar very quickly. Flexible forged blades must be fixed with a stop and sharpened with a bar, sliding movements. Regular use of a kitchen knife sharpener will lead to a greasy surface, which must be restored by roughing.

The old device for sharpening forged knives was made in the form of two wedge-shaped bars of bog oak. The bars were laid on both sides of the blade so that the cutting edge remained free, the “sandwich” was tied with twine and sharpened to a razor sharpness with an ordinary whetstone. Hardwood wedges made it possible to correctly guide the block and obtain the required sharpening angle.
According to the above recommendations, manual sharpening of planer knives is performed. A fine-grained emery cloth is glued onto thick glass, but it is installed with the beveled part of the cutting edge on the surface of the abrasive and sharpened in a circular motion.
The sharpening of a ceramic knife turns out to be more difficult; manually, the cutting edge can be corrected with a diamond-coated needle file, or a special grinding paste can be used.
Homemade knife sharpening options

The simplest tool for sharpening knives is shown in the diagram. For its manufacture, a hardwood block is required, the upper plane of which is sharpened at an angle of formation of the cutting edge. This solution helps to properly maintain the edge processing angle. To make it more convenient to sharpen the blade, you can wrap a pair of self-tapping screws to fix the blade in the plane of the bar.
To sharpen planer knives, you can make your own tool for the sharpener shown in the photo. This solution simplifies the process and allows you to sharpen the blade as sharply as possible, but the lack of mechanization requires a certain skill and skill from the master.
Devices and machines for dressing and sharpening knives
Sharpening knives is certainly a creative activity that requires a lot of patience and skill. But is it worth spending time and effort on solving a problem that a specially designed machine or knife sharpener can successfully handle? If for knives, household tools, for example, planers, kitchen or carving blades, you can try to restore the cutting edge of the blade with your own hands, then even sharpening devices will not help for industrial volumes. You will need a powerful and productive machine.
Machines for sharpening blades of carving knives
The highest form of a sharp knife blade is non-rare models with chrome-plated blades and handles made of rare woods. These are rather museum exhibits or their cheap imitation. A cutting or boning knife is considered a model of blade sharpness, with which raw meat and skins are cut for 12 hours a day. It is in such conditions that the edge of a forged knife made of high-quality steel dulls unusually quickly.
For small volumes of cutting work, you can sharpen knife blades on simple machines with automatic control of the angle of the cutting edge.


KNECHT USK 160 professional equipment is most often used for cutting sections of meat processing enterprises. The machine has a high degree of versatility, which allows you to sharpen the entire range of cutting tools, from fillet blades to carving scissors.
Machines for sharpening cutting elements of carpentry tools
Sharpening knives for woodworking machines requires the mandatory use of specialized machine tools. If you can sharpen a relatively short blade of a home knife or a hand planer manually using the simplest device, then long and sharp blades of jointers and planers must be sharpened using a mechanical drive for the supply of a grinding tool.

If you try to sharpen the tool with your own hands on a grinding cup without support and guide slides, sections with different sharpening angles are formed on the cutting edge. When processing wood, this leads to the formation of an uneven wavy surface of a board or an array.

Small flat knife blades can be sharpened on a simple vertical type machine.
Circular saws are usually sharpened on machines equipped with a divider and a turntable.

Universal grinding machines
In the work of small carpentry workshops, woodworking sites, repair offices, universal grinding machines are used that can sharpen a very wide range of cutting tools, including sharpening guillotine knives.
An example is the desktop model of the VZ-319 machine. Thanks to a rigid frame and properly selected gear ratios of the mechanical drive, the unit can sharpen almost any tool, from planer blades to cylindrical cutters.


Conclusion
Sharpening knives has long gone beyond the scope of craftsmanship into the category of a simple mechanical operation. A large number of all kinds of machines and devices, desktop machines and automatic machines are able to perform difficult work within a few minutes. A high-quality sharpener bought once in a lifetime can last for several decades, eliminating the problems of resharpening knife blades.


