How to hide the hatch in the floor. Installation of a floor hatch for easy access to the basement. The most important details of the cover - the cellar entrance hatch
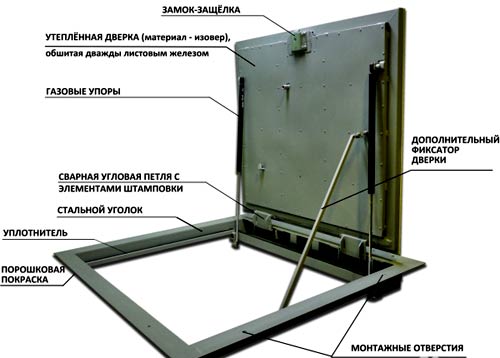
When arranging the entrance to the basement great importance has the reliability and quality of the hinges used, the installation of elements that are not strong enough or cannot withstand loads leads to rapid loosening of the doors or complicates the process of opening them. With the correct drawing, installation is not a problem, to mandatory conditions maintenance include measures to extend the service life: inspection, tightening, lubrication with oil. You can buy the necessary fittings at any hardware store; in most cases, the frame and cover are made independently.
1. Extended overhead loops fixed on one side of the hatch and on the floor or wall. The cost depends on the reliability and decorativeness, the maximum costs are observed when using forged types.
2. Hidden, mounted in the ceiling or internal frame and allowing you to bring the basement door on the same level with the floor covering. When choosing this option, the underground hole is easily covered with a carpet, only the owners of the house will know about it.
3. Driven mechanisms that automatically open and close heavy and massive hatches, most often metal ones. This variety, in turn, is divided into retractable and folding groups.
4. Pantographs, providing consistent movement of the hatches up and only then to the side. When using such hinges, the edges of the door come out of the overlap without problems, regardless of the thickness of the materials. Best results are achieved when they are installed on wooden structures and doors with two wings.
5. Gas shock absorbers, closers and stops, which make it easier to lift the hatch from the cellar and allow it to be fixed in the desired position. The main advantage is the ability to lift heavy doors made of metal and wood by one person when they are horizontal.
Regardless of the type of fasteners used, serious requirements are put forward in terms of weight bearing, backlash and corrosion protection. Loops, like handles, are purchased with a margin. With small manhole sizes (within 0.75-1 m2), two pieces are enough, installed closer to the corner, in other cases the axis is reinforced in the center. Actively used hatches need metal edging, this requirement is taken into account when selecting the backlash.

Description of the set "Cellar"
With self-manufacturing and installation, it is worth buying a universal set. Standard kit includes:
- Gas shock absorbers (stops) with the required length and force (from 500 N and above).
- Mounting brackets, including wall.
- Hidden hinges (left and right) with a bracket for a gas shock absorber and central ones without it.
- Prefabricated lock, consisting of a mounting and lifting plate, a locking part with a set of keys that simplify opening the hatch and lifting it.
The cellar set can be bought fully equipped, but in most cases not all of its parts are used. When installing a simple basement hatch without shock absorbers, central hinges and a lock are sufficient. Regardless of the selected configuration, the mount ensures free opening of the manhole with a minimum gap along its perimeter with a floor covering thickness of up to 1.5 cm. Hidden or hidden handles with brackets or a ring are purchased separately. The cost of parts included in the "Cellar" kit varies from 150 to 1500 rubles, they are characterized high quality metal and anti-corrosion protection.
Step-by-step instructions on how to make a hatch with your own hands
Work begins with drawing up a layout of the cover, taking into account future furniture and places of passages, if possible, the entrance is equipped even at the stage of building a house. For the manufacture of a small structure, boards up to 40 mm thick are used, upholstered with moisture-resistant plywood; with the expected heavy load, it is better to build a frame from a single bar. Everything wooden elements pre-treated with drying oil, antiseptics or similar hydrophobic impregnation. The metal version is recommended to be made from a sheet of steel from 3 mm and above and the same corner; to isolate the underground, it is insulated with a sheet of foam.
In the manufacture of wood, a simple scheme of actions is followed: to subfloor a frame of 4 pieces of timber is nailed → a blank 1 cm smaller than the selected size is assembled from boards and plywood → ordinary hinged hinges are stuffed from the basement side or shock absorbers are fixed → crashes in the right place hidden handle→ the cover is screwed on at a 90° angle and checked for jamming.
Wooden hidden hatches are recommended to be multi-layered, the best results are achieved when the first and outer layers are made of moisture-resistant plywood, stuffing along the edges of the crate and filling the internal space with insulation. A 1 cm gap is required.
Wooden varieties are easier to do yourself, you will need a welding machine and a grinder with the appropriate discs. step by step diagram work includes: cutting a metal door in compliance with exact dimensions → welding a corner along the perimeter of the hatch, with a large area it is fixed inside the structure as additional stiffeners → laying a foam sheet with a thickness not exceeding the height of the corner → fixing the insulation with thin steel and self-tapping screws. The next stage consists in welding and fixing the metal frame with anchors, subsequently, reinforced hinges and closers are mounted to one of the selected sides, and a strip of sealant to the other.

When arranging a manhole in the basement with the simultaneous laying of a concrete floor, there are no problems - to bring the hatch to the same level with the floor, it is enough to sink the frame a few mm deep. In this case, it is more difficult to hide the handle; when making it yourself, it is simply welded to the outside of the metal. The exception is the types covered with floor materials, they require a special approach to fastening fittings. All involved steel elements are necessarily covered with anti-corrosion primers or paints.
When carrying out hidden installation, special attention is paid to marking. On metal structures, holes for future fastenings are prepared in advance, all elements have exact dimensions, when working with wooden knocked down or glued hatches, they are cut out 5-10 mm less due to the risk of swelling of the fibers. During installation, a plank with a height that matches the size of the provided gap between it and the floor is placed under the end of the door. Screws or self-tapping screws are screwed in when the hinges are at a right angle. During fixation, the lid is opened and closed several times until a smooth movement is achieved, without a jam in any area. If necessary, the hinges are displaced and twisted, but in no case are they operated in an incorrectly fixed state.

To ensure a safe and long service, a number of measures are taken even at the stage of building a do-it-yourself hatch into the basement.
1. In houses with children, protection is provided against accidental opening of the door; if necessary, a lock with keys crashes into it.
2. outdoor part covers are finished with the same materials as the rest of the floor. To bring the upper plane to zero, the type and thickness of the floor covering are known in advance.
3. At least once a year, the rotary elements are treated with lithol or oil, with active operation this interval is reduced. Both hinged and hidden hinges need lubrication, free access is provided from the side of the cellar or from above.
4. Measures are being taken to isolate the underground: the hatch is sealed around the perimeter and insulated.

5. If there is a high risk of damage to the flooring, to prevent creases at the moment of opening, the edges of the tile or laminate facing the axial side are cut at an angle of 60 °.
6. The risks of the cover being forced into the basement are eliminated, the width of the corresponding supporting strips is at least twice the size of the gap or sealing layer.
7. Actively exploited horizontal hatches are reinforced at the edges with metal.
Temporary doors to the cellar will come out to be fixed with a piece of rubber or simple canopies. If it is impossible to purchase factory-made products, they are fixed on hinges from the hood of the machine with a spring mechanism. This option should also be selected big weight or the need for frequent installation in the open position. Automotive shock absorbers successfully fix both wooden and steel varieties.
Possible mistakes
The main problems arise when the upper plane is brought flush with the floor mark, especially when making a do-it-yourself tile hatch. TO erroneous actions include fixing the door or screwing on the hinges before the installation of the floor covering, or adjusting its position when the concrete has not yet hardened.
Opening and changing the mount is only permissible if there is a stable frame: the heavier the structure, the stronger Negative consequences. Violations of the installation and operation technology also include the lack of anti-corrosion protection for metal elements and antifungal protection for wooden elements, the use of weak hinges and ignoring the need for their lubrication.
If the house has a cellar, it must be entered. It can be a door or a hatch. As a rule, in private homes, the choice is made in favor of the second option. Let's see how to equip do-it-yourself hatch in the cellar. Drawing construction, more precisely, how to compose it, will also be described in this article.
Relevance of the issue
It is pointless to argue about the benefits of a cellar in the house. It not only acts as a utility room, increasing the area of \u200b\u200bthe house, but also ensures that the floor of the first floor is always dry and warm. Its arrangement, however, requires considerable investments. In addition, you must have certain skills and knowledge of building codes.
Those owners of private houses who have sufficient funds entrust the arrangement of the cellar and the entrance to it to professionals. Other owners prefer to do the work themselves.
As a rule, the basement is provided for by the project. Accordingly, at the design stage, the location of the hatch to the cellar is determined. It should be equipped so that the lid does not interfere with walking and does not touch the furniture. It is important to take into account appearance hatch to the cellar. Lid should be made of a material that would be in harmony with the environment. Before starting work, it is necessary to think over the details and take into account the nuances.

Features of drawing up a hatch in the cellar
When drawing up a diagram, you should determine:
- The place where the hatch will be located. As mentioned above, the lid should not interfere with moving around the room and not touch surrounding objects.
- Optimal cellar hatch dimensions. Minimum internal parameters 75x75 cm.
- The material from which the hatch will be made. It should be light but strong.
- Materials for thermal insulation and ensuring the tightness of the structure.
Floor hatch in the cellar often equipped with a soft opening / closing system. In houses where there are small children and animals, a fixing device is additionally provided.
To prevent unauthorized access to the cellar, the hatch can be equipped with an electric drive.

Material selection
It depends on the most various factors. When choosing, the material from which the walls of the house are made is taken into account.
For example, in wooden structures for a hatch in the cellar, boards and plywood sheets are used. Cut according to drawing the right dimensions, treated with special impregnations. Within a few days, the composition should be completely absorbed into the tree. After that, the actual installation begins.
The hatch in the cellar can be metal. To install it you will need:
- Steel sheets with a thickness of 0.5-1 and 3-4 mm.
- Corner 40 or 50 mm.
- Door hinges.
- Styrofoam.
- Rubber compressor.
- Bulgarian and cutting wheels.
- Primer.
- Welding machine.
- Self-tapping screws.
- Drill with drills.
How to install a do-it-yourself cellar hatch?
As mentioned above, the first thing to do is draw up a drawing. Everything must be accurately calculated so as not to redo the work.
Before that, you need to prepare the material and tools. According to the drawing, blanks are cut off, a support is equipped. It is attached to the floor.
The edge of the shield must be processed with longitudinal rails. A heater (mineral wool or polystyrene) is laid in the crate.
After the completion of the main activities, the exterior finish. As a rule, the material from which the floor is made is used.

Nuances
If you have materials and tools, you can make blanks yourself. However, as a rule, owners turn to metal depots. In the workshops you can order blanks according to individual sizes.
When choosing a steel sheet for a metal hatch, it must be borne in mind that its size should be larger than the size of the manhole and overlap it a little.
Corners must be placed at a distance of 5-10 mm from the edge. Stiffeners should be installed in the center of the structure.
Welding of parts is done without gaps. The finished cover is cleaned and primed.
In internal voids insulation needs to be installed. It is covered with plywood or another steel sheet.
The hatch is installed on the hinges using anchors.
Do not forget about the seal. It will provide floor protection and additional insulation.
Door hinges can be used for installation if the hatch is made of light material(trees, for example). For a heavy metal structure, it is better to choose more reliable hinges.
Smooth running
It greatly facilitates the operation cellar hatch. With shock absorbers The lid will close smoothly to prevent injury. When mounting the mechanism, keep the cover open.
There are many ways to make the lid move smoothly. One of the most popular is the use of spring hinges used in car hoods. This option is suitable for light metal or wooden hatches. Fastening must be carried out so that the cover can be opened perpendicular to the floor.
Another option is gas shock absorbers. They are used if the manhole cover is heavy. In stores, you can find various shock absorbers of different capacities, suitable for any design.

Pen
It is made, as a rule, folding or hidden. Some craftsmen cut a recess in the lid. Removable handles are also a common option. They have one important advantage: The sunroof cannot be opened by small children.
When making a hatch with your own hands, it is advisable to use simple inexpensive options that do not involve working with metal products.
electric drive
As mentioned above, this mechanism prevents unauthorized access to the cellar by outsiders. There are several ways to install the drive. Let's consider the simplest option.
For installation you need:
- Electric motor.
- Dural pipes.
- Sheets of steel.
- Welding machine.
- Bulgarian with cutting wheels.
- Cable.
- Current source.
The mechanism is installed directly on the cover. At the same time, it is recommended to leave some margin for opening the hatch (i.e., the lid should open a little less than 90 degrees).
The mechanism works quite simply. A signal is given by the remote control, the system begins to rotate, respectively, the cover starts to move. The lift is provided by the rod. You can also close the sunroof using the remote control.
Retractable system
For its installation you will need:
- Steel sheets 5 mm thick.
- Two electric motors.
- metal rollers.
- Three position switch.
- Current source.
- Cable.
This construction is more complicated than the one described above. However, it allows you to make the hatch cover almost invisible. The whole mechanism is located under it and does not take up much space.

Hatch under the tile
As in all previous cases, a drawing is being developed. It displays the following options:
- Box dimensions (width, length).
- The thickness of the opening and frame.
- Loop locations.
Before installation cellar hatch for tiles a level foundation is created. For this, a screed is used. Alignment is carried out in several stages:
- The floor level is determined. In this case, the thickness of the tile (about 8 mm), as well as the adhesive layer (about 4 mm), should be taken into account.
- A solution is being prepared, beacons are being set.
- The opening of the future hatch is beaded. At the same time, 10 cm must be left around the perimeter for support for the cover.
The screed is performed according to standard technology. After the solution has hardened, the hatch is tried on. It is applied to the opening. On the this stage it is recommended to pre-lay out the tiles.
Facing starts from the corner of the wall, which is located in plain sight. Trimming and laying tiles when finishing the opening begin after mounting the frame for the hatch cover.
Finishing
The ends are drawn up in a certain order. You need to do the following step by step:
- Attach the frame to the niche and level it with a building level.
- The existing gaps between the metal frame and the screed must be filled with mortar. For its preparation, cement grade M-500 is used. The solution must completely harden.
- Cut the tile and cover the remaining area around the opening.
- Niche slopes must be leveled. To do this, beacons are installed, cement mortar is applied and leveled.
- The slopes are tiled.
- Before the glue dries, it is recommended to fix the tile with adhesive tape and put delimiting crosses.
Installation and lining of the cover
The hatch can be mounted on hinges or any of the mechanisms described above can be used. After fixing the cover, you can start finishing it. If the flooring is tile, then it can also be laid on the hatch. In general, as practice shows, the most different materials. The main thing is that the appearance of the hatch is in harmony with the interior design. In this case, of course, one should not forget about the technology of laying a particular material.

IN wooden houses usually hatches are not trimmed. They are simply covered on top with linoleum or other coating.
Conclusion
In general, it is not difficult to make a hatch in the cellar on your own. The main difficulties can arise at the design stage and when calculating dimensions. At these stages, many nuances must be taken into account, including the expected load on the lid, the frequency of visiting the cellar, its purpose, the features of the items that will be there, and much more. To store bulky items, you need a large hatch.
It should be remembered that when facing the hatch with tiles, its weight will increase significantly. Therefore, in preliminary calculations, it is necessary to determine the most suitable hinges or closing mechanism. We should not forget about the stiffeners. Their number will depend on the dimensions of the cover. In standard hatches of the minimum size (75x75 cm), 1-2 stiffeners are provided.
Particular attention must be paid to safety. It's about not only about operation, but also about the installation of the structure. During the installation of the hatch, the opening will have to be kept open. In this regard, if there are small children or animals in the house, access to the place of work for them should be limited.
We should not forget about the heater. If it is not placed in the structure, heat will escape through the cover. It will also help prevent heat loss. In addition, it will soften the contact between the cover and the frame.
For a more convenient descent into such basements, it would be very good to make a special floor safe hidden hatch into the basement under the laminate - a device designed to provide convenient and safe access to the premises under the house.
Original disguise of the basement hatch
It should be clarified that it is multifunctional and its presence has a number of positive qualities - in it all year round you can store old things, food and supplies, as well as Building tools, household materials, kitchen utensils and other property, which allows you not to occupy extra space. In addition, storing things in the basement is much more convenient than in the barn, since they will always be in close proximity to you.
One of necessary conditions for the basement is to maintain the same temperature regime throughout the year. This goal can be achieved if you correctly make a modern floor hatch in the basement for laminate flooring in compliance with all basic technologies, which will provide the basement with good thermal insulation.
The names of the elements and the design of the hatch to the basement
It is not at all necessary to make a floor insulated hatch in the basement under the laminate, the corresponding order can be left in the welding shop. The only possible problem is that a number of necessary building materials specialists may ask you to purchase it yourself, since they are not kept in workshops or in construction warehouses.
It is best to purchase all materials with a certain stock, especially since all the excess residues that form after construction will be returned to you along with the finished hatch.

Basement hatch option made to order
So, in order to make a modern safe floor hatch for laminate flooring in the workshop, you will need:
- standard hinges for entrance doors;
- lock with snap mechanism;
- several metal corners;
- metal pipe (for the frame);
- steel or aluminum material in the form of sheets;
- a metal bar that will be required during the construction of the hatch for the manufacture of a removable type key handle;
- drywall sheet;
- conventional shock absorbers from a car;
- metal nuts.
Read also
The device of floors in a brick house
Also, the craftsmen in the welding shop will first need to make a detailed diagram or draw an accurate drawing in order to build a high-quality floor hatch in the floor under the laminate in the future. 
It is practically impossible to compile it from scratch on your own, unless you have certain knowledge in the field of calculating the allowable loads on metal structures and building design skills.
However, on the Internet today you can find a number of already finished projects hatches in the floor, which are freely available. It is not difficult to partially modify or transform them, taking into account individual preferences and wishes.
Self-made basement hatch
First, let's take a closer look at what requirements a safe basement hatch must meet if you decide to do it yourself, having previously drawn detailed drawing designs:
Before proceeding with the installation of the floor hatch, which you decide to build yourself, you need to prepare everything in advance necessary tools and materials:

The original decor of the basement hatch in a wooden house
- corners made of metal;
- sheet metal material with an approximate thickness of 4-6 mm;
- rubber;
- welding machine and all related elements for its safe operation;
- electrodes;
- self-tapping screws;
- screwdriver or screwdriver;
- grinder;
- electric drill;
- tape measure or other measuring materials.
Before proceeding directly to the construction of the hatch with your own hands, you first need to make a special frame. It must be built taking into account all proportions and technologies, so that it fits perfectly into the overall structure.

Construction and drawing of the basement hatch
For this, using welding machine from corners and other metal parts, you can design a blank for the main part of the hatch structure, its shape should look like a square or rectangle.
It is necessary to leave a small gap between the part of the frame and the opening, which will be required for the installation of the sealing material. The optimal gap width is about 5 mm.
As the work progresses, the following notes can be made and some general advice can be given:

Parts to pay special attention to when making a basement hatch
Regardless of what you decide to do - order the manufacture of the hatch in the welding shop or make it yourself, you will need to adhere to the following general recommendations:
- When choosing metal corners, you should pay attention to the fact that they are strong enough, since this is the part that will take on significant loads. The best option is to use a corner with a thickness of at least 5 mm, such dimensions will allow it to maintain its geometry and not be deformed even under very heavy loads.
- If, when installing the hatch, you will be guided by car shock absorbers, then you will need to make sure that the cover is securely fixed and does not fly out during operation, otherwise this can lead to various injuries.

Example of an installed manhole cover with shock absorbers
If the shock absorber cannot cope with pushing the cover out, the hatch door simply will not be able to open. Therefore, the power of the shock absorber must be carefully examined: when the key is turned, the cover must rise easily and smoothly. The power of shock absorbers, as well as their number, can only be determined with accuracy during test tests of the structure's functioning. It is also necessary to correctly distribute their location so that the lid rises strictly at an angle of 90 °, otherwise the mechanism will quickly become unusable during operation.
- You will need to find the right balance in the location of the drywall panel. If the height is too low, then the recessed cover will not open with the tile. If the height, on the contrary, is too high, then it will be above the floor surface.

Scheme for mounting the basement hatch
- It is best to use concealed hinge mounting technology, similar to how it is done on vertical doors. However, there is a difficulty with the basement hatch, due to the fact that the door has a lining, the thickness of which can reach 1.5 cm. To do this, it is necessary to take into account the minimum requirements for the gap that will need to be left. The process requires a separate study and calculation regarding the design of the loop, with which qualified specialists can help.
- All gaps should not have direct contact with other elements of the hatch when it is opened, otherwise it threatens to chip the lining in the hinge area.

An example of mounting fasteners
When using the hidden hinge installation technology described above, well-thought-out gaps with the same distances between the cladding elements should be formed.
- The ideal design is one that has a swing-front opening. In other words, the manhole cover should initially go up, and then move to the side. If you follow all of the above recommendations, then you should get just such an option, which is considered the most reliable, and will provide you with the durability of the basement hatch.
In conclusion, I would like to note that if a hatch is made and installed with high quality and competently, it will save free space inside the living space, and with the proper approach, completely hide the presence of a descent to, so as not to harm the design and decorative attractiveness of the living space. For many homeowners, this is a must.
Everyone would like to have a basement under the floor in the house. You can talk about the pros for a long time. Firstly, this is an additional room, which has an almost constant temperature and humidity throughout the year, regardless of the season. Allowing you to use yourself as a vegetable store, as a warehouse, a workshop, etc.
And in this regard, it is important to equip the entrance to the basement with an aesthetic and reliable hatch.
1. Ease of opening and closing;
2. Presentable appearance;
3. Reliability.
Ease of opening
It is very important that when opening, it opens without extra effort, and when closing, the hatch cover does not fall with all its might, trying to beat off any limb, but closes smoothly. Reliable fixation of the manhole cover is also equally important. The opportunity to be closed, and even worse - to get a cover on the head, will not please anyone.
The advantages include the reliability and solidity of the design. Due to the mass, it does not hang out and does not creak when walking on it. A solid fastening in the opening is also required. The mechanism for fixing the cover in this design is simply vital. The handle is usually made removable, you can use a regular eyebolt. Various sealing materials are used for sealing.
Making a basement hatch with your own hands
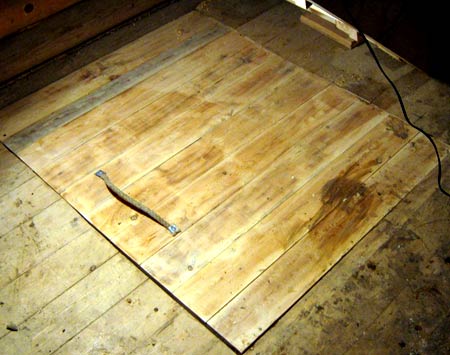
 The hatch for the basement can also be made with your own hands, for example, wooden. For the frame use bars 100 x 50 mm or thicker depending on the load. The lid is made of boards 30-40 mm on top of the boards GVL is glued on top of which is laid flooring. If it is necessary to install a hidden hatch, it must be lowered by the thickness of the floor covering. Loops for this will require mortise. You can also make a hatch from metal with your own hands.
From the materials you will need:
Necessary equipment:
- Welding machine
- Bulgarian
- or electric drill
- Roulette
 First, a frame is assembled from corners or a square pipe, after which a cover is made. The lid can be made from metal or wood. If the design turns out to be heavy, then the installation of gas shock absorbers is necessary. For those who want to restrict access to the basement of outsiders, we recommend installing electric drive. The actuator is actuated by giving a signal to open and close from the remote control.

Almost all private houses have their own basement or cellar. If the entrance to it is in the floor, then you will need to make a floor hatch to the basement. How to make such a hatch largely depends on the structural features of the lift and its location. Creating a hatch in the basement with your own hands involves the manufacture of drawings, the selection and purchase of materials from which the structure will be created. The hatch to the basement, first of all, must be completely safe and convenient for use.
Features of the hatch device
A basement has many benefits, including acting as a storage space and also allowing the ground floor floor to retain heat better. The main disadvantage is the high cost of creating a basement, so most homeowners are engaged in making an opening in the floor and installing a floor hatch in the basement with their own hands.
To install the hatch, you need to think through all the stages of work
Features of manufacturing an opening in the floor can save a lot, but for the successful completion of the project, you need to think through all the details in advance:
- Develop a detailed drawing.
- The choice of location for installation is also of great importance. Furniture or other objects should not prevent the lid from opening freely.
- Set the optimal size. In this case, the internal opening should not be less than 75x75 cm.
- Choose materials that can make the structure strong enough, but not heavy, and also fit into the interior.
- Choose the best option for sealing and thermal insulation of the cover. The insulated hatch to the basement will not allow cold air to enter the house even in winter.
Often hatches are equipped with a lifting basement mechanism, which ensures smooth movement and allows you to fix the cover in one position. In addition, an electric drive can be installed on the hatch, which will not allow animals or small children to enter it.
What materials are the hatch in the basement made of?
There are many materials for the manufacture of the hatch. Their choice largely depends on the overall interior of the house and flooring. With the right selection of materials, you can make a hidden entrance to the basement, which will not violate general form premises.
In this video you will learn how to make a hatch:
Basement hatch made of wood
If the floor covering is wooden board, then it is recommended to use a tree to mask the entrance to the basement. In addition, with its help, the load on the entire structure will be much less. If the manhole itself has dimensions of 80x80 cm, then the lid should be slightly smaller. This will ensure that the lid rests freely on the floor.
Important! It is also required to leave gaps of 4-5 mm between the floor and the cover. This will ensure free air circulation.
The manufacture of a wooden structure is carried out according to the following algorithm:
- Nail 4 supports from a bar, on which the lid will then lie, to the rough flooring from the side of the basement.
- Prepare wooden blanks 79 cm long from wood for the floor and slats.
- Cut out a square 79x79 cm (should be 10 mm smaller than the manhole itself).
- Treat all wood parts with drying oil or another substance that can protect the material from moisture and fungus.
The height of the hatch should be equal to the final and rough coating, which is achieved due to the multi-layer. This design is usually lightweight, so it can be mounted on conventional hinges.
metal hatch
Making a metal structure is much more difficult, but it is more reliable and durable than the previous version. To make it you need:
- Cut the cover out of a sheet of steel at least 3 mm thick.
- Weld the corners on the inside of the steel around the entire perimeter.
Important! With the help of a corner, you can make stiffeners, into which you can then install a heater.
- Clean all welds.
- Place a heater, the size of which should not be larger than the corner.
- Lay the steel sheet overlap and bend the edges with a mallet, fasten with self-tapping screws to the corners.
Next, you need to install the frame. To do this, it is necessary to cut the corners in compliance with the dimensions of the hatch opening. The corners need to be welded together, and then, with the help of anchors, attached to the concrete base. Along the protruding edges of the frame, it is required to fix a small strip of insulation. At the very end, fix the lid.
 This hatch is much more practical
 Hatch under the tile
If a hatch is installed under the tile, then you will need to initially create the necessary markings. The hatch itself in the subfloor does not fit on the tile, but is created in conjunction with it, that is, it will be necessary to make a metal frame that will fall below the level of the floor surface, and install the material itself on it.
The creation of the hatch follows the standard plan, with one exception: the castle must be hidden and not have prominent elements.
In short, the process looks like this: a metal base is created, tiles are laid on it with the calculation that the floor elements adjacent to the hatch coincide.
Most often, accurate calculations are used before work. This will help to avoid inconsistencies and shortcomings.
Basement hatch sealing
The hatch must be built in hermetically, but at the same time not interfere with the full course. If the entire floor in the room consists of a certain type of coating that cannot be damaged, for example, laminate, then floor hatches are equipped with additional sealing that does not interfere with either the coating or the structure itself.
Sealants are selected depending on compatibility with the materials used in the construction work.
electric drive
The electric drive is installed on the hatch to control the closing and opening of the cellar. There are many arrangement options, but even with the most simplified, additional markings for the size of the hatch will be required. This is necessary for a complete move.
It is required to remember that the rods must be installed correctly. The electric drive itself will be located on the hatch cover.
Creation of a sliding mechanism
The retractable mechanism is often used in the arrangement of floor hatches. To create a mechanism, you will need a small space under the floor, as well as a list of materials:
- steel sheet 2 pcs. thickness 5 mm;
- a set of metal rollers;
- steel rods;
- electric motors of compact size - 2 pcs.;
- current source and electric cable;
- switch with three positions.
The retractable mechanism is easy to use, but its creation and arrangement should be carried out by a person with experience in such work.
 Each type of hatch has its own nuances
 Types of hinges for the hatch cover
Hinges for the hatch to the basement are an important element that must be chosen with great care. When installing the entrance to the basement, the following types of loops are used:
- Overhead. They are attached on one side to the hatch cover, and on the other - to the floor or wall. The cost of loops can vary significantly depending on the degree of reliability, decor. The most expensive are forged hinges.
- Hidden. They are mounted in the coating itself or in the inner frame, which makes it possible to achieve a snug fit of the cover to the floor. Such a mechanism will completely hide the hatch from prying eyes.
- Pantographs. With their help, the hatch slides smoothly first up and then to the side. Regardless of the thickness of the material used, the edges of the lid easily emerge from the slabs.
- Gas dampers. With their help, you can easily lift the cover and fix it in the desired position. Such a mechanism allows you to lift heavy wooden or metal doors located horizontally without much effort.
- Driven. Allows large and heavy manhole covers to be freely opened or closed. Most often used in the manufacture metal structures. In turn, the mechanism with a drive is divided into retractable and retractable. The choice depends only on the desire of the master himself and the available space.
The choice of loops must be carried out depending on the load that will be assigned to them. In addition, do not forget about the need for play and protection against corrosion.
Step-by-step instructions on how to make a hatch in the basement with your own hands
Before starting work, an exact layout of the hatch should be developed, taking into account nearby furniture or passages. It is best to arrange the entrance to the basement at the stage of building the house itself.
If the structure is small, it is recommended to use boards up to 4 cm thick, which must be upholstered with moisture-resistant plywood. If it is assumed that an increased load will affect the structure, it is recommended to use a solid bar for the manufacture of the frame.
Important! A few days before the start of work, it is required to treat all wooden elements with drying oil, antiseptic or hydrophobic impregnation. Only after complete drying can you start collecting the hatch.
In the manufacture of a similar metal structure, it is recommended to take sheets of steel with a thickness of 3 mm or more and the same corner. To isolate the basement from the living room, it is recommended to insulate it with a foam sheet.
When making a wooden structure, you must follow the step-by-step instructions:
- Nail a frame made of 4 bars to the subfloor.
- Assemble a blank from boards and plywood, the size of which is 10 mm smaller than the selected one.
- Install hinges or shock absorbers from the basement side.
- Cut out the hidden handle.
- Screw on the cover at an angle of 90° and check the mechanism of operation.
Hidden hatches made of wood should be multi-layered. To do this, it is recommended to sheathe the first and outer layer with moisture-resistant plywood, and fill the packings along the edges of the crate and the interior with insulation. Be sure to leave a gap (10 mm).
Metal elements are easier to make yourself. This requires:
- Cut out the doors to the dimensions you have chosen.
- Weld the corners around the perimeter of the hatch. If the structure is large, then it needs to be fixed in the inside.
- Lay the foam, the thickness of which will not exceed the height of the corner.
- Fix the insulation with a thin sheet of steel and self-tapping screws.
- Weld and fix the metal frame with an anchor.
- Attach reinforced hinges with a closer to one side of the frame, and a small strip of insulation to the other.
 Do not forget to follow the installation steps of the hatch
 Important! All parts made of metal must be pre-coated with anti-corrosion agents or paint.
If a concrete floor is being laid at the same time as the entrance to the basement is being installed, then in order to bring the hatch to the same level as the floor, it is necessary to slightly drown the frame 1-2 mm deep.
Exact adherence to the markup is required for flush mounting. On metal parts, it is required to prepare holes for fastening in advance with exact observance of dimensions. In the case of wooden hatches, it is necessary to make holes 0.5-1 cm smaller than required, as the fibers may swell.
The last step is installation. To do this, it is necessary to place a bar under the end of the cover, its height will be equal to the gap that you want to leave. Fixing is carried out only with the cover open at 90°. Upon completion of work, it is required to check the operation of the mechanism. When jammed in any area, it is required to shift and twist the loops.
Finally
The entrance to the basement, located on the floor, is a convenient way to organize the entire space both inside the basement and outside. A basement hatch with shock absorbers must meet all safety requirements, as well as be convenient to use.
Installation of hatches under the tiles can be done independently. To avoid possible mistakes, it is recommended to draw up a drawing of the entrance to the dungeon on shock absorbers in advance.