Decoration of a wooden wall on the veranda. Sheathing of the outer part of the veranda and the inner. Economical and at the same time beautiful option. Covering the ceiling on the veranda with siding
Immediately after the construction of the veranda is completed, many people think about its decoration. After all, it is not enough just to build it, you need to properly protect it in order to extend the operational life. And besides the protective function, high-quality finish plays a decorative role. After all, you must admit that they are greeted by clothes. And the veranda is the hallmark of every home. Therefore, it is important to choose high-quality finishing materials that will cope with all tasks. But, you may encounter such a problem: there are a lot of finishing materials, but you only need one.
Let's look at how to sheathe the veranda from the outside, find out the advantages and disadvantages of this or that method, and also consider the technology of sheathing the veranda. This will help you select the material and work with it.
Material requirements
As we are talking about sheathing the veranda from the outside, it is important to understand the seriousness of the choice of material. It must meet certain requirements. For example, have you seen someone wallpapering a house or a veranda? Not? But why? The thing is that the material is simply not made for outdoor use. Wallpaper after a few days will burn out, peel off or get wet in the rain. In this example, you can understand that the material for sheathing the veranda must meet certain requirements. Here is the list:
- Withstand atmospheric precipitation in the form of rain, fog or snow.
- Resist UV rays, do not fade or warp.
- Be resistant to sudden temperature fluctuations.
- Be frost-resistant and durable.
- Withstand various physical and mechanical damage.
- Be biostable, not susceptible to mould, fungus or insects.
- Be aesthetically pleasing.

Only such materials for sheathing the veranda will be able to serve you well, remaining strong, reliable and beautiful for many years. And what can you choose from? Let's look at the list of suitable materials, and video installation instructions for each of them.
Wooden lining
One of the most popular materials for finishing both inside and out. The lining is made of wood, so it is environmentally friendly. Besides, appearance The products are simply amazing. As for the plating process, it is simple. It all comes down to creating a wooden frame and fixing the lining on it. Due to the lock connection, no seams are visible. Connections are hidden. But you can fix punks in different ways. Often, clamps, nails, screws or staples are used for this.

Here are the product benefits:
- Great look.
- Ecological purity.
- Ease of installation.
- With proper processing, the material will be protected from moisture and other atmospheric influences.
- The lining is strong and durable.
- Thanks to the classification of products, you can choose products according to the price category for yourself, ranging from inexpensive to luxury.
- The ability to lay insulation under the lining.
- Versatility. Can be used both outside and inside.
The installation process itself is simple. You can see the technology from this video:
Veranda siding
This is a unique material that is designed for outdoor use. It has all the benefits we talked about above. At the same time, there are several varieties of siding:
- metal;
- cement;
- wooden;
- vinyl.
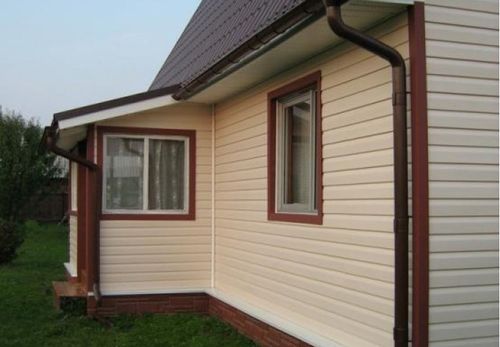
Most often, the last two options are used in the decoration of verandas. The installation technology is somewhat reminiscent of a lining, since here you also need to build a frame and fix the siding to it. But, in the work there are some details and subtleties that differ. The material itself is very worthy and is widely used for sheathing not only verandas, but also houses in general.
Here are the benefits of siding:
- Long service life (50 years minimum).
- It has a beautiful appearance and a variety of colors.
- Easy to operate, easy to wash, no need to paint and repair.
- Light weight and flexible.
- It is universal, you can choose the material of manufacture by yourself.
- Installation is pretty simple.
- Handles extreme temperatures and harsh weather conditions.
- It has holes for ventilation and condensate drainage.
- The material for sheathing the veranda will not rot and be attacked by insects.
- Durable, practical and will not fade.
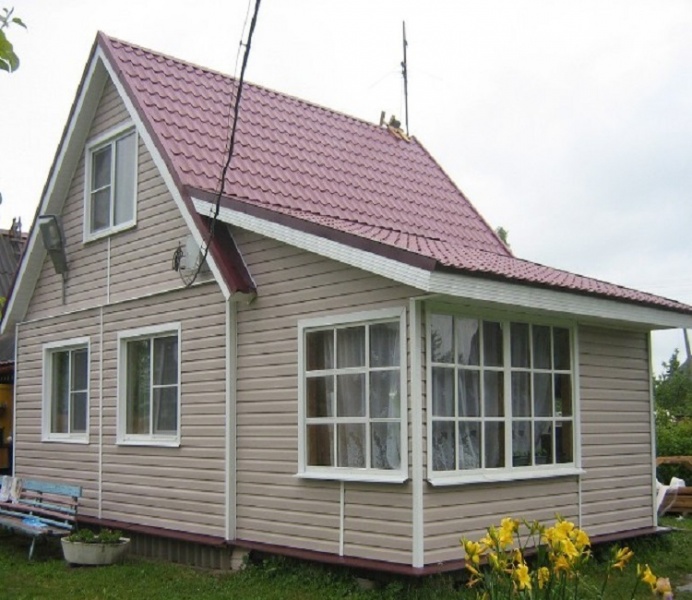
Due to its advantages, siding occupies a leading position among other cladding materials. Although, like everything, it has some drawbacks:
- the material cannot be called environmentally friendly, although this is not so important for covering the veranda from the outside.
- vinyl products burn very well, emitting harmful and toxic smoke;
- vinyl products for the veranda become brittle at low temperatures;
- metal siding is easily damaged. By bending it once, you will not return it to its former appearance;
- wood siding has a short lifespan.
You can see the installation of siding from this video:
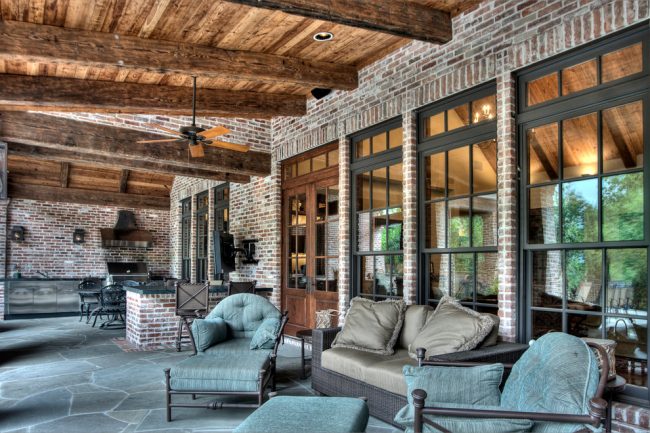
Other popular veranda sheathing materials
Most often, for sheathing, they resort to the materials described above. Although, there are other options that are also in demand. One of them is facing brick. If your house is completely lined with this material, then it would be foolish to use some other material for the veranda. Facing brick quite expensive, but has its own advantages. Reliability, strength, external beauty, durability, resistance to precipitation and temperature fluctuations can be noted. The material is not afraid of impacts and ultraviolet rays. Therefore, we can say that this option is a guarantee of reliability.
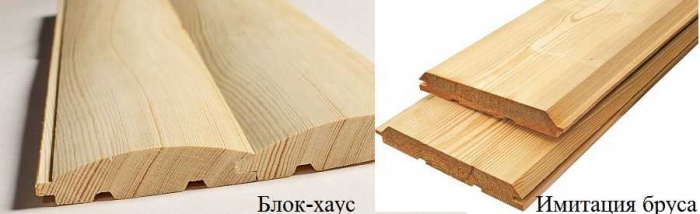
If it's about wooden house, then the veranda for him can be made in this style. Many sheathe the veranda with wood, lining can also be attributed here. Nevertheless, often for these purposes a block house or imitation of timber (false timber) is used. This is one of the varieties of lining, which differ in appearance and characteristics. Block house is a lining that imitates rounded timber. The material has a convex shape, so after sheathing the veranda it may seem that it is entirely made of wooden beam. But the imitation of a beam creates the effect of an ordinary beam, has a rectangular shape. Take a look at the photo to understand the difference in the appearance of the materials.
You can decorate the veranda in one way or another. This is up to you. It all depends on the desire, preferences and financial capabilities.
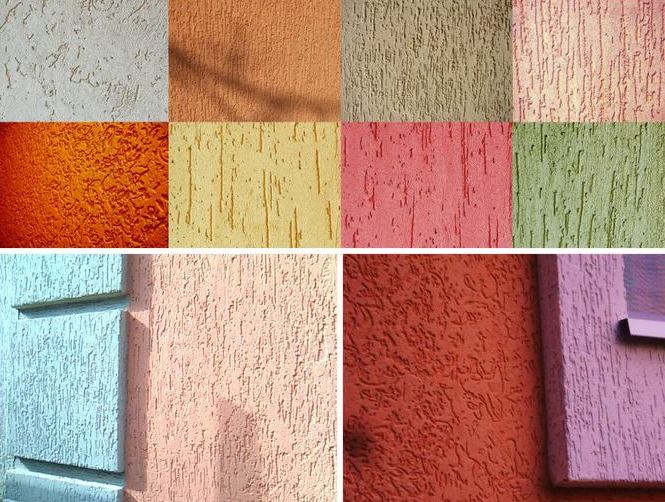
Not always the veranda can be sheathed. There is another finishing option, which is plastering. Often the house itself is finished using plaster, so the veranda can be made like that. In this case, you have the opportunity to insulate it from the outside. It is enough to sheathe the veranda with insulating material. plaster the surface using a reinforcing mesh, and then perform finishing putty or plaster. In this case, there are various options for plastering. It can be bark beetle plaster, fur coat, structural, decorative or textured plaster. There are many options, and their choice is up to you. At the same time, the material will perfectly withstand external influences and protect the insulation inside. So, you can kill two birds with one stone. Look at the photo how the bark beetle looks on the surface.
Summing up
As you can see from this article, sheathing the veranda from the outside is a responsible matter and does not tolerate delay. Thanks to the variety of finishing materials, you can choose the option that sunk into your soul. You will not only protect the building material from which the veranda will be made, but you will also be able to insulate it and give it a beautiful appearance. Then everyone who sees your beautifully finished veranda will understand that respectable people live in this house. Do not forget about the requirements for the material, and consult the sellers when buying. In this case, you do not need to save, since all efforts and funds can be wasted. Remember the main principle: quality is above all. Then your veranda will stand for many years.
The modern country house is designed to provide best conditions living in it. At present, all conditions have been created for this - an abundance of design solutions in housing construction, a lot of traditional and new proven materials.
One of the elements of private buildings is currently a terrace - a fully or partially open area, equipped with a roof. It allows you to fully feel like a part of nature, almost without leaving your home. About what materials and with what requirements the terrace can be finished, and will be discussed in the future.
Users often search:
Classic terrace design
Structurally, an extension to the house, called a terrace or veranda, is a podium raised above the ground on one of the types of foundation, and a roof made of some material, based on several support beams. According to the embodiment, such structures are divided into:
- open;
- partially closed;
- closed.
open veranda
This species is good when located on the leeward sunny side. Due to the absence of fences, there are practically no boundaries between the veranda and the surrounding space. It is better if the height of the floor of such a structure is small. This is especially true when living in country house children.


This option requires minimal construction costs. Yes, and finishing the veranda will not require large expenses. But it is necessary to impose maximum requirements on its quality, since the structural elements will be under the constant influence of excessive moisture, frost, winds, and temperature changes.
Partially closed option
Such a terrace retains its airiness and openness, but provides high security for households and their guests. The main difference from the previous version is the presence of fences made of timber, in the form of a frame structure made of lumber, as well as blocks or bricks, followed by finishing the walls of the veranda from the outside and from the inside.

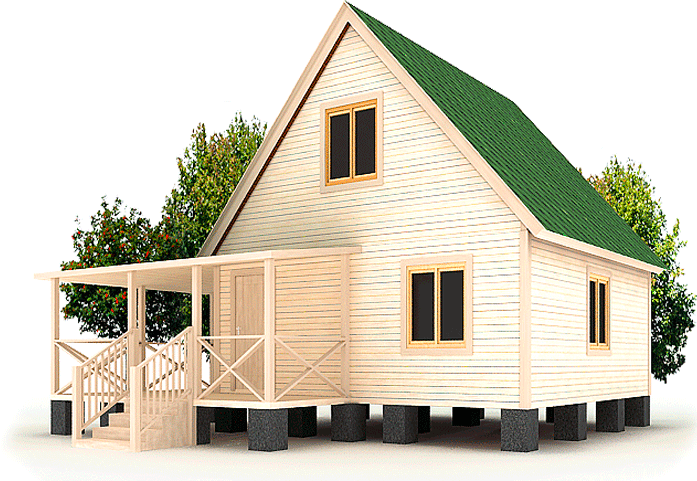
Photo: 3D project country house with veranda
Due to the lack of complete isolation from the atmosphere, the operation of structures of the first and second types is possible only in the warm season. It is impossible to insulate them with high quality due to the design features, and it is quite difficult to completely protect visitors to such a terrace from the wind and raindrops flying inside.
Covered terraces
This type is most suitable for year-round use as an additional room. Even in winter cold closed from wind and frost, you can enjoy hot tea while admiring the beauty of nature. At the same time, it is better to combine the interior decoration of the veranda with the insulation of all its walls. This will minimize the cost of heating the house as a whole.

Veranda finishing options
The manufacturing process of the described structures is not complicated and is quite accessible with your own hands, as is the decoration of the veranda inside or outside. Since the topic of the article involves a more detailed acquaintance with the second part of the work, we will consider them, focusing on options, their features, advantages and disadvantages.
Currently, the lining of the veranda from the inside is performed using the following materials:
- lining wooden;
- plastic panels;
- MDF panels;
- cement plaster and cement-based artificial stone.
wood veranda trim
The classic option is the use of natural wood materials for wall decoration not only in the interior of the house, but also in outbuildings. The lining is distinguished by good appearance, ease of installation and low requirements for the quality of base preparation.


It is mounted on a crate of 40x40 mm bars with the help of special fasteners - kleimers, which grab the panels by the groove and securely fix them. Finishing details can be located vertically, horizontally or at an angle to the floor.
Thematic material:
For exterior decoration, the veranda can only be sheathed by installing the lining parallel to the soil with the ridges up to prevent water from accumulating in the grooves.
plastic finish
Also a fairly common option. It is better to trim a closed veranda with such panels. In this case, temperature differences are less sensitive to the material, which increases its service life.

Unlike wood materials, plastic is practically not afraid of water. Modern retail chains offer many options for both color and texture design of plastic panels.
Installation of plastic trim is easier than wood. Due to the considerable width of the panels, the process is faster.
It is convenient to fasten the trim parts to the crate using a construction stapler, hammering the staples into a wide shelf along the edge of the products. Plastic panels do not require further finishing of coatings, they are well washed with a damp cloth, dust does not settle on them.
Interior trim with MDF panels
Another common finishing material for interior work is MDF panels. Like the previous version, they are distinguished by a large working width, which allows you to perform sheathing quickly enough. For fastening to a crate made of wood, clamps are used, similar to those used when installing a wooden lining.

Due to the large number of colors imitating natural wood, stone and even leather, such an interior decoration of the veranda will have a very high quality look. With all the advantages, MDF also has a significant drawback - very low moisture resistance. In this regard, it is better not to use them for finishing open terraces. Otherwise, additional protection will be required in the form of varnishing on all sides of the panels.
Finishing the walls of the veranda with cement materials
In the case of using cement-containing building materials for the manufacture of a terrace - blocks with one or another filling, or bricks, it is better to finish the walls with mixtures or parts similar in composition.
Please note that gypsum-based plaster and gypsum artificial stone are not suitable for covering the walls of outdoor verandas.
Often homeowners are stopped by the high cost of cement finishing materials. At the same time, it is not difficult to make the required amount of original artificial stone on your own in a home workshop. By adding aniline dye, you can get a unique interior in the finished room.

Polycarbonate in the decoration of terraces
As already noted, the materials listed above used in the decoration of the interior of the verandas have certain disadvantages that limit their use. AT last years More and more external walls and roofs of terraces are covered with polycarbonate - an artificial transparent material that allows you to get a closed space, while maintaining visual contact with the surrounding nature.
There are two main types of this plastic:
- Cellular. Differs in the minimum weight, high light transmission, durability therefore it is often used for a roof of terraced roofs.
- Monolithic. Its properties are close to real quartz glass, but unlike it, it does not have such high brittleness. This determined its use in frame structures of a vertical arrangement - windows, doors, transparent walls.
Modern manufacturers are not limited to the production of colorless sheets. To create a soft shadow, we recommend using green, blue, red, yellow cellular polycarbonate for the roof. You can combine several colors, giving the whole design brightness and originality.

Sheathing the walls of the veranda with cellular polycarbonate is quite affordable for do-it-yourself work. To work, you need a minimum set of tools:
- cutting knife - any will do building;
- screwdriver
Polycarbonate installation technology involves the following list of works.

The installation of cellular polycarbonate on the roof of the terrace is carried out in a similar way. If there is a ridge - the junction of two roof slopes, use a special ridge profile sold in organizations selling sheets.

In the absence of cutting experience, cutting sheets to the required dimensions can also be performed by workers at construction bases.
As follows from our review, the amount of materials for terrace cladding is sufficient to make a unique structure. Before finishing your veranda with any of them, carefully study all the features of operation in a particular case.
After the veranda is attached to the house, it's time to do interior finishing work. Given that this room connects the street and residential premises, is a kind of communication gateway between them, preference should be given to practical finishing materials that are resistant to temperature extremes, since most often the veranda is not heated, to moisture, to mechanical stress.
Materials should be easy to maintain and use. About what the decoration of the veranda in a private house can be - our today's publication.

The choice of finishing materials primarily depends on the design of the veranda and its purpose - whether it is open or closed, it will be used as an outdoor room where you can walk in street shoes, or as an indoor one.

Before you go to the store for materials, it is recommended to complete a draft design of the interior design of the veranda - this will help you correctly calculate the required amount, choose the right color scheme and think through every detail to create an organic space that will blend with the look of the house.

According to the purpose, the materials can be floor, wall, ceiling. Exist a large number of finishing materials, universal in their performance properties, which can be used both for open and for.

Wall finishing materials

A wide range of finishing materials for walls allows you to choose a finish that will have not only excellent performance, but also an attractive appearance.

Important! When choosing a material, special conditions on an unheated veranda are taken into account. So, ordinary paper wallpapers will burn out very quickly and become unusable. It is better to choose glass or other varieties that are resistant to ultraviolet radiation, temperature changes and moisture.
Finishing the walls of the veranda clapboard

The use of lining for cladding the walls of the veranda allows not only to create a warm atmosphere in the interior, but also to insulate the room with high quality.
- The lining is a slats of small width (from 5 to 10 cm). It can be wooden or plastic.
- Wooden lining looks natural, it has all useful properties natural wood and requires periodic treatment with antiseptic compounds.
- The shade of wooden lining is determined not only by the type of wood from which it is made, but also by the way the wood is processed - stain, oil-wax, varnish.

- Plastic lining looks neat and tidy, it is easy to care for it, it does not require additional processing. The material is resistant to moisture and temperature extremes.
- Outwardly, it can imitate any type of wood, but it will never look as noble and beautiful as natural wood.
- Reliable fixation of the slats among themselves is provided by the “thorn-groove” locking system. Thanks to this, wall cladding is quick and easy.

Planks differ from each other in the profile of the groove and the way the edges are processed, which affects the optical effect that is obtained after fixing the lining on the wall.
The profile is:
- Standard having beveled edges, due to which noticeable transitions between the lamellae are formed;
- "Calm", which has smooth transitions due to the fact that the corners are less grinded when forming a profile;
- Euro profile, which forms a special pattern after the installation of the coating.

According to the fastening method, the lining is conditionally divided into “American”, which imitates overlapping laying, and “European” with additional ridges on the front side, covering the joints. Wooden lining is made of solid wood and MDF.
The first one is the most whimsical in care and after mounting on the wall it can shrink. MDF lining does not shrink, but with increasing humidity in the room it can absorb moisture, which negatively affects the performance properties of the material.
Wall decoration with decorative plaster

Decorative plaster is a versatile finishing material equally suitable for both indoor and outdoor use. The material is applied to the wall in the form of a plastic mixture, which, when dried, creates a durable, monolithic coating with high performance and decorative properties. When using colored and textured plasters, additional wall decoration is not required.

Of all the diversity, we can distinguish:
- Colored plaster with a large selection of shades;
- Stone plaster imitating the surface natural stone;
- Venetian plaster imitating marble pattern;
- Silk plaster (liquid wallpaper) with natural or synthetic fibers in the composition.
Important! Liquid wallpaper is recommended to be used only on the territory of heated verandas. To protect against moisture, the coating is treated with a transparent varnish. If the veranda is very sunny, then it is better to use a composition with silk fibers - such a coating does not fade and it turns out to be quite durable.
How the coating will look after drying is influenced by the method of applying the composition - various visual effects are created due to the type of application technique, the direction of strokes.
Wall decoration with PVC panels

PVC panels belong to the category of budget materials.
Of their main features, the following can be noted:
- Panels can take any shape and color, they can imitate the pattern of any material, have a realistic image on their surface or an ornament;
- The coating is resistant to high temperatures;
- The panels are light in weight, therefore they do not exert load on the supporting structures;
- The coating is absolutely not afraid of moisture, it is easy to care for it;
- PVC panels have a low cost.

Externally, PVC panels exceed the width of the lining, but are fastened in the same way - with the help of clamps and screws. Panels can be glued to a flat base. When fixing the finish on the crate or frame, it is possible to hide communications and lay insulation.
The mechanical fragility of PVC panels occurs when the air temperature drops to -15 degrees.

MDF is a medium-density fibreboard, which is made from wood shavings of different species, pressed under high pressure.
Panels have the following properties:
- They are environmentally friendly;
- Possess sound and heat insulating properties;
- Easy to handle and install;
- Not afraid of high and low temperatures;
- wide range decorative coatings face layer.
Among the shortcomings, one can note the vulnerability to moisture, under the influence of which the plates eventually lose their integrity and collapse.
Ceiling finishing materials

The same requirements are imposed on the material of the ceiling as on the walls - resistance to moisture, temperature extremes and low weight. Ceiling finishes must allow safe and efficient placement of artificial lighting sources.
It is worth remembering that in addition to the material for the ceiling sheathing, skirting boards are required, which are installed around the perimeter of the room. They will complete the repair and allow you to hide the technological gap between the ceiling and the wall.
Clapboard ceiling trim

The method of mounting the lining on the ceiling is indistinguishable from mounting it on the wall. Such decoration gives the room a noble appearance, creates a cozy, homely atmosphere, gives a sense of harmony and closeness to nature.

One of the advantages of lining is that with the help of the direction of the lamellas, you can create the necessary optical effect and visually make the room higher or wider - the slats are placed horizontally, vertically or diagonally. Herringbone styling has a special chic - it looks stylish both on the walls and on the ceiling.
When laying the lamellas at different angles, you can even create an original pattern on the ceiling. For ceiling lining, a special type of lining is used - it is lighter and has a thickness of 7 mm.
Important! When installing the lining on the ceiling around the perimeter of the room, a gap is left between the coating and the wall in case of its mobility when the wood expands. The gap is closed with a decorative plinth.
Plasterboard ceiling

Suspended plasterboard structures can be used as a material for decorating the ceiling on a closed veranda, provided that the roof of the building is well insulated. It is recommended to use moisture resistant drywall.
The advantage of this material is:
- In the possibility of choosing the height of the ceiling;
- Disguise communication;
- Installation of built-in lamps;
- Creates a perfectly even finish.

The decorative finish of such a ceiling has many options, but you need to choose those that can withstand special operating conditions. If the veranda is insulated and heated in winter, then the finish can be any.
Advice. On an unheated closed veranda, it is quite possible to use a tension fabric ceiling. In addition to all the qualities of a suspended structure, it is also characterized by a quick installation. The downside is the high cost of coverage.
PVC ceiling trim

The installation of PVC panels on the ceiling is justified by their low weight and excellent performance properties of the material, which can be combined with other wall finishes.
The main advantage is that the installation takes place on a metal frame, so the base does not require careful preparation, and the height of the ceiling can be chosen at your discretion. This allows you to make a hidden installation of communications and electrical wiring located under the ceiling, as well as install built-in lights.

PVC ceiling panels are thinner than wall panels, but they are also equipped with air chambers between the stiffeners, which guarantees the strength of the material, its rigidity and thermal insulation properties. The width of the slats is chosen depending on the desired visual effect and the area of \u200b\u200bthe room.

In order to make the veranda seem more spacious and lighter, preference is given to light PVC panels with a glossy sheen.
Polycarbonate ceiling

The construction material of the roof of the veranda sometimes does not require additional finishing - for example, if it is made of polycarbonate. This material transmits light, so the room will always be bright.
Polycarbonate is monolithic and cellular. For the roof, you can choose a transparent material that imitates clear or tinted glass, or colored polycarbonate - then the veranda will acquire a special look.

Installation of a polycarbonate roof is simple. It is carried out on a frame, which can have a semicircular shape - cellular polycarbonate is quite flexible and easy to process.
Floor covering for the veranda

The floor covering on the veranda is selected based on the operating conditions and the type of room - whether it is open or closed, whether they will walk on it in shoes, how often the floor will have to be washed, whether it will experience serious loads. So, if on the veranda is located summer kitchen, then all surfaces must be moisture resistant, easy to clean, resistant to dirt and high temperatures.
floor tiles

Floor tiles are the most practical material, although their installation requires considerable effort and time.
Some of the features of this coverage include:
- It is impact resistant;
- Easy to care for;
- Resistant to temperature changes;
- Resistant to moisture;
- Variety of options color design and invoices.

With tiles, you can lay out a geometric pattern using a combination of tile shapes and patterns on its surface. The installation process requires pre-training bases - leveling and screed devices. This will provide an even, stable finish.

For laying tiles, a special tile adhesive is used, which is applied to the back of the product and to the surface of the base. The tile is lightly pressed down and, tapping with a rubber mallet, adjust the height of its location in accordance with the level and markings on the wall.
The distance between the tiles is formed with the help of remote plastic crosses, which are subsequently removed, the seams are cleaned of excess glue and covered with a special grout. The tile can be used on open and closed verandas.
Terrace floor board

Decking is one of the most popular veranda flooring materials. Terrace board is a special kind of three-layer lumber. Ventilation slots are located in the lower layer, the middle layer provides for the presence of cavities for expanding the material, the front layer is smooth, decorative.

The advantages of the material include the following:
- The terrace board is easy to mount;
- The coating is strong and durable;
- The decking surface retains heat well;
- The material is environmentally friendly and safe;
- If necessary, you can quickly make repairs by replacing the damaged element without disassembling the entire coating;
- Surface terrace board withstands high and low temperatures;
- The service life of the coating is 20-25 years;
- The board has the correct geometric parameters, which greatly facilitates installation;
- The material is not exposed to insects, microorganisms, fungus and mold;
- The coating is not afraid of water;
- Such a floor has mechanical strength, wear resistance, the material is able to withstand a point load.

Such a coating naturally blends into the environment and is combined with trees and green plants, many natural materials.
Linoleum

Linoleum belongs to the category of budget floor materials of artificial origin:
- The advantages of such a coating include moisture resistance, solidity, impact resistance, easy installation and maintenance, low cost and availability.
- Linoleum can imitate a large number of materials, their textures and shades, but its unnaturalness cannot be hidden.
- Use linoleum on the floor in enclosed spaces.

- Among the disadvantages of linoleum, one can note its vulnerability to point loads from heavy furniture, and the impossibility of repairing the coating if its integrity is damaged.

rubber coating

The rubber coating on the veranda can be laid in the form of tiles or rolled coating.
- This unique flooring material has high impact strength, it is absolutely waterproof, not afraid of temperature changes, does not slip, has high strength and wear resistance.
- Lays on a flat surface.

- It is recommended to give preference to a modular coating, which has a special collapsible locking system.
- A damaged element can be easily replaced.
- There are cheaper rubber tiles that are glued back to back. When laying rolled material, the joint between the canvases will need to be welded using a special soldering iron, building hair dryer or polymer glue.

The concrete floor on the veranda at first glance seems to be the most simple option, but it has a lot of weight, so it requires a reliable device, monolithic foundation or concrete floor slabs.
The advantage of such a coating is its impact resistance, water resistance, it is resistant to temperature extremes and does not require careful maintenance. To concrete pavement had a neat appearance, it needs to be sanded and polished.
Options for finishing the veranda in a private house are shown in the video.
The veranda can become not only a comfortable, but also a practical room, but the owners should think about this in advance. There are several options for finishing, and they will be determined by the complexity of the upcoming work. Works are divided into internal and external. We propose to consider the most acceptable, from the point of view of costs, methods, methods and materials that are involved in facing work on the veranda. A secure and well-furnished space can become a favorite room for the whole family.
Subject to consideration of the option in which external finishing work is carried out, special attention should be paid to the choice of material. The requirements are the same for materials that participate in external finishing works Oh. No one is going to use paper wallpaper as a finishing raw material, which themselves will fall off after the first rain. The thing is that paper matter is not suitable for use from the outside. The list of requirements looks like this:
- Aesthetics, which will eliminate subsequent costs for the design of surfaces;
- Resistance to insects, fungus and mold;
- Ability to withstand some mechanical and physical exercise, as well as damage;
- Durability;
- Frost resistance;
- The material must withstand significant temperature and climatic changes;
- The resistance of the upper layers to direct sunlight, which excludes the possibility of curvature and burnout of the coating;
- The ability to exist in a humid environment and endure snowfall, fog and rain.
classic veranda design

Structurally, the veranda or terrace attached to the house will be a small podium, which will be raised above the ground through the foundation of one of the types. Beams are used as support. Based on the options, the veranda can be:
- closed;
- partially closed;
- completely open.
Covered verandas

This type of design is perfect for everyday use, regardless of the weather outside the window. In addition, a veranda of this type can be considered a separate room that can be used. On frosty days, it is comfortable to read a book in a warm blanket in the room, or drink warm tea, enjoying the beauties that open outside the window. When carrying out interior finishing work, you should consider the full insulation of each of the walls. Thus, heating bills in the cold season will be significantly lower.
Partially enclosed veranda

Such a room will be protected from rain and at the same time remain as open as possible, thereby providing the necessary level of safety for family members. The characteristic features include the presence of fences, which are frame structures made of timber and other lumber. It is also possible to use bricks and blocks, which should then be additionally sheathed on each side. There is no complete isolation from the surrounding atmosphere, so the veranda will be used only in the warm season due to the features of the chosen design. Full protection from the wind is not provided, as well as obstacles to oblique drops from the rain. In the winter season, you will need to cover the room with a cloth or regularly rake out snowdrifts.
open veranda

Suitable only if the site chosen for construction is located on the sunny, leeward side of the house. The complete absence of any fences blurs the boundaries between the veranda and the house, expanding the available space. Making the floor high does not make sense, as the difference will be felt strongly. Such a construction is also relevant with the regular residence of guests on the territory of the house and children, who in sunny weather can equip themselves with a playground on the street and at the same time remain under the supervision of adults. Construction costs will be minimal, since few consumables will be required. The most stringent requirements are imposed on quality, since the design will not have additional protection against moisture and bad weather and all year round stay out in the open.
Arrangement of the ceiling surface

Before you start ennobling the ceiling of the veranda from the inside, everything should wooden elements cover with protective impregnations (antiseptic). After that, you should proceed with the installation of the base - the frame, for the manufacture of which you will need wooden blocks measuring 50x50 or 30x50. The beam belongs to the category of lumber, which also needs additional processing with antiseptic compounds. The bars are attached to the surface of the rafters (roof) by means of long nails or self-tapping screws. The fastening step will be 35-40 cm. Installation is carried out in a horizontal direction in order to avoid subsequent accumulation of drops and snow at the junction points. To check the quality of installation, a building level is used.
Waterproofing should be applied to the rafters, which will provide a proper indicator of the heat insulator of the finishing materials used and protect the structure from excessive moisture and precipitation. As a heat-insulating material can be used:
- Styrofoam;
- mineral wool;
- other well-known heaters.
Only after laying the heat-insulating material, you should proceed with the installation of the selected sheathing on the surface of the ceiling of the veranda. The easiest way to work with a wooden lining, the installation of which is carried out perpendicular to the existing bars from the frame. The material is nailed by means of galvanized nails directly into the highlanders. After finishing the surface sheathing with lining, the surface is sanded and covered with any of the available protective compounds, varnish or paint. When using PVC panels as a finishing material, the sequence of work will be as follows:
- To begin with, the initial profile is fastened directly to the crate (wooden), with which it will be possible to join the individual panels to each other.
- Panel sheets are inserted into the grooves of the initial profile. For this, self-tapping screws or special (expensive) clamps are used.
- The next element of the panel is inserted into the groove, the fastening of which is carried out in a similar way.
- The sequence of work remains unchanged until the end of the material or work surface.
- plastic material tends to expand when heated (sunlight). To avoid deformation in the future, gaps between the elements of 1-2 cm should be left.
As a finishing material when arranging a ceiling for a veranda, you can use MDF, siding panels. This option is recognized as the simplest, since the material can be purchased at any store that can offer many color and texture variations. For homeowners, variety and affordability are considered paramount. When using drywall boards for sheathing the surface of the ceiling, you will need the arrangement of a wooden crate. In this case, you should consider the option of subsequent use of a metal profile. Sheets are fixed to the profile by means of self-tapping screws. The finished surface is puttied, sanded, and then finished with any material classified as finishing.
Floor and walls of the veranda: arrangement

Finishing work aimed at improving the appearance of the floor and walls is classified as simple and does not require outside intervention (hiring workers). To begin with, a wooden frame is made on the basis of bars. Installation must be carried out with the utmost accuracy; a laser or building level is used for verification. If you plan to make the room suitable for use in cold weather, then you should take care of high-quality insulation. Before the heater should be laid waterproofing material, which will help protect the selected finishing materials and insulator from condensation and moisture accumulation. All wooden elements that are in the room must be treated with specialized protective compounds - antiseptics. Only after that the facing material will be fixed to the wall surfaces.
Particular attention is paid to the floor located on the veranda. The requirements and characteristics applicable to the finishing material will depend on the conditions of subsequent use. As floor covering can be used:
- ceramic tile;
- laminated panels;
- massive board;
- terrace board.
The optimal choice is considered to be a decking board and a moisture-resistant laminate, which are better than others for arranging a terrace or veranda. In installation, they are simple, moreover, they are characterized as durable and not demanding in further care. It is possible to use such materials under the condition of arranging premises in which there is temporarily no glazing or it is not provided at all. In this case PVC panel or ceramic tile can be used as an alternative as more traditional materials. Linoleum can lie down, however, a type of moisture-resistant material is expensive, which is not justified given the available performance characteristics.
External finishing works

After considering the materials that may be involved in the internal finishing work, it is necessary to deal with the varieties of materials that can be used in the behavior of the external finishing work of the veranda. It is possible to use ordinary lining, but the quality of the material does not speak in his favor. Despite the use of various impregnations and protective compounds, the tree will quickly deteriorate, losing decorative properties with regular exposure to aggressive environmental factors. Annual treatments are expensive and can undermine the family budget. When using lining, you should pay attention to the fact that the installation is carried out in a horizontal direction, in which the groove spikes will be directed upwards. Fixation is carried out in several rows - from the side of the groove and the spike.
Siding
The most economical and easy to use finishing material used for exterior finish.
In recent years, siding has been in great demand among finishing materials. Provided that a brick covered with decorative plaster, the upcoming work in the form of framing the building with the help of siding will perfectly fit into the existing ensemble. The most popular is vinyl siding. In addition to an acceptable cost, the material has excellent performance. The ease of installation also speaks in favor of vinyl siding. As a finishing material for facades, it is customary to use horizontal-type siding with lock joints placed on it.
Mounting technology:
- First you need to take care of the crate. For these purposes, a timber with a section of 40x50 mm or an uncut board is suitable. Across the entire working surface, the elements are fixed vertically in increments of 35-50 cm. Additional bars are arranged around the windows, as well as in the corners of the house along the edge located below.
- The starting profile is mounted at the bottom and attached to the crate by means of self-tapping screws. The location must be horizontal.
- It is the turn of corner profiles in external and internal corners, as well as around door and window openings.
- It is worth paying attention to the fact that the edges of the lower corner profile should be slightly lowered below the level of the starting rail by 0.5 cm.
- Now it is the turn of installation and preliminary cutting of the purchased vinyl siding panels. Cutting the material is not difficult. For this, it is used electric jigsaw, hacksaw or jigsaw for metal work.
- The panel is slightly bent in the center, after which the edges are inserted into the grooves of the corner profiles.
- After leveling the panel, the lower edge is brought into the starting bar.
- Through pre-prepared holes, the upper edges of the panels are fixed with self-tapping screws. The panels should not be pressed tightly against the surface of the crate. Oval holes are responsible for the free movement of the web along the mounted self-tapping screws when heated. A gap of several millimeters is left between the crate and the hat.
- The subsequent bar is carefully inserted into the corner profile, after falling into the groove it snaps into place, and then attached to the crate.
- Before mounting the last plank, the finishing profile is laid strictly according to the level. After strips are cut from the siding sheet the right sizes, inserted and snapped into the previous bar. The free profile is placed in the finishing profile.
- The veranda is ready. Appearance is excellent.
Over time, the vinyl will expand slightly as it heats up, so the panels should be 0.5 cm shorter than the wall.
Arrangement of an unheated veranda

When choosing the material that you plan to use for interior finishing work, you should consider many options. There are not many. The list consists of coniferous lining, OSB boards of waterproof type, plastic panels. The main problem that owners have to face unheated verandas- the formation of condensate, which will form on the inner surface of the selected material. Structures containing cellulose or its fibers (MDF and fiberboard) should not be used. Even by coating the material with protective compounds, it will not be possible to exclude the swelling of matter from excess moisture. The panels will become skewed, which will lead to the subsequent breakage of the previously used fasteners.
In this case, PVC panels should be preferred. Such material does not lend itself to rotting processes, the choice of color is wide, the cost is acceptable compared to lining made of cedar or oak. If necessary, plastic panels can be used for cladding, which are painted to look like precious woods or natural stone. A plain surface will also look interesting. Everything will depend on interior decoration premises. When using PVC plates, a frame based on a galvanized profile is preliminarily equipped. The allowable step when attaching the profile strips to the wall surface will be 6 cm.
It is much more convenient and practical to sheathe PVC surfaces with strips arranged vertically. The profile will be equipped with horizontal rows. As an insulating material in the arrangement of external walls, foil polyethylene or isolon can be used, the cost of which is low compared to other materials, taking into account acceptable characteristics. Internal walls can be sheathed with mineral-based thermal insulation, provided that an auxiliary layer (located inside) consisting of a vapor barrier membrane is provided.
The room will need forced (auxiliary) ventilation, as plastic will create an increased level of humidity, as well as glass. On the summer cottages this problem is very common. To remove the accumulated moisture in the form of steam, you will need the arrangement of a flow-through type of ventilation. Otherwise, on internal walls oh, frost forms. For interior finishing work, PVC is not suitable in the best way. Plastic belongs to the category of flammable materials that break easily when carelessly hit in the cold. Low temperatures make plastic incredibly brittle. If possible, for the implementation of interior finishing work, natural wood should be used, the service life of which is calculated in decades.
Finishing a glazed veranda

When decorating the interior in a glazed veranda, you should follow the same rules as when arranging loggias. There is more space on the veranda, which provides more opportunities for applying various design tricks. In fact, verandas belong to the category of summer buildings, but no one forbids connecting several heaters or insulating an additional room. If the room is heated or insulated, then the choice of finishing materials will be wider. It is possible to install stained-glass windows, instead of a roof, a glass structure, due to which the room will become incredibly bright and cozy.
Many do not trust glass structures from the fact that direct sunlight can render almost any coating unusable after some time. However, over time, a solution was found and it became possible to use a special acrylic-based frosted glass. Wide and heavy curtains or blinds can act as an additional element. The design of the ceiling will directly depend on how the roof was built. In addition to natural wood, it is possible to use drywall, plastic, MDF as a finishing material, the surface of which, if desired, can be painted. Some prefer polystyrene tiles.
False ceilings will look no less attractive. Wall decoration can be done using different materials using different methods and technologies. Light colors are preferable, as they visually make the room spacious and bright. Tiles, parquet, carpet can be used as flooring. It will not be superfluous cushioned furniture, which will stand for years, subject to the implementation of the correct finish. Comfortable rest implies the presence of comfortable furniture and auxiliary accessories.
The choice of materials for sheathing the veranda is a responsible process, since further comfort during your stay in the room depends on the right decision.
And finally, video tips for sheathing the veranda with OSB boards:
You may also like:
 Which heater is best for frame house in 2017?
  How to choose floor insulation in a wooden house in 2016?
One of the most significant advantages of living in a private house is the opportunity to go out into the fresh air at any time of the day or night and enjoy the scent of flowers in summer or the enchanting smell of rotten leaves in late autumn. And how pleasant it is to sit with a cup of tea on the open veranda during the first May thunderstorm, when the air is filled with ozone and tender young greens rustle under elastic streams. A closed veranda in a country house can be easily turned into a dining room, where the whole family will gather for Sunday lunch: share experiences, make plans and just chat. An important role in creating the necessary mood is played not only by the view from the windows, but also by the decoration of the veranda. It is she who will help you create an atmosphere of home comfort and peace.
Material selection
The choice of materials for finishing the veranda is not only aesthetic, but also practical. As a rule, the word "veranda" means an unheated room. In some cases, the open veranda looks more like a gazebo attached to the house, so that we are not talking about heating at all.

So, the decor should be not only beautiful, but also resistant to high humidity and temperature fluctuations.
Protection of wooden structures and thermal insulation
most popular building material for the construction of the veranda is wood. Before proceeding with the final finishing, all wooden structures must be treated with a special antiseptic composition.
In addition, for glazed verandas great importance has the correct thermal insulation of the lower part of the walls (under the windows) and the ceiling. The interior decoration of the veranda begins with it. If the insulation is done correctly, the room can be inhabited until late autumn.

You can insulate the ceiling of the veranda with almost any heat-insulating materials: mineral wool, extruded polystyrene foam (EPS), polystyrene foam or liquid sprayed polyurethane foam. Having chosen foam, you must be prepared for the fact that for high-quality thermal insulation it will be necessary to lay a sufficiently thick layer of this material, which will inevitably lead to a decrease in the ceiling level by 10-15 cm. Sprayed polyurethane foam is an effective but expensive insulation. But EPPS and mineral wool at a fairly affordable price can perfectly protect your veranda from the autumn cold.
Insulation is laid on the walls and ceiling according to the same scheme. First of all, it is necessary to provide waterproofing. To do this, a waterproof film is spread along the entire wall, and the joints between its sheets are hermetically glued with metallized tape. Then we install vertical wooden blocks at an equal distance from each other, and between them we lay a heater.
Important! It should be remembered that mineral wool is very afraid of dampness. Under the influence of moisture in just a few years, such a heater turns into dust.
The last layer will be a heat reflector, which is laid with a metallized film inside the room and fastened with adhesive tape.

We insulate the ceiling in the same way.
Wall and ceiling decoration of the veranda
When all preparatory work completed, it's time to think about the interior of your veranda. You can entrust its development to a professional designer, or you can cope with this task yourself. There are a lot of options for finishing open and closed terraces. Consider the most popular of them.
Finishing with PVC panels
Most budget option decoration of the walls of the veranda in recent years are plastic panels. This material is resistant to high humidity and temperature changes. In addition, it is quite easy to install and clean. It will help you imagine how interesting a photo made in one of the hardware stores made of PVC can be.

The disadvantages of plastic include perhaps low environmental friendliness and fragility - it is very easy to break it by inadvertently pushing a chair or accidentally hitting the wall with your knee.
As a frame for PVC panels, wooden slats with a section of 30 * 20 or 30 * 10 mm or a metal profile for mounting drywall can be used. When using wood, it must first be treated with an antiseptic.
Helpful advice! On the walls of the veranda facing the street, it is better to use wooden slats for the crate. Fasteners of metal profiles can create "cold bridges", which will significantly reduce the quality of thermal insulation. But for not too smooth interior walls, it is better to use a profile on special suspensions.

- The slats must be fixed perpendicular to the direction of laying the panels. So, if the plastic is placed vertically on the wall, then the slats are stuffed horizontally with a step of no more than 50 cm.
Important! Decorating the walls of the veranda with panels with a pattern is carried out from left to right. You can start the installation of plain panels from either side of the wall.
- When the crate is ready, a starting profile or mounting bracket is attached to the corner of the room with nails or self-tapping screws. The first is used if the adjacent wall is finished with a different material, and the second will allow PVC panels to be joined together.
- Then the first panel is inserted into the guide profile so that the wide mounting flange is directed towards the installation.
- To fix the panel to the crate, you can use metal holders, or you can simply screw it to the rail with a self-tapping screw.
Important! If you are not using holders to mount the panels, do not overtighten the self-tapping screw. Otherwise, the panel will "lead".
- We insert the next panel so that there is no gap left, and fasten it.
Remember that PVC panels are subject to thermal expansion. To compensate for it, it is necessary to leave a gap of 2-3 cm at the top and bottom of the wall and close it with a plinth.
MDF - cheap wood imitation
Another popular finishing material is MDF panels. They are somewhat stronger than plastic, but less resistant to moisture. It is not worth using this material on open verandas, but for closed ones it is quite suitable.

MDF panels are installed in the same way as plastic ones.
Wooden lining - a classic of the genre
Listing the materials for finishing the veranda, it is impossible not to mention the most traditional of them - wood. Most often this is the so-called lining.
Lining - sheathing board, up to 22 mm thick with special grooves that facilitate installation and docking.
This material is sheathed not only on the walls, but also on the ceiling of the veranda. After treatment with antiseptics, the lining will last you up to 20 years. There is no need to talk long about the advantages of wood over artificial materials. What is worth only a delicious woody smell that will be felt on your veranda for many years.
The choice of wooden lining
First of all, it should be said that according to the method of production, the lining is divided into spliced and solid. In the first case, the highest quality pieces of wood are joined in a special way. Despite the fact that such material looks excellent - it does not have knots, cracks and other puttied defects - it is not suitable for finishing an open veranda. With increased humidity, cracks may form at the splice point, which will greatly spoil the appearance of the finish.

In addition, the lining is divided into 4 classes. The most expensive and high quality - the "extra" class - is almost always spliced. But the material of class A, B or C, as a rule, is made of solid wood. On such a lining there are knots and potholes. Most often they are treated with putty during production.
Important! When purchasing material, be sure to unpack it. Very often in the middle of the pack there are defective or low-grade slats.
Preparation and installation of lining
Preparing the lining for installation comes down to treating it with an antiseptic and adapting the material. It is necessary to leave the lining in the finished room for several days, and then cover it with a protective compound.
When using lining, the veranda is finished with wood in almost the same way as PVC panels or MDF. The crate is done according to the same scheme, but there are several ways of fastening:
- Fixing with galvanized nails. This is the easiest way. The nail is simply driven into the center of the board, and then the hat is sunk with the help of a dominator.
- Self-tapping fasteners. In this case, a hole about 10 mm deep is drilled in the board from the side of the spike. The diameter of the drill should match the diameter of the screw head. Then we fasten the lining to the crate, drowning the self-tapping screw in the hole, close it with a dowel and grind it. As you can see, the method is more time-consuming, but the attachment is not visible.

Important! With the help of kleimers, only the veranda can be finished inside.
When the installation of the lining is completed, you need to close the corners and joints in the area of \u200b\u200bdoors and windows with a corner and proceed with the finishing. To give the wood a shade, colored varnishes or stains are used.
Important! Before starting work, coat the forcing cut with the selected varnish and let dry. Sometimes after drying, the color becomes completely different than when applied. It will be very difficult to remove the varnish that you don’t like from the walls. For the same reason, do not immediately buy a large amount of varnish: buy a little, try it, and if you like it, buy more.
You need to apply varnish from top to bottom: first we cover the ceiling, and then the walls.
Exterior finish
So, we examined the main options for finishing the veranda from the inside. How to line it on the outside? In principle, you can use lining here, but is it worth it? Despite all kinds of impregnations and antiseptics, a tree that is constantly exposed to negative effects environment, quickly loses its decorative effect. This means that you will have to re-treat annually.
If you still decide to choose wood, remember that you can only fasten the lining outside horizontally with the spike up. At the same time, it must be fixed in two rows - from the side of the spike and from the side of the groove.
Siding
In recent years, siding has gained particular popularity. Even if the house is faced with brick or covered with decorative plaster, you can easily choose a shade of siding that fits perfectly into the ensemble.

The most commonly used type of this material is vinyl siding. It owes its popularity to a fairly affordable price, good performance and ease of installation.
To finish the facades, horizontal siding with a lock connection is most often used. We will consider the technology of its installation in more detail:

Let's start cutting and installing panels. Cutting vinyl siding is fairly easy. This can be done with metal shears, a hacksaw or a jigsaw.
Important! Vinyl is highly susceptible to thermal expansion. Therefore, each panel should be 5-7mm shorter than the wall.
- We bend the panel a little in the center and insert its edges into the grooves of the corner profiles.
- Align the panel and bring its bottom edge into the starting bar.
- We fix the upper edge of the panel with self-tapping screws through the prepared holes.
Important! You can not press the screw tightly to the crate. The oval fastening hole is designed to allow the material to move freely along the self-tapping screw with temperature fluctuations. The distance between the cap and the crate should be 1-1.5 mm.
- We also insert the next bar into the corner profiles, snap it into the groove of the previous one and fasten it to the crate.
- Before installing the last plank, we mount the finishing profile according to the level, cut off the required width of the siding strip, snap it into the previous plank, and simply insert the free edge into the finishing profile.
- Here is a detailed video instruction for the installation of this material:
That's all. From the outside, your veranda looks perfect.
Finishing the veranda - photo selection
In order to make it easier for you to make the final choice in favor of one or another finishing material, we have prepared a small photo selection:


