How to restore an old wooden table with your own hands. How to make a new piece of furniture out of an old "bored" kitchen table. Coating with decorative composition
The site company is actively engaged in the restoration of tables and wooden products for over 10 years. In our practice, we are guided by the extensive knowledge and honed skills of our carpentry and woodworking masters. It will not be difficult for them to complete a full repair in the workshop and fix minor cosmetic flaws in the furniture in place.
At your service:
- Restoration kitchen table. Key damage to kitchen tables is associated with contact with hot dishes. Burns are easy to eliminate both on solid wood and on MDF and fiberboard products.
- Desk restoration. Written and office tables must be maintained in good condition, because this workplace. In desks, we are ready to replace the guides and drawers themselves, install new handles, magnetic locks and limiters.
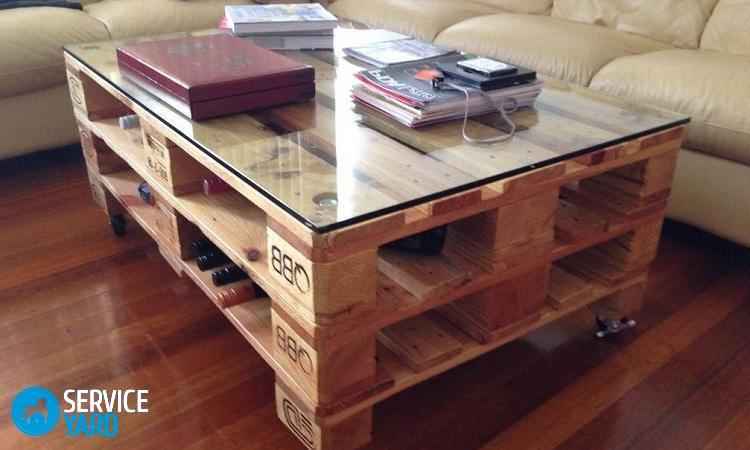
- Coffee table restoration. Coffee tables often suffer from being lower than normal. Therefore, they cannot be noticed and, stumbling on them, damage them. We do complete glass countertop replacements. artificial stone and tree.
- Restoration of polished tables. Furniture with a mirror polished surface requires reverent care. Dust quickly settles on it, traces of fat and scuffs remain. Our painters will help restore the original shine.
- Restoration of the round table. Compact round tables on one or more legs help save space in small kitchens, cafes, and are used as card tables. Radius tabletops are more expensive to manufacture, so the restoration of a table of this shape is also justified financially.
- Dining table restoration. A family dinner, a celebration with friends cannot be imagined at a broken or scratched dining table. The restorers of our workshop are ready to completely renew the varnish and paint on the countertop, restore the loose legs and make individual parts again.
- Restoration of an old table. For houses with a rich history and private collections, the periodic restoration of the table is a matter of course. Experienced restorers who are familiar with traditional furniture design and woodworking techniques will help preserve the original look of the furniture.
We all love to have beautiful things around us at home. However, the years go by and the interior begins to go out of fashion. Very often it is impossible to say goodbye to your favorite items, because so many happy moments happened with them! And sometimes there is simply no money to buy new furniture. The way out of this situation is very simple - you can update coffee table with your own hands. So the money will be saved, and the interior will become more modern. In addition, many people like the restoration of things. Some interesting ideas you will find in this article.
Removing the old coating
Before you start restoring the table, you need to remove the old varnish.
Important! You can use a grinder, but you should act carefully, otherwise the wooden surface may be damaged.
Do-it-yourself coffee table restoration begins with the preparation of the necessary tools:
- Grinders or cycles;
- Sandpaper;
- Wood putties;
- spatula.
You can use special solvents. It is very important to calculate the thickness of the layer, because the varnish must dissolve and the wood must not be damaged.
Important! If the solvent is absorbed into the surface of the table, there may be a problem between the materials during future processing. As a result, the coating may swell, peel or crack.
If the old varnish has not been removed, and cracks and scuffs have appeared on it, we get rid of them with sandpaper:
- Moisten medium grain paper.
- We wrap the paper around the bar.
- We process the surface.
Important! If the sandpaper is clogged with dust, you can simply rinse it and continue to work.
After removing the varnish, the surface is polished with fine-grained sandpaper. Then, with the help of putty, cracks and scratches are eliminated:
- Putty is applied with a spatula and leveled.
- After the putty dries, it is leveled with fine sandpaper.
Important! In the case of further processing of the table with the help of wood stain, a putty is purchased to match the color of the wood.
Decorate the table with wallpaper
So, how to restore a coffee table with your own hands? First of all, you should acquire materials:
- Vinyl wallpaper;
- Glue;
- Clear acrylic varnish or special silicone sealant;
- scissors;
- decorative nails;
- hammer;
- Roulette;
- With a simple pencil;
- Ruler.
Important! Before updating the table, you should make sure that the countertop is clean and dry, and there is no grease on it.
So, how to restore an old coffee table with your own hands? To do this, follow the instructions:
- We measure and cut required amount wallpaper. They should be enough for the length of the countertop and bends down.
- With your finger we press the edge of the wallpaper along the countertop - this way it will be easier to glue them.
- We apply glue to the countertop from all sides.
- We start the wallpaper sticker from the corner, gently press it and smooth it with our hands in order to remove air bubbles.
- Using a dry cloth, smooth the wallpaper.
- For normal gluing of the edges and turns, we apply glue to them. When it dries a little, the wallpaper is pressed tightly and smoothed out.
Important! When using spray adhesive, newspapers and masking tape are used to protect the rest of the surface.
- We apply two or three layers of special transparent sealant or clear acrylic lacquer. Thanks to this, scratches and damage will not appear on the wallpaper.
- We hammer in beautiful carnations for the aesthetic appearance of the product.
Decorate the table with mosaics
If you're looking for a way to update your coffee table, look no further than decorating with mosaics. This will require the preparation of the following materials and tools:
- Paints in a can;
- Sandpaper;
- Grid mosaic tiles;
- Clay;
- Grouts;
- brushes;
- spatula;
- Scissors.
- We put paint on the table, let it dry.
- We apply glue to the place where the tile pattern will be glued.
- We apply the tile, press it and let it dry.
- We process the space between the tiles with grout, the excess of which is then washed off.
As a result of such simple actions, you will become the owner of an original and practical table.
Decorating a table using decoupage technique
Usually furniture, which is to be decorated using decoupage technique, requires pre-painting. Most often they use white, light blue and light green colors. To do this, use acrylic paint, which is applied in two or three layers. Then varnish is applied to the surface, and then it must be processed with fine sandpaper.
- Set for decoupage or disposable napkins with drawings;
- Polyethylene;
- Wide paint brush with dense bristles;
- Strong tea;
- Laka.
Important! In order for the edges of the napkins not to stand out too much on the countertop, they should not be cut off, but cut off. Moreover, you need to try to make the edge uneven.
In addition, when using napkins, the surface may turn out too white. Therefore, napkins should be dipped in tea for a couple of seconds. In addition, you can choose other colors of staining, for which they use a solution of watercolors.
Probably, many have somewhere in the pantry or in the attic an old rare table that the hand does not raise to throw away. In this article, we will try to convince you not to throw it away, but to give it as a gift. new life. Moreover, this is relevant in our time, when there is a continuous high cost around. It is much cheaper to do a table repair with your own hands and get an exclusive designer item that will surprise all your friends when you look at it.
Restoration of furniture is a rather exciting process and, if desired, everyone can try it.
We will describe the restoration of the table to you using the example of a small table, which you see in the photo above.
Before the beginning repair work you need to stock up on such tools and materials:
- A hammer
- Screwdriver
- Pliers
- Sandpaper different types graininess;
- brushes;
- Varnish or paint;
- Impregnation for wood;
- Putty for wood;
- Rubber spatula;
- Carpentry glue or PVA glue;
- Veneer.
Restoration stages
Inspection
We examine the table and determine what defects are present on the product. It can be:
- scratches and dents,
- worn varnish,
- damaged legs that stagger.
If the legs are very wobbly, it is better to disassemble the table and carry out further restoration in disassembled form.

grinding
The purpose of this process is to remove the old paintwork and prepare the table for subsequent refining.
For grinding, we need a sandpaper. We begin to grind the product with a coarse-grained sandpaper, we pass in a circular motion around the entire table: along the table top, legs and tsarg belt.

When sanding, it is important not to overdo it and not grind to holes.

After grinding, be sure to clean the product from dust
Impregnation, restoration of countertops
If the table is made of natural wood, it is better to treat it with a special impregnation that will protect it from pests and diseases.

Leave the parts to dry for a while. Next, we cover all the cracks with putty. After complete drying, the putty is sanded again with a fine sandpaper
If the table is made of chipboard, you need to inspect the countertop and determine if there are bubbles on the surface. If there is, then the veneer is peeling off.
Such a defect can be corrected by making an incision on the surface of the bubble with a thin knife. After that, glue must be applied to the hole with a syringe. Then we take a regular iron and iron the surface of the table until the veneer sticks.

If the veneer chipped off on the edges of the countertop, we can cut a patch from a new piece of veneer, apply glue to it, attach it to the damaged part and iron again.
Painting
Let's start painting. We take paint or varnish, depending on your taste, brush and paint. You may need to paint two or three coats.
This is determined in the course of restoration work, depending on which appearance we want to get. Let the paint dry well.
Table assembly
When all the parts are well dried, proceed to the assembly of the product.
To prevent the legs from staggering, when installing, we insert thin pieces of veneer or matches into the grooves along with the legs. Legs with a tsargo belt are assembled with glue.
We leave the assembled furniture until the glue has completely dried and the parts have set.


It may be that the old table is solid, does not stagger and the legs do not need to be repaired. Then it is better to carry out all stages of restoration in assembled form. There is no point in taking it apart.

Here we have considered the main stages of restoration wooden table. We wish you to try to make repairs with your own hands and be satisfied with the result.
Often this old piece of furniture in the kitchen that has lost its presentation, which clearly falls out of the general style of the room, is a cause for controversy: it seems to be time to replace it so as not to spoil the interior - however, it is a pity to throw it away, and the funds do not allow furniture to be “scattered”, even if it has served for a long time.
Dilemma: restoration or decoration?
Old but still strong dinner table, especially if it is made of metal or solid wood, could have lasted for a very long time if the work surface had not suffered from time and long use, or a design no longer suitable for the style of the new kitchen.
All work on the return to life of this important part of the interior of the kitchen, with the restoration of normal functions or their change, can be divided into three categories:
- Restoration;
- Restoration with a change in design;
- Decoration.
On the options for how to update the old kitchen table with your own hands in the best possible way, you should dwell in more detail.
Restoration. This type of work is carried out if the furniture is ideally suited to the interior of the kitchen, but has lost its presentable appearance during long-term operation, or the strength of the structure has suffered from time to time.
Before proceeding with the restoration, you need to stock up on the following materials and tools:
- Sander, sandpaper of various grain sizes;
- Glue for wood or metal (depending on the material of the underframe);
- Putty for underframe material, primer;
- Special paint of the desired color (for wood or metal), intended for interior work, as well as a small roller and brushes.
If the frame is metal, then the restoration process consists of the following steps:
- Dismantling the tabletop;
- Cleaning the surface from the old coating;
- Puttying the surface for better painting - the special composition of the putty for metal allows you to make the surface smoother, protecting it from oxidation in the future;
- Grinding - necessary in order to remove various roughness to prepare the surface for painting;
- Priming - can be done using special formulations, or you can use the base paint with the addition of a solvent;
- The paintwork of the frame must consist of at least two layers. Moreover, each new layer of paint is applied to the already dried up previous layer.
- The tabletop for the restored metal frame can be done as follows:
During restoration wooden furniture, the sequence of steps does not change. However, before proceeding with the restoration of such a surface, it is necessary to strengthen the entire structure of the product:
- Carefully inspect all connection points, if necessary, fix them with glue, furniture corners or confirmants (furniture ties). If there are movable connections, check their functionality. If the mechanism is damaged: repair it, replace it, and if such a function is not important, make the assembly static.
- Remove the remaining decorative elements and fittings that may be damaged during further work;
- The countertop, if it is not planned to be replaced, cannot be dismantled.
- Next, you should get rid of the old coating - carefully sand all surfaces, including the internal elements of the frame;
- If there are potholes and chips on the restored planes, cracked seams at the joints, you need to putty them with a special acrylic putty. It is better to level the countertop with a special compound: mix small sawdust into PVA glue or wood glue and fill the existing recesses with this mixture. After the glue has dried, sand all structural elements again;
- If the surface was leveled so that the defects became invisible, and the tree retained its original structure, you can cover the table with tinting (transparent acrylic paints that give any shade to the wood and do not hide the pattern of its fibers);
- After applying the first layer of paint, all structural elements should be carefully sanded - to remove raised wood fibers;
- The next 2 coats of paint are applied at intervals of several hours (so that each has time to dry);
- Finishing - varnishing: for kitchen furniture it is necessary to choose a special varnish that gives a coating that is resistant to mechanical and temperature influences.
- After the varnish is completely dry, the working surface of the table must be covered with several layers of wax - this will give it additional water-repellent properties.
- Remove all dirt (especially grease stains) with detergents. Dry thoroughly.
- Using a grinder, clean the surface, getting rid of the old varnish coating - paint does not adhere well to it.
- Apply a primer (preferably one that protects the wood from moisture penetration) using a roller, brush or aerosol. Be sure to let it dry well.
- Paint in the desired color 2-3 times, applying layers as evenly as possible, giving time to dry each of them. After applying the last layer, leave the product to dry for at least 24 hours.
- Apply wax paste and, using a cotton napkin, carefully rub it into the countertop in a circular motion - repeat the procedure 2-3 times to get a matte, non-sticky surface.


Your old table in a new guise is ready: you need to let it stand without work for about a day, and it will serve you for more than one year!
Restoration with a change in design
Such design is another way to make a new, more spacious kitchen table out of an old kitchen table.
You can go this way if you bought a new table for the kitchen, and the old one is still good enough to throw it away.
In addition, you can simply restore it by adding a "zest" to the design. How to update an old kitchen table with your own hands in a similar way is shown in the photo - the process itself requires a slightly more detailed description.

To make changes to the design, we need:
A sheet of chipboard, 2 bars for legs, 2 planks of chipboard - all of this size to make a table that fits under the old kitchen in size. It is better to fasten the wheels to the legs of a small table - it will be more convenient to use it, and the floor covering will be better preserved.
For the screed, 6 confirmations and 2 furniture corners will be needed, and to combine the two structures, 2 aluminum corners equal to the width of the larger table will be needed.
In addition, we will need: wood putty, enamel in 2 matching shades, varnish and wax paste for finishing surfaces.


Rest assured that the "away" dining space will be hugely popular with the younger members of the family - children will be more comfortable here due to the smaller difference between the height of the chair and the tabletop.
Decoration - for every taste, style and ... wallet
This method of "resuscitation" of the kitchen table is the most exciting, having a variety of ways using the most unexpected materials. When thinking about how to update an old kitchen table with your own hands using decoration, you need to remember the strength of the coating being performed - the surface must be resistant to temperature changes, mechanical stress, and should also be easy to clean.
For decoration, you can use the decoupage method, making various collages on the countertop (especially if you use glass as a protective coating for the countertop), painting and screen prints.
We offer you one more, in our opinion, very interesting option- decoration with smalt. This solution will be even more original if the working surface of your masterpiece is made of the same mosaic tiles as kitchen apron.
We will need:
- Remains of smalt left from the apron, or several matrices (according to the size of the table). As a rule, matrices with tiles have dimensions of 300x300 mm, and the size of smalt squares can vary from 10x10 mm to 20x20 mm;
- Tile adhesive, grout and an old waffle towel;
- Masking tape, spatula and scissors;
- Paint of one of the shades of smalt (on wood); end tape (preferably ABS);
- Lacquer and wax paste for finishing the countertop;

1st step. Restoration and painting of surfaces - the actions are similar for all similar products and are given above.
2nd step. We glue the ends of the tabletop with masking tape, and apply a thick layer of tile adhesive on the tabletop itself with a spatula, level it, and carefully lay the mosaic matrices pre-fitted in size and color. Gently press down, being careful not to dislodge the pieces. It is necessary to carefully monitor that the ends of the countertop (taking into account the thickness of the smalt) remain even. Let the tiles dry.
3rd step. We do grouting. To do this, we apply the grout diluted to the desired consistency on the mosaic, level it with a spatula, removing excess grout with it. Let it dry a little, and then remove the grout from the smalt with a damp sponge.

From a natural tree - perfectly gives in to restoration. Assessing her condition is quite simple. First of all, you need to inspect the product for the presence of rot and rotten elements. This is a common occurrence for furniture that has been stored in improper conditions. Moisture quickly destroys wood, making it unrepairable.
Pay attention also to the frame of the product. If the parts are intact and made of natural wood - great news for you. Old plywood, sheet materials covered with peeled veneer can be removed. But the frame will become a reliable support for the entire restoration process.
In addition, remember that the paintwork is of great importance if you are evaluating the product as a subject for further restoration. Furniture varnish is difficult to remove, and even then, mainly on flat areas with a flat surface. The processing of small curly elements requires special equipment and a large number consumables. It is better not to mess with such furniture if you have no experience.
Finally, paint is not a sentence for a restorer. On the contrary, be prepared to face multiple layers old paint. There are several ways to get rid of it. Building hair dryer and solvents are the most gentle of them. Then the product is polished and after that it is ready for restoration.
Let's see what is needed in order to restore the old desk from this tutorial:
Materials:
Wooden curly legs - 4 pcs;
- a small pine board to strengthen the frame;
- tabletop according to the size of the frame;
- thin wooden boards no more than 15 mm thick for decorating the side panel of the table;
- primer on wood;
- resistant paint of a light shade;
- paint with a loose coating for a decorative side panel - 2-3 shades;
- glue for woodworking;
- self-tapping screws and furniture screws;
- fittings for fastening the reverse side of the table to the wall;
- plastic handles for drawers;
- wood putty.
Instruments:
grinder;
- sandpaper;
- paint brushes and roller;
- screwdriver;
- screwdriver;
- electric drill;
- construction roulette;
- hacksaw for metal;
- putty knife.
Step one: preparing the table for restoration work
The table for restoration went to the author free of charge. By the way, as many as four tables. However, his countertop turned out to be completely unusable, so he borrowed another one from a neighbor - with a countertop suitable for the project. All this pleasure cost him $ 35. And part of the money went to the purchase of figured legs and paintwork materials. It turned out to be quite economical.
The author cleared the table of dust and began to re-equip it. To do this, he took out all the drawers. On the side, there are usually levers that should be pressed from both sides. Then the box is easily removed from the cell.
He also removed the sidebar of the table. It was fastened on furniture screws and it turned out to be too difficult to unscrew them. Therefore, the author used a hacksaw and cut the screws along the line between the panel and the frame.
To keep the tabletop frame rigid, he reinforced it with a small wooden board, screwed on screws and planted on glue. Always use glue when assembling furniture if you can. This significantly extends the service life of fasteners.
The author removed the bottom panel of the table under the drawers. In order for the plywood not to crack, he preliminarily pasted the tape along the cut line. The hand saw did the job just fine. For the same purpose, you can use a jigsaw.


Step Two: Refurbishing the Desk
Since the table had lost its support and side panel, they had to be replaced with something. But the decision was already made. The author purchased four curly legs in a supermarket. Three of them he filed on the machine. They will be located under the part of the table where the drawers are located. One leg will partially replace the removed side panel.
The second fixed the short legs under the panel with drawers with screws from the back. Glue is also needed here. Remember that excess glue should be removed promptly, otherwise it will affect the quality of the coloring of the product. This is done with fine sandpaper.


Step three: painting the old table
Before painting, the surface of the product should be carefully sanded. Small elements and hard-to-reach places are usually sanded with sandpaper or disassembled.
He then applied two coats of white paint. The author used acrylic paint. It is not very durable, but it has its advantages. For example, acrylic paint is non-toxic and has no bad smell. Therefore, all work can be carried out in a residential area.
Acrylic paint often needs varnishing. Alkyd, oil and nitro paints are more resistant, but even when using the latter, furniture should be varnished. This will prolong the life of the paintwork.

Step four: setting up the table
You probably noticed that the table lacks legs. It's all right, you're right. The author used only four supports, instead of six. This is because the table is designed to be used in one specific place - in the corner where the old desk used to be.
And since the table was not planned to be moved from place to place, the author decided to save a little and fix the frame permanently to the wall. He started this work before installing the countertop.

Step Five: Installing the Countertop and Final Preparations
The author also replaced the plywood side panel with drawers. Instead, he used several tinted boards that fit perfectly into the overall picture and turned into a highlight of the product. Such toning is carried out using materials that have a loose coating. Their choice among acrylic paints huge. A similar effect can be achieved with some decorative oils.
Finally, the author fixed handles made of black matte plastic on all drawers and varnished the countertop with a glossy varnish. When choosing a varnish for countertops, pay attention to the degree of durability of the coating. If you have the opportunity to compare samples of materials, then a good furniture varnish should form a hard coating that does not scratch with a fingernail after drying. So you will be sure that the countertop will have an excellent fresh look for a long time.