Crafts from plastic bottles boat. How to make a boat out of plastic bottles. Further installation work
Helpful Hints
Things made with your own hands are always more valuable and more expensive. We bring to your attention a master class, thanks to which you can learn how to make not only beautiful, but also useful things from plastic bottles.
See also: palm tree from plastic bottles
Bird dispenser from a plastic bottle

You will need:
- 1 liter plastic bottle.
- 2 wooden spoons.
- Screw.
- Rope.

1. Draw a hole with a radius of 1 cm at a distance of 10 cm from the bottom.
2. Rotate the bottle 90 degrees and draw another hole with a radius of 2 cm, opposite the first one.
3. The same process must be repeated at a distance of 5 cm from the bottom.
4. Then carefully cut out all the drawn holes with a knife.
5. Now you can insert spoons.
6. To hang the bottle, you need to fasten a screw or screw to the bottle cap and hang it on a rope.
7. Finally, you can fill your tank with bird food.
Do-it-yourself seedling dispenser from a plastic bottle
This is a real garden that moisturizes itself, and you need to make a minimum of effort. In addition, crafts of such pots diversify children and fresh parsley, sage, rosemary and thyme are always needed in the kitchen.

You will need:
- Marker.
- Sturdy 1 liter plastic bottles with caps.
- Scissors.
- Label remover (e.g. vegetable oil).
- The soil.
- Saplings (they can be purchased in the vegetable departments of supermarkets).
1. Mark a line 12 cm from the bottom of the bottle.
2. First, pierce a hole on the marked line with a knife, and then cut the bottle in a circle with scissors.
3. Remove labels with vegetable oil.
4. Insert the top of the bottle with the cap into the bottom base.
5. Fill the top with soil.
6. Fix the seedling by gently pressing it down with soil.
7. Add water to the bottom of the bottle so that the water covers the cap.
8. After that, some water will be absorbed by the soil and you need to add water, following the instructions for a particular plant.
Craft a pencil case from a plastic bottle
Unnecessary plastic bottles can fit into the right and convenient pencil case. The proposed thing can be improved, it all depends on your imagination.

You will need:
- Empty, washed and dried plastic bottles (in this case 6 items).
- Scissors.
- Old newspapers.
- Paint in bolognese.
- Paperclips.
- Glue (it is necessary that it glues the plastic well, but does not corrode it).
1. Lay the bottle on its side and carefully insert the knife blade at the base. Cut along the bottom edge.


2. Repeat the procedure with the rest of the bottles.
3. Place all received products on the old newspaper with the bottom up.
4. Spray the paint on the outside of the products in several layers.

5. After the bottles are dry, it's time to line the edges of the cut with felt. The felt strips should be slightly longer than the circumference of the bottle. Glue the material evenly and carefully to each section of the bottle.

6. Wait 15-20 minutes for the glue to dry. It is better not to touch the extra, remaining felt for now.

7. Secure the felt with paper clips for a better bond. Wait another hour and then cut off the rest.

8. Decide where exactly the whole structure will stand, and glue all the bottles together from the side of the felt along the edges with glue. For a good strength of the entire pencil case, do not spare glue.

9. The glue must dry completely. You can fill your pencil case. Everything is ready!
Crafts from caps from plastic bottles for the garden
Sealed bag

1. Trim the thread on the neck of the bottle.
2. Insert the plastic bag through the neck and screw on the lid.

This seals the bag, which contributes to the long-term storage of products.
Original curtains from covers

Here are the original curtains in quality interior doors can decorate a house, cottage or apartment.
Simply connect the lids together plastic bottles fishing line or thread. At the same time, the curtain pattern can be limited only by your imagination.
DIY paintings from covers
Plastic bottle caps can even work for fine art.
Try to make such a picture, because even children can do it.

You will need:
- Canvas (any size desired).
- Plastic bottle caps.
- Paint (acrylic) and brush.
- Pencil.
- Ruler.
- Glue (not fast drying).
- Assortment of jewelry, balls, mosaics or buttons.

1. Using a pencil and ruler, mark sections on the canvas.
2. Glue one big plastic cover in the center of each section. Next, you can glue the covers of different sizes and shapes first.
3. Paint the entire canvas with black paint and let dry.
4. Glue an assortment of jewelry in the center of each lid and let dry.
5. Now the sections can be colored as you like.
How to make plastic bottle toys
DIY snake toys
Make funny snakes out of foam by creating a simple device at home!

You will need:
- Scissors.
- Plastic water bottles.
- Old towels.
- Rubber strip.
- Small bowl.
- Dishwashing liquid.

1. Cut off the bottom of the plastic bottle.
2. Secure the towel to the bottom of the bottle with a rubber band.
3. Dip the bottle, towel-side down, into the bowl of soapy water. After that, you can create snakes from tiny bubbles.
Important! Care must be taken to prevent soapy liquid from entering the mouth and eyes.
DIY crocodile toy

You will need:
- Two half liter plastic bottles.
- Bottle caps.
- Scissors.
- Glue.
- Thin paper.
- Tassel.
- Waxed paper.
- Eyes (for example, buttons can be used).
1. Using a knife and scissors, cut the bottles in half, then cut one piece so that the height remains 7 cm.


2. Trim the edges of the bottles so that the crocodile is bent.
3. Glue the legs-lids to the crocodile evenly.
4. Make thick balls of paper and attach them like crocodile eyes.
5. Cover the entire body with thin green paper.

6. Cut out waxed paper and glue on paws, eyes and teeth. Paint your teeth white and your nostrils and eyes black.
Instructions: a vase from a plastic bottle

1. For convenience, cut the bottle on the upper contour.


2. Measure and evenly cut strips around the bottle. It is more convenient to do this by cutting wider segments in half.

3. Gently press and fold all strips outwards.


4. Press down on the bottle, placing it upside down on a flat surface. This will help even out the edges.


5. Fold the end of each strip under the next two. Do this so that the tip of each strip is in the place indicated in the photo.


Balls and stones can be added to create a beautiful play of light in the sun. Since the vase will be very light, the weight can contribute to proper balancing.

A warning! Such a vase will be subject to large temperature changes. Therefore, do not leave it near heating units in order to prevent thin strips from spreading.
Large lamp in the garden from a plastic bottle
The bottle is used as a light source. Such an invention is capable of making a lamp with a large illuminated space from a small lantern.

Alternatively, you can use a bleach solution in a bottle for the best light diffusion.
Universal spoon from a plastic bottle
Here is such a simple, but at the same time, sometimes very necessary spoon (for example, at a picnic) can be cut out of an empty plastic bottle.

Making food containers from plastic bottles
The idea is to use two plastic bottles to make a storage container for food like beans, rice, noodles and sugar.

Just cut out bottles of different sizes: the long one will be the base, and the short one will be the lid. Choose a size so that the lid closes easily and at the same time tightly.
Watering from plastic bottles
If you have a large garden, but do not have time for watering and do not want to spend money on newfangled expensive structures, then we present a simple idea sprinkler.

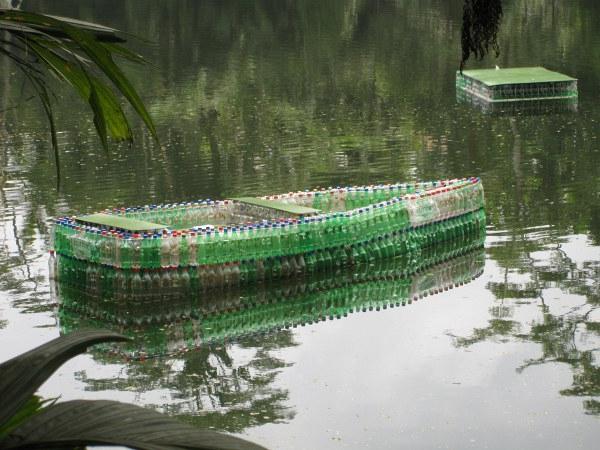
The once famous traveler Thor Heyerdahl made a balsa wood raft, on which he successfully traveled across the Atlantic and Pacific Oceans. Balsa is very light tree which does not absorb water. If you look around, you can find a substitute for this wonderful wood, these are ordinary plastic bottles, it is possible to build an aphid boat from them, a simplified version, a raft, and use such unusual boats for fishing or recreation.
Many foreigners notice that Russians are very fond of crafting with their own hands, and making such a boat or raft is cool, cheap, it’s enough that all materials are available, the design is simple.
A boat made of plastic bottles was first built not in our country, but in some Asian country, but the idea is good and therefore they are trying to repeat it again and again.
Necessary materials
In order to make this craft with your own hands, you will need the following materials:
- Bottles - your task is to make the boat rigid enough. It would seem that the larger you take plastic bottles, the less they will be needed and the assembly will go faster, it is more logical to use five-liter containers. This is true, but you will need to make the boat stiff enough, and to achieve this effect it will be better to build it from smaller bottles. It seems to me that bottles of one and a half or two liters are better suited.
- Water repellent adhesive.
- Scotch.
- Plywood.
- Wire.
- Plastic sticks or wooden planks.
Preparatory stage
Take an empty bottle, close it and squeeze it, you will feel that it is quite soft and fragile. To give strength to the bottle, it is balloon must be inflated with pressurized air. This can be done with a compressor for pumping car cylinders.
Then the bottle must be firmly closed with a lid, after lubricating it with waterproof glue for plastic.
Instead of a compressor, you can use an easier way. If you have a cold pit in your garage, then place the bottles in it for several hours so that the air in them cools down. When you take it out immediately close the lids, after a while the air will heat up and the pressure in the bottle will increase.
Only clean bottles are suitable for work, any dirt or labels will interfere with the gluing process.
Initially, decide on the size of the boat, the number of bottles that you will have to collect in advance will depend on this, because you will not find such a quantity right away. A small boat from plastic bottles can be built from 300 pieces, the Chinese used 1500 for their construction.
Since the use of a compressor and toxic glue is necessary, it is necessary to build a boat in the fresh air, on suburban area or in the garage.
Manufacturing methods
There are a lot of ways to make a boat with your own hands. The most important thing is that the structure can support your weight. The bottles are glued together with the same water-repellent glue, for example, liquid nails, and rewound with adhesive tape for strength.
1 way
Initially, logs are made from bottles, which are then interconnected, forming plastic platforms, and a boat or raft is assembled from these platforms.
Log making method
Ready-made tightly twisted bottles are connected by slots that are on the bottom of each bottle: for glue, groove into groove. On top of the connection, to give greater reliability, the cut off middle of another bottle is pulled. 
About the bottoms, it’s clear how to connect, but how to fix the bottle spouts? To do this, a part with a bottom is cut off from another empty bottle and put on, pre-lubricated with glue, on a spout with a screwed cap on the prepared bottle. And the operation of gluing the bottom of the bottles together is repeated. All joints are wrapped with tape or glued. This is how a log of the required length is assembled. 
Platform
The logs are tightly fastened to each other with wire, wrapped with adhesive tape and a platform is obtained, like a catamaran. There are two such platforms. There will be 8-10 bottle logs in one platform. Between themselves, the platforms are fastened with plastic tubes and it is already possible to put a plywood bottom on them.
2 way
This option does not involve the manufacture of longitudinal logs, but are glued together by the side walls of the bottles, forming transverse segments. The width of such a plate depends on the width of the intended boat. Then these transverse plates are connected with the same glue to each other. 
The transverse plates are glued together only after the glue has dried in each layer.
3 way
Glue the bottles with each other "standing", spouts up. From above, on the second floor, the sides are being completed. 
Of course, not many people dare to make a full-fledged boat for fishing, but to assemble a small raft on which it is very convenient to get to hard-to-reach places under the branches of trees is quite real and fast. Watch the video for another simple assembly option:
Boat repair with plastic bottles
In addition to building an unusual vehicle on water, using plastic bottles is possible.
To do this, an incision is made in each compartment, such that the bottle crawls through and empty bottles are carefully pushed into the compartments, very tightly.
If you start from the nasal compartment, then push the first row with the throat forward, the next - with the bottom forward, the next with the neck again, so a more compact and dense filling of the entire cavity is obtained. 
It is necessary to push as tightly as possible, as soon as the design of the boat allows. Since neither glue nor tape can be connected inside the side of the bottle, you will have to fasten everything with mounting foam.
At the junctions of the rows, a puncture is made in the board and each row is foamed with mounting foam.
Large slots in the compartments for bottles after filling must be sewn up and then sealed with a rubber patch. It is clear that with such a constructive solution, the tightness of the boat will be broken, but now the air will be firmly corked into bottles.
folk omen: If you dreamed of a boat and you are in it, this is for well-being.
Surely, many craftsmen have thought about how to use the buoyancy of empty plastic bottles to make a small boat or raft for fishing. In fact, putting this idea into practice is not so easy. Apparently, therefore, there are not so many examples of such creativity, but still they exist.
An industrial engineer from Argentina, Federico Blanc, calculated and built a similar design in the form of a narrow kayak. The boat can carry two adults with additional cargo.

The boat floats well and is often used for its intended purpose on the Argentinean Parana River. The author did not immediately come to this construction. He made several experiments with assembling a boat from standard bottles with closed caps. In the end, an ideal design of long cylinders was obtained.

The most important and difficult element of the construction is to glue oblong cylinders from several large bottles. Two extreme bottles are taken with whole necks closed with corks. For the rest, the bottom and neck are cut off from the bottles. The bottles are glued together with overlapping walls on top of each other. Of course, such work will require some time and ingenuity. But now the master has made his dream come true. In addition to two people and fishing gear, there was enough space on the boat for a small refrigerator, indeed, a dream and not a vacation.
Another version of a plastic bottle boat was made by the owner and staff of a small hotel on the island of Viti Levu, Fiji. Here, when designing, they went what is called "on the forehead." The bottles are simply glued together; to increase buoyancy, the bottom is made of a piece of thick foam.

Parts of the structure for tightness were poured from the inside with waterproof mounting foam, I'm really not sure that we have such foam in our stores. On the other hand, I know from experience that good foam sticks to any material and you can't just tear it off. Outside, the product is covered with a film, which increases the rigidity of the connection. Despite its rather strange appearance, the boat can withstand three grown men afloat.

The case was not limited to one boat, square rafts were also assembled. A raft is certainly easier to make than a boat. It is enough to take some kind of light sheet material, it can be a piece of foam reinforced on top with a piece of plywood of the same size. Then, under the foam, two or three rows of bottles are glued from below.
A few years ago, I was struck by a short video in which a man makes a small boat out of plastic bottles. No matter where I looked, I couldn't find any instructions on how to make one for myself, so I had to make this boat out of bottles with no advice. I decided that this would be a project for everyone, that it would be easy and safe, and also completely eco-friendly.
I made a boat out of plastic bottles like a kayak, with an open top. It measures approximately 3 x 7.5 feet and weighs approximately 50 kg. Since the bottle caps are screwed on tightly, they will keep the bottle boat afloat even if it is flooded with water, so it is an unsinkable boat! It's perfect for smooth water, it's amazingly durable, but I wouldn't advise anyone to try even small rapids on a bottle boat.
Step 1: Materials
You only need 3 things:
- Plastic bottles with tight-fitting caps (about 270). I used 20 ounce sports drink bottles because they are the right size and sturdy construction.
- Glue. I used polyurethane glue liquid nails. I tried using silicone for caulking, but it wasn't sticky enough for me.
- A gun for a tube of sealant.
Step 2: Deck
The design of this bottle boat is reminiscent of a simple punt design - these open boats can be purchased at sporting goods stores. We're going to make a few layers that are flat like a raft and stack them on top of each other. Start by gluing the bottles side by side into neat sections. A line of adhesive about 3/16" - 1/4" (5 - 6 mm) wide is sufficient. You need a total of 12 horizontal sections for the boat deck. Section sizes:
6 x 11 bottles
2 x 9 bottles
2 x 5 bottles
2 x 3 bottles
Step 3: Body
After these sections of the bottled boat are glued, allow the glue to dry according to the instructions on the tube. While you are waiting for the glue to dry, you can begin assembling the next layer of the boat, which will act as the hull of the boat. This will be slightly smaller than the first layer, but built in a similar way. You need 11 horizontal sections for the second layer. Their sizes:
5 x 10 bottles
2 x 8 bottles
2 x 4 bottles
2 x 2 bottles
Step 4: Installation
After you have made all the sections, you can start gluing them end to end. Place a large slap of glue on the bottom of each bottle and squish the caps of the adjacent section into it. Connect the sections, as in the purely technical diagram above, to get an ellipse of the bottom of the boat from plastic bottles.
Connect the two parts of the bottom of the sections, as described above, with caps to the end of the boat, until you reach the 6th section. Then two halves, each consisting of 6 sections, connect the bottoms of the bottles. You will end up with the caps in the back half looking aft and the caps in the front half looking forward. Leave it all to dry.
Spring is the traditional start of the fishing season. What is fishing without a boat? You will learn how to make a boat out of plastic bottles from this article.
In order to start building your boat, collect all the appropriate material. It consists of the following basic elements:
1. Plastic bottles. They need to collect as many as possible. Well, if they are large.
2. Scissors or a sharp knife.
3. Adhesive tape for fastening bottles.
4. Thin wire.
5. Crossbars made of wood or plywood.
Stages of work
We will tell you step by step how to make a boat yourself. Stage one involves preparing the bottles for use. Wash them, remove the stickers and the adhesive itself, using a solvent if necessary. Then fill the bottles with pressurized air to keep them from deforming.
The bottles are placed in the freezer. After they are filled with cold air, you need to screw them on with lids. When moving bottles from freezer heat expands the air. Thanks to this, the bottles are no longer subject to deformation. When all the procedures are done, put the bottle caps on the glue, and it is better if the glue is waterproof.
So, When describing the second stage, everything will become somewhat clearer. You will need to collect plastic bottles in the so-called "logs". The first two bottles are fastened with bottoms: the protrusions of one are connected to the hollows of the other. For their connection, a third bottle is used, the frame of which is stretched over the other two. Adhesive tape connects the joints of the containers. At this stage, it becomes clear to you how to make a boat. You see that it is simple and inexpensive.

To continue, you need to cut off the neck of two more bottles. Each of them is put on already fastened bottles from its side. The joints are connected and sealed with adhesive tape and glue. As a result, a workpiece with bottoms at two ends was obtained. As in the first stage, we connect the notches and protrusions. In this way, you can get whole "logs" from plastic bottles. Surely the question of how to make a boat yourself does not scare you now.
Stage three begins with the connection of "logs" into floats. There should be eight of them in one float. "Logs" are fastened with adhesive tape, wire, you can also use waterproof glue.
Now, when the work is almost completed, you yourself can brag to your friends and tell them how to make a boat yourself. Only one step separates you from victory. It remains to assemble the boat itself from the components. They are fastened with cross bars. Assembly schemes and frames are very different. It depends on what kind of boat you are going to make. If desired, the boat can be upholstered with plywood sheets, paint it or draw something.
Now you know how to make a boat from improvised means. It doesn't cost much. Most often they make rafts or simple boats, but even a yacht can be made from plastic bottles. Show your imagination and make your boat unique, one at the sight of which your friends and relatives will be delighted.


