Jet furnace Kuznetsov. The best of its kind! Kuznetsov's stove, do-it-yourself manufacturing: diagrams and ordering. Necessary materials and tools
Arrangement of the furnace in country house or in the country - it is very popular today. Despite the appearance of modern heating appliances on the market, many prefer the good old brick stove, which for many centuries served as the only source of heat and cooking in the house. Such structures are especially relevant where there is no gasification.
Time does not stand still. The good old "Swedes" and "Dutch" ones were replaced by new and more advanced ones - bell-type furnaces, which are in no way inferior to their channel counterpart. The design of the bell-type furnace is fundamentally different new method use of hot gas.
The Kuznetsov bell-type furnace (popularly referred to as "Kuznetsovka") was named after its creator, I.V. Kuznetsov, who started developing a new heating scheme in the early 60s of the last century. The unique technology of "free movement of hot gases" immediately gained recognition and became very popular all over the world.

The peculiarity of "Kuznetsovka" is that the heated gases pass and circulate through the pipe due to their own gravity, in contrast to the "forced" movement through the chimney. We all know from physics lessons that warm air rises, displacing cold air. But, unlike channel prototypes, here the heat does not exit the pipe, but is collected under the hood. Gradually, it cools down there, and it is forced out by gusts of more hot air rising upwards.
The main difference between a channel furnace and a bell furnace is the principle of hot gas movement. In the first one, the smoke, as it were, is drawn up through the pipe, and in the hood, it is pushed out. The hood itself can serve as a container for heating water, cooking, drying, etc. Thus, the bell-type furnace can perform a dual function.

Furnace "Kuznetsovka"
That is, by functional characteristic, "blacksmiths" can be divided into:
- bath stoves;
- stoves for cooking (bread, cooking, under a cauldron, barbecue, grill, etc.);
- fireplace;
- furnaces for heating;
- combined type.
The most common are combined types with the possibility of cooking and heating the whole house. Despite the possibility of variation in style and shape, the principle of operation of the bell-type furnace remains unchanged.

To make it easier to understand the basic principle of the Kuznetsov stove, imagine a fire kindled in the open air. Due to the unlimited access of air to the fire, the fire gives little heat. And now let's try to cover this fire with a metal cap, leaving a small gap below, so as not to extinguish the flame at all. Hot air will go up, heating the walls. Gradually cooling down, the air will begin to descend to the left opening while a new portion of hot air takes its place. This is the principle of the free movement of hot gases, which I.V. Kuznetsov successfully applied in his development.
Design features
Today, more than 150 types of designs can be found on the Web, but no matter what form, style of execution they may be, all furnaces are built according to the same method. The designer, creating a scheme for laying a bell-type furnace, set himself two tasks: the productivity and efficiency of the heating system.
It is not so easy to build such a structure. It is necessary to strictly adhere to the developed by Kuznetsov I.V. orders. The inventor pays great attention and attention to the location of the internal channels of the bell-type furnace.
The hood is a separate chamber for retaining heated gas, which contributes to fuel savings and increases the efficiency of the furnace.
The standard design of the "blacksmith" assumes the presence of two caps. The lower one is combined with the combustion chamber, and the second cap is located in the upper part of the furnace. The task of the first cap is to separate gases into cold and hot streams. This is what distinguishes the bell-type furnace from the channel one, where the heated air, under the action of draft, freely goes outside. Here, the hot gas flow leaving the furnace tends upward, where it lingers under the first hood and accumulates heat for a long time.
Further, the flow tends through the passage to the second chamber, where it also lingers under the second ceiling, since the passage is at the base. As a result, hot air accumulates heat in the furnace for a long time before exiting through the chimney. This gives a high efficiency - up to 95%. If compared with the efficiency of a traditional Russian stove (channel), then this is 45-50% more.
In addition to the free movement of gas, the bell-type furnace also involves mechanical flow control. For this, valves are installed in the structure. They, as needed, can delay and redirect hot streams. The "summer" valve is designed for the warm season, when the oven is used as a hob for cooking. Having opened the summer valve, the flow of hot air will rush up the chimney without going under the second cap.

Benefits of a bell furnace
If we compare the blacksmith's furnace with other brick counterparts, then it has a huge resistance to deformation. It heats up quickly and retains heat for a long time. Even if the damper is not tightly closed, the generated heat can be stored in such an oven for a long time.
- long-term operation;
- small formation of soot and soot (it almost completely burns out, turning into ash);
- Efficiency - up to 80%;
- lightweight design that can be mastered even by a beginner;
- improved heating system in comparison with the channel analogue;
- simple and practical in care - there is no need to clean it often;
- does not crack;
- versatility of erection (in a house, apartment, bathhouse, etc.)
- a large selection of shapes and designs;
- no need to take into account the height of the chimney to ensure good draft;
- high speed of kindling;
- the design allows you to install a large heating element;
- there is a uniform heating of the furnace;
- the stove cools down longer compared to its brick prototypes.

Ignition of "Kuznetsovka"
Basic installation rules
- The inner shell of the furnace must be surrounded on all sides by empty space, since the brick will become very hot during the operation of the furnace.
- The location of the oven heat source can vary depending on the type and shape, but it should always be at the bottom of the hood.
- Every third row of brickwork should be tied with metal wire. This will strengthen the bond and prevent further deformation of the furnace.
- The shape of the cap can be of any shape and size.
- When mounting the oven, take into account the fact that when heated, all metal elements (grid, door) will expand. Therefore, all these details of the furnace system must be installed with a margin for expansion. A refractory gasket must be installed between brick and metal.
- At the first kindling of an already finished furnace, it is not necessary to immediately give the maximum temperature. The furnace must be fired gradually, starting from low temperatures.
- After installation, the furnace should be treated with a refractory compound.
Today there are a huge number of varieties of bell-type furnaces, because progress does not stand still. Kuznetsov himself laid the foundation for this new type of heating system, and his followers around the world are already making their own adjustments and working on improving the furnace. Of course, it is much easier to build a stove at the stage of building a house. But often people think about the need to place such a heater after the walls have been erected. Here, when developing a scheme, it will already be necessary to take into account the height of the beams, the location of the partitions, the roof, etc.
If the stove is laid during the construction of the house, then it is better to arrange it in such a way that it heats 2-3 rooms at once.
It is simply physically impossible to describe the instructions for laying all types of bell-type furnaces, so in this article we will present the classic version of installing a bell-type furnace with our own hands. By following our instructions exactly, you will definitely be able to assemble a solid, beautiful and functional oven.
The dimensions of the furnace, of course, can be different - the volume of material will depend on this, respectively. But in no case should the order be changed!
What materials will be needed to install the oven
Before starting to execute construction works stock up on all the necessary materials. In order for the bell-type furnace to please you with its functionality and appearance long years materials must be of good quality.
| |
| Refractory brick for firebox (fireclay) SHA-8. |
| Brick ceramic (brand not lower than M150). |
| Clay, sand and cement for laying bricks and foundations. |
| Plywood for the construction of formwork. |
| Steel plate. |
| Metal wire or reinforcing rod. |
| Steel corner. |
| Wooden bars (50x50 mm) - 4 pcs. |
| Doors and latch. |
| Foil under the first layer of brick (according to the size of the foundation). |
| |
|


Tools for laying a bell-type furnace
- construction mixer or drill with a nozzle;
- Circular Saw;
- pliers (for tightening the wire);
- Master OK;
- shovel;
- building level;
- Bulgarian;
- construction gloves.
Let's start installation: step by step instructions
Step 1. We think over the design of the bell-type furnace and draw a diagram on paper.
Before starting work, you must clearly know what width your oven will be. It must be drawn on paper, having calculated all the necessary parameters.
- Calculate the size of the hole for the foundation. Keep in mind that it should be 10 cm wider than the heating structure itself.

Step 2. Laying the foundation
Before installing the oven, you need to take care of the base. It must be firm and perfectly even so that cracking of the structure and deformation does not occur in the future. Laying the foundation is a very responsible step, which must be taken seriously.
For a concrete floor, the foundation will be a kind of platform, raising the oven itself 20-30 cm above the floor level. We make formwork according to the dimensions of the foundation and fasten its corners with wooden bars (50x50 mm). At the bottom of the foundation we pour sand 15-20 cm thick, we compact it well, and only then we slowly pour the solution. The foundation of the main house should not be connected to the foundation of the furnace. They have different weights, which means that shrinkage will be different.

If you are making a wood floor oven:
- Draw with a marker wooden planks the size of the future foundation and cut a hole around the perimeter with a circular saw.
If the stove is being built in a wooden house, then fire safety rules should be taken into account. It is necessary to lay a sheet of asbestos between the structure of the furnace and the ceilings.

- We dig a hole 80 cm deep and 1.5 m * 1 m wide. Make sure all walls are even. For this, it is better to use a bayonet shovel. We pour sand at the bottom of the pit with a thickness of 15 cm, carefully tamp. It is necessary to wait for the sand to shrink (within 2 days).
- Let's start creating formwork. It is possible to use any old formwork for installation wooden doors, unnecessary boards, but, ideally, it is better to take plywood. We measure the length and width of the boards according to the dimensions of the foundation, lower them into the pit and connect them with screws. If the formwork is not all immersed in the ground, then we additionally connect the corners with wooden blocks (50x50). If the formwork is immersed in the pit to its full height, then you can not do this.
- We reinforce with a metal rod.
In some wooden houses, the floor has already been raised above the ground by 50-80 cm. In this case, you will need to dig a hole under the foundation by 20-30 cm. That is, you need to “go deep” anyway, but consider this difference.
- Cooking cement mortar(sand + cement + water) and slowly pour into the pit. Try to pour in layers, each time stirring lightly with a shovel. This will allow excess air to escape and create a stable base. Let the base dry. It will take at least a week, but sometimes you have to wait 20-25 days for the solution to fully set. In this matter, you should not rush, since the operational properties of the furnace depend on the strength of the foundation.
- While the solution is still damp, it is necessary to clearly determine by the building level how level the site turned out to be. Correct if necessary.
- To do this, we take the building level and check the place where the furnace will be installed.
- When the solution is completely frozen and the foundation is ready, you can start laying the furnace. Do not rush with the construction of the furnace. The foundation must be strong and solid, the further operation of the furnace depends on it.
- We lay a layer of reflective foil under the first layer of brickwork. This will prevent heat loss and redirect the direction of heat flow from bottom to top. Take the material a little more than the perimeter of the foundation. After laying the brick, then it will be exactly necessary to cut off the edges with a knife.

Video. Masonry brick "Kolpakova" furnace
Step 3. Preparation of clay-sand mortar for bricklaying. We will use clay as the basis, as it has heat resistance up to 1000 degrees.
You can watch the video visual instruction by mixing the solution.
Video. Preparation of clay mortar for kiln masonry
In a large metal container, it is necessary to combine the clay with water and soak it for 2 days. After that, pour the sand into the container and mix well with an electric drill with a mixer attachment. When the mixture is well mixed and 2 materials do not separate in it, check the density of the mortar with a trowel. If the mixture slowly slides off the tool, then the solution is ready. You can start laying bricks.
Masonry of the 1st level of the furnace
Before you start laying bricks on the cement mortar, it is better to immediately lay out each row, according to the ordering scheme, on the floor “dry”. The diagram shows that in some rows you will have to divide the bricks into ½, ¼. Where you have to grind bricks, use the manual method so as not to violate the technical properties of the material and its aesthetic appearance.
- Row number 1. The brick will spread evenly over the entire area of the oven. The first row is solid, keep even corners. Start from the side walls of the blacksmith, laying out with a spoon method, move from right to left. (Figure 14). The brick is laid longitudinally in length. We lay each next layer with an edge in the center, and report the missing part, having beaten off the required size from the new brick.
- Lay row number 2 bricks. At this level, we install a blower (according to the previously developed scheme) and a window for cleaning the furnace (there may be 2 of them). The design of the bell-type furnace allows you to place the door for cleaning and the blower anywhere, but the window must be below the firebox. Here it will be necessary to divide one brick in half and install them so that they protrude from the general row outward. When you lay the second row, you should not connect them with a solution. Upon completion of construction work, you will need to clean the furnace from fallen clay. And after you clean the oven, then fix them with a solution.
In order to properly install the blower doors and windows, it is necessary to thread the knitting wire into the existing holes, make a loop and twist it with a bundle. Insert between bricks. If there are no holes in the factory parts, then they must be made with a drill with a drill bit for metal. Use pliers to twist the loop as tight as possible. While the doors for stability must be fixed with bricks, but not connected with mortar. This will need to be done after laying the third row.

- We put number 3 in the same way as the previous one. From the 3rd row, we begin to raise the firebox itself, laying it out of heat-resistant bricks. Between the front wall of the stove, lined with red brick and the firebox itself (made of fire-resistant brick), we lay basalt cardboard or corrugated foil. After burning out, it will create a perfectly even thermal gap of 5 cm.
The main feature of the Kuznetsov furnace is the "floating" furnace. That is, it should be a separate module, separated from the furnace body by a dry seam. Refractory bricks (chamotte) should not be included in any protrusions in the ordinary brick of the furnace body.

Features of the laying of the Kuznetsovka furnace
- We make row No. 4 a little narrower (by 1.5 bricks) to reduce the connector for falling combustion products (you can see it in the diagram). We design in such a way that a partition appears in the far corner from the firebox leading to the upper compartment.
- Row number 5 is laid out similarly to the 4th row, only a grate must be placed on top of the reset rim. We put it without mortar, and fill the gaps with sand.
- Row number 6 is laid in the same way.
Here we begin to install the furnace door with a gap of 5 mm. We set it carefully on a plumb line to control the level deviation. In the same way as in the 2nd row, when you installed the ash pan, you need to fix the door in the brick with metal wire.
In order not to move the door while you continue to lay a row, fix it with bundles and press down the ends of the bundles with a brick from above. This will allow you to continue working without worrying about the door being level.
- Row number 7. We bring the chimney 0.5 bricks wide from the furnace into an adjacent air chamber.
- Row number 8 is laid similarly to the seventh.
- Row number 9. We display the walls of the furnace with fireclay bricks. Here, a passage is formed between the furnace and the first hood for the removal of combustion products (seen in the diagram).
- Row number 10 is laid out by analogy with the previous one.
- On the 11th row, half-brick work goes into the masonry of the whole.
- Row number 12 - a lattice of fireclay is laid out. Again, we continue to lay in half a brick according to the above ordering scheme.
- Row number 13 - the same styling as on the 12th row.
- Row number 14 - remove the crate and leave 2 chimneys.
- 15th row - similarly, but for 16 we use whole bricks instead of halves. We block two chimneys into the air compartments.
- 17th row. We block the movement of smoke with a steel plate. Thus, the channel that you created on the laying of row number 4 now remains the only one.
![]()
Step 5. Laying the second level of the furnace.
- Row No. 18 is laid similarly to the 17th, but on this row we fasten the intake plate, which is fixed on three sides with cement mortar.
- Row number 19. We build a column under the very top of the structure. Behind the stove we make a small sinus (the width of a brick) so that the smoke leaves through the pipe.
- Row number 20. We stack in the same way as the 19th row.
- Row number 21. This row is laid so as to block the channel leading to the pipe. The smoke will come out through the bosom that you left below (on the 19th row).
- Row number 22. From a quarter of a brick, perform an extract that comes from a steam collector. Overlapping steel part ceiling.
- Row number 23. We put it similarly to row No. 22.
- Row number 24. In this row, it is necessary to connect the chimney with a steam collector with a closed channel
- Row #25-26. We lay similarly to the previous row.
- Row number 27. Fence plate installation.
- Row number 28. We cover the structure with a brick roof.
- Row number 29. We make an additional layer similarly to the previous one.
- Row number 30. The row is almost completely covered with bricks.
- Row number 31. Lays the base of the pipe. We bring out a pipe with a diameter of 1 brick.
- Row number 32. A chimney pipe is formed.
Step 6 To make the stove look attractive, you can carefully round all its edges by hand grinding. This must be done after the completion of construction work.
Step 7. We process the created furnace with a refractory compound.
Step 8. We melt the stove. No need to immediately give the maximum temperature. The oven should gradually “burn out”. Start with the minimum temperature, and then add heat.
That's all! Following the instructions, and most importantly, without violating the masonry order, you will definitely be able to assemble a reliable beautiful stove that will last for decades.
At the end of this article, we suggest watching a video in which you can see the stages of laying out the Kuznetsov furnace.
Video. Do-it-yourself Kuznetsov oven masonry
A great contribution to the development of the furnace business was made by I.V. Kuznetsov, who devoted almost his entire life to the invention and improvement a large number new designs of furnaces. He purposefully worked to ensure that his developments worked effectively and benefited people.
The improvement of previously designed thermal structures is based on equipping them with more rationalized capabilities. Thus, for some models, the firebox underwent changes, the heat preservation increased, certain equipment was added, and so on. The fact that the structures created by Kuznetsov work efficiently has long been proven by their great popularity and many years of operation. Positive feedback about Kuznetsov's furnaces motivate many to independent production domestic heating devices. In this case, you can save a little, but you need to choose the right materials and strictly follow the Kuznetsov furnace ordering scheme.
Kuznetsov proposed a completely new approach to building a brick oven. As you know, traditional ovens have channels through which hot gases move, heating the brick. The main factor supporting this process is traction. This forced method of heating the furnace body is characterized by uneven distribution of heat. In addition, it often leads to the formation of cracks in the walls of the structure. In the construction of such a furnace, which takes up quite a lot of space in the room, a lot of bricks are used.
The question also arises regarding the availability of space for the installation of a heat exchanger. This device loses the service life specified by the manufacturer if it is placed in the firebox itself. Constant contact with fire has a detrimental effect on the strength characteristics of the heat exchanger. Such a neighborhood also leads to deterioration in the conditions of fuel combustion, a decrease in the efficiency of the furnace and the formation of a large amount of soot.
In a furnace built according to the Kuznetsov method, gases move freely.
This design is based on the installation of caps inside it, which are vessels turned upside down. In some models of ovens, the hoods may have top openings. The vessels are arranged in a different order, however, the main condition for their placement is the presence of vertical hollow slits between them, called dry seam. The space thus formed is up to 3 cm do not fill with either a heat insulator or a solution. As a result, gases move freely, moving from one vessel-cap to another.
To make it easier to imagine scheme of operation of the Kuznetsov bell-type furnace, you need to visualize in your imagination a fire kindled in the open air. As a result of the fact that the air has unlimited access to the flame, little heat comes from the fire, which is immediately dissipated in space. You can change the nature of the process of heating the air around the fire, if you cover it with a cap-shaped vessel, for example, a large cauldron. At the same time, it is important to leave a gap below so as not to extinguish the flame at all. As a result, hot gas naturally rises to the bottom of the cauldron and limits the access of air coming from outside. After the heat is given off to the walls of the vessel, it, descending to the open opening, gradually cools down and goes outside, and the next portion of heat takes its place.
Such a self-regulating process is characterized by the possibility of dosing outside air and finding the heated gas in the vessel until it cools completely.
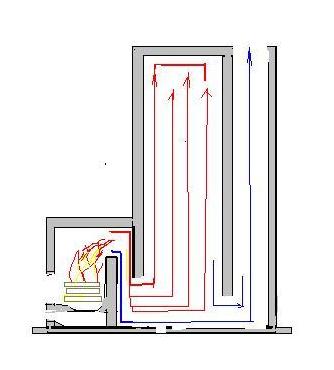
The principle described above is used in Kuznetsov furnaces, for which they are applied immediately two caps connected with a dry seam. Such a non-standard design helps to increase the efficiency of transferring a sufficient amount of heat from the stove to the room where it is installed. Hot gases first fill the first cap, thereby heating its walls, and then, cooling down, give way to a hot stream that rises from the furnace.
Trying to optimize this process, the inventor, even at its first stage, which begins after the firebox, decided divide the flow of gases according to their temperature. To this end, he used a baffle to separate the bell space from the firebox. In this case, the barrier does not reach the bottom of the vessel. As a result of this separation, hot gases immediately rush to the dome of the hood, and the flow of lower temperature is directed along the dry seam through the gap in the baffle. Thus, due to the accumulation of hot gases under the arch and the presence of a barrier, air enters the first cap only in the required amount. This contributes to the complete combustion of the fuel with the formation of a certain amount of ash.
A similar process of gas movement occurs in the cap installed above the first one.
Less hot combustion products are placed at the bottom of the vessel, and hot gases tend to the roof and, when cooled, give off heat to the brick walls. Then they go down and out through the chimney. Due to the equipment of the furnace with two hoods, in which natural injection and movement of gases takes place, the creation of forced draft in the chimney is not required.
Types of furnaces
Kuznetsov's bell-type furnaces, designed mainly for domestic use, are built to perform certain functions. There are the following types of structures:
- cooking type - for cooking food;
- heating - to provide a residential area with heat;
- bath Kuznetsov stoves - for heating baths;
- street ovens look like simple barbecues or whole oven complexes;
- for baking bread often combined with other types of furnaces;
- fireplace stoves that serve more of an aesthetic role.
Only the most common types of Kuznetsov furnaces are named here. Often, experts create combined versions of such structures, distinguished by their versatility. For example, a heating and cooking stove is well known to everyone, thanks to which it is possible to heat the house and cook food.
Strengths of Kuznetsov furnaces
More specifically, the following Benefits Kuznetsov's designs:
Self-manufacturing
Work example. Before you start building a Kuznetsov bell-type furnace with your own hands, you need to clearly know what role in the house or on the plot will she play. More than 150 drawings of furnaces developed by Kuznetsov are presented to the public. Everyone can choose the most acceptable option for themselves, but here we will consider the construction technology of a fairly simple do-it-yourself Kuznetsov bell-type furnace for heating a dwelling.
When designing the installation of a Kuznetsov two-bell furnace with your own hands at the first stages of building a house, make sure that it can evenly heat all residential premises. It is not very convenient to build such a structure in an already fully built house. Nevertheless, if such a need arose, then why not try on such a project. It is only important when determining the location of the chimney arrangement to pay attention to the location of the supporting structures and beams.
The foundation for the furnace must be planned either together with the construction of the foundation for the house, or in an already finished building, but one should prepare for the fact that the process will be laborious and time-consuming.
Preparatory work
Kuznetsov's do-it-yourself bell-type furnace at the initial stage of construction involves laying foundation. To complete this process, you need to stock up bayonet and shovel, as well as the following materials:
- sand (3 parts), cement (1 part) and water for mortar preparation;
- reinforcing rod of medium section;
- polyethylene film;
- board for the construction of formwork.
Foundation works must be done in the following order:
After pouring, the freshly prepared foundation should be left alone for 5-7 days, or even more (20-25). The time allotted for the complete solidification and drying of the base is important to foresee in advance. In this case, do not rush. The longer the foundation stands, the higher will be its strength and stability of the entire furnace structure.
Fulfillment of basic requirements
Some points during construction:
- The brick, from which the inner refractory shell is constructed, tends to expand when heated. Therefore, it is so important to ensure the independence of this part of the furnace from its entire structure.
- A refractory shell inside the furnace is created by an edge-mounted one. Drawings do not always convey this moment, but it should be taken into account. When installing simple clay bricks, freedom of action is allowed on the part of the master.
- Using wire, you need to perform a bunch of them in every 3 rows of bricks.
- When installing all metal fixtures, it is important to leave room for their possible expansion. A special gasket limits the contact of metal products with brickwork.
- At the end of the construction of the Kuznetsov furnace with your own hands, it is recommended to use a refractory compound for processing bricks.
- It is necessary to start the bell-type furnace into operation gradually, starting with heating at the minimum temperature, and then increasing it.
Preparation of tools and basic materials
It is possible to thoroughly prepare for the construction of the Kuznetsov furnace with your own hands only when it is available at hand Bulgarian, equipped with diamond discs, and perforator with mixer attachment. In addition, it is necessary to deliver to the place of installation of the heating device the following materials:
Important Points
The correct ordering of the Kuznetsov bell-type furnace will achieve uniform heating of the walls and provide excellent traction.
Before starting laying, many craftsmen lay roofing material. However, we recommend lay down a layer of foil, which, having the ability to reflect, will better retain heat.
The heat dissipation of the device largely depends on the number of compartments created in it. However, for the construction of the warmest bell-type furnace, when building them, it is important to observe the laying order and volume conditions.
What does it look like.
13.03.2017
9154
Pechnik (Moscow)
Kuznetsov's stoves are a whole story. Over the years, a lot of various models have appeared, designed under the guidance of this person, which continue to improve and become better, more thoughtful and more functional every year. Kuznetsov's fireplace stove, the order of which must exactly correspond to the declared scheme, is distinguished by its small overall dimensions, impeccable design and functionality.
Design features and result
Kuznetsov's fireplace is, first of all, a certain method, which consists in the fact that gases as a result of combustion can be evenly distributed into two equivalent streams with hot and cold vapors.
The main advantages of such installations include:
- The highest efficiency, for some installations reaching 90 percent;
- Uniform and maximum fast heating, both the installation itself and all the premises of the house;
- Good draft (what to do if there is no draft in the chimney) and duct ventilation;
- small dimensions and the possibility of installation in any place and room.
Important: if you want to use this constructive method, before starting work, you need to determine the size, shape, method of operation, heat transfer and other equally important characteristics of the heating installation, and only after that choose one of the most suitable options. To date, the number of models presented by Kuznetsov exceeds 150.
Kuznetsov stove fireplaces have their own distinctive features and are divided into:
- Fireplace. In my own way appearance and functionality resemble standard fireplaces. Used as an element of decor or a source of additional secondary heating;
- Cooking. They include not only the heating function, but also other equally useful functions, such as: hob, oven. All these features allow you to cook food through such a unit;
- Heating installations. Used exclusively for space heating. Depending on their overall dimensions, location and power, they are able to heat a house of a certain area;
- Grills. Are established on streets, in the open air or under a canopy. Installations necessary for cooking, work exclusively on solid fuel;
- Complex installations. They include the most complete set of functions and can combine several elements at once. Such furnaces have the largest overall dimensions, are distinguished by their high power and are mainly installed in rooms with a large area.
Important: using the detailed drawings and diagrams developed by Kuznetsov, you can assemble any stove or fireplace with your own hands.

Application of the bell method
Kuznetsov's fireplace stoves are assembled according to a certain technique, which has the following features:
- All gases and flows begin to be evenly distributed outside the combustion chamber;
- Depending on the number of hoods installed inside the structure, warm air is retained to a greater or lesser extent in the interior of the unit, thereby ensuring fast, efficient and even heating;
- When installing the cap in the immediate vicinity of the combustion chamber, when melting, hot air vapor instantly gets inside and the installation, as well as the room warms up several times faster;
- Due to the presence of caps, a minimum amount of soot and other plaque is formed, which greatly simplifies maintenance and cleaning;
- The heat exchanger must be installed exclusively outside the combustion chamber, which allows the efficiency to remain at the highest level and not to decrease.

The Kuznetsov fireplace stove is designed in such a way that only cold air is released through a special hole located in the lower part of the installation, while hot vapors accumulate in special hoods.
In order to learn more about finished works fireplaces and stoves, we recommend that you view the photos located in this article.
Ordering and styling
Preparatory stage of work
In order to fold the Kuznetsov stove fireplace with our own hands, we need the following materials:
- About 160 kilograms of sand;
- Red brick (it is recommended to use only full-bodied) - about 800 pieces;
- Fireclay brick - 70 pieces;
- Refractory clay - about 140 kilograms;
- Cast iron door, which, if necessary, can be made on your own using special paired steel sheets;
- Steel wire;
- Grate or prepared fittings;
- Corners and latches for fixing all elements and parts.

In order to get acquainted with the process of ordering and laying in more detail, we recommend watching the video in this article.
Tip: before starting work, first of all, it is necessary to check each brick separately for the presence of all kinds of cracks and irregularities; it is not recommended to use such bricks for ordering.
Foundation preparation
The optimal foundation will be the one that is being built along with the house and is connected. If the construction of the house is already fully completed, it is necessary to build a separate foundation. In order for the furnace to be reliably protected, the foundation must be additionally insulated using metal sheets or roofing material.

Order and features
Kuznetsov's fireplace stove: ordering and step-by-step guide:
- For the correct execution of the ordering, it is recommended to use a special standard drawing, which must be transferred to the selected location and make sure that the chimney will subsequently be installed correctly.
Detailed instructions:
- The first two rows must be laid out dry using fireclay refractory bricks;
- Bottom part heating furnace should be slightly thicker than all the others;
- The first two rows should be laid perfectly even. In order to verify this, use a special building level;
- The second and subsequent rows are laid in such a way that in the future a place is formed for a blower and an ash pan. Bricks are stacked in a checkerboard pattern;
- The thickness of the seams should not be more than 5 millimeters;
- Laying bricks is only necessary on a special clay mortar;
- Complete the masonry internal partitions and walls, after which, on the fifth row, install the grate of the required size;
- The gap between the grate and the walls should be no more than 7 millimeters;
- The grate itself is mounted so that it is at a slight angle - this is necessary so that during the combustion process all the chips and other combustion products remain inside and do not enter the room;
- On the fifth row, a hole for installing the fuel chamber is also made. This element must be lined with strictly special fireclay bricks. The laying is carried out by the lining method, that is, the brick must be laid on its side. This masonry method is used in places that are subject to the most severe heat;
- The sixteenth row is the complete closure of the chamber. Then the second camera is laid out;
- Using standard scheme, the laying should be continued up to the 26th row, which is completely closed from above with bricks.
After laying, the stove must be allowed time to dry completely. On average, a trial firebox can be made 3-5 days after the completion of work.
Tip: at the first check, pay attention to the presence of cracks, cracks that can let in smoke and air. For the full functioning of the furnace unit, each hole must be sealed using a special clay solution, and then re-checked, up to the elimination of all design inaccuracies.
The first Kuznetsov bell-type furnace was built in the 60s of the last century. The unique development belongs to Igor Kuznetsov, whose main activity is the design and improvement brick ovens for heating.
Kuznetsov's heating furnaces are efficient and reliable designs that use various fuel materials.
Currently, more than 150 types of furnaces have been invented, each of which has a high efficiency rate - from 80 to 94%.
Characteristics
Kuznetsov's bell-type furnaces have a number of distinctive characteristics and advantages that distinguish them from the main competitors in the market of heating equipment for home and baths.
The principle of operation of such a device is quite simple: the lower level (tier) and the firebox are a single structure - a cap, which is designed to effectively move gases formed during the combustion of fuel. In this case, the accumulation of light gases is carried out at the top of the cap, and heavy gases - at the bottom. Gases with an average heating temperature are concentrated in the middle.
"Kuznetsovka" made of bricks provides for a long-term retention of heated air inside the hood for efficient heat accumulation inside the room, and then the rapid removal of combustion waste through the chimney.
A feature of the furnace is to maintain the maximum combustion temperature. In addition, the Kuznetsov stove has a high efficiency, which is several times higher than that of a classic Russian stove.
The specific advantages of such ovens are as follows:
- High efficiency - up to 94%.
- High temperature mode of combustion of the fuel material.
- Fast accumulation and long keeping warm.
- Low level of soot deposition.
- Ease of care and unpretentiousness.
- Insignificant material consumption with high heat output.
- Possibility of additional embedding of a contour for hot water supply.
- Increased draft with small dimensions of the chimney.
- Attractive design and wide selection constructive forms. An improved version is the two-bell Kuznetsov furnace, which can be designed for any type of room.
- Fast distribution of thrust between channels in automatic mode.
Kinds
By appointment and design features"Blacksmiths" can be divided into several types:
- Heating. The devices are designed for efficient and safe space heating.
- Cooking. Used for cooking. This includes ovens for baking bread and bakery products.
- Bath. The Kuznetsov sauna stove is designed for simultaneous heating of the main bath rooms. Such devices have high heat transfer with minimum fuel consumption.
- Street. Oven complex, consisting of a grill or barbecue, for outdoor cooking.
- Fireplace. The equipment is used as a decorative element of the interior or as an additional heating option. Some are equipped with special sunbeds for a pleasant pastime.
The most popular are complex devices that are distinguished by their multitasking. A striking example is the Kuznetsov heating and cooking stove, which is intended both for heating residential premises and for cooking.
Despite their functional features, all stoves work on the same principle - the efficient distribution of heated gases in the hood into separate streams.
It is noteworthy that furnace caps can be equipped with additional equipment– electric heaters, hot water tanks, steam generators, oven and stove.
A well-designed and erected Kuznetsov sauna stove will provide reliable heating in all functional areas: a steam room, a washing room, a dressing room, and a rest room. In addition, it will allow you to quickly heat water, accumulate hot steam and purify the air.
What explains the high efficiency of furnaces
The reasons why bell-type ovens are so efficient compared to traditional devices are as follows:
- Correct distribution of flue gases according to the heating temperature outside the furnace compartment.
- A large number of caps contributes to the retention of hot gas and more efficient heat accumulation inside the device.
- The correct location of the cap helps to contain the heated gases and maintain a high temperature regime. This leads to the collection of products of combustion of fuel in one place and a decrease in the level of soot formation in the chimney. For this reason, "blacksmiths" do not require frequent cleaning of soot.
- The heat exchanger is located in the hood, so it does not retain the heat produced by the furnace and does not reduce the level of efficiency.
It is not so easy to build a Kuznetsov oven with your own hands, but all that is required from the master is to follow clear step-by-step instructions.
Materials and tools
To equip a brick "blacksmith" for a house or bath, first of all, you should prepare working drawings and orders. The author himself has developed over a hundred different stoves with step by step instructions for their construction.
The order of the furnace is complete guide, which clearly explains the correct laying of each individual row in the prescribed sequence. Beginning craftsmen are advised to strictly follow the orders of Kuznetsov's furnaces, which will allow them to build a reliable and durable structure.
For construction work, it is necessary to prepare the basic materials and working tools:
- solid red fire-resistant brick;
- fireclay brick;
- fire-resistant clay of medium fraction;
- mountain sand (twice the volume of clay);
- steel wire;
- metal corner;
- structural elements: doors for a blower, fireboxes, a grate for a grate, a valve, a stove for a hearth.
Attention! If desired, instead of clay and sand, you can purchase a ready-made masonry mixture, which is sold in specialized stores. It has all the necessary proportions of the main components.
Do-it-yourself Kuznetsov's furnaces have their own subtleties of construction, therefore, before starting work, the masonry scheme of the device should be carefully studied.
Construction technology
Even beginners can build such a device on their own, the main thing is that the construction technology and the working scheme are observed.
Foundation arrangement
The first stage is the construction of the foundation, which can be planned during the construction of a house or a bath. Otherwise, it is necessary to prepare a new base for the stove.
The base should exceed the dimensions of the furnace by 15 cm along the entire future perimeter, which will ensure high strength and wear resistance of the finished structure. For the arrangement of the foundation, it is worth considering the following:
- The base for the stove is not recommended to be connected with the foundation of the house or bath.
- When the furnace is located along the wall, the foundation must be 6 cm away from the main base, and the distance between them is protected by a sand layer.
- To protect the base from high humidity and groundwater, reliable waterproofing is required - a sand cushion at the bottom of the trench and a rolled roofing material over the concrete layer.
- To increase the strength, the foundation must be reinforced with a special reinforcing frame.
Brickwork
After the concrete foundation has completely hardened, you can proceed to the brickwork. The Kuznetsov furnace is correctly lined up only if the order proposed by the inventor is followed.
Before starting masonry, it is worth considering the location of the chimney pipe inside the room and outside on the roof, which must meet certain requirements. Recall that any Kuznetsov furnace has ready-made drawings, in accordance with which construction work is carried out.
- Fireclay fire-resistant bricks are used for laying the first two rows. A special one is being prepared to connect the bricks. It is not recommended to use a mixture prepared for arranging the foundation. After completing the laying of the 1st row, the corners are checked, each of which should be 90 degrees. From the 2nd row, the arrangement of chimney channels begins.
- To improve the heat output of the device, it is recommended to install 4 cleaning channels for the channels - in the back, in the blower and on the sides. The sizes of cleanings are chosen individually. At this stage, the horizontalness of all surfaces is checked using a corner.
- From the 2nd row, an ashpit and a blower are formed. These working chambers are designed to clean the ash and create the necessary draft for combustion. Brickwork is carried out in a checkerboard pattern with a seam 6 mm thick. To fix the bricks, a solution based on refractory clay is used.
- Next, partitions are installed for internal compartments, a wall is formed between the blower and the working part of the furnace. When laying the 5th row, a grate is installed, the thickness of which is determined by the degree of loading of the chamber with fuel. When installing the grate, technological gaps of 7 mm are observed between the grate for the grate and the outer wall of the stove. The grille is mounted at a slight angle with respect to the door.
- Here is the installation of the door for the firebox. When arranging the combustion chamber, it is additionally lined with fireclay bricks, which are laid with an edge. This provides reliable protection of the outer walls of the furnace from high temperatures.
- Until the 16th row, laying is carried out similarly to the previous rows. From the 17th row, a cap is installed, after which you can begin to equip the second chamber located above the first. It will be the second cap. At this stage, the cap is overlapped, and on the 21st row, passages are arranged that are directed along internal walls on both sides.
- The work is carried out in accordance with the proposed order until the 26th row, after which the upper part of the cap is securely closed with brickwork.
- 24 hours after the completion of masonry, you can perform test run furnaces with the addition of a small amount of fuel material. This will allow you to check the finished structure for tightness and the absence of gaps between the bricks. If even minor deficiencies are found, they must be eliminated immediately.
Any "blacksmith" must have a floating firebox, for the arrangement of which a special seam is made.
A dry seam in Kuznetsov's furnaces is a small technological gap in the extreme corner, almost at the bottom of the furnace. It provides a safe separation of gases in the furnace into cold and hot.
This process contributes to the unhindered rise of hot gases to the top of the hood with their subsequent cooling. Further, the cooled gases are discharged into the second hood and through the chimney to the outside.
- The first hood must not be connected to the combustion chamber. This is due to the fact that the fuel material must burn separately - to create a high temperature regime. The connection of the hood and the firebox is allowed in a classic Russian stove with less efficient draft.
- Each even row of brickwork should be fixed with metal wire to create additional strength and stability of the structure.
- After completion of the masonry, it is recommended to treat the brick with a protective fire-resistant composition.
- Decorative and functional elements of the metal furnace are installed taking into account the possible expansion when heated. The distance between them and the brickwork is protected by a special gasket.
- The first furnace of the device is carried out at minimum temperatures with a small amount of fuel.
- When heated, the brick expands, so the internal structure of the furnace made of refractory material must be designed so that there are technological gaps on each side.
The most accessible design of the Kuznetsov bell-type furnace can be built with your own hands. When planning a complex and multifunctional device, the technology of its construction can also be complicated.
When building or buying country house First of all, the issue of heating is taken into account. It all depends on how often you plan to use the premises for living. Consider just one example, when it was decided to spend only weekends in a country house, in other cases the proposed options are irrelevant.
Content:
fireplace stove
The classic version is the Kuznetsov stove. The furnace is used everywhere, its versatility, design and execution options, time-tested. The maintenance mode of the furnace involves a two-time firebox per day. The morning firebox of the stove to provide heat in the house for the whole day is also designed for possible cooking. In the evening, the stove is heated for night heating. The average village house for the winter period requires about 5-10 cubic meters of wood. We subtract the working days, as a result we have the result - two cubic meters of firewood for the winter. Not so much, in general.

Furnace differences
The Kuznetsov furnace has no special fundamental differences from other furnaces. The traditional tiling makes it attractive and a constant reminder of the Christmas holidays. Tiles are made by hand, piece by piece - the cost of such a furnace, respectively, is an order of magnitude higher.

Furnace heating
Any well-built stove gives even and comfortable heat throughout the house. The process of heating the furnace adds positive emotions during your stay in a country house.

Fireplace functions
Fireplace - as a type of heating, should be considered only for a single room. Undoubtedly, it is part of the interior of the living room and is not able to heat the whole house. There are two types of fireplaces: with an open firebox and protected by refractory glass. The fireplace gives the effect of heat almost immediately, but it also cools down without additional fuel lining after an hour. Dry wood burns well and quickly. There are also Kuznetsova.

Description of the Kuznetsov fireplace stove
Stoves and fireplaces are usually built of ceramic bricks, without the use of cement, which enhances their buffering properties of accumulation and uniform heat release. In addition, the furnaces are provided with a multi-pass system for the removal of hot gases, which makes it possible to reduce heat losses.

Chimney
Any device that runs on solid fuel provides for the removal flue gases, that is, chimneys. This also applies to small-sized stoves, under the common popular name "potbelly stove". IN homemade version, are a piece of large-diameter pipe and are equipped with furnace attributes. They are also available in cast iron, with a good casting design. Extremely gluttonous and fire hazardous.

It should be noted that it is necessary to strengthen fire safety measures when using open fire. Elementary skills in using stoves are unconditional.

Construction scheme


Video