Instructions on how to assemble a sliding wardrobe with your own hands. Photo report and visual video. Step-by-step instructions for assembling a sliding wardrobe How to assemble a sliding wardrobe made by Mari El
Self-assembly of furniture helps to save a lot of money. It is good if a person has simple skills in assembling objects. It will be useful for beginners to learn how to assemble a sliding wardrobe on their own. Step-by-step installation steps for each element of the product will allow for quick installation.
Among all types of products for storing clothes, the sliding wardrobe occupies a leading place today. It is multifunctional, roomy, available in different shapes and sizes, and does not require additional space to open the doors. That is why most people, when choosing between a wardrobe and a wardrobe, prefer the latter option.
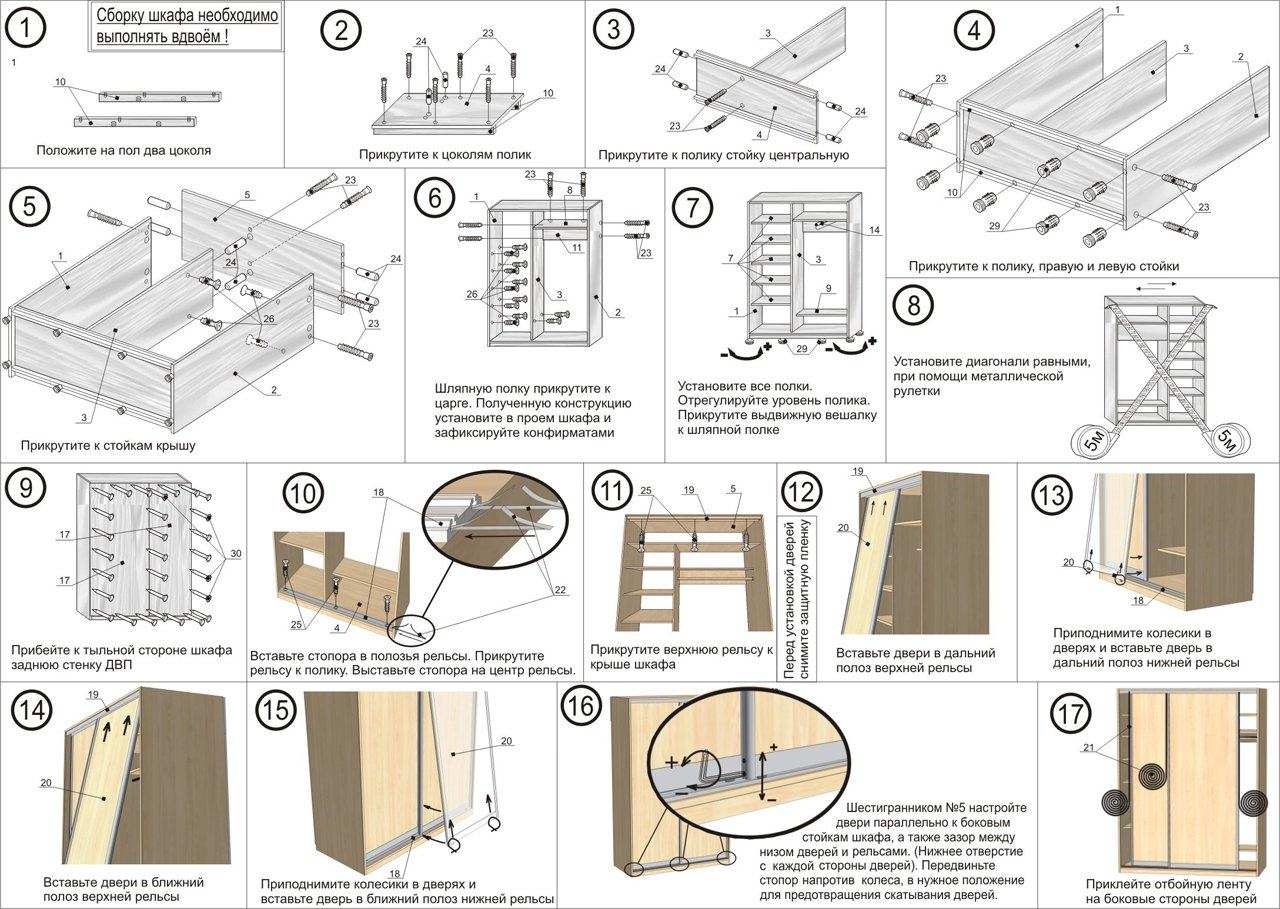
Assembling a sliding wardrobe with your own hands on the video presented is quite simple - for this it is enough to have in the apartment necessary tools and be familiar with the design of the product. Often, when ordering a cabinet without the services of assemblers, companies send a document containing a drawing of the product. It also lists all the component parts, which are numbered in order. Looking at the picture and comparing the elements of the cabinet, you can intuitively assemble the product.
To work according to the wardrobe assembly scheme, you will need the following tools:
- building level - to check the evenness of the installation parallel to the floor;
- corner;
- rubber and regular hammer;
- straight and Phillips screwdriver;
- roulette;
- pencil and ruler;
- screwdriver;
- wood drill - to make holes;
- drill for metal - for installing an aluminum base.
From additional tools to assemble furniture yourself, a jigsaw, drill and sandpaper can come in handy. It is also necessary to prepare all the details of the cabinet, which means checking the diagram for the correct number of items. Pay attention to fittings and mechanisms: if there are drawers in the closet, ball guides should be included in the package.
Doors for the product are often supplied ready-made. They are pre-installed with rollers and a strip of soft material. It is necessary to mount the door in the final phase.

Instruments
Assembly steps
To know how to get started, you should familiarize yourself with its stages. Most sliding wardrobes are assembled according to the following algorithm:
- plinth;
- frame;
- installation of the back wall;
- installation of shelves and guides;
- sliding door installation.
After the completed stages, the introduction of internal additional elements is carried out. These include pull-out baskets, drawers, rods, hanging hooks and pantographs. Consider the installation of each element of the cabinet separately.

Assembly steps
plinth
The assembly of sliding wardrobes, the video of which is presented below, starts from the bottom, which accounts for the entire load during operation. We find a part that will perform this function, and put it in front of us. In order for the process to go correctly, we use tools such as screwdrivers or a screwdriver, a hexagon, a pencil and a tape measure for marking. Also check the package for the presence of self-tapping screws and special camouflage plugs.
The algorithm of actions looks like this:
- on the details for the bottom, a place is marked for installing the base;
- sometimes, instead of plinths, adjustable legs are used, a place for which also needs to be marked;
- drill holes for fasteners;
- we attach the bottom to the slats with the help of confirmations (corners) - for this, self-tapping screws and a screwdriver are used;
- we assemble the transverse supports of the base, designed for stability.
Some products, such as phoenix coupe models, require installation with adjustable feet. This is easy to do: the plastic plugs are cut off with a knife, and the legs themselves are screwed into holes prepared at the bottom with a diameter of 10 mm.
Depending on sizes assembled cabinet coupe, the number of legs will be regulated. So, for large planes, more than 6 support elements will be required.

Preliminary marking of the cabinet base

The base is easiest to assemble on furniture metal corners

Installing the legs

Finished plinth with legs
Frame
Before disassembling and assembling wardrobes from scratch, it is important to familiarize yourself with the general structure of the existing product. Carefully study the diagram, because the assembly of the case must ensure the safe operation of the cabinet. From how securely it is installed, the stability of the internal elements will matter.
In order for the assembly of furniture to be accurate, you should additionally check the floor surface for evenness. Use the building level: if there are differences on the floor, tighten the adjustable legs. Only then assemble the product box.
To properly mount the case, follow these steps:
- it is better to assemble the product while standing, because it is very difficult to mount a perfectly fitted cabinet in a lying position. But it is important to remember that for a complete assembly, a minimum of 100 mm must be left for roof mounting;
- in the part that is responsible for the bottom, you must first drill a few holes and insert the anchor. Rack strips will be mounted on the installed fasteners;
- installation of standing panels is carried out together: in order not to get confused, you can view the instructions for assembling the sliding wardrobe, presented in the video. First, the left sidewall is inserted, one person holds it while the second one inserts the right sidewall;
- at the next stage, the middle stand is mounted, if it is present. After its installation, the installation of the roof takes place. If the cabinet is assembled in a standing position, then this part will be fixed correctly on the corners or confirmations.
It is a little more difficult to assemble a maestro model wardrobe with many functions. Its installation is carried out slowly, preferably by several people.

Fastening takes place with euro screws

Installation of the side and inner walls of the cabinet

The base is connected to the body with the help of confirmatory corners.
Back wall installation
To assemble the compartment yourself, in particular, to attach the back wall of the product, you need to correctly select consumables - fasteners. Often, assemblers use incorrectly selected consumables, due to which, over time, the fiberboard panel moves away from the furniture product. IN Soviet times hardboard on the back wall was assembled with nails, which is undesirable today.
For greater reliability, attach the fiberboard wall to the cabinet using self-tapping screws. This is how the product will not be damaged during operation.
When assembling furniture for yourself, it is important to carry out a high-quality assembly of the sliding wardrobe with your own hands: the video below clearly shows all the complex nuances. Perform the following manipulations:
- put the hardboard panel behind the cabinet;
- holding the sheet with your hands, use short self-tapping screws and use a screwdriver or screwdriver to screw them in at a distance of 10-20 cm.
If the cabinet has several rear walls at once, they must be fixed end-to-end. Use special tightening fasteners, then screw the screws onto the back of the middle bar.


Rear wall fixing
Installation of shelves and rails
In order not to have to disassemble the product and redo your work, check the reliability and stability of the frame, and then proceed to filling with internal elements: shelves, rods, drawers and guides. You can engage in self-assembly of the sliding wardrobe using the video, which is at the bottom of the article. It visually provides information about all the important points of the process.
You should pay attention to such nuances:
- shelves can be fastened using corners and self-tapping screws. For this, the parts themselves already have drilled holes. We first note the distance between the shelves and fasten them to the sidewalls and the central standing bar;
- first, the upper rails for the doors are installed, after which the lower rails are mounted. It is worth emphasizing that the installation of these elements must be carried out strictly in a straight line - the correct course of the doors will depend on this;
- the bar is installed on special flanges that come with it in the kit. If necessary, the length of the pipe is filed with a hacksaw for metal. If a Fortune model cabinet is being assembled, you should pay attention to a large number of elements and not confuse them;
- drawers and drawers are inserted into the product after attaching the mechanisms for their operation.
Before you mount the internal filling yourself, check the availability of all fittings and consumables.

Guide sliding system

Preparing holes on the rails

Before installing the guides, it is necessary to correctly position the stopper


You can assemble Basya's wardrobe yourself. You will have a new experience, while you will save money and raise your credibility in front of your family.
Sliding wardrobe Basya is suitable for a hallway or bedroom. Due to its small size, it is roomy, but the main advantage for small apartments is sliding doors. In this article, we will not talk about its advantages, but about how to properly assemble a cabinet.
Free up floor space for convenience during assembly. There are times when this is not possible, then find an assistant and assemble the wardrobe while standing. Understand the instructions, lay out all the components and arrange the racks, shelves, and other components in order.
The inner parts of the outer racks have many holes for shelves and other elements. In order not to confuse them during assembly, you can put marks on the sidewalls - left and right side.

To assemble Basi you will need:
- hammer,
- mallet rubber,
- roulette,
- metal square,
- screwdriver,
- screwdriver,
- hex wrench 4 mm.
Assembly order
The base (bottom sheet of laminated chipboard) is screwed with euro screws (confirmants) to two longitudinal legs made of laminated chipboard. The supporting part must be with an edge so that the material does not swell from moisture while standing on the floor. You can immediately nail the thrust bearings - 3 pieces per strip.
Work takes place on the floor and therefore the box is assembled face down.
Attach the middle rack to the base of the Basya cabinet and then the side ones, and in order not to return to the bottom again, put the plugs in the holes of the euro screws. Do not forget to install heel pads on the side racks of the cabinet.
The next step is to attach the top cover of the cabinet, and put the plugs. To stiffen the box, install shelves that are pulled together with euro screws between the sections (in some configurations, such shelves are not available).

We measure the diagonal and nail the back wall
Before nailing the back wall, make sure the closet is rectangular. This is done with a square, applying it to the corner of the cabinet or measuring the diagonals with a tape measure. You can use two options at once to be more accurate. All angles must be equal to 90º, and the diagonal of the two sides must be the same. In case of unevenness, it is necessary to level the body by shifting to a smaller side.
If the box has exact shapes and data, then you can nail the back wall of the cabinet. The stiffening wall is attached not only around the perimeter, but also to the shelves.
Now the structure should be rigid and can be installed in a vertical position.
Installation and configuration of doors
Two running rollers are screwed to each door on the upper part. It happens that the mirrors come attached to the middle door of Basya's cabinet, but if the manufacturer has not glued it, then you will have to do it. To do this, attach a mirror and outline it around the circumference. Then put on liquid nails.
Now you need to install the lower guides and upper rails for the rollers. Stepping back from the edge of 2 cm, the guide is screwed at the bottom and in the same way the rail at the top.

Then carefully insert the doors into the grooves of the profile. The course of the rollers should be soft, and the doors should fit well, not touch or cling to anything. In case of poor running, the rollers can be adjusted. After that, we screw the rollers with a fixing screw. We fasten the guides to the lower parts of the doors. Now we install the upper facade bar and install shelves and a bar for dresses. Basya's cabinet is ready for use.
Any dwelling, be it an apartment or a house, needs furniture. It is required not only for decoration, but also for practical purposes, namely, the placement of things. IN Lately wardrobes with sliding doors are gaining more and more popularity. But not all models are suitable for small spaces, and the high price is not always justified. You can buy no worse option and at an affordable price: Basya wardrobe from a Russian manufacturer.

Features and Benefits
Sliding wardrobe "Basya" stands out among similar designs with its compact size and reasonable price. It will perfectly fit into the interior of not only any room, but also the hallway. A small, but at the same time, spacious closet perfectly copes with the task of accommodating not only clothes, but also shoes.


The cost of this wonderful model with a mirror is three times lower than other products with a similar design. Its low price does not affect either the appearance or the quality of components.


Material and color
The sliding wardrobe "Basya" is produced by a Russian manufacturer from a sheet composite material made by pressing. To give a pattern "under the tree" it is laminated, and for resistance to moisture it undergoes a special treatment.


Color solutions of the proposed model are presented in three versions based on the contrast of two colors, and in one monochrome. In three versions, the frame and the central leaf are made of a dark saturated shade, and the two remaining hinged sliding doors are made of light colors. The color version of the produced models is presented in combinations:
- bleached oak with wenge, wallis plum with wenge;
- light ash shimo with dark ash
There is also a single monochrome oxford cherry variant.

photos
Size and content
The three-leaf wardrobe is produced by the manufacturer in one size.

The height of the product when assembled is 200 cm, which allows you to install it in a room with low ceilings. The cabinet is only 130 cm long, which makes it possible to place this piece of furniture even in a small space. A depth of 50 cm makes it possible to place a fairly large amount of clothes and bed linen.

Sliding wardrobe "Basya" - outwardly beautiful, modern, consisting of a strong body and a magnificent facade, the design of which is represented by three sliding doors. A large mirror is attached to the central part. Behind the attractive outer façade is a functional interior.

The cabinet frame is divided into two spacious compartments. In one is a bar attached parallel to the back wall. Here you can place clothes, hanging them on the "shoulders", and below, if desired, you can store boxes with shoes. In another compartment there are three shelves for storing folded clothes and bed linen.

Assembly instructions
In order to start assembling according to the scheme, you must first unpack all the parts. Doors are in one box, walls are in another, and a mirror is in the third.

The assembly of the wardrobe involves the phased implementation of the following steps:
- First of all, we unpack the box with walls and begin to assemble the frame, arranging the parts so that the assembled structure is face down.

- To fasten parts to each other, you need to use special screws - confirmants or, as they are also called, euro screws. This fastener does not destroy the material and is able to withstand the loads of separation and bending.

- We start mounting from the bottom corner, attaching the side wall to the bottom part.
- We install a parallel wall and a rack that divides the frame into two halves.
- We fasten the side wall with the rack shelf located in the center. This is necessary for a more rigid attachment.
- At the end of the installation, we fasten the cabinet cover, but not until it stops.

- Using a tape measure, we measure first one, and then the second diagonal. When properly mounted, they should be equal. If there is a difference between them, then it is necessary to align the frame by shifting to a smaller side. A structure is considered to be properly fastened if each of the four angles is 90 degrees and both diagonals are of equal value.
- Now you can start attaching the rear wall, which consists of three parts. Each part is fixed with nails nailed at a distance of 10-15 cm to the ends of all elements. We start from the side on which the shelf is located. Having laid and leveled the sheet, we draw a segment that determines the level of the previously fixed shelf. It is necessary to do this in order to nail the back wall not only to the ends of the structure, but also exactly to the shelf. After all the parts are nailed, you need to fasten them with special profiles.
- We proceed to the doors - we fasten the running roller to each from the top on both sides.

- Then we begin to deal with the middle door, on which we will mount the mirror. We put it on the surface face up and apply a mirror to it, which we circle, having previously placed it evenly. We degrease the prepared surface, and remove it from the inside of the mirror protective films double sided tape. In order for the mirror to stick evenly, it is necessary to lay linings between the mirror and the door, their thickness should be greater than the adhesive tape. Then we begin to carefully clean them.

- Now we install the shelves in the laundry compartment from top to bottom, and then attach the dress bar. We screw the upper rails and lower guides, having previously drilled holes in them. We start with the bottom guide, stepping back from the edge of about 2 cm, and finish with the top one.

- We carefully install the doors in the grooves of the profiles. We check the course of the doors: it should be smooth and without unnecessary sounds, and the doors should fit snugly. If necessary, we carry out adjustment by twisting the roller. Next, we twist the fixing screws and install the lower guides on each door. After that, we hang the doors and fix the upper bar with self-tapping screws.

More detailed instructions on the assembly of the wardrobe "Basya" can be viewed in the following video:
Manufacturer reviews
Affordable price coupled with attractive appearance sliding wardrobe "Basya", proposed by a Russian manufacturer, attracts many people. Therefore, most of the reviews on it are mostly positive.

Almost all buyers note the very good packaging of this product, thanks to which all the details of the cabinet reach the consumer in complete safety. The mirror is especially carefully packed, for which many buyers express their gratitude to the manufacturer when they write reviews.


Many agree that this cabinet - great option for those who are used to saving, but not to the detriment of the functionality and quality of the purchased product.


But there is one downside. Almost all customers agree that the instructions that come with the product should be more understandable and better if they are printed in a larger font.
But for those who are well versed in assembling furniture, there should be no problems with this process.


Options in the interior
Sliding wardrobe "Basya" due to its size can be placed in a small room. When buying this product, you must take into account the color of the furniture already installed.
The best placement option for this closet would be a bedroom. Due to their compact form, the presence sliding doors, it does not take up much space, but at the same time, it can accommodate quite a lot of things. In addition, the presence of a mirror not only contributes to the visual increase in space, but also performs a practical function.
Each apartment must have such a multifunctional piece of furniture as a wardrobe. It will save space in your home and organize the space. Not everyone can afford to buy it due to various circumstances. This is not a reason to refuse such a thing. A jack of all trades, it will not be difficult to make and assemble it yourself.
Of course, some knowledge is required. There is nothing complicated here, as it seems at first glance. In addition, what joy and pride you will experience from the work done. After all, furniture assemblers charge a fairly high fee, and you can handle it on your own.
After the decision to buy a closet has been made, it becomes necessary to correctly assemble it.
To assemble the purchased furniture, you need to follow the cabinet assembly instructions supplied by the manufacturer. There are certain rules. Following them, you will assemble any item of high quality and in a short time.
- You should not take everything out of the packages at once, especially mix parts from different packs. Follow the sequence.
- Read the instructions carefully so that later there are no overlays and you do not have to redo it again.
- Make sure that the fittings and components are in place. Otherwise, you will not be able to fully assemble the furniture. Handles must match the color scheme. It is necessary that the guides for drawers have a soft stroke.
- Assemble one section at a time. You need to start from the bottom, gradually moving to the sides.
- Open the package, lay out the parts, prepare the tools.
- Mirrors, glasses are installed at the final stage. This is how you avoid damage.

For assembly, you need a screwdriver, screwdriver, hex key, tape measure.
If you yourself are engaged in manufacturing, then it will be much easier to assemble.

It is very important to follow the assembly sequence, otherwise you will be forced to disassemble and reassemble the cabinet in the correct sequence.
How to work with laminated chipboard - a popular material for cabinet furniture
Currently, in the manufacture of furniture, chipboard is mainly used. This is the fundamental. Represents wood shavings of large dispersion. By hot pressing, it is shaped into a sheet. In the manufacture of plates, formaldehyde resins are used, they are an additional component. The difference from simple chipboard lies in the coating with a film made of paper and melamine resin. According to environmental indicators, it is better to use class E1 materials. Chipboard boards have good compaction, thanks to which the furniture made from them is strong and has a long service life.

Fastening the rail on the cabinet door
If you think that this material has the same composition, then you are mistaken. By coating they are divided into veneered, rough and laminated. According to the composition of quality, they can be divided into three grades: the first - they use first-class sawdust (usually a tree of the same species). The surface is flawless, not a single chip. The plate is decorated, laminated with a film or veneer. The second grade - you can already see small defects. Facing may or may not be. Third - there are already tangible defects. Such plates are not covered by anything.

While the cabinet is not completely assembled, make sure that the attached parts do not tilt, as the fasteners can be broken out.
In addition, chipboard is moisture resistant and refractory (withstand high temperatures). They are mainly used to make a furniture body, but they are also used in the production of partitions or used as interior decoration. It is worth mentioning that chipboard, due to its composition, perfectly holds nails and self-tapping screws.

In order to stiffen the closet, it is necessary to fix the back wall.

The main “steps” for assembling do-it-yourself wardrobes are indicated in the instructions.
Furniture from these plates has many advantages compared to other materials.
- Acceptable prices.
- No manufacturing difficulties.
- Q factor.
- Significant period of use.
- Diversity colors and decorations. This will help to perfectly match the furniture in the living room, kitchen or children's room.
- Perfectly harmonizes with other materials.
Such furniture looks great in any interior.
Another important feature of laminated chipboard is that these plates have heat and sound insulation. Therefore, they can sheathe the walls of the room.

Make sure that the holes for the shelves and the hanger rod mounts match the holes on the opposite rack.

Also, if you started a redevelopment of an apartment / house, knowing how to assemble a wardrobe yourself will help you quickly and easily solve the issue of moving this furniture.
What tools are needed
Significant costs in the acquisition of the tool will not be required. To collect kitchen set, closet or hallway, you need to have the usual set of tools: a screwdriver, a hex key for confirmation, a screwdriver, various drills, a bit for confirmation, an awl, a pencil, a tape measure, a square, fine-grained sandpaper, an electric drill, a stationery knife, an iron, a knife - cant, rubber mallet, retainer for details.

The distance between opposite corners should be the same.

Assembling a wardrobe with your own hands is quite easy and everyone can do it simply by using the instructions.
It is unrealistic to guess what tool you will need to assemble furniture. It depends on whether the project is difficult or not.

Now you need to install the wardrobe doors.

To open the closet, you do not need to remove chairs or move other furniture.
Preparation before assembly
First you need to prepare the room. The final outcome of the case depends on this, how much time you spend on work. Important point- so that nothing interferes. Make sure all materials and necessary tools are at hand.

As a depth limiter, you can use a plastic dowel 6 or 8 mounted on a drill.

With the help of a sliding wardrobe, you visually separate different areas in the room, for example, a work area from a recreation area.
Assembling furniture at first glance seems to be a simple matter. Many people make mistakes, as a result of which defects appear: the doors and sashes are weakly adjacent, when the doors are opened, they can creak, due to misalignment of the holes, the parts are skewed, the furniture is unreliable on the floor. To avoid this, you must follow certain rules and instructions.

Built-in wardrobes are very popular in interior design. various models made from natural and artificial materials.

Some models of the wardrobe are able to transform to the features of the room: the presence of a corridor, recesses in the wall, where you can put the wardrobe.
Basic assembly steps
The assembly of the wardrobe is carried out strictly according to the scheme, vertically or horizontally. The second option is better, so you can prevent skew of the parts to be joined. If the height of the ceilings does not allow you to raise the finished cabinet, then work is best done in an upright position.

You will be able to assemble a wardrobe of the "compartment" type with your own hands if you follow the step-by-step instructions.

In such a closet, you can put twice as many clothes, while not at the expense of the enormity of the furniture itself.
First of all, you need to attach the base and adjustable legs to the bottom. They are necessary if the floor is uneven. Next, we proceed to the assembly of the body. We connect the sides to the base. To make the structure strong, we attach an intermediate rack and a shelf. This is necessary so that the sidewalls do not roll. After we fasten the remaining parts, attach the cover. It is advisable not to nail the back wall, but to screw it onto self-tapping screws. On the this stage put the wardrobe in its place. We install guides for drawers, holders for shelves, a bar for hangers. Check that the drawers should slide out smoothly.

You need to familiarize yourself with all the details of the product (so as not to confuse anything during the assembly process and not have to start all over again), prepare the tools and the place where the assembly and installation will take place.

This job will take a lot of your time.
Next up is the installation of the doors. First we fix the guides, then we fix the rail on the screws. We insert the doors, check that they open and close smoothly. Correct them if necessary. Lastly, we glue the sealing brushes. We attach plugs to the holes of the confirmations.

As a rule, sliding wardrobes, like all furniture, are assembled in the lying position of the cabinet.

Do not skew cabinet parts, keep even corners.
Summing up, we can say that assembling a wardrobe is not such a difficult job. Your desire, skill and ability will make it easy.

After you have done everything, be sure to check how the doors work (whether they creak, move freely, etc.), how shelves and other details are firmly fixed.

Be careful until the cabinet body is assembled and the back wall is installed, all fasteners can be easily broken out.
VIDEO: Do-it-yourself wardrobe. How to assemble a closet?
To save on the assembly of the wardrobe, without turning to specialists, you can do it yourself. In addition to all the details, the furniture set should include instructions on how to assemble a 3-door wardrobe, which will help to assemble the wardrobe correctly and quickly.
Required Tools
Almost every cabinet model comes with the necessary bolts, nails and washers, but you need to prepare the tools yourself. To assemble the wardrobe, you will need the following tools:
- Phillips screwdriver.
- Bit PZ2.
- Screwdriver straight.
- Screwdriver or drill.
- 4 mm drill for metal.
- Hammer.
- Level.
- Pliers.
- Stationery knife.
- Hex key.
Also, additional parts may be required to assemble a 3-door wardrobe. For example, if the floors are uneven, it is necessary to prepare the substrates in advance. Depending on the model, a confirmed and 6 mm drill may be required.
Assembly basics
There are standard rules for assembling a wardrobe:
- Do not unpack all the parts at once, otherwise you can get confused and it will take a lot of time to find the necessary part.
- It is necessary to carefully study the instructions on how to assemble a 3-door wardrobe before proceeding with the assembly.
- Make sure all accessories are in place and match the size and color scheme.
- Assembly is carried out in stages, starting from the bottom of the cabinet.
- Mirrors and glass are installed last.
- The space for the cabinet must be exactly the right size and not have openings or other obstacles when installing it.
Assembly example on the example of the wardrobe "Basya":
Assembly steps
First of all, the frame is assembled. It is necessary to connect the elements of the frame. To do this, it is necessary to insert the chopsticks into the prepared holes and screw the confirmations into them, with the help of which the frame is fixed. It is more convenient to connect cabinet parts in a supine form. You should start from the bottom shelf, so to speak, the bottom of the cabinet.
After the frame is ready, we proceed to place the partitions of the three-door cabinet. It is very easy to determine where the partitions are top and where the bottom is, since holes for dowels are provided in the lower part of the partition. Non-through holes are also provided on the bottom shelf (bottom of the cabinet), into which dowels are inserted, and only then we install partitions on them. It is worth noting that initially it is not worth fixing confirmations to the end, it is necessary to leave a free move.
To betray the rigidity of the structure and protect it from loosening, it is necessary to install the back wall of the cabinet. The wall must be reinforced with the laminated side out. The wall is fastened with small nails, which are driven in around the entire perimeter of the cabinet.
Special holes are prepared for each shelf, in which it is necessary to install the corners or other fasteners provided in the kit and it is on them that you need to install at the shelf. The shelves are fastened with the help of corners or on confirmations.
After that, you can install the cabinet. Here it is important to align the structure and only after that it is necessary to tighten all the fasteners to the end. In order for the doors to open freely and not jam during operation of the cabinet, it is necessary to level it with a level. After that, you need to install the guide rails for the cabinet doors. Using a screwdriver, holes are made for fasteners around the entire perimeter of the rails. The holes should be chamfered for flush screws and 4 holes will need to be made for each plank. First you need to fix the bottom rail.
For the top rail, it is necessary to make holes in a checkerboard pattern in both slats. Screws are included in the wardrobe kit for fastening the slats. The distance from the front end of the top cover to the beginning of the rail edge must be at least 3 mm.
The next step is to install the rods and fittings inside the cabinet. First of all, we mark the attachment points for the holders, drill holes and tighten the screws. It is important to correctly install the mounts for the rods so that they are even. The mounts are correctly installed or not, you can check with a level.
The final step is to install the doors. It is necessary to start installing the doors from above, for which we insert the doors into the upper rails, and then the end rollers are placed in the groove of the lower rail. Thus, all 3 doors are inserted in order, the main thing is not to confuse the front and inside sides.