How to finish the outer corners in the apartment. Plastic corners for wallpaper - a way to design external and internal wall joints. Universal flashings for windows and doors
A huge selection of finishing materials allows you to design walls, ceilings, doorways of an apartment or house in the most daring and interesting options decor, but there is one condition. You need to think in advance how to strengthen and protect the corner lines of the walls. Feature of modern wall decoration is such that the outer corners of the walls are the first to age and lose their appearance.
In some cases, protective plastic wall corners are simply indispensable, as in the case of tiling or wall panels. Therefore, people who are versed in matters overhaul When choosing a finish, be sure to look after the plastic corners to protect the corners of the walls.
Where and how profiles are used to protect wall corners
You have to get acquainted with the first version of the profile corner at the stage of plastering or leveling the surface of the walls using drywall. Installing a plastic corner under the wallpaper makes it possible to solve two problems at once:
- Strengthen the finishing layer of putty;
- To give the outer corner an ideal geometry, at least visually, the junction line of the two planes looks quite even.

Everyone who at least once had to glue wallpaper on walls with crooked corners will appreciate all the benefits and practicality of the simplest plastic profile.
Note! With the help of a wall plastic corner, you can easily bring out the outer and inner corners even on the most uneven walls.
The main difference between corner profiles and decorative plastic corners is that the mounting option always has perforations along the entire length. The corner does not need to be glued, it is simply imprinted into a layer of putty or plaster mass. Even professional plasterers always use a plastic corner in their work.

But the use of mounting profiles to level the walls does not solve the problem. appearance corner edges, both internal and external, especially if the walls are finished with light trellises. Therefore, plastic corners are often installed in addition to the perforated profile.
What does it give:
- Complete corner protection. No matter how carefully the owners treat the decorative trim at the corner joints of the walls, after a few months, a maximum of a year, traces, scratches and chips of the lining will appear;
- Eliminate cracks and gaps between wall panels, especially at wall corners and skirting boards, on curved surfaces;
- A radical improvement in appearance. Colored plastic corners for walls will help to transform and significantly refresh wall decor at minimal cost.

In this case, it is not necessary to be limited to the outer corners of the walls, although it is they, as they say, that are in sight and require protection in the first place. Often, a plastic corner on the corner of the wall has to be installed after the fact, it is worth rearranging the furniture once with the transfer of the most dimensional interior items. Scuffs and dirt can still be removed or washed, but chips and deep scratches on the walls have to be hidden.
Internal corners also have to be closed in order to mask the transition from one type of finish to another, for example, while lining the walls of the corridor with drywall, MDF or DFP panels, and living rooms with wallpaper and wall slabs.

Plastic profile for sealing corners
For decorative purposes, corners made of PVC, polystyrene, polyurethane and even silicone are used. If the walls of the room are finished with wood or tiles, then you will need a corner made of a similar material; a plastic profile for such a decor looks unnatural. For all other cases, the list of the most suitable materials invariably leads the PVC corner, it remains the most in demand. Almost everyone who faced the problem of finishing and protecting the corners of the walls with an overlay profile is unanimous in their choice, this is a PVC profile.
The exceptions are metal and MDF corners used as flashings, covering the line of the window opening from the side of the street. At the same time for balcony doors often use a plastic outer corner made of polyvinyl chloride.
The reason for the popularity of the PVC profile is determined by three important properties:
- Beautiful appearance, there are practically no problems with the selection of the desired shade of colored plastic corners to protect the corners of the walls;
- Plastic material is highly flexible and "democratic" during installation. No problems with gluing, as in the case of polystyrene or polypropylene corner profiles;
- Easy processing when adjusting the size of the corners. The material can be cut without problems with scissors, a "bread" knife or, best of all, with a sheet of metal.

Note! Good workability of the material does not exclude the possibility of profile cracking, especially if the plastic corner has been stored for a long time on a balcony or in a garage at low temperatures.
In this case, before cutting the plastic corner, it must be kept for an hour at room temperature.
Size of plastic corners
The advantages of the plastic corner include the low cost of the material. Depending on the height of the shelf, the price of a plank 2.7 m long ranges from 50 cents for a 10x10 mm size to $1.7 for a 50x50 mm profile. For cladding home walls and corners, a corner with a shelf of 20 mm and 15 mm is usually used, their cost is in the range of $ 0.7-1 for a standard bar of 2.7 m.
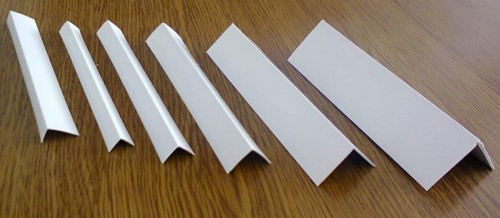
PVC profiles are represented on the market by three types of plastic corners:
- Standard equal-shelf version, in which both shelves are the same size;
- Double corner or T-profile used for decorating interpanel and tile joints;
- L-shaped or arched plastic corner with different shelf heights.

No matter how hard the masters try to align the planes of the walls, all the same, over time, a gap forms in the corner, which must somehow be masked by installing a plastic corner on the corner of the wall. Otherwise, an ugly line of transition from one type of finish to another will remain. For the case when you need to close the joint between wallpaper and decorative plaster on the wall, the smallest profile, 10x10 mm, is quite enough. The same size of the shelves is selected for the outer corner for the plastic plinth. The largest profiles, 50x50 mm, are used for installation at the corners of building facades, sizes 20x20 and 25x25 are the most popular for interior work.
Options for using a corner profile for finishing corners
At first, most apartment owners are rather reserved about the use of a corner profile when decorating corners and the junction line of walls. First of all, the well-established classical opinion interferes that the use of PVC materials in an apartment should be limited and used primarily where it is simply impossible to do without it. For example, for entrance doors in the bathroom or in the kitchen.

It is possible to destroy distrust of plastic corners only if people see with their own eyes the difference between wall decoration without a corner and after installing a plastic corner profile. The difference in perception even with the simplest decor is significant.
Finishing the slopes of doors and windows
The most obvious example of the benefits of installing a corner PVC profile the windows and doors of a modern apartment remain.

With the replacement of an old wooden window frame with a double-glazed window, as a rule, it is necessary to plaster the slopes in a new way, look for a way and material to close the resulting external corner to the walls of the room.
Traditionally, window slopes are made on the basis of drywall sheets, with the outer corner reinforced with a perforated metal corner, photo.

This makes it possible to perfectly align the planes and achieve the most even angular line, but still the edge will remain a risk zone. The window is used quite often, so even curtains or curtains often cause damage to the edge. If finishing the slopes using MDF or PVC panels, then you simply cannot do without installing a plastic corner on the slopes. First of all, you will need to close the end of the cladding panel, otherwise the entire decorative effect of using the finish will be smeared. The dimensions of the plastic corner for slopes depend on the height and width of the window opening.

A plastic corner for drywall and wallpaper is selected 20x20 mm, for a corner at the transition of an MDF plate - wallpaper sets a corner profile measuring 25x25 mm. In the latter case, if desired, you can hide the installation of a protective profile, for this you just need to choose the right colored plastic corners for the slopes. Polyvinyl chloride is quite difficult to paint, so the repainting option is used if the entire window with slopes and corners is planned for painting.
In addition to finishing the outer edge, it is necessary to install plastic flashings between window frame and the plane of the slopes, as well as close the line of intersection of the window sill with the walls. For these purposes, it is best to use a T-shaped profile with a deflection in the central part.

At first glance, the line of intersection of the slope and the window sill may not be covered with a plastic corner, but this is not entirely true. Plastic window sill It springs quite strongly even under a small load, so after a few months the material with which the corner joint is sealed can simply spill out of the gap, so it is better to close it with a corner profile in advance.
The same plastic corners are often used for decorative sealing of the seam line between the bathroom and the tiled wall. PVC is ideal for damp bathroom environments.

The second section of the walls, where it is almost impossible to do without installing a decorative plastic corner, are entrance doors. If the front doors are changed in a house or apartment, this means that the owners will have a large front of work on finishing and decorating the vestibule and door slopes. Since the front door always remains the dustiest place in the house, the slopes of the doorway, with rare exceptions, are traditionally finished with MDF, clapboard and PVC panels and, most often under a tree or a natural stone.
After the walls of the door vestibule are plastered and puttied, the lining can be laid. Any master can confirm that after finishing works at the corner of the intersection of the walls of the corridor and the plane of the slopes, the ends of the facing panels will remain visible. They must be closed in order to achieve a finished appearance of the doorway and to exclude the accumulation of dirt and dust in the cracks.

If the lining of the vestibule was carried out by directly sticking PVC tiles or panels onto a plastered surface, then in order to close the gaps, a plastic corner with a shelf width of 30 mm will suffice. For a decorative finish laid on a pre-stuffed crate or galvanized profile, you will need a corner plastic profile 40-50 mm in size.
arched doorways
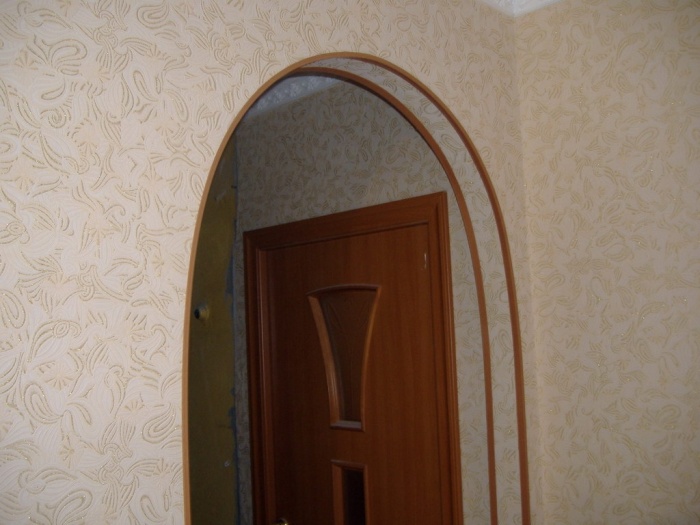
Among the many design options for an interior opening, the arched scheme is considered one of the most beautiful and expressive. The arch is most often assembled on the basis of a metal frame lined with plasterboard sheets, or laid out from lightweight wall foam blocks.
One of the problems that one has to face when assembling an arched arc is related to the inflexibility of drywall and galvanized profiles. Both of them are almost impossible to bend in a smooth curve. In order to get an arc, the supporting frame has to be recruited from a dozen short segments - chords. The filing of the inner surface of the arch is also recruited from short pieces of drywall.
You can simplify the task, for this, the decoration of the arch with a plastic corner is performed in the form of several rectilinear sectors, photo.

There are two ways to solve the problem of the most smooth profiling of the arch:
- Installing a finished arched plastic corner photo. It will only be necessary to adjust the dimensions of the opening to the finished profile, install and fix the polypropylene frame;
- Run the overlap of drywall wall sheets with a curved arc cut out according to the template. Inner part the slope is blown out with polyurethane foam, and the edge is sheathed with a decorative plastic arched corner.

The use of a decorative plastic profile allows you to close the joint and the corner transition from drywall to slope. This method of arranging an arched passage is cheaper and easier. But there is one condition, you need to know exactly how to bend the plastic profile under the arch. At first glance, bending a soft PVC profile is not difficult. One of the simple descriptions of how to bend a plastic corner onto an arch is shown in the video.
An ordinary plastic corner is not suitable for these purposes. Any attempt to stick or nail it to the edge of the drywall results in the decorative profile moving away from the wall at the top and breaking into two pieces. You have to cut one of the shelves of a regular corner into segments 25-30 mm long or, more conveniently, use a special plastic corner for the arch.
Most often, a 17x5 mm profile is used for an arched doorway. Due to the reduced side shelf of the plastic profile, the corner bends almost without distortion, which means that when laying the material on the adhesive, the risk of delamination from the edge of the wall will be minimal.

If the radius of the arc of the arched opening is small enough, the plastic profile has to be bent so much that even a special decorative corner begins to warp. In this case, you can use the "hot" method of arching. The corner is fixed at one end of the arch with a clamp or clamp. Next, the polyvinyl chloride profile is heated with a hairdryer to a temperature of 60-70 ° C and pressed against the edge of the drywall. While the material is cooling, it is rolled into place with a soft paint roller.

Advice! If it was not possible to bend the desired arc profile for two or three warm-ups, then the bending must be stopped, since the material becomes hard and brittle after several heating cycles.
Before gluing the plastic corner on the arch, it is necessary to determine the contact points of the profile to the wall surface in order to apply glue in these places. If you do this "blindly", most of the adhesive material applied to the plastic profile will be used up uselessly.
Do-it-yourself plastic corner installation
The process of laying a decorative profile on a corner or on the edge of an arch is not difficult, it requires accuracy and careful handling of plastic. PVC is easily scratched and loses its glossy sheen. Often, the front of the plastic corner is sealed with paper to avoid damage and contamination with glue. After the adhesive base has hardened, the surface of the corner can be polished with a soft cotton cloth.

One of the advantages of using a PVC profile is the fact that during production, the coloring of the material occurs throughout the mass, any scratches and abrasions do not lead to a change in color or shade. So you can polish the material an infinite number of times.
How to stick a profile on a corner joint
Working with a corner profile is no different from similar operations with a polyurethane glazing bead or plinth. Initially, before gluing the plastic corners to the slopes, you need to do a little preparatory work.
First, with a tape measure, we measure the length of the PVC profile for each slope angle. Since the window opening has a rectangular shape, all plastic corners will be joined together at a right angle. We will cut the junction line at an angle of 45 o. For other structures - arches or polygonal vaults, the angle of the cut will need to be determined at the place of the sticker.

After marking, you need to cut off the plastic strips according to the measurements taken. This should be done as carefully as possible, since the corner is quite thin, only 1-1.5 mm, so the material can be easily split if it is cut incorrectly.
Experienced craftsmen cut the profile with a construction knife under the ruler or well-sharpened scissors. If there is no relevant cutting experience, then it is better to use a carpentry tool for corner cuts. PVC is ideally cut with a conventional hacksaw blade.
After cutting, carefully remove the burrs and perform a final fitting of the cut blanks at the place of the sticker. To do this, you need adhesive tape and a building level. Having attached a blank of a plastic corner to the place of gluing, we align its position according to the level and fix it with several strips of adhesive tape. Install the upper corner bar in the same way.

Only by setting all the cut-out segments of the corner “roughly” and aligning them with the building level, it becomes clear how correctly the corner was washed down. Usually, for amateurs, a gap of 1-3 mm wide forms on the junction line. It is clear that it is impossible to glue a plastic corner with such slots.
Advice! When cutting a corner profile, add an allowance of 2-3 mm to the calculated size. This margin, when fitted, will help correct the situation without any special consequences.

To get rid of the cracks at the joints of the walls, you will need to once again clarify the passage of the gash line along all three blanks. To do this, draw a corrective line with a pencil and disassemble the design to adjust the corners. The cut line can be cut with scissors or sharpened with a piece of sandpaper wrapped around a wooden block.
How and what to glue
It remains to stick the plastic corner on the corner edge of the slope. First of all, you need to choose how to glue the plastic corner to the wall. In salons and hardware stores, the liquid nails adhesive composition will be recommended as the most suitable means. Of the positive characteristics, only convenient packaging in the form of a tube can be called.

Everything else - on the conscience of the manufacturer. With this composition, you can glue light polyurethane bovelacchi or a plastic corner measuring 10x10 mm to the tile joint. In addition, the white adhesive mass becomes beige-gray over time, so traces of glue are very clearly visible on the seams and joints.

The slopes on the windows, on the entrance doors must be glued with silicone, it can be transparent, but if desired, you can easily choose the color version of the sealant. Not all adhesive materials adhere well to the smooth surface of the PVC corner. Silicone sealant is a pleasant exception, it does not drip or shrink.

But the main advantage is in obtaining a strong and elastic seam. If you have to stick something on doorjamb, on light partitions that vibrate with each slamming of doors - choose silicone. Any other adhesives that give the strongest and toughest seams cannot withstand vibrations and chip off, especially if we are talking about the plastic corner.

The technology of sticking a corner plastic strip is quite simple. We apply glue with thin lines on the inner surface of each of the shelves. If the glue is very thick, then the adhesive mass can be applied to the wall with short oblique lines or dots. You can not cover the entire surface of the wall with a continuous layer. Firstly, it will be impossible to press such a plastic profile into place, and secondly, 50% of the adhesive mass will be squeezed out uselessly outside the corner. Too liquid glue will simply flow out from under the plastic strip.
Carefully place the prepared plastic corner with glue on the place of gluing. To make the adhesive seam strong, you need to gently press the bar into place. Not a large number of the adhesive mass can be squeezed out from under the plastic profile, but do not rush to remove it - first you need to level the corner. The PVC profile is very flexible, and it will not be possible to trim it with your hands, so the laid corner is brought into a straight line state using a metal ruler and a building level. So that until the glue dries completely, the plastic corner does not fall off the wall and does not slide down, you need to fix it with several strips of adhesive tape.

We glue the next plastic profile bar in the same way, but before laying it in place, it will be necessary to apply a small amount of glue to the joint line. After precipitation, part of the adhesive will come out at the joint, all excess can be removed only after the final drying of the adhesive mass. Until the glue has dried, any attempt to remove excess glue will result in stains on the wallpaper.

Sometimes there is a problem with the length of the arched corner. Maximum length the plastic strip is 3 m. This may not be enough if the arched opening is made for the entire width of the room, the length of the corner profile on such an arch can reach 3.5-4 m. In this case, the arched arc has to be finished with a small piece. It is best to make the central part of the arc solid, add two small segments on the sides, and close the joint line silicone sealant in the color of the plastic material.

After a couple of years, due to shrinkage processes, the seams may diverge a little, but still the arch will retain its original showiness. If you increase the length of the plastic corner on one side, then the junction will be perceived as a stain, and spoil the impression of the whole structure.
Conclusion
Plastic corners are successfully used not only for residential premises. For example, for a dacha or a bathhouse lined with clapboard, for a country house made of timber, protection of the corner joints of the outer walls always remains relevant. This is not so much a matter of aesthetic appearance of the building as an urgent need for protection from moisture penetration. In this case, under the plastic corner 50x50 mm, two load-bearing wooden slats are stuffed, on which the plastic corner profile is glued.
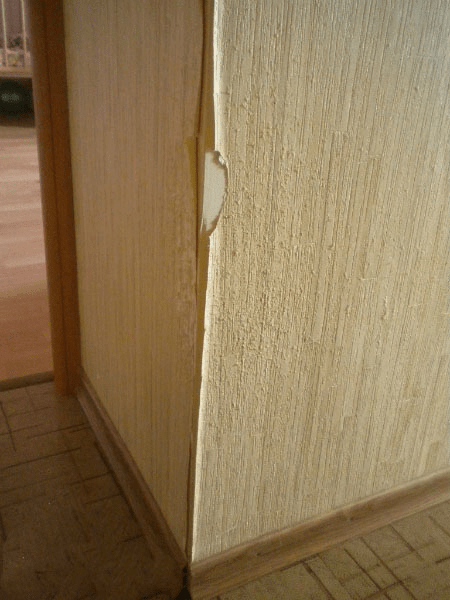
What types of decorative corners are there, methods of application, installation rules and examples of use in the interior. Contents One of the most problematic areas in interior decoration are the outer corners.
It is rather difficult to paste over them with high quality, often the wallpaper rises at the corners, the corner is easily damaged by hitting furniture when rearranging or ...
Decorative corners made of aluminum, wood or silicone on the corners of the walls: how to decorate under or on the wallpaper, what is best to glue and fasten
What types of decorative corners are there, methods of application, installation rules and examples of use in the interior.
Decorative wall corners
One of the most problematic areas in interior decoration are the outer corners.
It is quite difficult to paste over them with high quality, often the wallpaper rises at the corners, the corner is easily damaged by hitting a solid large object when moving furniture or carrying it.
Decorative corners help to solve these problems.
The corner protects the surface from mechanical damage, allows you to hide some flaws in the finish, arrange the transition from one material to another, close the ends of tiles or panels.
Where applicable
There are many options for using corners in the interior. They can be used to decorate both external and internal wall corners. Some difficulties arise when finishing corners other than 90 °, this requires special, so-called. folding corners. To finish the curved surface of the corner, flexible, “arched”, corner profiles are used.
The most common ways to use decorative corners:
- Adjacency of a window slope to a wall. It is extremely rare to see a slope, the near edge of which is not closed by a corner. Their use in this case protects the edge of the slope from damage and prevents the wallpaper from peeling off, which quite often occurs at external corners. In addition to the technical, the angular profile also carries an aesthetic load. The use of a white corner completes the window opening. A profile that contrasts with the slope and wall decoration can create the desired color accent or become an independent original interior detail.
- Decoration of the doorway. Corners can also be used in the design of the doorway, when the thickness of the wall is greater than the width of the door frame. In that case, additional strips are installed to the door, the adjoining of the end of which to the wall is closed with a corner element matched to the color of the door.
- Protection of external corners of walls, columns, ledges. In this case, the corner protects the wall finish from mechanical damage, such as accidental impact with a heavy oversized object. It helps to preserve the finish and layers of putty and plaster. Also, the use of a corner profile simplifies the cleaning of the room. Often, handprints remain on the outer corners, which are easier to remove from plastic than from wallpaper. Properly selected contrasting corners allow you to avoid dullness and monotony of the interior.
- Formation of openings. In interior design, instead of doors, they often leave just an opening, for example, between the kitchen and the living room. The corners serve to decorate and protect the corners.
- External corners of walls lined with tiles or wall panels. The ends of the tiles are closed with an angular profile, because. they differ in color from the front surface of the tile. If the tile is cut to size, and the cut edge is not sanded, it is easy to cut yourself on such an angle. When mounting the corner on the panel, they close the corner joint. The use of a special corner profile for these purposes is not always convenient, then decorative corners are used.
- Decorating and protecting the corners of gypsum board structures, such as racks or shelves.
- Decorating furniture, framing mirrors. In addition to decorative functions, it protects the edges from chipping.
Varieties according to the materials of manufacture
 Corner profiles are made of various synthetic materials, MDF, wood, metal. Its appearance depends on the material of the corner, specifications and scope.
metal
Made from aluminium, stainless steel, brass. Steel and brass products are polished and uncoated, while aluminum products are divided into polished, anodized and with decorative coating, usually under a tree, but can be painted in various colors. They are mainly used in the manufacture of furniture, less often in interior decoration. To protect the ends of the furniture boards, they are covered with a corner with different shelves, one of the shelves of which completely covers the end, the second goes slightly onto the plane. Unpainted profiles are suitable for framing mirrors and glass-covered pictures or posters.
Metal corners can be mounted on walls as a basis for a light false ceiling of the Armstrong type or PVC panels. Aluminum products are attached to the steps as anti-slip pads and edge protection from chips.
Wooden finishing
 They are made from various types of wood, including valuable ones. Wooden corners are used to complete the decoration in rooms made of wood, for example, wall cladding with a block house or clapboard.
With their help, the ends of the boards are closed, both on the outer and inner corners. Also, these products are suitable for decorating painted or wallpapered walls. In this case, they need to be painted or varnished. Wooden corners can only be used at strictly right angles, because. they are fragile and with the slightest effort to bend or unbend them can crack.
Transparent silicone corners for wallpaper
If you need to protect the corner and keep the pattern of the wallpaper, stick a silicone corner profile. This material is quite soft and is well suited for rooms where small children are often present, because. reduces the risk of a child being injured by hitting a corner. The relative disadvantage of these products is that due to their transparency, they do not hide flaws in the finish.
Polyurethane
 They are smooth, with a relief ornament and profiled. Smooth ones are similar to ordinary PVC corner profiles, differing from them in a larger shelf thickness. On the shelves often reproduce a three-dimensional ornament.
For use in classic interiors, polyurethane profiles of a complex section are produced that imitate gypsum stucco molding. On sale are white and painted in various colors, including imitating wood, you can also find painted in several colors, for example, a smooth part under a tree, and an ornament under gold. Due to the complex shape, they require great care in installation. Paints used in decoration fit well on polyurethane.
Plastic colored
Made from PVC. Visually imitate wood, metal surface or simply painted in one shade. The palette of monochrome corners contains approximately 30 shades. If necessary, in the desired shade, you can use special paints white profile. It is used everywhere in decoration, second only to white in popularity. For the design of arches and other curved surfaces, there is a special type of corners - flexible or arched.
MDF corners
They are 2 strips of MDF glued together with a film. The film is applied from the front side, the pattern repeats the pattern on MDF panels. Due to the fact that the shelves are movably fixed relative to each other, the same profile can be used on surfaces mated at different, internal and external, sharp, right and obtuse angles. Commonly used in wall cladding MDF panels, but can also be used instead of any other type of corners.
MDF corners are undesirable to operate in rooms with high humidity.
Corner decor in an apartment: how to decorate a room with corners
 The options for using decorative corners in the interior design of a room depend on many factors:
- surface material. A white plastic corner glued to the corner of walls lined with clapboard will look ridiculous.
- Finish colors. In no case should a red element be placed in a room designed in pastel colors.
- General stylistic solution of the interior. A polished stainless steel profile will not fit into a classic interior, a polyurethane, “stuccoed” profile, not suitable for high-tech style.
- Purpose of the premises. In the nursery, silicone corners are perfect. They will keep the corners intact and help protect the child from injury.
Design options for wallpaper
To complete the finish after wallpapering, a profile from any of the above materials can be used. The main criterion for choosing a corner will be its color. The choice of color can be approached in different ways. If the joining walls are of approximately the same shade, you can match the product to the color of the walls, if different - to the color of the wall that is more often looked at. For example, when finishing the corner between the room and the hallway, it is more logical to choose a profile to match the color of the room.
As one of the finishing options - decorating with a wooden corner, tinted in the color of the doors or the floor with the help of an impregnation stain and varnished. For the same purposes, products made of MDF and PVC, decorated under a tree, are suitable. When decorating a strict laconic interior, metal corners will look good.
The solution for the corners on the slopes: the better to close the corners in the apartment
 To complete the finishing of the slopes, corners are used in the color of the slope, almost always white. Often, a sandwich panel serves as a material for slopes, therefore, so that the material does not differ much, PVC corner profiles are used. The width of the shelf is chosen such that it covers the end of the panel or plasterboard. If there are any defects in the finish near the window opening, for example, unevenly cut wallpaper, the corner is chosen so wide that these errors are covered.
The angle between the wall and the slope is usually more than 90 °, in order for the corner to lie flat, it should be slightly “unbent” - put on a flat surface or a pipe of large diameter and lightly press with your hands, moving along the corner.
In the cold season, the profile must warm up to room temperature before work.
Option for decor under the wallpaper
For walls pasted over with wallpaper, an option with wallpapering a corner may be suitable. For these purposes, profiles made of PVC, MDF, wood or smooth polyurethane are suitable. The profile should be of a light shade, because dark can come out from under the wallpaper. Wallpaper is glued on it, the glue is allowed to dry, then, not earlier than the next day, it is mounted on the wall. Wallpaper on the corner should be glued in one piece, of such a size that the wallpaper goes to the inside of the shelves.
How decorative corners are attached
For the installation of a corner profile, they usually use various adhesives, much less often, metal and wooden parts are fixed mechanically using self-tapping screws or nails.
What to glue plastic
 For fixing PVC corners are used:
- "liquid Nails";
- acrylic sealant;
- silicone sealant.
When using sealants, the profiles must be fixed for 12 hours after gluing with masking tape. The best result is given by liquid nails, some brands of this glue do not require fixation for the drying time. As a rule, such glue must be applied to one of the surfaces, pressed on the second, then removed, allowed to dry, and then firmly pressed on the part to be glued.
For the installation of polyurethane products, you can also use liquid nails or special glue.
Finishing wooden corners in the apartment
The surface of wooden corners must be protected with varnish or paint. The varnish will allow you to preserve the texture of the wood, the paint applied in a thick layer will hide it. If you need to give the tree some shade, while maintaining the texture, you should use a wood stain or tinting impregnation for wood.
Fasten wooden elements with liquid nails, wood glue or PVA. It can also be attached to finishing nails.
When hammering a nail, the distance from the edge of the part to the nail should be more than 10 of its diameters.
How to stick a plastic corner on the wallpaper
 The plastic corner is glued to the wallpaper using the same adhesives as to any other surfaces, i.e. liquid nails or sealants. It is important that the wallpaper at the place of installation is well glued to the wall, the wallpaper glue is dry. It is best to wait a few days after wallpapering and then decorate with corners.
How much dries
The drying time of the glue is indicated on the packaging, and rarely exceeds 12 hours. When sticking to silicone or acrylic sealant, it is desirable to keep the elements fixed for a day.
Decorative corners allow you to solve many tasks for decorating a room. They are inexpensive and relatively easy to assemble and dismantle, so it is quite possible to experiment if desired.
Useful video

Corners play a bigger role in the interior than it might seem at first glance. It is enough to look at their uneven or “erased” surfaces, so that it immediately becomes clear: no one will call such a neat finish. Decorative corners on the corners of walls, slopes of door and window openings began to be used everywhere during repairs only in last years. Until then, the materials that covered the joints simply changed more often than the rest of the finish.
You can appreciate the transforming effect of a decorative element even in an empty room without furniture. According to the type of location, they are classified into two types:
Also, elements are classified into those that are imposed on the outer sides of the corners and those that are inserted into the inner ones. The latter may have semicircular shapes that "soften" the finish. You can make a corner with your own hands, or purchase it in a specialized store. Products are made mainly of plastic, MDF, but there are also more durable metal, stone options. Polyurethane effectively imitates various natural materials: wood, marble, sandstone, brick. Plastic corners are used not only as a decor, but also as a durable finishing element that will outlive wallpaper or other less durable wall surface coating. There is also a “mystical” component to the question. According to Feng Shui, the “junctions” of the walls are considered energy breaks that create an imbalance and negatively affect the perception of the situation, so their edges are decorated with corners, “smooth out” the sharpness.
What are decorative corners for?
Corners most often “touch” people passing by with their shoulders, elbows and carried objects. Accordingly, it is this part of the wall that is erased and scratched more than the rest. To protect the joint from mechanical stress, a decorative corner is attached to it - a special type of finishing materials, a special "overlay". It is designed to perform two functions:
- Decorate the finish;
- Protect the "sensitive" area.


In addition, the decoration using these elements looks neater, and the interior seems finished. With the help of the material, color and size, you can emphasize the features of the style used in the design of the room.
When to apply
The corner part of the wall is covered with decorative elements in several cases:
- If the corner has visually noticeable defects: curvature, "dimples" or protrusions that have not been corrected with plaster;
- When the protruding part interferes with the passage or is located next to the "pedestrian" zone. Accordingly, it will constantly be touched, washed, scratched. Over time, mechanical damage will become noticeable and adversely affect the sensitive wall finish and its appearance;
- If without them the interior does not look complete;
- To prevent the destruction of the outer corner of the building and give the exterior a neat appearance.

The installation of elements usually completes the repair: they literally become the final touch in the design.
Size of plastic corners
The standard size range of PVC corners starts from 10x10 mm and ends at 50x50 mm. Between them, a gradation with a difference of 5 mm is used. Parts of non-traditional sizes are made to order. Between the two guides of the decorative element, an angle of 90 degrees is observed, at which all planes of the apartment should intersect. If you got housing with “curved” walls, then you need to take appropriate measurements and contact the master with a request to make individual details.
Decorative panels for the kitchen

Types of decorative corners on the walls
Corners are universal finishing elements. They are glued in bathrooms, kitchens, bedrooms, balconies, offices and living rooms. Decoration is carried out using several types of elements:
- Arched, for plasterboard partitions;
- For ceramic tiles. The same category includes profile strips for the bathroom;
- Corners made of natural and artificial stone;
- Options made of wood;
- Special guides for siding (exterior design);
- Corners for ceiling and floor "joints";
- Textured options;
- For external and internal corners;
- Corners for openings of doors and windows.
Each of the types is combined with a certain wall decoration and organically merges into specific styles. Not only walls are decorated with corners, but also fireplaces, stoves, furniture, “boxes” for masking communications and pipes.


Arched
Arched corners are used under plaster or glued on top of an already finished surface. "Internal" elements provide smooth straight lines. Corners for semicircular partitions are characterized by increased flexibility, which allows them to be tightly bent to the curved surfaces of the base. If the decorative wall has a strict rectangular or square shape, then the decorative elements can be selected from standard plastic options designed for simple walls.
For ceramic tiles
Ceramic tiles are used for walls and floors in kitchens and bathrooms. At the corners, the tile joints are tightly sealed, they do not let water through, but they collect dust, dirt and grease (in the cooking area). Also, it is these places that are usually used by bacteria and fungi to organize their "hotbed". Microorganisms will not get under properly processed seams, but they may well arrange a comfortable “housing” for themselves on their surface. When cleaning tiles, it is advised to pay special attention to these areas. The overlay of the corners allows you to reduce the scope of work and make the place of convergence of the walls reliably protected from the adherence of dirt particles. In addition, the decorative element will competently mask uneven tile cuts, and options that contrast with the color of the tile will add chic to the room. Corners are divided into two types:
- Internal. They are used to decorate the joints between walls and ceilings, floors, shower cabins, that is, “depressed” corners. Usually they have a convex or concave shape (fillet);
- Outdoor. Used in the processing of protrusions.


Popular plastic for decorating tiles is not used, since the main coating can compete with polyurethane in terms of durability and strength. We also need all the finishing elements to “grow old” in approximately the same way, otherwise, due to the corner that has become unusable, the tile will have to be “disturbed” once again. To decorate tiled surfaces, metal and ceramics are used.
There are so-called "tape" corners. They are made of flexible plastic, are available in "bobbins", have high flexibility, and are easily replaced if necessary. This option is ideal for quick repairs.


For outside and inside corners
Separately, the elements are classified into external and internal. The former are used to decorate protruding surface joints. The latter are used less often in "concave" corners. The latter are not so in dire need of protection, so the overlays are only needed to decorate the finish. Internal corners usually have a semicircular concave or convex shape.
textured corners
Textured options differ in color and pattern. They are usually made of plastic. Often the corners imitate a certain material: bricks, marble or granite surfaces, porous stone, wood (wenge, cork, oak, cherry). A variety of shades allows you to choose a contrasting or background option for a particular interior.
Wallpaper under a tree: types, advantages and disadvantages +50 photos

Wooden
Wooden corners are usually made of thin MDF boards, bamboo, cork or veneer. In terms of lightness, the materials are not inferior to plastic. MDF is flexible, and a decorative layer with a protective film against damage is applied to the surface of the compressed sawdust. In veneer versions, the element is made from thin wood cuts, that is, it is more natural and has a natural pattern. Solid wood corners are denser. Glued to the surface, they will protrude slightly on it.
It is not recommended to use natural wood in bathrooms and kitchens. Before attaching the material, it should be coated with a layer of varnish. wooden elements most often made independently. Unfortunately, a cracked corner can be deformed, and crack from a strong blow. For the natural beauty of the decorated surface, you will have to “pay” with a lower service life.


Corners for ceilings and skirting boards
Ceiling and floor plinths at the junctions of individual modules have a very unsightly appearance. No matter how carefully the sections are processed, they will slightly shake the aesthetic picture of the interior. For their disguise, decorative corners are used. In appearance they differ from wall options: They look like small overlays that are designed to cover a small area. For ceiling plinths with stucco molding in classical styles acquire special corners with monograms, repeating each bend of the connected straight lines. On the ceilings, the use of elements is not mandatory, which cannot be said about the floors. Here, skirting boards are constantly in contact with the feet of guests and household members. Their "joints" can loosen, fray and become completely unusable. Corners will save skirting boards from rapid wear.

In design compositions, the lower decorative elements sometimes overlap with the upper ones. This solution ensures the integrity of the composition, so the ceiling and floor plinths often have the same shape, respectively, and the corners for decorating them are identical.
natural stone corners
Decorative elements made of natural stone are usually used to decorate the facades of houses. Due to the strength of the material, they serve as excellent protection against the destruction of the building. However, with the popularization of the industrial loft, brick and stone masonry became an organic addition not only to the exterior, but also to the interior of the house. Such corners will necessarily "protrude" slightly above the surface. You should choose flat stones that will provide a neat look for the whole structure. Hold them together cement mortar, that is, the corner will be monumental and installed for a dozen years. Elements are combined with plasterboard walls, embossed plaster and wooden clapboard.


artificial stone corners
Corners made of artificial stone are classified as cheaper and practical options. As a rule, imitation is made of plastic. It repeats not only the color, but also the “rough” texture of the surface. PVC is flexible, often goes beyond the "boundaries" of the corner and crawls onto the wall itself. This solution is used in order to create the illusion of natural scenery, because real masonry is usually not adjusted to the ruler. Combine a corner with wallpaper and the same plastic panels.
It is important to know. The most budgetary imitation of stone on the corners are dense wallpapers. Curly pieces are cut out of them along the contours of the pebbles and glued to the joint. Such an element will not protect the surface from scratches and damage, but it will cope with the decorative task.

Options for using a corner profile for finishing corners
The corner profile is used to decorate the following elements:
- "Natural" joints between walls that are in a vertical plane;
- Door and window slopes;
- Places of "convergence" of ceilings, floors and walls in horizontal planes with a concave shape;
- Corners of decorative partitions, including arched openings;
- Joints between shower cabins, fireplaces and other "monumental" (not involving movement) interior objects and walls, floors.
Mirror tiles in the interior: application ideas
A decorative element can "smooth out" any "seam" at the junction of finishing materials. If earlier it was necessary to carefully process the sections so that they retain a beautiful aesthetic appearance, now irregularities and chips are allowed on them, which the corner will mask.

Finishing the slopes of doors and windows
Double-glazed windows usually come with special corners that complete the installation of the window. Door sets also often include trims and architraves. If the corners are left without additional protection, then you will have to pick up and glue it yourself. The element will protect the slopes from damage and smooth the junction of the two different materials. For example, the end of the wallpaper will begin to wear off and peel off over time. No matter how smoothly you cut the finishing material on the slope, it will look untidy without additional coverage. AT doorways slopes can be scratched by furniture that is carried through them.
The best option would be to use PVC corners. If necessary, it is easy to replace, and the surface texture can imitate any natural materials. By choosing a particular shade, you can create an illusory transitional border between the color of the wallpaper and the window frame or doorway. Less commonly used corners made of veneer or bamboo.

arched doorways
Arched openings, as a rule, have one of the classic forms: with a semicircle on top. Not every material can repeat its contours. For example, solid wood corners can only be used to decorate straight lines. Smooth transitions are decorated with elements made of flexible plastic, MDF, veneer or bamboo. All of the above options will easily follow the contours of the arch, and complete the design of the doorway.


How to stick a plastic corner yourself
In addition to decorative corners, you will also need a fastening composition. For narrow elements, it is not recommended to use glue, the excess of which cannot be removed from the surface without a trace. The joint before carrying out the procedure must first be cleaned of dirt and residues of wallpaper or protruding pieces of finishing material. No corners will save an excessively uneven and bumpy surface. Then the wall is measured. Measurements are accurately transferred to a piece of corner. cutting material better with a hacksaw with small teeth. Do not forget about the joints between the corners themselves (in doorways, windows): two straight lines should end with cuts at an angle of 45 degrees. The “wrong side” of the prepared material is smeared with glue and applied to the wall. Hands firmly press the corner to the surface and hold until the fastening composition "grabs"

Conclusion
There is another type of decorative corners that decorate furniture (sofas, wardrobes, beds, cabinets). It is used, as a rule, to protect the joints of MDF or chipboard boards, which are especially sensitive to damage and begin to crumble over time. Special silicone corners save the little fingers of the household from constant impacts on these surfaces. In interior design, the use of these elements usually completes repairs. Their installation is akin to the last strokes of a brush on an almost finished canvas, when the artist, moving away from the easel, evaluates his creation with a critical eye and corrects individual areas so that the composition becomes complete. Decorative corners have become an indispensable element in the design of the room, which emphasizes its accuracy and beauty.
Finishing the corners in the apartment has various options its execution. There are also two types of corners that can be finished. For this on this moment used a huge amount modern materials. How the facing of the corners is made, let's consider in more detail.
Varieties of corners in the room that can be finished
Ways to finish the corners are quite diverse. They are based on what kind of corner is made and what material the walls are decorated with (see Wall finishing options).
All corners in the room can be:
- Internal.
- Outdoor.
Most often, decorative trim is performed on the outer corners, as they are most susceptible to rubbing. This is a kind of protection of the main finishing material from deformation along the edges of the finish. Internal corners in the decoration of the whole room and do not require special decoration.
Advice. It is necessary to decorate the internal corners in the room only if it is required by the design of the room from www.24siding.ru.
For example, completely two walls are treated with decorative plaster, and the inner corner is decorated with decorative stone or ceramic tiles. The photo shows examples of the design of internal corners according to interior design.
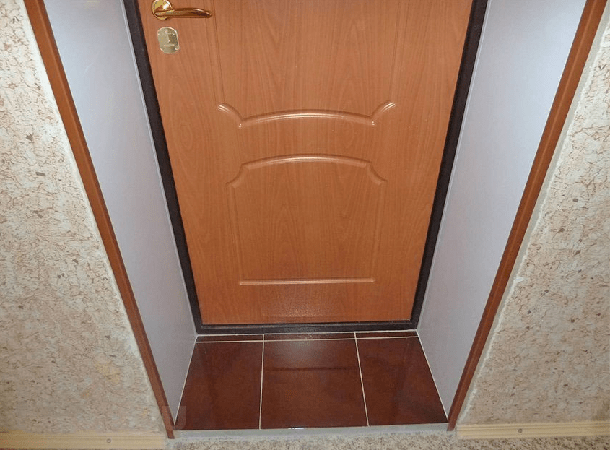
How can I arrange the outer corners in the room
_0.jpg)
How to finish the corners in the apartment? Everything is very simple for this today there are a large number of modern materials. You can use ready-made fixtures for this or make the facing of the corner surface yourself.
Finished fixtures are presented in the form:
- Plastic profiles with a straight corner radius.
- Plastic corners.
- Styrofoam or wooden corners.
All of them are quite easy to install and are able to decorate any finish.
Plastic profiles and corners for finishing external corners
Plastic profiles for finishing wall corners can be used both on external and internal structures. They are universal, as they are mounted on the surface of any finishing material.
Advice. For facing internal corners, profiles and corners should be used only if using plaster or other means it is not possible to make the corner perfectly even.
They are moisture resistant and are not able to react with deformation to temperature changes. They are very practical and reliable. Dirt and dust are not absorbed by their surface, due to which there is a quick and easy cleansing.
The dimensions and appearance of such devices are quite diverse. There are the following surfaces of corners and profiles:
- Smooth or rough.
- Glossy or matte.
More:
- The color range of the material is also quite large and it will not be difficult to choose the necessary shade for decorating the surface of the corners.
- The length of the profile or corner is at least 250 cm. The width starts from 1 cm and ends at 10 cm.
- They do not burn, but can only melt under the influence of a temperature of at least 150 degrees. They are used freely in damp rooms and where there are temperature differences.
They are considered environmentally friendly, since various harmful chemicals are not used in the production of profiles and corners.
Styrofoam corners

Very often, the decoration of the corners of the walls in the apartment is carried out with polystyrene foam corners. They are quite practical and durable. The surface of the material is represented by various reliefs. They are very light and will not put extra stress on the entire finish.
So:
- The material does not absorb moisture and dirt.
- Does not burn and can be used in any room with any temperature regime, as they are not afraid of temperature fluctuations.
- They are made of expanded polystyrene, by pressing under the influence of high temperatures. They have a wide range of colors.
- The main advantage of styrofoam corners is that they can be painted.
Advice. With a high passability of the room or with a very small square of it, such corners are not recommended for use in decoration, since they are not resistant to abrasion and deformation. With an inaccurate turn, the structure of the corner breaks quite quickly and simply, thereby spoiling the appearance of the corner.
Finishing the corners in the apartment with the corners of their polystyrene foam is simple and liquid nails are used for this.
Wooden corners for decoration

The method of decorating corners with wooden structures is quite common in wood finish premises. There are both internal corners made of wood and external ones. They have a very attractive appearance. There may be carvings or other decoration on their surface.
Advice. Since such elements are sold ready-made and their surface is not varnished, it will definitely be necessary to paint it before installation. Such actions are also performed after the installation of the element, but only if the main decoration of the room is not completed.
The price for them is quite high. All this is due to the environmental friendliness of the material. They are very durable and reliable. The color scheme is limited only to shades of natural wood.
Note. To darken the shade of the material, special tools are used that not only change the color of the material, but also give it special strength and moisture resistance.
It is not recommended to use wooden corners in rooms where there is high humidity air and sudden changes in temperature. The structure of the tree is designed in such a way that it is able to absorb moisture and at the same time deform (cry out and shrink).
How to mount plastic, polystyrene and wooden decorative corners

All work is easily done by hand, and for this you need to carry out preparatory work on the surface of the corner. They include leveling the corners even before the main finishing of the room.
This is done in two ways:
- The use of drywall.
- Application of plaster.
Let's take a closer look:
- To use the plaster on the corners there is an instruction. In this case, not only the main types of plaster are used, but also metal corners, which are pre-mounted on the surface of the corner and help to make the corner even. The process is quite lengthy and laborious.
- The use of drywall to level any surface is characterized by the speed of work. The material is used for both external and internal corners.
How to level corners with drywall
Finishing external corners with drywall is currently very popular.
There are two ways to mount such material on a surface:
- On the frame.
- Without him.
Advice. Finishing the outer corners of drywall should be done in the same way as the alignment of the walls in the room. That is, if the wireframe method is used, then the angle should also be using the wireframe. This will make the surface around the perimeter of the room in the same plane.
Carrying out work:
- If you opt for the frame method of fastening the material, then initially a crate is made using special metal profiles. It is fastened with dowels to ensure a secure fit.
- Sheets are mounted to the frame with self-tapping screws. The joints of the material are puttied with a small layer and processed after complete drying with sandpaper. Now on the drywall surface, you can perform a fine finish.
Advice. For such work, it is better to prime drywall sheets for a stronger bond between the finish and the surface.
- Drywall finishing of external corners without the use of a frame is considered simpler and more practical. For mounting sheets of material, a special glue is used. It is applied to the back side of the GLK, and the material is pressed tightly.
Advice. Before such work, the surface of the corner must be prepared: cleaned and primed.
- Joints of sheets or open cuts must also be puttied. The surface of such an angle is also primed.
- Drywall has one drawback - its surface does not have an attractive appearance and it is used only for rough finishing.
Advice. Be sure to veneer the plasterboard surface with another finishing material.
Methods for finishing drywall corners

Options for finishing the corners of plasterboard are quite diverse. Here you can use various modern finishing materials:
- Ceramic tile.
- Plastic panels.
- Natural or decorative stone and other materials.
Finishing the corners with ceramic tiles is done using:
- A tile cutter that cuts material very quickly.
- Building level, which ensures smooth installation of each finishing element.
- Special glue or concrete mortar.
- Ceramic corners, which serve as the basis for mounting tiles on the corners.
Execution of works:
- Decorative putty masks the seams of ceramic tile masonry. It is possible to use decorative corners on top of such a finish in case of uneven laying of tiles. They are attached to the surface of ceramic tiles with a sealant or a special adhesive. Most often, foam or polystyrene foam corners are used.
- Finishing the corners of PVC (plastic) panels is also quite simple. Only here you can use liquid nails, which are able to firmly fix any material on the surface.
The only thing to consider is that finishing the corners with PVC panels requires additional decoration, since plastic cuts will be visible on the surface of the corner. Small plastic corners are used for such masking. They are glued to PVC panels using special glue or liquid nails. Watch the video on how to decorate corners with decorative stone.
A large number of building materials on the modern market allows you to decorate the interior of a house or apartment in a variety of decor options. This applies to walls, ceilings, doorways, window slopes, etc. But in order to give the lines a finished look and protect them from deformation, they use protective plastic corners that are easy to install, durable, practical and affordable.
- Reliable protection. No matter how carefully you treat the decorative finishes in your apartment, without using these plastic parts after a few months, scuffs, scratches, chips and other marks appear at the joints of the walls. Especially if there are pets in the room.
- Elimination of cracks and gaps. The plastic corner does an excellent job of solving the problem on any curved surfaces between wall panels.
- Improvement in appearance. A variety of options and colors allows you to transform the decor of the room and give it a finished and beautiful shape.
- L-shaped and T-shaped. They are used to seal joints, cracks, seams and create an even edge and an angle between plates or panels of different types.
- Standard (P-profile). Designed for decorating window slopes, arches, interior openings etc.
- F-shaped. It is used as a material in the arrangement of slopes to close the joints of PVC panels and walls.
Show all
Plastic profiles to protect the outer corners of the walls
Perforated metal or plastic corners are used even at the stage of plastering and leveling walls and ceilings using drywall. Profile options are installed to strengthen the finishing layer of putty and give joints and lines in two planes an ideal geometric shape. With the help of these materials it is easy to align, at least visually, the outer and inner corners, even on the most uneven surfaces.
This material for finishing the outer corners of the walls has a number of advantages, among which experts distinguish such as:

But not only on the outside, plastic corners are used, they are also used to protect internal joints in order to hide the visible transition from different types finishes, such as drywall or MDF panels with wallpaper and wallboards.
Plastic corner - features of production and application
When sealing corner joints and irregularities on walls and ceilings, profiles made of silicone, polystyrene, polyurethane or PVC are used. The last PVC option remains the most popular and in demand due to its versatility and practicality. Such species are not used only as "flashing". When it is necessary to close the outer line of the window opening, metal counterparts or MDF panels are better suited for this.

Otherwise, the popularity of the PVC corner is due to good flexibility, durability, ease of installation and adhesion of the material with various types glue. Another plus is the affordable price, which is why the finishing corner is used if necessary to decorate large areas.

According to the shape, on which the specific area of \u200b\u200bapplication depends, the following options for plastic corners are distinguished:
Corners are produced in several sizes and in almost any color, wood effect, natural stone, etc., depending on the specific conditions and finishing tasks. For installation at the transitions between wallpaper and decorative plaster, the most little corner 10x10 mm. For other interior work, materials with dimensions of 20x20 or 25x25 are used, which are considered universal. Large views (50x50 mm) are used mainly for finishing external arches and the facade of the building.
Finishing slopes and bathroom
One of the areas of application of the PVC corner in repair and construction is the sealing of the slopes of doors and windows. This material is ideal for closing outside corners. The traditional technology for the manufacture of slopes involves the use of drywall and plaster with mandatory reinforcement with a special metal profile with perforation.

It allows you to create perfectly flat surfaces and geometrically align the planes, but after the final finishing, the open edge remains unprotected and here a plastic corner comes to the rescue.
They close the ends of the facing panels and other external joints, as well as the intersection lines of the window sill and walls. Dimensions are selected based on the width and height of the window opening.
Such a corner is also indispensable when decorating a bathroom with tiles laid out on the walls. L-shaped profile close the seam between the bathroom and the wall. Due to its properties, PVC is ideal for a humid atmosphere and warns against the appearance of fungus at the joints and the passage of water.

Corners are also used to close gaps and joints at entrance and interior doorways, especially when used in lining, PVC or MDF panels.
The use of "arched" corners in the decor of the room
The arched version of the doorway is becoming more and more popular, as it gives the room a solid look and frees up real and visual space. Internal arches are most often made of a metal frame with drywall or wall foam blocks with a special layout.

In this case, joints and corner transitions from slopes to drywall are closed with a decorative plastic profile. To do this, the corner must be bent correctly so that it does not crack or break. Therefore, when improving the arched corners, a special plastic profile is used or a regular one is cut into small segments of 25-30 cm each.

For arches, a corner of an unequal variant with a size of 17x5 mm is ideal. It bends without distortions and fits well on the adhesive base, without peeling off the edge of the wall. With a small radius of the arc, "hot" bending of the profile is used. To do this, as it is being installed, it is heated with a building hair dryer to a temperature of 60-70 degrees and rolled against the wall with a soft paint roller.
The process of installing plastic corners is simple. The progress of work is no different from sticking a skirting board or polyurethane glazing beads. The main thing is to properly prepare the material and handle it as carefully as possible so as not to scratch or damage it.
When gluing slopes, first measure the length of the profile for each slope angle. Most often they have a rectangular shape, which means that all joints are made at right angles and the joint line is cut at 45 degrees. For arches or multifaceted vaults, the angle of the cut is determined locally.
After taking measurements, proceed to the correct cutting. To do this, use a sharp knife or well-sharpened scissors. If there are no such tools, then use an ordinary hacksaw for metal and a ruler for an even cut. All burrs and irregularities are treated with fine-grained sandpaper. Next, perform a preliminary measurement. The blanks are installed at the place of gluing and aligned with the building level and pre-fixed with masking tape in several places.

After that, it becomes clear how correctly the angular cut of the product was carried out at the junction of the two profiles. Sometimes it happens that a gap appears at the joint line (1-3 mm), especially for those who work with this material for the first time. To avoid this, allow an allowance of 2-3 millimeters to the initial measurements, and erase the excess with the same sandpaper.
Gluing process and selection of suitable material
Before proceeding to the final stage of the installation of the plastic corner, it is necessary to choose the right glue. Construction stores offer compounds called "liquid nails", they are also used by some craftsmen. But this tool cannot be called universal, it is only suitable for fixing thin and small profiles to a flat wall surface.
To close the slopes or gaps between the tiles and the bathroom, in complex arches and transitions from one material to another, it is better to use liquid silicone. It is classic, transparent or colored, mostly white. Silicone does not shrink, does not drain, unlike liquid nails and ordinary glue, which tend to chip and crumble over time.

This is especially true for places with a high level of vibration, in doorways, window slopes. In the bathroom, silicone will not only securely fix the corner, but will also serve as an additional gasket from water ingress and the formation of fungus due to constant humidity.
The sticker technology is simple. Silicone is applied to the inner surface of the profile along the entire length. If glue and the corresponding compositions are used, then they are squeezed out of the tube pointwise, at a distance of 10-15 cm from each other. You should not cover the entire corner with glue, it will be impossible to press it evenly, and the remaining glue will stain the surrounding finish, it will be problematic to remove them later.
The corner is installed in place of gluing and gently pressed, and then set as evenly as possible according to the building level and ruler. Additionally, they are fixed with several pieces of adhesive tape or electrical tape so that it does not change its position. Squeezed out adhesive residues are removed with a wet rag or paper towel; when working with silicone, the excess is removed after setting and drying with a clerical knife.

When joining a horizontal and vertical profile, a long bar is installed first, followed by the top one. It is also glued, but be sure to apply a small amount of adhesive to the corners of the joint and then allow the planks to fully grasp, usually it takes 15-20 minutes.
The plastic corner is used not only when decorating the interior, but also in the outdoor version, in cottages, bathhouses, wooden house from a bar with clapboard, on panel facades, etc. The material gives the structure completeness and additionally protects the tree from excessive moisture and other climatic influences. Affordable price, durability and a variety of shapes and colors make the plastic corner an indispensable and reliable interior detail.
The most characteristic part of the house, in terms of architectural decoration, is the corner of the house. In this part of the building, you can see all, or almost all, elements of the facade stucco.
Roof overhang decor
The overhang of the roof is decorated with a large or small, complex or simple, single or composite subroofing cornice. A little lower there may be an additional dividing strip on the facade, which allows for color zoning of the facade of the house. The corner of the house itself is decorated with a variety of options in order to visually reduce or increase the height of the building. Rusts, pilasters, combined options are the main types of facade decor for the corner of the house. A separate and most basic part of the decoration of the exterior walls of the house is the facade decoration of the window.
window decor
The main task in the decoration of the window opening is also the alignment of the general proportions of the building due to the decor. More details and details about window slope design you can see on a separate page of our site. Also a very important part of the facade decor is the interfloor dividing strip. With the help of this decor element, the issue of separation is easily solved. various materials decoration of the walls of the facade of the house.
home wall decor
Also, with the help of interfloor molding, we visually reduce the not always proportional height of the house. And the final one in the set of facade decoration of the walls of a private house is. This element is primarily a logical separator between the basement part of the structure and the main wall. Also, the basement profile can perform technical functions - smoothing the difference between the protrusions of the wall and the basement, drip, etc.
Below are a few examples of facade decoration on the corner of the house. You can see more ready-made design options for the facade of the whole house HERE.
1. House Facade Decor Example
In this example, the design of the facade country house the subroofing cornice consists of two separate elements forming a massive filling.
Making the corner of the house
The corners of the house are decorated with beveled rusticated stones. Rusts at the corner do not join with each other, but are mounted each on their own side.
Window decor, slope
The windows of the second floor are framed by a molding 12 cm wide along the wall. The top of the window is supplemented with a profile with an angle cut, as well as a keystone. On the windows of the first floor, in addition to the molding, a decorative window sill profile was used.
decorative division
In this case, a double interstorey division of the facade is applied. One strip goes along the line of the second floor window sills, and the other along the floor slab of the first and second floors. This technique helps to significantly underestimate the visual height of the building. Decorative frames from a thin facade profile are used between the dividing strips.
Basement decoration
Wall finishing materials
2. House Facade Decor Example
On this fragment of the architectural decoration of the facade of a private house, the under-roof space is also filled with a combination of two separate stucco elements. The height of the composition is greater than its departure along the roof, which gives a strong effect that underestimates the overall height of the house.

Facade stucco molding on windows
The second floor windows are framed by two separate moldings. Along the edge of the slope there is a flat profile, around it there is a symmetrical convex element. Brackets are cut into the outer molding of the window, which support the massive top of the window. The profile of the top of the window is made with a bevel, which allows not to cover it with additional metal. The windows on the first floor are complemented by a window sill profile and a curly top with an angle trim.
Making the corner of the house
The corners of the house are decorated with rustication of various sizes with chamfers on four sides. Rusts are located at a short distance from the corner.
Interfloor separation
In this example, one strip goes along the line of the window sills of the second floor, and the other along the floor slab of the first and second floors. This technique helps to significantly underestimate the visual height of the building.
Finishing the basement of the house
The plinth element is located with a thin part upwards to smooth out the difference in the thicknesses of the plinth and the main wall.
Wall finishing materials
The main wall decoration is bark beetle or decorative plaster. The finishing coating of the walls is applied after the installation of decorative stucco. This helps to additionally isolate the joint of gluing decor elements to the wall. The basement is decorated with marble or granite.
3. House Facade Decor Example
In this set of facade decor of a private house, the roof overhang is also decorated with a combination of two separate stucco elements. The height and reach of the set are almost the same, which gives a complete and deep filling of this part of the facade of the house.

window framing
The windows of the second and first floors are decorated with a simple set of moldings and window sills with keystones.
Finishing the corners of the house with foam
The corners of the house are decorated with rustication of different sizes of a simple rectangular shape without a chamfer. This version of rustication is usually mounted from molded products.
Interfloor separation is made using two types of small size profiles located at a distance from each other. The gap between them is painted in the color of the decor, thanks to which we get a wide separation on the facade.
plinth trim
The plinth element is located with a thin part upwards to smooth out the difference in the thicknesses of the plinth and the main wall.
Wall finishing materials
The main wall decoration is bark beetle or decorative plaster. The finishing coating of the walls is applied after the installation of decorative stucco. This helps to additionally isolate the joint of gluing decor elements to the wall. The basement is decorated with marble or granite.
4. House Facade Decor Example
In this set of facade decor of a private house, the roof overhang is also decorated with a combination of two separate stucco elements. The section of the elements has a greater number of bends and steps compared to the previous version.

Decorative window trim outside
The windows of the second and first floors are decorated with a large molding around the perimeter. The cross section of the molding has a pronounced, convex, rounded shape. The top of the window is mounted at a distance from the molding and is supported by decorative brackets.
Finishing the corners of the facade of the house
The corners of the house are decorated with pilasters of relatively small width along the facade. Each element is located a short distance from the corner of the house.
Dividing strip
In the interfloor division, two separate elements are used between which there is a strip of architectural ornament. The upper dividing strip runs along the bottom line of the second floor windows. The lower strip runs along the interfloor slab.
Finishing the foundation of the house
The compositional design of the basement of the house can be attributed, in this case, to the strip passing along the bottom line of the windows on the first floor. This option looks favorably in the presence of the so-called French windows - when the bottom of the windows is not located high from the floor. The plinth element is located with a thin part upwards to smooth out the difference in the thicknesses of the plinth and the main wall.
Wall finishing materials
The main wall decoration is bark beetle or decorative plaster. The finishing coating of the walls is applied after the installation of decorative stucco. This helps to additionally isolate the joint of gluing decor elements to the wall. The basement is decorated with marble or granite.
5. House Facade Decor Example
This set of elements of architectural stucco can be described as more complex in terms of geometry, complete set with decorative elements. Techniques were used to bypass additional thicknesses to create more relief and volume.

Window decoration outside the house
The windows of the second floor are framed with a wide relief molding 18 cm wide. From the window sill profile, additional reliefs imitating brackets are formed under the moldings by trimming at 45 degrees. The top of the window also has a complex relief due to undercuts at an angle. The keystone is embedded in the profile part of the top of the window.
Exterior decoration of the corners of the house
Dividing strip
Finishing the basement of the house
The plinth element is located with a thin part upwards to smooth out the difference in the thicknesses of the plinth and the main wall.
Wall finishing materials
The main wall decoration is bark beetle or decorative plaster. The finishing coating of the walls is applied after the installation of decorative stucco. This helps to additionally isolate the joint of gluing decor elements to the wall. The first floor is completed with rustication. This type of finish is performed by facades when insulating walls. Grooves are made in the insulation, which are then reinforced with the help of corners together with the main wall. The basement is decorated with marble or granite.
6. House Facade Decor Example
In this case, the main distinguishing feature of this composition is the massive, voluminous framing of the windows. The subroofing cornice is made of two separate elements. mounted at a distance from each other. Gap between top. the main cornice and a smaller strip on the wall is painted in the color of the decor, which visually gives a single composition.

Window design outside
The windows of the first and second floors are trimmed with small molding around the perimeter. Moreover, a figured frame was created from it into which the brackets are inscribed. On the first floor, a straight top window from a large profile has been added. In addition to it, there is an arched element on the second floor.
Decor of the corners of the house with foam plastic
The corners of the house are decorated with simple rectangular rustication of the same size. Such a performance is usually performed by performers facade works in place or from a molded product.
Dividing strip
A voluminous, protruding dividing strip was launched between the floors. Its dimensions and volume create an additional relief on the facade of the house.
Finishing the basement of the house
The plinth element is located with a thin part upwards to smooth out the difference in the thicknesses of the plinth and the main wall.
Wall finishing materials
The main wall decoration is bark beetle or decorative plaster. The finishing coating of the walls is applied after the installation of decorative stucco. This helps to additionally isolate the joint of gluing decor elements to the wall. The basement is decorated with marble or granite.
related posts:
 Facade Design ~ 13+ Finished Appearance Solutions…