How to fold a cooking oven with your own hands drawings. How easy it is to fold the oven with your own hands. Dutch woman - a small-sized furnace device with high heat transfer
A brick oven in a private house or country house can always perform several functions, such as heating and cooking. But most often the construction of a brick oven is carried out for one purpose - to constantly maintain heat in the house. In order for the heating of the room to be carried out efficiently (regardless of its size), and fuel consumption to remain moderate, you should know not only design features brick ovens, but also the correct order of its construction. Also, special attention should be paid to the choice of building material. How to fold a simple brick oven with your own hands can be found further.
Furnaces should be accurately distinguished according to the principle of use, which are divided into:
- Red brick heating stoves. They are used most often, since with their help you can heat up to 100 m 2 of the room. The dimensions of the furnace can be quite large.
heating stove
- Cooking ovens. They are used exclusively for cooking, of course, while spreading a certain heat around.
- Combined brick. Such a brick oven can be used for both cooking and heating. Very convenient, for example, in the country or in a country house.

Combination oven example
- Fireplace options. A brick fireplace stove is not widely used, but some owners are trying to give old stoves exactly the look of a fireplace, saving space. Used for space heating or as decorative option fire source.

Fireplace version of a brick stove
To know the basic structural elements and the dimensions of the red brick stove, for example, you should take the most popular option - the combined one (hob and brick stove for heating a house or cottage).
The structure of the combined brick oven:
- Firebox. This is the place in the Russian stove where the combustion of fuel takes place. Since the temperature in this place is constantly high, the materials should be selected accordingly.
- It blew. A free cavity, which is laid out of brick directly under the firebox. The main function is the accumulation of ash and small unburned residues. Also, air enters the furnace through the blower, which improves the quality of fuel combustion.
- Channels for removing smoke from the furnace. One of the most difficult parts of the oven. Passing through the channels, the combustion products give off part of the heat to the brick, which subsequently heats the room.
- Chimney. Releases exhaust gases into the atmosphere. It also provides the draft necessary for combustion in a Russian stove.
- Tile. It is located in a place above the firebox and only in cooking or combination ovens.
- Holes for cleaning. For greater convenience, they are mounted at the top of the chimney, this place allows you to clean it quickly and efficiently.
The foundation is the foundation of any structure.
Like every solid building, a brick stove for a house must have its own foundation. The average weight of a brick oven is 1.5 tons, no more. Therefore, in the ground it will be enough to dig a trench up to 15-20 cm deep, which is approximately equal to one spade bayonet, and you can start building a brick oven with your own hands.
After the trench for the foundation is ready, formwork can be installed in it. The formwork is made from boards of any category with their own hands, the only condition is the absence of traces of decay. The structure should rise 10-15 cm above the ground. According to the rules, the basement of the foundation should be level with the floor, but many homeowners make it a little higher. The formwork walls can be fastened together with knitting needles.
A sand cushion is poured at the bottom of the trench. You don't need to use a lot of sand. A cement masonry mortar can be poured over the embankment, for which the following materials are required:
- 1/3 bucket of cement.
- 8 bayonet shovels of sand.
- Water (add until thick cement mortar). In case of accidental overflow of water, a little cement and sand should be added.
The first layer of cement will be 7-8 cm. Materials such as pieces of reinforcement or pre-welded reinforcing mesh should be laid on it. Next, the second layer is poured and reinforcement is also laid. Reinforcement will allow you to securely connect the entire structure and add strength to it. After pouring, the mortar must be allowed to dry, which can take up to several weeks.
2 layers of waterproofing should be laid on the finished foundation. It is not necessary to fix it, the brickwork will qualitatively press the waterproofing to the foundation.
Laying a brick oven with your own hands, step by step
If you know the sequence of laying a simple brick oven and have the required tools and building materials at hand, the work can take several days. At the building masters brick oven takes no more than one day.
- The most responsible in the furnace is the first brick row, which is laid with a solid surface, without any cavities or technical holes. To set its level and the correct angles, you should use: a square, a building level and (if necessary) a tape measure. After finishing the laying of the first furnace level, it can be checked using a plumb line fixed on the ceiling in the room.

Construction of the first row of brickwork
If you do not follow these recommendations and do not use a measuring tool, then the result may not correspond to the desired one: a row with curved walls, disproportionate corners, uneven surface. Then the furnace will have to be shifted, which will lead to additional waste of funds.

A whole oven brick is not always needed here, sometimes halves are enough. In order to prepare such pieces, you should use a grinder with a diamond wheel. Brick cannot be beaten with a hammer, it is too fragile and the pieces will turn out uneven.


You can see the entire process described above in more detail in the video:
The above sequence shows exactly what you can do with your own hands to fold a simple oven (which can withstand rising degrees) or a brick slab, and this does not require complex tools or expensive building materials.

Ordering for a brick oven
Preparing a mortar for laying the oven
Most often, clay mortar is used for laying a brick oven (or firebox), which you can prepare yourself (for example, for a cooking stove), it will not take much time for this. The following materials are needed for the firebox: clay, water, sand. Clay, before preparing the mortar for laying the furnace, must be soaked for at least 24 hours. After that, you should add clean water without mineral impurities. The resulting masonry mortar should be thick enough and resemble sour cream in consistency. The last ingredient is sand, it is added in small portions, constantly stirring the solution.
If the laying of a brick oven is carried out in accordance with all the rules, then the clay mortar is not suitable for the first row (the junction of the brick and the foundation), as well as for the chimney. This is due to the accumulation of moisture during continuous operation of the furnace. Clay is prone to absorbing water and with sudden changes in temperature gives a crack. Therefore, for these places it is better to use lime mortar.
The procedure for preparing lime mortar for a brick kiln:
- Materials: quicklime, water, sand. Prepare a mass consisting of water and lime in a ratio of 3:1. In this case, it is necessary to add water to the lime and constantly stir the solution until a dough is formed. It is very important to use a protective mask and gloves when working with quicklime.
- After preparing the dough for laying the oven, it should be crushed and sieved with high quality, getting rid of too large particles.
- Sand is added to the sifted solution, the amount of which should be 3 times more lime.
- Adding water will allow you to get a thick mass for laying a stove or a separate firebox. Now you can start building a real Russian stove. Some masters, for greater strength, add a small part of the cement to the solution.
A high-quality, but more expensive replacement for oven clay and lime mortar is cement mortar. Cement is characterized by increased strength, as well as resistance to temperature changes, it is most suitable for laying a stove used for heating a room, as well as a chimney or oven.
To prepare such a solution, sifted sand and cement are required. The ratio should be 1 portion of cement to 3 portions of sand. Having prepared a dry mortar (it is enough to mix cement and sand), water can be gradually added to it, but only in small portions. Having achieved the necessary consistency (the solution should become creamy), you can start laying a brick oven for a house or a summer residence. The main disadvantage of cement mortar for creating a do-it-yourself brick oven is that it should be used within one hour after preparation.
And another useful video for beginner stove-makers
Once upon a time, classic brick stoves for the house were its obligatory attribute and the only way of heating. Professional stove-makers were in demand and respected. To date, there are many new means for space heating, which operate from different energy sources, ranging from solid fuel ending with electricity. However, good stove-setters remain in demand and the online request for “brick ovens for home drawings with orders” remains frequent.
Some build stoves for baths, for giving, or simply because of the remoteness of housing, which is why there is no alternative. Different types ovens can perform a heating function, on some models you can cook traditional dishes. Some are large in size, others are compact and prefabricated. Some plan before building a house, while others need to fit into an existing room. Furnaces are ordered or made with their own hands in order to save money, others are erected to fill the decor. In any case, all such equipment should be built from high-quality and suitable materials, in accordance with the existing SNiP. On the Internet, you can find any drawings with orders, but you need to understand that it will not be so easy to build a stove for a house with your own hands.
Why does the brick oven remain competitive, more and more are being built, so many advantages?
It would seem that today there are many alternatives for heating, which are much more convenient to operate, and according to manufacturers, have a greater efficiency (coefficient of performance). But why are bricks still in demand in some areas or buildings. One of the reasons is that the brick stove “breathes”.
This means that when the furnace is heated, moisture is released from the base of the structure. As it cools, the moisture reabsorbs. Due to this, it maintains a normal dew point in the room. It is this indicator that indicates that "a cozy atmosphere is maintained in the house."

The ability of a brick oven to "breathe" not only has a positive effect on human health, but also allows you to feel comfort even at a non-domestic level. During the heat engineering calculation of the house, the temperature indicators during the heating season are set within 18-20 Celsius. At the same time, air humidity should be optimal for health. The furnace for the house provides optimum humidity of air, at a temperature of warming up about 16 degrees Celsius. At this temperature, a person does not feel discomfort, clothes, bedding remain dry. At the same time, in panel houses, when using centralized water heating, even at a temperature of 18 degrees Celsius, excessive humidity may be felt.
For water heating, the optimal temperature range will be 20-23 Celsius. And for electric heating with infrared emitters, the temperature should be even higher (since they dry the air a lot). It turns out that a brick oven with an efficiency of about 50% will be more profitable, in terms of economy, than modern systems, with indicators of 60-80%. Thus, the savings will be more significant, because the heat loss of the house depends on the difference in temperatures inside and outside the room.
Selecting the size of the furnace surface
Before proceeding with the construction, it is necessary to choose the type and model of the future structure. The main criteria for selection will not be her appearance and ease of construction, and heat transfer (the ability to heat the required area).
When choosing a place for its placement, you should know that the side surfaces of the furnace have the highest heat transfer. This factor determines when choosing a place.
Different models have different forms:
- Rectangular;
- In the shape of the letter T;
- With a bench or kitchen equipment for cooking.
They can serve as a heating device for living rooms, or be a space separator.
For a small house area, you should not choose too massive structures, even if they have a wide range of functions, they will take up too much space and give off too much heat. To warm up the entire furnace, a lot of fuel is needed, while the heat transfer will be too great.
The location of the stove, relative to the living rooms, is also important, and the criterion is the insulation of the whole house.

Oven dimensions table, taking into account the area of the room
The structure of the stove for the house, stoves for the house of the classical scheme
The furnace consists of 3 main parts. Furnace body, foundation and chimney leading to the roof.
Furnace diagram example: 
The oven consists of:
- Foundations - foundation;
- waterproofing material;
- Shantsy. They are holes, they make you create heating in the lower part of the room. They perform the function of "legs" in the design;
- Blew;
- The opening of the air channel, contributes to the heating of the room along the entire height;
- Door for blower;
- grate grate;
- Kindling door;
- Furnace part;
- Arch of the furnace part;
- “Hailo” (Sometimes the vertical part of the firebox with a nozzle is called a hail);
- door for cleaning;
- Dusnik pass;
- Dusnik;
- Valves regulating the direction of travel;
- Convector channel;
- A valve that closes the chimney after heating the furnace. Close after heating, so that the furnace does not cool down.
- Air outlet door;
- flue hole;
- Overlapping (upper part of the furnace);
- Cutting the chimney under the ceiling;
- overlap;
- Chimney on the roof (otter or fluff).
Foundation
The foundation for the furnace is made separately from the general foundation of the house. Use conventional reinforced concrete strip foundation. Insulation is laid on it in several layers of roofing material, and on top of them is a sheet of asbestos. Asbestos is covered with an iron sheet (cast iron is best, but it is very expensive, ordinary roofing metal will do), and covered with felt on top. Felt bedding is pre-moistened, laid on the foundation and allowed to dry. Only after that they begin laying. By itself, the litter is needed so that the foundation does not take on all the thermal energy of the furnace. In simple words"so that the heat does not go into the ground."masonry base
The base of the masonry is made in oblique hatching from a simple red brick, on a cement-sand mortar. This part is located under the firebox and will not experience high thermal loads. The furnace part is laid out of red ceramic bricks, in combination with refractory (chamotte) material. As a clay mixture with sand is used (sometimes with the addition of fireclay).
A sheet of metal and asbestos is placed in front of the blower door. The thickness of the asbestos layer should be about 5 mm. Its edges should be laid in the masonry of the furnaces. Removal of a metal sheet not less than 250 mm. The edges are tucked, knocking to the floor.
Unlike a cement-sand mortar, a mixture of clay and sand dries rather than sets. Therefore, with the constant action of moisture (especially in winter), the solution soaks. For this reason, some part of the furnace that does not experience high temperatures (up to 300 degrees Celsius) is placed on a cement-sand mortar. Apply Portland cement grade 400 and quartz quarry sand.
To ensure the accumulation of soot in the lower part of the channels, the edges of the transitions are made of a rounded appearance. Each new channel must be higher in height than the first (bottom transition). It is much easier to clean soot from the lower channels.
Chimney
It is laid out from red ceramic bricks and ordinary cement-sand mortar. Such a brick is cheaper than fireclay, and the solution is much stronger. We must not forget about cutting the chimney inside the apartment (in the ceilings). The cutting performs fire-fighting functions. A thick layer of bricks warms up more slowly, in the event of a soot fire, and thereby gives less heat load to the ceiling.
The upper chimney pipe (otter), which is located above the roof, performs decorative functions, is a side for rain to drain. From the height of the pipe, the draft in the furnace will hang.
Place for the stove in the house
Its effective operation will depend on the installation location of the furnace. The best location will be the intersection of all the walls in the house. With no larger area, it will be possible to effectively heat the entire space. The closer the oven is to the outlet, the better. The heated air will prevent cold air from entering from outside. In addition, in this case it will be easier to deliver fuel for the furnace.

Factors to consider:
- The structure must be installed so that all side parts can be reached. This is necessary for proper operation and the possibility of full cleaning.
- The stove should not be part of the general foundation of the house, as its foundation will experience completely different types of loads.
- The location must be such that the chimney pipe does not rest against the floor beams. This must be calculated when building a house or when laying the foundation for the furnace.
- In front of the door of the furnace part, there must be a flooring that can withstand fire. (sheet of metal or ceramic tile) to prevent accidental fires.
Do-it-yourself equipment and building materials for building a furnace
Brick
There are sources on the Internet claiming that brick for furnaces and refractory are one and the same. In fact, they have only linear dimensions in common. The dimensions of an ordinary single building brick are 250 by 125 by 65 mm., And the standard stove has a size of 230 by 114 by 40 mm. Sometimes there are 230 by 114 by 65 mm. In the construction of the furnace, a special high-quality brick of grade 150 is used. It is resistant to temperatures up to 800 degrees. It would be possible to build an entire furnace from it, but it cools quickly and is not suitable for a full-fledged furnace.
Fireclay bricks are used for laying furnace channels in the furnace part. It withstands high thermal loads. It is used in Swedish ovens or sauna ovens. It is able to withstand temperatures up to 1800 degrees, but in home ovens, this temperature does not happen. It is valued for other qualities - the ability to keep warm for a long time. It does not make sense to build the entire body of the furnace from it, since it is very expensive and has poor strength.

In order to distinguish high-quality fireclay from low-quality fireclay, there is an opinion that it should have a yellowish tint. But such a calculation is not correct, since chamotte can change color depending on its deposit. A sign of high-quality fireclay is the fine grain of the brick. Another way checks - check to sound. The brick is tapped with a hammer. The sound should be loud and clear, not dull. The last way to determine the quality of the material is radical. The brick is broken in half and looked at the break. Qualitative fireclay is broken into large pieces.
As a substitute for expensive fireclay, clinker bricks are sometimes used in furnace construction. It is that de red ceramic, only it is fired at elevated temperatures. It has greater strength and fire resistance.
White silicate is not suitable for any parts. It is not resistant to thermal stress and absorbs moisture too much.
Sand
Quarry sand of medium fraction is used as sand in a cement-sand mortar. It is sifted through a sieve to sift out large fractions and various organic inclusions. The presence of additional inclusions in this case very important. All organic impurities will burn out from heating, due to which the masonry will crack and begin to crumble.
Masonry mortar
For laying the furnace, you will have to use several types of mortar based on:
- cement;
- Lime;
- clays;
- Fireclay.
Characterized by its plasticity. It is used in places experiencing high temperature loads. This solution is cheap. Clay can be easily found on almost any land, after cleaning it. It can withstand temperatures up to 1100 degrees Celsius. Such a mixture dries out under the action of high temperature, but becomes wet when exposed to moisture. The stove masonry can always be disassembled and reassembled. But it is impossible to lay the foundation on such a solution.
A mixture of clay with the addition of fireclay is used in furnace parts. Such a solution withstands the highest thermal loads.
The lime mixture is used on the foundation masonry or for the chimney. This solution is strong enough, but can only withstand 450 degrees Celsius.
Cement-lime is even more durable than ordinary lime, but the fire resistance is reduced even more. Used in foundation.
Cement-sand mortar is used for masonry chimney. It has the best indicators of strength and resistance to precipitation. The seams of such a solution will not let smoke through and dig into the room and provide good draft for the firebox.
Brick oven projects examples
Furnace for giving
Medium sizes country house are about 15-20 square meters. With a consumption of only 280 bricks, you can build a small stove, 2 by 3 meters in size and with a heat capacity coefficient of 1.90 kW. As mentioned earlier, the furnace part is made of refractory bricks, and the whole body is built from ceramic red.

The figure shows the project of the furnace in the context
Such a simple option can easily be made of bricks with their own hands by every beginner, without even making mistakes.
Scheme with ordering, ordinal instruction
Despite the small dimensions and light weight, it still requires the construction of a separate foundation. The foundation must also withstand the pressure of the chimney.

The thickness of the seam for masonry should be standard 8-10 mm., while the thickness of the seam between refractory bricks should be half as much.

It is better not to change the drawing if you do not have your experience.

For such a furnace, the chimney is laid in a brick floor.
Material Quantity:
You will need about 210 pieces of ordinary brick, about 75 pieces of fireclay. The clay solution will take about 70 liters. Sand 0.4 cu. m. One grate, door for furnace, blower and cleaning. Two smoke dampers. Sheet of metal for the foundation. For waterproofing about 3 meters of roofing material.
The number of bricks is approximate, as there will be a certain percentage of brick battle.
Russian oven
Such a furnace has an efficiency of 80 percent. She has a beautiful appearance. On such an oven you can cook food and there is a stove bench in its design. Laying and erection schemes are quite simple. Its main disadvantage is the design feature, due to which it heats only the upper part of the room. But in our country, it is still popular.

What does it consist of:
- A) the ward part;
- B) niche;
- B) six;
- D) bugle;
- D) stuffy part;
- E) shield;
- G) valve;
- H) chimney pipe;
- I) Repainting the crucible.
Large, small and medium-sized furnaces are built according to their size. Consider a small one, measuring 1270 by 650 by 2380 mm.
Necessary materials:
Brick red about 1620 pieces. The clay solution will take about 1000 liters. From steel, a plug measuring 430 by 340, a valve measuring 300 by 300 (two pieces), a samovar, measuring 140 by 140 (one).

Order of the Russian stove:
Row No. 1 is laid out from solid ceramic bricks, on lime mortar with the addition of cement. There is a formation of the ward part;
Row number 2 to number 4 is laid out well. All sutures are tied. On the one hand, they leave room for baking;
Rows No. 5 to No. 7 erect a vault over the oven;
Row No. 8 to No. 10 a lock is being erected for the vault;
Row number 11 lay out a cold stove. Sand is poured into the remaining space between the stove and the stove;
Row number 12 is laid out "under". It is made from a special brick;
Row No. 13 the beginning of the cooking chamber;
Row No. 14 to 16 are done in the same way as the previous one;
Row No. 17 set the vaults of the mouths;
Row No. 18 laying the walls of the furnace;
Row No. 19 of the wall of the vault;
Row No. 20 with the help of halves of bricks narrow the hole above the hearth;
Row No. 21 align the walls;
Row No. 22 stage of alignment and reduction of the pre-pipe part;
Row No. 23 lay out a samovar;
Rows from No. 24 to No. 32 installation of view valves;
Row No. 32 chimney masonry. In a Russian stove, a chimney is laid in 2 bricks.
Some features can be seen in Fig.

Before you start laying furnaces, you should try to lay out at least one without mortar in order to understand the essence of the schemes. But with effort and patience, everyone can make a stove with their own hands.
Video
In the proposed video you can see the order of the heating furnace:
Cooking ovens include stoves of various designs. They come in various sizes and serve only for cooking. Connect kitchen stoves to root or tube pipes.
Brick cookers
Kitchen stoves according to their design can be divided into simple, medium complexity and complex.
A simple stove has a furnace and blower door, a grate and a smoke damper. It is the simplest of all household stoves.
Cookers of medium complexity have, in addition to the above stove appliances, an oven, and complex stoves also have a hot-water box. Ovens are made of black steel with a thickness of at least 1 mm, and hot-water boxes are made of galvanized steel. The casing of the hot water box is made of black steel with a thickness of at least 1 mm. The thicker the steel, the more durable the instruments.
Stove with double camphor stove and oven
In a simple kitchen stove, hot flue gases from the firebox are directed under the cast-iron stove, and then through the hole under the pipe they are discharged into the chimney.
In the rest of the stoves, hot flue gases are directed under the cast-iron stove and then, descending, heat the walls of the oven or one wall of the hot-water box, and then are discharged into the pipe, while heating the bottom wall of the oven, the bottom and other wall of the hot-water box.
The above stoves do not have a cooking chamber, so during cooking, steam and smell are released into the room, which negatively affects the microclimate of the room. This article provides drawings of cuts and ordering of an improved design cooker, in which a cooking chamber is provided, connected to the pipe by means of a ventilation duct blocked by a ventilation valve.
simple cooker
A simple kitchen stove has dimensions, mm: 1160x510x630 (without foundation, i.e. without two rows of brickwork on the floor).
For laying the stove, the following materials are needed:
- red brick - 120 pcs.;
- red clay - 50 kg;
- sand - 40 kg;
- grate - 28 × 25 cm;
- furnace door - 25 × 21 cm;
- blower door - 25 × 14 cm;
- cast iron stove for two burners - 70 × 40 cm;
- plate binding (corner 30x30x4 mm) -3.5 m;
- roofing steel sheet under the slab - 1160 × 510 mm;
- construction felt - 1 kg;
One stove-maker can fold a simple stove within 3 hours (not counting the laying of the chimney), in addition, it takes 1.5 hours to bring the material and prepare the clay-sand mortar. calculating half an hour per 1 m of pipe laying (when laying a pipe in a quarter of a brick).
The heat output of a simple stove with two meals a day is about 0.7-0.8 kW (660-700 kcal / h).
The figure below shows vertical and horizontal sections of a simple kitchen stove. Next, masonry drawings will be given in rows (ordering). From the sections and drawings of the masonry in rows, it can be seen that the masonry of a simple stove does not present any difficulties.

Sections of a simple kitchen stove: a - facade; b - section A-A (longitudinal vertical section of the furnace); c - section B-B (transverse vertical section). Designations: 1- firebox; 2 - ash chamber; 3 - grate; 4 - smoke damper; 5 - cast iron plate (flooring).
Before you start laying a simple kitchen stove, you should purchase the necessary stove appliances.
Having prepared a clay-sand mortar, they begin laying a simple stove. If the slab is placed on the foundation, then level it up. When laying the slab on wooden floor it is necessary to cut a sheet of roofing steel to the size of the plate. Put a layer of sheet asbestos on the floor, and in its absence - two layers of building felt, well soaked in a clay-sand mortar, cover everything with a sheet of roofing steel and nail it to the floor. Then, from a whole brick, a platform is made in two rows of masonry on a clay-sand mortar. After that, they start laying the slab from the first row strictly in order.
First row lay, observing the rules for dressing seams from selected whole bricks, as indicated in the figure below. The completed masonry is checked for squareness.

The first row of a simple kitchen oven
During laying second row they arrange a blower, install a blower door, which is attached to the masonry with the help of furnace wire. Temporarily, the front blower door can be supported with bricks, which are stacked on the floor in front of the blower door. The bottom of the ash chamber is 380 × 250 mm.

Second row kitchen oven
Third row similar to the previous one, but the seams should be well bandaged.

Third row
Fourth row covers the blower door, while leaving only the opening of the ash chamber with a size of 250 × 250 mm, on which the grate is laid. If possible, laying from the fourth row is preferably made of refractory bricks, as shown in the figure below.

Laying of the fourth row. Shaded bricks are refractory. The arrows indicate the directions of motion of the hot flue gases in a heated oven.
Fifth row forms a firebox with a size of 510 × 250 mm. The brick adjacent to the grate at the back is cut off to form an inclined plane along which the fuel will roll onto the grate (see section B-B along A-A). When laying this row, you need to install a furnace door, after attaching paws from roofing steel to it with rivets.

Masonry of the fifth row of the furnace
Sixth row stack in the same way as the previous one, but the seams should be bandaged.

Masonry of the sixth row of the furnace
Seventh row placed as shown in the figure below. This row leaves the chimney under the stove, connecting the firebox to the chimney.

Seventh oven row
Eighth row perform strictly horizontally, this row closes the furnace door. A cast-iron slab is laid on the laid out eighth row with a thin layer of clay-sand mortar. Factory-made cast iron slabs have protrusions or stiffeners on the underside, which recede 15 mm from the edges of the slabs.

Eighth row oven
The internal dimensions of the masonry of the eighth row should be such that the slab freely enters it with its ribs and has a gap of at least 5 mm on all sides, designed to expand the metal when it is heated. If this is not observed, then the cast-iron stove, expanding, will destroy the furnace masonry. In order for the masonry to be strong, a corner steel harness is laid on the eighth row. It is desirable to cover the frame with a refractory varnish, which protects the steel from rust.
After masonry ninth row using a thin layer of clay-sand mortar, a smoke damper is installed. This row is the final one, followed by the laying of the chimney.

The final row of a simple kitchen oven
Cooker works as follows. Flue gases from the firebox enter under the cast-iron stove, then through the hole under the chimney through the flue valve are discharged into the chimney.
There is no cleaning hole in the stove, since you can clean the chimney through the hole under the pipe, where it is easy to put your hand through the burner of the cast-iron stove.

Example of laying a hob
Firstly, in the stove, the furnace door is installed flush with the grate. In the stove, flue gases constantly maintain a high temperature in the chimney, as a result of which it is not necessary to lay thick fuel on the grate. Secondly, with such an installation of the furnace door, the distance from the grate to the cast-iron stove will be only 280 mm, which makes it possible to quickly cook food even with low fuel consumption.
After finishing the laying of the furnace, it must be dried by opening the furnace and blower doors and the valve in the pipe.
The longer the oven dries, the stronger the masonry will be. The stove can be dried with small test fires, but after test fires, the valve in the pipe and the blower door must be left open.
After complete drying, the stove is plastered with a clay-sand mortar, followed by whitewashing.
Exterior finish is best done as follows: after laying the eighth row and installing a cast-iron slab, as well as before installing the corner steel trim, the kitchen stove is walled up on all sides in a roofing steel case (galvanized steel can be used). Pre-cut the corresponding holes according to the size of the furnace and blower doors. The case near the floor is fixed with a plinth, which is nailed around the stove. The outer surface of the case is cleaned and covered with oven varnish, which withstands high temperatures well.
In front of the furnace door, a pre-furnace sheet is nailed to the floor with nails 50 mm apart from each other. If the plinth was nailed earlier, then the pre-furnace sheet must be bent onto the plinth.
Cooker with oven
The kitchen stove with oven has dimensions, mm: 1290x640x560 (without foundation, i.e. without two rows of brickwork on the floor).
For laying a stove with an oven, the following materials are needed:
- red brick - 140 pcs.;
- red clay - 60 kg;
- sand - 50 kg;
- grate - 26 × 25 cm;
- furnace door - 25 × 21 cm;
- blower door - 14 × 25 cm;
- cleaning doors 130 × 140 mm - 2 pcs.;
- cast-iron stove of five composite plates measuring 53 × 18 cm with two burners;
- smoke damper - 130 × 130 mm;
- oven - 45x31x28 cm;
- plate binding (corner 30x30x4 mm) - 4 m;
- pre-furnace sheet of roofing steel - 500 × 700 mm;
- roofing steel sheet under the slab - 1290 × 640 mm;
- building felt - 1.2 kg;
- metal box for collecting ash in the ash chamber - 350x230x100 mm.
One stove-maker can fold this oven within 3-4 hours, additionally it takes about 2 hours to bring the material and prepare the clay-sand mortar. The heat transfer of the stove during two-time cooking is about 0.8 kW (770 kcal / h). The figure below shows general form, longitudinal and transverse sections of a stove with an oven. The following are drawings of the order of each row. Laying a stove with an oven is also not difficult and is similar to laying a simple stove, but here you have to install an oven and cleaning doors.

Cooker with oven: a - general view; b - sections A-A, B-B (vertical sections), C-C, G-D (horizontal sections). Designations: 1 - ash chamber; 2 - grate; 3 - firebox; 4 - cast iron plate; 5 - oven; 6 - smoke damper; 7 - furnace door; 8 - blower door; 9 - cleaning holes.
When laying the slab on an independent foundation, before starting work, its top is leveled with a layer of clay-sand mortar.
When installing the slab on the floor, before laying the first row, it is necessary to carry out the same work as when laying a simple kitchen stove.
masonry first row made from selected whole bricks, while strictly adhering to the rule of dressing the seams. The length of the stove should correspond to the length of five bricks, the width - to the length of 2.5 bricks. Using a cord, check the equality of the diagonals.

Laying the first row of a stove with an oven
Second row spread, strictly following the order. An ash chamber measuring 380 × 250 mm is left here, a blower door is installed and fixed, cleaning holes are left on the back wall (the width of the holes should be equal to the width of the brick, i.e. 12 cm). If possible, install cleaning doors with a size of 130 × 140 mm. At the cleaning hole extreme from the ash chamber, a brick is laid on the edge, as shown in the laying order. For better fixing of the oven in the middle of the place of its installation, put half a brick on the edge.

Laying the second row of slabs
Third row similar to the previous one, only the rule of dressing the seams should be observed.

Masonry of the third row of the slab
Fourth row covers the blower and cleaning doors. After finishing the laying of the fourth row, an oven is installed on a thin layer of clay-sand mortar at a pre-marked place. After that, a grate is installed. The same row of bricks installed on the edge block the chimney into the chimney.

Masonry of the fourth row of stove with oven
During laying fifth row the furnace door is installed and fixed, the brick is cut off before being installed behind the grate so that the fuel gradually rolls onto the grate during the combustion process.

Masonry of the fifth row of the slab
Sixth row similar to the fifth.

Masonry of the sixth row of the slab
Seventh row laid out in order. The resulting chimney channel from the front side is laid with the help of three bricks, as a result of which the internal size of the formed channel under the chimney will be 130 × 130 mm. In the image of this row, a steam outlet pipe with a diameter of 10 mm and a length of 160 mm is visible at the oven, which connects the oven to the ascending channel. This pipe is designed to remove steam and odor.

Masonry of the seventh row of a stove with an oven. The arrows indicate the directions of movement of hot flue gases in the heating furnace.
Eighth row
perform strictly horizontally in level. This closes the oven and the furnace door. The upper wall of the oven is coated with a layer of clay mortar up to 10-
15 mm, which will protect the oven from rapid burnout.

Laying the eighth row of a brick oven (before installing a cast-iron stove)
In this case, it is necessary that the distance between the top of the clay coating and the cast-iron plate be at least 70 mm. After that, a cast-iron slab and brickwork made of angle steel are installed on a thin layer of clay-sand mortar.

Eighth row of a brick oven (after installing a cast-iron stove)
After masonry ninth row only the laying of the vertical channel remains. The ninth row is laid according to the image below.

Ninth oven row
After masonry tenth row install a smoke damper.

Tenth oven row
Masonry eleventh row start the chimney. Further laying of the pipe is not difficult.

The final row of the furnace (does not take into account the laying of the chimney)
A stovetop with an oven works like this. From the firebox, flue gases are directed under the cast-iron stove, from where they, heating the oven from the back on both sides, fall under the oven and are directed to the hole under the chimney. Rising along the vertical channel, they enter the chimney through the smoke valve and are removed into the atmosphere.
Cooker with oven and hot water box
For laying a cooker with an oven and a hot water box measuring 1290x640 mm, the same materials are needed as for the previous stove. Additionally, you should purchase a hot water box with a size of 510x280x120 mm.
The figure below shows a general view, a horizontal section along A-A and a vertical section along B-B of the slab.

Cooker with oven and hot water box: a - general view; b - cuts. Definitions: 1 - firebox; 2 - cast iron plate; 3 - oven; 4 - hot water box; 5 - smoke damper; 6 - ash chamber; 7 - piping made of angle steel
The cooker with oven and hot water box is placed in the same order as the cooker with oven. The only difference is that after laying the third row, instead of a brick partition, a hot-water box in a case is installed on the edge between the oven and the vertical channel. The height of the hot water box must correspond to the height of four rows of flat brickwork. Otherwise, the masonry is completely similar to the masonry of a stove with an oven.
Improved Design Cooker with Oven and Hot Water Box
In the kitchen stoves in the countryside, not only food is prepared for people, but also feed for livestock is cooked, and linen is boiled during washing. During the firebox, a lot of steam enters the room and extraneous unpleasant odors. Because of this, the humidity in the room increases, which negatively affects its microclimate. Therefore, in order to remove foreign odor and steam in cookers, it is desirable to provide a cooking chamber, which is connected to the chimney using a ventilation duct. A ventilation valve must be installed in the ventilation duct.
Installing a double-leaf door in the cooking chamber allows you to keep food in it hot for a long time and thus prevent it from souring.

Cooking chamber in a brick oven
The firebox and blower (ash chamber) are closed from the outside with the corresponding doors. The upper surface of the oven is protected from hot gases by a layer of clay mortar 10-12 cm thick. It is advisable to lay a stove from the fourth to the ninth row from refractory bricks (especially the firebox).

An example of an ash pan cover
It is desirable to make a kitchen stove up to the ninth row of masonry from sheet steel, and to enhance its strength, after mounting the frame on a clay-sand mortar, install a trim of angular steel. Since the mass of such a plate will be more than one ton, it is installed on an independent foundation.
If it is not possible to build an independent foundation, the floor must be reinforced with additional beams that are mounted on brick columns. Instead of brick pillars, you can use pillars made of hardwood logs, reinforced concrete pillars, iron pipes with a cross section of at least 180-200 mm.
The cooker of an improved design has a “forward” stroke valve. During prolonged heating of the stove, evaporation of water in the hot water box is possible. To stop this, you need to add a little cold water and open the forward stroke valve. At the same time, flue gases from under the cast-iron stove do not go down, but immediately go into the chimney. As a result, the hot water box ceases to warm up, the evaporation of water in it stops.

Example of a "forward" stroke valve
For the convenience of cleaning the ash chamber from ash, a special box made of roofing steel with a size of 350x230x100 mm is installed in it. This prevents contamination of the room when cleaning the ash chamber from ash.
A cooker of this design has the following advantages compared to the previous cooker with an oven and a water box:
- during cooking, steam and foreign odors do not enter the room, which are removed into the atmosphere through the vent;
- food cooked on the stove in the cooking chamber remains hot for a long time and does not turn sour during the day;
- With the help of a “direct” stroke valve, it is possible to cook food without heating the hot water box and thereby preventing further evaporation of water in it.
The figure below shows a general view of the stove from the front, here are also drawings of the cuts of the stove in the most difficult places. Drawings of masonry in rows will be further, and they give a comprehensive idea of the internal structure of the slab. Using the orders and drawings in rows, you can fold the slab yourself, without the help of a stove-maker.

Stove with an oven and a hot water box of an improved design: a - facade; b - sections A-A, B-B, c - sections C-C, G-D, D-D, E-E. Definitions: 1 - blower door; 2 - furnace door; 3 - oven; 4 - door of the cooking chamber; 5 - smoke damper; 6 - ventilation valve; 7 - valve of the "direct" stroke; 8 - hot water box; 9 - cleaning holes; 10 - cast iron plate.
The kitchen stove with an oven and a water-heating box of an improved design has dimensions, mm: 1290x640x1330.
The following materials are required for laying:
- red brick - 250 pcs.;
- refractory brick - 80 pcs.;
- red clay - 180 kg;
- sand - 90 kg;
- furnace door - 250 × 210 mm;
- blower door - 250 × 140 mm;
- grate - 280 × 250 mm;
- oven with a size of 250x280x450 mm;
- cast iron stove with two burners - 700 × 400 mm;
- hot water box - 250x140x510 mm;
- pre-furnace sheet - 500 × 700 mm;
- steel strip size 400x250x6 mm;
- door to the cooking chamber - 750x350x5 mm;
- corner steel for strapping a plate measuring 30x30x3 mm - 4.1 m;
- steel strip for overlapping the cooking chamber with a size of 450x45x4 mm - 4 pcs.
A stove can be put together by one stove-maker within 18-20 hours, an additional 6 hours are required to prepare the solution and bring the material.
To fold the stove with the firebox on the left side, you need to consider the drawings with the help of a mirror placed with an edge on the drawing.
The kitchen stove is laid out as follows. masonry first row produced on a foundation erected to floor level. The first row defines the main dimensions of the slab. The length of the slab is equal to the length of the laying of five bricks on a clay-sand mortar, and the width is equal to the length of 2.5 bricks.

First row of improved cooker with oven and hot water box
During laying second row two cleaning doors and a blower door are installed in front. They are attached to the masonry with the help of furnace wire.

Masonry of the second row of the furnace; 1 - blower door, 9 - cleaning holes.
masonry third row produced according to the order, it is similar to the previous row. After laying the third row, a water-heating box is installed.

Masonry of the third row of the furnace; 11 - steel sheet 3 mm thick.
fireman fourth row they are laid from refractory bricks, in its absence, sorted first-class red bricks are used. The fourth row covers the cleaning holes and the blower door, forming the beginning of the hearth. After laying the fourth row, a grate and an oven are installed.

Masonry of the fourth row of the furnace
masonry fifth row presents no difficulty. The brick adjacent to the back of the grate is cut halfway to form an inclined plane.

Masonry of the fifth row of the furnace; 3 - oven.
Before masonry sixth row the furnace door is prepared, for which strip steel is attached with rivets above and below, which should be 10 cm longer on both sides of the furnace door. For greater strength, the ends of the strip steel are screwed with furnace wire, the ends of which are embedded in the masonry. The door is installed on a clay-sand mortar, having previously wrapped the frame of the furnace door with asbestos fiber.

Masonry of the sixth row
Masonry seventh row fix the base of the furnace door.

Masonry of the seventh row
Eighth row covers the water box.

Eighth row masonry
Ninth row covers the furnace door and oven. The top of the oven is protected from burning with a layer of clay mortar 10-12 mm thick. It is desirable to lay this row entirely of refractory bricks.

Ninth row masonry
After the completion of the laying of the ninth row, a cast-iron stove is installed above the firebox on a clay-sand mortar. The large burner of the stove is placed above the firebox. Next to the main plate, an additional one is placed, made of steel sheet measuring 400x200x6 mm. After that, angle steel is laid, to which the lower frame of the cooking chamber door is welded. For strength, it is advisable to tie angle steel through special holes in it with furnace wire, which is attached to the masonry.

Installation of a cast-iron stove on the ninth row; 12 - steel sheet 6 mm thick; 13 - angle steel.
Tenth row made of ordinary red brick. On the right side, a window is left for cleaning the channel of the “direct” stroke. Part of the bricks that cover the slab are hewn with a pick before laying, so that in the event of a slab breakdown, it can be easily replaced.

Tenth row masonry
masonry eleventh row does not present difficulties, it is only necessary to follow the rules for dressing the seams.

Eleventh row of the furnace
Twelfth row covers the purge window.

The twelfth row of the furnace
After masonry Tthirteenth row on a clay-sand solution, a “direct” stroke valve is installed.

The thirteenth row of the furnace; 6 - ventilation valve.
masonry fourteenth row must correspond to the level of the upper frame of the door to the cooking chamber. Next to the upper frame of the door to the cooking chamber, an angular steel measuring 45x45x800 mm is installed.

The fourteenth row of the furnace
Fifteenth row closes the door to the cooking chamber.

Fifteenth row of the furnace
Sixteenth row blocks the channel of the "direct" course.

Masonry of the sixteenth row of the kitchen stove
masonry seventeenth row provides ventilation duct to remove odor and steam from the cooking chamber.

Masonry of the seventeenth row of the kitchen stove
After finishing laying eighteenth row four pieces of strip steel 4x45x500 mm in size are installed above the cooking chamber to cover the cooking chamber.

Masonry of the eighteenth row of the kitchen stove
Nineteenth row covers the cooking chamber. After the laying of this row is completed, a ventilation valve is installed.

Masonry of the nineteenth row of the kitchen stove; 6 - ventilation valve.
masonry twentieth and twenty-first rows is not difficult, only the seams should be well bandaged.

Masonry of the twentieth row of the kitchen stove

Laying the twenty-first row
masonry twentysecond row reduces the size of the chimney, it will be 130 × 130 mm.

Laying the twenty-second row
twenty third and twenty fourth ranks put in order.

23rd oven row

twenty-fourth row
After masonry twenty fifth row install a smoke damper, which is also an adjustment valve.

Laying the twenty-fifth row of the furnace; 5 - smoke damper.
Masonry twenty-sixth row start the chimney. Laying a chimney is not difficult.

Masonry of the final row (not counting the chimney)
After finishing the laying of the furnace, before coating it, the chimneys are cleaned from the fallen mortar residues and crushed stone through the cleaning holes. Holes for cleaning are then laid with brick halves on a clay-sand mortar.
When installing the cleaning doors, they are tightly closed, the leaks are covered with a clay-sand mortar.
After that, the stove can be dried in two ways: by opening the furnace and blower doors and valves or by small trial furnaces. After complete drying, the slab is plastered with a clay-sand mortar, and after the plaster has dried, a double whitewash is made. In front of the furnace door, a pre-furnace sheet is nailed to the floor.
Do-it-yourself brick cooking oven: step-by-step instruction masonry + photo
1.
2.
3.
4.
5.
Since ancient times, the construction of a stove for the home has been trusted by stove-makers who have the appropriate skills and desire to improve their skills. High-quality laying of a heating structure can be classified as a certain type of art, although building a stove with your own hands is also possible.
At the same time, it should be noted that the construction of furnaces with their own hands is now quite possible. But for this, you should carefully study the recommendations of professionals. You will need to choose the design of the heat unit and high-quality materials. A home craftsman who built a stove with his own hands will have the opportunity to admire his creation for many years.
Do-it-yourself furnace construction begins with the choice of its structural solution. Not all brick heating units are the same - they differ in parameters and their functionality.
According to the classification, brick kilns of the following types are distinguished:
- heating structures;
- heating and cooking;
- special units.
The choice of heating design
When choosing the type of stove, the owners of private houses and cottages, first of all, take into account their own financial capabilities. Of course, laying a brick heating structure will cost much more than assembling metal device. Despite the difference in price, most homeowners still prefer brick-lined stoves.Building a furnace with your own hands: important nuances
First of all, before you build a stove in a house, you need to make a base for it. For a heating structure made of bricks, a monolithic foundation is performed. Any concrete is used for it, but its grade cannot be lower than 300. The required laying depth should be observed, which should be below the freezing level of the soil.
The laying of furnaces is made of solid bricks using clay mortar. Fireclay bricks are required for the firebox. Be sure to observe the thickness of the seam. It should not exceed 5 millimeters, but it is better if it is only 3 millimeters. It is not difficult to make a masonry mortar yourself. For him, they take quartz sand and mix it with clay in a ratio of 4: 1. You will also need a sieve with cells up to 5 millimeters. Before preparing the mixture, the sand is sieved.
The technology for laying fireclay bricks is similar to that observed when using a conventional one. This will require chamotte clay. If we build a stove with our own hands, many questions arise regarding the installation of doors, stoves, valves and other metal elements. When arranging them, it is necessary to observe the parameters of expansion joints - they must be at least 5 millimeters.
All fittings used must be securely fastened. The head above the roof (chimney) is erected using a conventional sand-cement mortar.
A variety of oven accessories are sold in specialized shopping centers and construction markets. It can vary in value at times, depending on who produced it. Foreign products are more expensive than domestic products, but they have a more attractive appearance. Now most often they install a door with heat-resistant glass.
Features of the furnace device
The traditional device of a classic brick oven provides the most fast heating in the part that is intended for cooking, while the walls warm up more slowly (read also: ""). Many consumers are not satisfied with this feature. To solve this problem, an afterburning system is provided. As a result, for cooking, it makes no sense to load the oven completely, but you can get by with only a secondary firebox.In this situation, the nozzle that supplies air for afterburning fuel performs the function of a blower. In this case, combustion products are removed by adjusting the gate. The chimney is equipped using an iron or asbestos-cement pipe.
The chimney pipe is supplied with heat-insulating elements only when it passes through the room. Outside it is insulated basalt wool, and covered with foil on top to prevent condensation on internal surfaces. The junction of the chimney brick with the metal exhaust pipe is minted with an asbestos cord.

When the construction of a heating brick construction takes place in a country house, it is not always advisable to equip a shield with wells and channels, as should be done when building a Dutch stove (in more detail: ""). To ensure good traction, the height of the pipe must be at least 3 meters. In summer, a side firebox will be enough to operate the stove. Starting cooking, you need to load about three kilograms of fuel - peat briquettes or small logs. See also: "".
Tips from stove masters on how to build a stove correctly
- A good solution to increase the heat transfer area would be to install steel pipe to which metal radiators are welded. For this purpose, you can also use any iron products.
- To build a furnace, you need to use a full-bodied ceramic brick. Dinas products resistant to high operating temperatures should be used when assembling the firebox. The fact is that it gives off heat worse than red oven brick - it warms up longer at a higher cost - almost 2 times (read also: "").
- Before you build a stove in the house, the brick must be placed in water for about 4 hours. When laying, bricks should be placed as accurately as possible, leveling with a mallet. If they are already laid, they cannot be moved from their place. Stove makers usually spread the solution with their hands, without using a trowel. If necessary, hew bricks using a mason's hammer, you also need to have a grinder.

Materials and tools
For the construction of the furnace, the following materials and tools will be required:- bricks;
- red clay and quartz sand;
- cement;
- furnace fittings;
- corner, plumb line, level;
- Bulgarian;
- Master OK;
- overalls.
Some tips for building a furnace with your own hands on the video:
Despite the modern abundance of heating and kitchen equipment, many owners do not represent private house without an oven - and this is absolutely correct. Even if it is planned to create an autonomous heating system, then the stove will also be useful. For example, in order to save money in the spring or autumn, when full-fledged heating is no longer needed, but you don’t want to breed excessive dampness in the house either. Having heated the stove once a day or two days, the premises can be maintained optimal balance humidity and heat.
Folding the oven with your own hands, a step-by-step instruction of which has intricate configurations, will be quite difficult for a beginner. Therefore, if there is no experience in the furnace business, then it is better to choose an affordable ordering option that will be easy to figure out.
When choosing a model, it is necessary to take into account not only the simplicity of the circuit, but also the heat transfer and functionality of the furnace, since there are furnaces that do not provide all the functions. Heat transfer is selected depending on the area that the heating structure should heat.
There are a lot of models of stoves, since experienced stove-makers, working on one of them, make their own adjustments to its design, and thanks to this, new and new options for the heater appear. And to stop at one of the types of furnaces, you need to know what they are in terms of functionality.
Prices for fireclay bricks for laying furnaces
fireclay brick
Types of brick ovens
There are T Three main types are heating and cooking, cooking and simply heating without additional built-in elements.
- A heating and cooking stove can have not only a hob, but an oven and a tank for heating water, as well as a drying niche. In addition, such a structure is able to heat one or two rooms of a certain area.

Such stoves are often built into the wall, turning the hob and firebox towards the kitchen, and the back wall into the living room. Thus, the stove performs a triple function - it works as a partition, food is cooked on it, and it provides dry heat to the bedroom or living room.
- work only for heating, and most often have a compact size. Such a stove is installed precisely in order to maintain a balance of moisture and heat in the house in autumn or spring, when it is too early to turn on heating system or have not turned on the central one yet.
It is good to install such an oven, for example, in the country, if there is a device on which you can cook food. If the power supply in the holiday village is often turned off, then it is better to choose a building with a hob for installation.
- The cooking version of the stove can also serve for heating, if you need to heat a small area. The device is perfect for a country house or for a small building for permanent residence.
With such a stove and a supply of firewood, you can not worry that the house will be cold and damp, and the family will be left without dinner or hot tea when the electricity or gas is turned off.
It should be noted that any type of furnace can be compact or massive. The choice of the size of the furnace structure depends on the area of \u200b\u200bthe house or room, as well as the place that is allocated for construction.
Choosing a place to install the oven
When choosing a place for the construction of a furnace, you need to provide for the nuances that are important not only for creating comfortable conditions operation, but also for reasons of fire safety. It is especially important to consider location stoves in an already built house, since the chimney should not stumble upon its construction on the beams of the attic floor or on rafter legs roofs.
The stove is installed at the inner load-bearing wall, in the middle of the room, or built into the wall located inside the house.
- It is not recommended to build a furnace near outer wall, as it will quickly cool down, and the effectiveness of its use will be significantly reduced.
- In the middle of a large room, the stove is installed if it is necessary to divide the room into two zones. Moreover, with a beautiful decorative trim it will become a decoration of the house and can become one of the elements for the interior that will emphasize a certain style.
- When building a stove into a partition between rooms, it is imperative to provide for its isolation from combustible wall materials using heat-resistant asbestos sheets or special drywall.
- The space allocated for the stove should be 120 ÷ 150 mm larger than its base in each direction, since the perimeter of the foundation always slightly exceeds the size of the stove.
- In order to make it easier to determine the size, you need to choose a model to which the ordering scheme is attached.
When the model is selected and the installation site is determined, you can proceed to the acquisition of materials and preparation of all necessary tools. The quantity and range of materials for each of the models is selected individually, but the tools used in masonry are always the same.
Tools to get the job done
For the process of building a furnace, you will need the following fixtures and tools:

A) A pickaxe is used for hewing and splitting bricks.
B) The furnace hammer has the same functions as the pick, but, in addition, it is convenient for them to remove the dried mortar that has protruded beyond the masonry.
C) The rule is used to level the concrete on the foundation surface. Often it is made independently from a perfectly flat planed board.
D) A wooden spatula is used for grinding and mixing the clay solution.
E) The level is a necessary tool, as it will help to maintain the evenness of the rows, both in the horizontal and vertical direction.
E) A brush of bast is used to remove sand and hardened mortar from the internal surfaces of the furnace.
G) Pliers are used to cut off and bend steel wire when installing and fixing cast iron structural elements.
H) Lead scriber is used for marking when decorating the stove with tiles.
I) Stukalce - a piece of pipe used to fit tiles.
K) Scriber-rod for markings.
K) The rasp is used to grind lumps and remove sagging on the finished masonry.
M) The construction angle is necessary for deriving internal and external corners by 90 degrees.
H) A plumb bob is used to check the verticality of the walls.
A) A rubber mallet is used for tapping bricks laid in a row.
P) A chisel is needed for parsing old masonry and splitting bricks.
P) Trowels or trowels are used to remove excess mortar and apply it to the rows of bricks during masonry.
C) Jointing will be needed if the oven is not lined with finishing material, and the seams between the rows are neatly drawn.
In addition, you will need two containers for mortar and water, as well as a sieve for sand, if the solution is made independently.

The laying of the upper rows will be easier if there are "goats"
For the convenience of carrying out work, you need to have scaffolds, which are called “goats” in another way. It is convenient to stand on them, carrying out masonry at a height, especially since the size of the working platform provides a place for installing a container with a solution.
Arrangement of the foundation for the furnace
- The foundation for the furnace is usually laid together with the general foundation for the entire structure, but they should not be interconnected, since one of them may damage the other if deformed or shrinkage.
- If the furnace will be built in an already built on a belt or column foundation a house with a wooden floor, you will have to open the coating and build a foundation for the stove from the ground.
- If a compact stove model is chosen, and a slab foundation, then the heating structure can be erected directly on itby making a waterproofing gasket.

If the foundation sun still, you will have to equip it from scratch, you need to remember that it must have the same shape as the base of the furnace, but protrude beyond it by 120 ÷ 150 mm in each direction.
- on wooden semi marked out the contour of the foundation, a part of the boardwalk is sawn according to the markings.
- Further, a foundation pit is being dug in the ground of the underground right size, with a depth of 450÷500 mm.
- The soil at the bottom of the pit is well compacted, and a sand bed is made on it, which is moistened with water and also compacted to a thickness of 80 ÷ 100 mm.

Pit under the furnace foundation with a sand and gravel "cushion"
- After that, roofing material can be laid around the perimeter of the pit, which will perform the function of waterproofing and formwork, if it is temporarily reinforced with boards or bricks. After the concrete mortar has hardened, the formwork is removed from the foundation.
Instead of roofing felt, formwork made of boards covered from the inside with a polyethylene sheet can be used.
It should be noted right away that it is better if the concrete base for the furnace rises 70 ÷ 100 mm above the floor. In this way, bricks can be saved and the joining of the floor surface and the side walls of the foundation can be simplified.
- A layer of crushed stone of the same thickness is poured on top of the sand and is also well compacted.
- The next step is to install a reinforcing grate made of metal wire or a finished mesh at the bottom of the pit. The elements of the lattice are interconnected by means of a twist of wire.

Foundation reinforcement - option
- The first layer of mortar is poured into the prepared pit. It may consist of gravel, sand and cement— 1:2:1 or gravel and cement 3:1. This layer should take up approximately ⅓ of the space to be filled.
- After pouring the first layer, immediately knead and pour the second, consisting of sand and cement in proportions of 3: 1.
The second layer is poured to such a height that 50 mm remain to the top, which will be required for the upper leveling layer of the foundation.
If necessary, for the upper layer of concrete, the formwork can be expanded, and then a reinforcing mesh with cells of 70 ÷ 80 mm can be laid on top of the poured mortar.

- Then the last top layer of the solution is poured and leveled using the rule.
The foundation is left for the maturation of concrete for 27÷30 days. It is advisable to moisten it daily with water and then cover it with plastic wrap - this will help make the concrete more monolithic and durable.

On the finished foundation, after removing the formwork, two or three layers of roofing material are laid, which will protect the brickwork of the furnace from capillary moisture coming from the ground or from the underground.
After that, you can proceed to the main work - laying the furnace.
A few recommendations for masonry work
- Before starting laying bricks on the mortar, the whole structure rises dry from the brick, but each of the rows must be laid out strictly in accordance with the ordering scheme.
Experienced stove-makers advise dry pre-laying to all craftsmen who take up the construction of a stove for the first time. This event is necessary in order to understand the location of all internal channels and not make gross mistakes when fitting bricks in each of the rows.
For dry laying, you need to stock up on wooden slats, which will determine the thickness of the seam between the bricks. Usually their thickness is 5-7 mm. The same rail will need to be used for the main masonry, already carried out with a solution. Such a "calibration" of the thickness of the seam is especially necessary if the laying is done "for jointing", and must be flawless.
This process is carried out slowly, thoughtfully, since it is very important to understand how the smoke will be removed from the furnace, and how it will enter the chimney.
- Having lifted the structure dry before laying the pipe, it is carefully dismantled. If at the same time the bricks were adjusted to size, then each row can be folded into a separate pile by marking the number of the row and the place in it on the bricks with a marker.
- Performing the main masonry, each of the rows is also first laid out dry, and then, after carefully fitting all the details, it is mounted on the mortar.
- When the main masonry is done, two measuring rails are laid on the edges of the previous row to maintain the exact thickness of the seam. Then the solution is applied with a layer of 10 ÷ 12 mm. A brick is laid on top of the mortar, pressed, and, if necessary, tapped with a rubber mallet until the brick rests against the measuring rail. The excess protruding solution is selected with a trowel.

- The slats are pulled out of the masonry after the installation of the third ÷ fourth row above them, and then used again. Therefore, you need to prepare several pairs of these auxiliary elements.
- After pulling out the slats, the seams are carefully filled with mortar and immediately “embroidered”.
- When laying on the mortar, each of the rows is checked using the building level for compliance with the horizontal and vertical planes.
Compliance with these nuances will help simplify the process of building any furnace, avoid "fatal" errors that may lead to the need to redo all the work.
Heating and cooking oven with a drying chamber designed by Yu. Proskurin
As mentioned above, there is a large number of different models ovens. This publication will consider one of the compact and functional options that can be installed in a small house, as it does not take up much space, but is able to heat a room of 16 ÷ 17 m².
The design of Yu. Proskurin's oven is a double-turn heating and cooking variant equipped with a single-burner stove and a drying chamber designed for drying vegetables and fruits, medicinal herbs, mushrooms, etc.
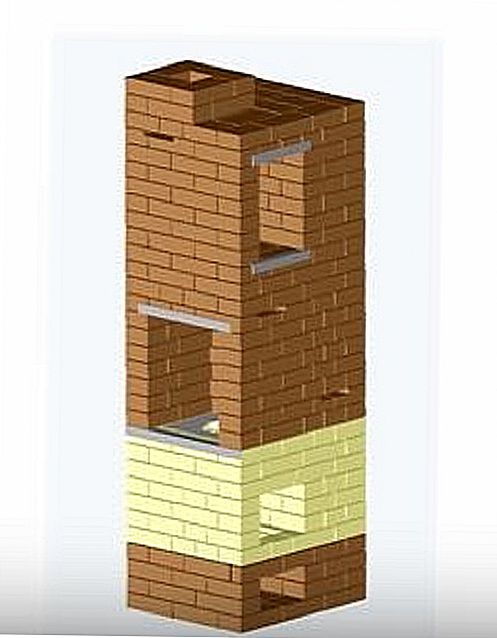
If desired, an oven box of a suitable size can be installed in the niche of the drying chamber.
The furnace has dimensions (excluding the height of the chimney) 750 × 630 × 2070 mm. Its heat transfer is 1700 kcal/h. The design provides for two operating modes - summer and winter, which is very important both for fuel economy and for the ability to heat the stove and cook food, without melting all constructions in the summer.
List of required materials
In order to build such a heating structure, you will need the following materials:
| Name of materials and elements | Quantity (piece) | Element dimensions (mm) |
|---|---|---|
| Red brick M-200 (excluding pipe laying) | 281 to 285 | - |
| Fireclay bricks refractory grade Sh-8 | 82-85 | - |
| Furnace door | 1 | 210×250 |
| Doors for cleaning channels | 2 | 140×140 |
| Blower door | 1 | 140×250 |
| Summer damper for chimney | 1 | 130×130 |
| Firebox valve | 1 | 130×130 |
| Stove valve | 1 | 130×130 |
| grate | 1 | 200×300 |
| Single burner hob | 1 | 410×340 |
| steel strip | 1 | 40×260×5 |
| 1 | 40×350×5 | |
| 1 | 40×360×5 | |
| steel corner | 1 | 40×40×635 |
| 3 | 40×40×510 | |
| 4 | 40×40×350 | |
| roofing iron | 1 | 380×310 |
| Pre-furnace metal sheet | 1 | 500×700 |
In addition, clay, sand, cement, crushed stone, gravel, marl and an oven box are required for work, if decided, install an oven instead of a drying niche.
Scheme-ordering the construction of a furnace designed by Yu. Proskurin
| Illustration | Brief description of the operation to be performed |
|---|---|
 | The first row is laid out in a continuous plane, observing the location of the bricks. It is very important to lay this row perfectly evenly in all respects, since the quality of the masonry of the entire structure will depend on it. |
 | In the second row, a blower (ash) chamber and the base of two vertical channels are formed. On the same row, the doors of the blower and cleaning chambers are installed. |
 | On the metal doors there are special ears, into which pieces of steel wire are threaded and twisted - they will then be embedded in the seams between the bricks. Temporarily, until they are completely fixed, the doors are supported by bricks on one or both sides. |
 | On the third row, the formation of the blower chamber and the lower part of the chamber of vertical channels continues. At the same time, there is a fixing on both sides of the installed doors. |
 | On the fourth row, the doors of the blower and cleaning chambers are completely covered with bricks. The common chamber of the vertical channels is divided in two, so instead of one large hole, two are formed, having a length of ⅔ of a brick and a width of half a brick. |
 | The fifth row is fully laid out with fireclay bricks. Above the ash chamber, a hole is formed with a seat for the grate. To do this, a part of the brick is cut out, from the side with which it should be turned to the hole above the blower chamber. |
 | The grate is mounted on the same row. It is planted on a clay solution or laid freely, without a solution. There should be a distance of 4-5 mm between it and the brick. |
 | On the sixth row, the formation of the combustion chamber and vertical channels continues. |
 | In addition, a furnace door is installed on the same row, the frame of which must be wrapped or overlaid with asbestos before installation, which, when the metal is heated, will allow it to expand without stress and damage. |
 | The seventh and eighth rows are laid out according to the order, the formation of the firebox and vertical channels continues on them. |
 | On the ninth row, the furnace door is covered with bricks. Moreover, in order to remove the load from the ceiling from the door, the side and third bricks from the edge are ground off on one side, and a brick is installed between them, hewn on both sides. |
 | On the tenth row, the fuel chamber and the first vertical channel are combined - this is done so that hot smoke from the furnace is directed precisely into this created hole. For a smooth flow of smoke, the protruding corner of the solid brick enclosing the second vertical channel is cut off. |
 | On the eleventh row, the masonry follows the scheme, except that cutouts are made on the edges of the bricks framing the combustion chamber, which will form a recess for mounting a single-burner hob. |
 | Then, on the same row, asbestos strips are laid on the cuts made on the bricks, and the slab panel is mounted on them. From the side of the formation of the cooking niche, a steel corner is installed. |
 | The 12th row is laid out from red brick, and in the future all the masonry comes from it. Two vertical channels are again formed, and a niche is being formed around the hob. |
 | The 13th row is laid according to the scheme, but in the front of the first vertical channel a place is formed for installing the summer-winter valve. After that, a valve is mounted on a clay-sand mortar. |
 | From the 14th to the 17th row, the laying is carried out according to the same principle - a cooking niche and channels are formed. |
 | On the 18th row, steel corners overlap the cooking niche. One of them is mounted on the edge of the niche, the second - at a distance of a brick from the first, and the third is pressed against the second with the back side. This is done in order to make it convenient to carry out the laying of the next row. |
 | On the 19th row, the cooking niche is completely covered, with the exception of the formation of an opening for the steam exhaust channel and a place for installing a valve. To do this, cutouts are made on the bricks into which the valve is mounted. |
 | 20 row is laid out according to the scheme. The formation of two vertical channels and a steam exhaust hole continues on it. Moreover, if you look closely, you can see that one of the bricks forming the first vertical channel is cramped. |
 | On the 21st row, the first vertical channel and the steam exhaust channel are combined with the help of the hollow space left. In this row, almost all bricks are placed only along the walls of the perimeter of the structure. Only the second vertical channel is protected. |
 | In the same row, the resulting cavity is covered with metal strips, which are laid according to the scheme shown in the figure. |
 | Further, a sheet of roofing iron is laid on the steel strips, with the help of which a chimney hole is organized, located on the opposite side from the steam exhaust hole. |
 | On the 22nd row, laying is done on top of the roofing sheet. A hole for the chimney and two holes for vertical channels are left. In the place where the drying niche will be formed, a piece of a corner is laid, which will protect the brick on the edge of the chamber from damage and make the edge of the niche more accurate. |
 | 23rd row - a drying chamber is formed, and its back wall is made of bricks installed on its side. It will isolate the chamber from the opening of the chimney channel. |
 | On the 24th row, the walls of the drying chamber, the chimney and two vertical channels are formed. |
 | 25 row - work continues according to the scheme. The second brick of the rear wall of the chamber is installed in the same way as the first. |
 | On the 26th row, preparations are underway to combine two vertical channels, so the inner bricks in both holes are grinded at a slight angle. |
 | 27 row - the first and second channels are combined with masonry. For them, a common cleaning door is installed. The rest of the work goes according to the scheme. |
 | On the 28th row, the drying chamber is covered with three pieces of corners according to the same principle as the overlapping of the cooking niche was done. The vertical channels are combined into one wide one, and the cleaning door is fixed with side bricks. |
 | On the 29th row, the drying chamber and vertical channels are completely blocked. A hole in the chimney channel is left, which is lined with bricks with cut out mounting grooves for the chimney valve. After laying the row, a frame with a valve is installed on the clay-sand mortar. |
 | On the 30th row, the entire surface of the furnace is completely covered. Only the chimney hole is left, which should be half a brick in size. |
 | 31-32 row - the formation of the chimney begins. |
This figure shows the oven in section. The diagram clearly shows all the internal channels through which heated air will circulate.


