What pipes for cold water. Polypropylene pipes for cold and hot water supply: how to connect and choose correctly. Types of water pipes according to the material of manufacture
A cesspool is a special recess in the ground designed to collect sewage and other human waste in those houses that are not connected to the drainage system through pipelines.
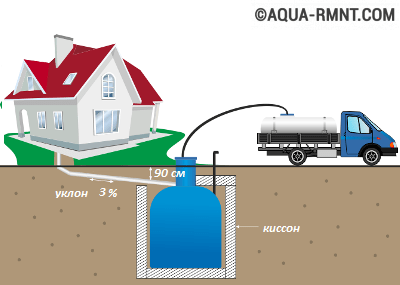
Today we will look at one of the most popular designs of drain pits - a pit without pumping.
Device
The device of the cesspool begins with the choice of a suitable place. There are three key rules that are used to select the optimal location:
- the pit should be at least 12 meters away from the nearest house where people live;
- from the pit itself to the place of the fence, the distance should be no more than 1 meter;
- the distance to groundwater should be taken into account, it should be over 30 meters.
After that, they begin to calculate the optimal size, and there are also several patterns here:
- calculate the number of residents, as well as the average rate of water consumption per person (approximately 180 l), calculate the monthly value of the volume of wastewater;
- taking into account the soil where the pit will be located, it should be taken into account that those soil types that easily pass liquid make it possible to accept only 40% of the monthly volume, and the soil that does not conduct water well will force the volume of the pit to increase above the calculated value;
- it should be remembered that the soil layer should be at least 1 meter;
- the optimum depth is about 3 meters.
materials
Now the most widespread types of materials used in the construction of a cesspool are:
- bricks;
- reinforced concrete rings - similar to those used in wells. So, you can do;
- tractor;
- special hermetic containers made of polypropylene and other polymeric materials, but are the most expensive means.
Scheme
In general, the scheme of the cesspool looks something like this: the pit itself represents a pit in the soil of a certain  size, in the middle of which, in order to maintain its original shape, as well as to prevent the walls from crumbling, there are solid materials such as bricks, reinforced concrete rings, etc. around the perimeter of the pit. Outside, directly between the soil itself and the outer wall of the pit, there is a layer of clay called "clay castle".
A prerequisite is the presence of a vent equipped with a pipe for removing gases generated by fermentation processes in the pit. The final and most important detail is the presence of a hatch that will provide access to the pit for its regular.
Manufacturing instructions
Consider the 3 most simple options pit structures.
from brick
The procedure for performing work during the construction of a pit with a brick lining: 
- to begin with, with the help of a thread and stakes, mark the selected area - on average, the parameters of the pit are 1 by 1.5 meters;
- to fill the pit at the end of the work, about 1.5-2 cubic meters of soil will be needed, the rest of the earth mined during the digging process should be evenly distributed over the surface;
- if it is planned to drain wastewater through pipes, then you should dig a trench under the pipe in advance;
- at the bottom of the excavated pit, apply a 15-centimeter layer of sand, on which apply a layer of concrete of the same thickness;
- with a sharp object, by “piercing” this layer, remove excess air bubbles;
- after the concrete pad hardens, lay sewer pipe(if such is provided);
- after that, proceed with the laying of the facing walls, placing the bricks in a checkerboard pattern using a sand-cement mortar;
- to extend the life of the cladding, also apply the mortar directly to the outer part walls;
- at the end of the cladding, apply a layer of bitumen to the walls;
- make indentations in the ground 20 centimeters around the entire circumference;
- from corrugated board, build a vertical partition around the perimeter of the pit;
- reinforce the overlap by using rods, reinforcement fastened together with wire;
- evenly fill the formwork with a concrete solution and let it dry for 25-30 days;
- carefully remove the formwork with the frame, making sure that the structure is strong.
From the rings
The procedure for performing work during the construction of a pit using reinforced concrete rings:
- dig a pit, maintaining the most round cross-sectional shape;
- mark the territory on which the pit will be located;
- fill the bottom with a layer of concrete mortar;
- build a metal frame using reinforcement bars, which will have to evenly distribute the mass of the rings over the entire area and protect the concrete pad from premature destruction;
- after the concrete has hardened, you can begin to install the rings;
- the joints of two adjacent rings must be filled with a concrete solution;
- the outer part of the rings should be covered with a layer of bitumen;
- after mounting all the rings, they should be closed with a concrete cover, the joint is also filled with mortar.
Made of plastic
The procedure for performing work during the construction of a pit using plastic containers: 
- dig a pit, given that in this case in size it will be much larger than in the two previous cases;
- make the bottom as even as possible;
- pour a 15 cm layer of sand on the bottom and compact it well;
- gently lower the tank to the bottom and fix it in a stable position;
- connect the inlet pipe of the tank to the drain pipe;
- fill the free space between the tank and the walls of the pit with soil or sand;
- pour a small volume of water to see how the reservoir compensates for the pressure on the ground. If the walls of the tank gradually bend inward, then the tank is not installed correctly.
- completely fill the pit with soil.
Required tool
 The main tool for the personal construction of a cesspool is shovel. It is optimal to have both a bayonet and a shovel, since it is more convenient for one to directly dig a pit, and the other to throw soil to the surface.
Be sure to have a bucket and a rope to pull out the earth. You will also need a wheelbarrow to remove the soil from the pit. Have a tape measure or other measuring device handy. To descend into the pit, you should purchase a ladder.
Considering that it will be necessary to make a mortar from cement, then if it is not possible to use a concrete mixer, a separate container should be allocated for preparing the required volume of mortar.Mounting highlights
As mentioned above, the first and main point of installation is the accuracy of the preliminary  calculations based on specific needs. Then follows the correct selection of the location of the cesspool, taking into account the planned type of pit, for example, a pit with or lined with bricks will be narrow and deep, and a pit with a tank will be wide, but not so deep.
When choosing the option with reinforced concrete rings, it should be noted that their installation will require the help of a truck crane due to their high mass and fragility of the structure during falls. The option with bricks and a tank can be mounted by hand. It should also be noted that in order to extend the service life of a plastic tank, its outer part should be sealed with a layer of soil.
When laying pipes through which sewage will pass, it should be remembered that they must be below the freezing level of the soil.Common Mistakes
Practice shows that often when arranging a cesspool, mistakes are made such as:
- incorrect performance of preliminary calculations in terms of volume and location;
- insufficient depth of the pit;
- weak strengthening of the walls of the pit, as a result of which shedding occurs
walls; - the outlet pipes are parallel to the ground, and not at a slight angle;
- neglect of the rules for the installation of concrete rings.
The question often arises before the owners of private houses,.
Do you want to apply modern methods for cleaning the toilet in the country? In you will learn how to choose bacteria for the toilet.
The choice of sewer pipes is a very important issue. Tips and tricks can be found at the link.
The lack of central sewerage brings with it a number of difficulties. The drain pit that replaces it quickly overflows and requires constant pumping.
Advantages of a pit with overflow: rare use of sewage equipment, reuse of water (for watering the garden), no unpleasant odor, the possibility of using water in the house in unlimited volumes, the absence of gurgling sounds from the sink and toilet bowl when the pit is overflowing.
The best option for giving or country house is a cesspool with overflow.
You should learn about the advantages, device and method of building an overflow pit before starting its construction.
: what is it needed for?
Installation features.
Installation of sewer pipes.
Advantages

The cesspool accumulates in itself not only human waste, but also sewage domestic water. More precisely, water takes up most of it. Washing machines, dishwashers, showers and bathtubs discharge large amounts of dirty water, which cannot be reused without prior deep cleaning.
If the family living in the house consists of 4 or more people, then the sump fills up very quickly and you often have to resort to the services of sewers. In these cases, it is better to immediately think about the construction of such a structure as an overflow cesspool. Its advantages:
- rare use of sewage equipment;
- reuse of water (for watering the garden);
- no unpleasant odor;
- the possibility of using water in the house in unlimited volumes;
- the absence of gurgling sounds from the sink and toilet bowl when the pit is overflowing.
In order for the drain pit to be useful, it must be properly arranged.
Device

The cesspool overflow structure consists of 2 settling pits interconnected by a T-shaped overflow pipe. Water used in the house and human waste come through pipes laid at an angle of 1.5-2 ° towards the drain, first drain hole. Heavy waste settles to the bottom, and the water, having reached the level of the T-shaped pipe, overflows into the second pit.
The second container has no bottom and consists of several layers:
- geotextile;
- crushed stone and broken brick;
- geotextile;
- sand;
- geotextile.
Passing through all the layers, the water is purified and goes into the ground without doing any harm to it.
For better decomposition of organic components, special preparations with bacteria are added to the first pit. For better work a biological product in the lid is left a hole to admit air.
It is possible to completely fill the second pit with rubble. Geotextiles and a layer of black soil are laid on top, plants with a small root system are planted. This method is only available on loose or sandy soils. Otherwise, the rubble will silt and require updating.
Construction

Standard construction of a sealed cesspool with a concrete bottom,
For work you will need materials and tools:
- concrete rings for the first pit;
- red brick for the second pit;
- crushed stone;
- sand;
- geotextile;
- plastic sewer pipes;
- T-shaped pipe or corner to prevent sewage from entering the second pit;
- bayonet shovel;
- shovel;
- bucket;
- rope;
- chisel;
- hammer.
To dig the first hole, it is necessary to install a concrete ring for its future permanent place. Climb inside the ring and start digging evenly over the entire area. Under its own weight, the ring will begin to fall. When the first ring is level with the ground, the second one is installed on it and the digging work continues. Unnecessary soil is taken out with the help of a bucket, a rope and a reliable comrade standing above.
After installing all the necessary rings, pipes are inserted into the finished cesspool, through which sewage will be drained. The hole in the ring is made with a chisel and a hammer.
At a distance of 0.5 m from the first hole, a second one is dug. Its walls are laid out of red brick without the use of concrete mortar. In the masonry, large gaps are left between the bricks. The depth is about 4 m.
2 pits are interconnected by a plastic sewer pipe, which has either a bend or a T-shaped end at the end. This is required to prevent foam and other impurities from the surface of the first pit from entering the second container.
The pipe is installed at an angle of 2° towards the second pit and is located below the level of the inlet drain pipe.
Geotextile is laid on the bottom of the second vessel, a layer of sand 1 m is poured on it, then again geotextile and a layer of crushed stone 1.5 m. The layers should not be higher than the connecting pipe.
When creating a variant with a complete filling of the pit with gravel, the connecting overflow pipe goes into the middle of the layer, and the crushed stone is covered from above with geotextiles and black soil.
Absence of gurgling sounds from the sink and toilet bowl when the pit is overflowing.
A properly made cesspool will make it easier to live in a house that does not have a central sewer.
For the townspeople, the problems of removal and disposal of domestic wastewater are solved by public utilities, but the adherents of a spacious country life have to think through such pressing issues on their own. If the owner of an estate intended for a large family to live most often has to order an installation on the site of a volumetric septic tank or a local treatment station, then a summer resident with his own hands may well build a cesspool from inexpensive or waste materials. She will perfectly cope with the important sanitary function, and will not require the allocation of too much funds for the arrangement.
The most simple and budget options
The historical predecessor of this sewer facility was a simple pit dug in the ground, the walls of which were coated with clay and reinforced with boards. Then they began to bury old barrels, tanks, and other used containers in the ground. Now, such "reservoirs" for collecting and partial filtration of wastewater are satisfied only if the daily amount does not exceed 1 cubic meter. m.
An elementary cesspool for a toilet can satisfy the needs of summer residents who stay on the site for a couple of days a week during the summer season. However, its device is not approved, and sometimes it is completely forbidden by the sanitary and epidemiological services, often accompanying the bans with the imposition of administrative penalties.
An elementary cesspool: from the simplest boarded container for a closet to a tank made of concrete rings
Attention. The depth mark of the bottom should be at least 1 meter higher than the maximum (spring-autumn) groundwater level.
If the owner of a suburban area really does not want to spend money on a construction device, and he has a certain amount of worn tires, this material can be usefully used. It will be necessary just to lay the tires in the excavated pit, fastening them together with bolts. If the pit is arranged outside the house or toilet, a hole must be cut in the side of the tire laid on top to connect the sewer pipeline. After the pit around the makeshift treatment plant, it is covered with soil, a concrete slab with a hole for ventilation pipe and hatch for pumping out.

The owner of the Nth amount of worn tires can build an excellent reservoir for collecting wastewater from them.
Common types of structures
According to the characteristic design differences, cesspools are divided into absorbing structures and sealed containers. The functions of collecting, accumulating and treating wastewater are also performed by septic tanks. They are more complex technical aspects installations with forced stimulation of the movement of wastewater inside and with biological and chemical methods of treatment.

It is unacceptable to violate the sanitary and epidemiological standards for the location of the cesspool
Containers without a bottom - absorbent
Direct descendants of the "folk" cesspool. Their characteristic feature is the absence of a bottom, due to which the liquid component of the drains, after being cleaned by coarse filtration through a layer of a mixture of sand, gravel, broken bricks and other “ingredients”, passes into the ground. The absorbing option is considered the most economical, in addition, the construction of a pit of this type may well be carried out by a performer who has absolutely no experience in the field of construction. More savings: due to the partial infiltration of purified water into the ground, it is much less necessary to call vacuum trucks.

Design scheme of a cesspool without a bottom - drains are filtered through crushed stone
An absorbing variety of pits is chosen if there is no need for a drain a large number drains, if country house no jacuzzis, dishwashers and washing machines. A large volume of land will not be able to process and receive. In addition, the ongoing cleaning cannot be classified as one hundred percent effective procedures, which means that effluents from an absorbing pit will still pollute the environment.
Sealed waste tanks
In their name there is a direct clue that speaks of the main design feature. In fact, these are closed containers made of impermeable concrete, brickwork, plastic, gas silicate blocks that need constant emptying after filling. Hermetic structures will ensure the complete absence of odors inherent in drains, but will force the owners to regularly call a sewer truck to remove accumulations.
Important. A cinder block is not applicable for the construction of a cesspool; it will collapse too quickly from contact with water.
The easiest way is to buy and bury a factory-made plastic container for collecting wastewater, bring a sewer pipeline to it and periodically call vacuum trucks to empty it.
The simplest scheme for constructing a wastewater tank is to install a plastic container purchased from a store. It does not need to be sealed, however, it is advisable to fill the bottom of the pit with a kind of cement screed and strengthen the walls with reinforcement. In principle, if the owners are not embarrassed by the unpresentable appearance, then there is no need to bury it in the ground. Another very strong argument in favor: a plastic structure can be installed regardless of the close groundwater level. No harm will be done to the environment anyway.

The tank should not be completely filled with waste masses, there should be at least one meter between the manhole cover and the liquid level, if the level has exceeded the limit, the tank should be emptied
The simplest homemade septic tanks
These are already more complex structures that perform not only deep cleaning, but also process the waste mass into fertilizer valuable for gardeners and gardeners. Most often they are a system of two or three chambers, in the first of which only collection and rough mechanical cleaning takes place, and in the subsequent chambers, specific bacteria enter the battle, finally processing the polluting inclusions of wastewater.
A cesspool with overflow purifies water so well that it can be successfully used for household and technical purposes, for example, for watering or for cleaning the site. But in order to make a septic tank with overflow, considerable effort will be required.

The principle of operation of a three-chamber septic tank is a multi-stage purification of waste masses: in the first tank, the collected effluent is subjected to coarse filtration, in the following chambers, finer purification is performed
If you don’t feel sorry for the efforts, but there is no surplus of financial resources, you can again resort to worn-out car tires. In the sense of "bald", but not worn to holes tires. Moreover, the owner will save not only due to waste building material. For the installation of a septic tank from tires, a powerful concrete foundation is not needed, a compacted cushion of crushed stone with sand with a capacity of 30-40 cm and a ten-centimeter screed is sufficient.
- To increase the volume of the reservoir created, the sidewalls of the tires must be cut off.
- A concrete pipe is installed vertically in a well made up of tires, its diameter should be approximately two times smaller than the same tire size. The upper cut of the concrete pipe is located 10 cm below the well made of rubber.
- The bottom of the pipe is poured with concrete so that a monolithic concrete cylinder is obtained.
At the top, you will need to make holes for infiltration and for installing pipes that provide overflow.

Pit design with overflow: the pipe entering the chamber must be located higher than the overflow pipe
- The sewer pipe must be inserted into a concrete container located inside the tires.
Places where sewer pipes enter vertically installed concrete pipes must be sealed.
Consider the stages of installation of several design options.
absorbent
Owners of small country estates, who decide to make an elementary sewer with their own hands, most often choose this option. Attracts simplest design and the ability not to use the services of vacuum cleaners too often. The walls can be laid out of bricks or gas silicate blocks, but it is easier and faster to build them by installing concrete rings on top of each other.

It is much faster to build walls from gas silicate blocks than to lay them out of brick, it is even faster to make a pit from concrete rings, but a crane is required to install them

Sealed
The principle of construction is similar, only it is not necessary to form holes for the infiltration of treated effluents and the bottom must be completely concreted. It is advisable to reinforce the lower concrete platform by laying a concrete mesh on the bottom before pouring. So that the reinforcement does not “drown” in concrete, it must be slightly raised above the surface and fixed on pegs.
An important aspect: it is recommended to seal the walls. Cheap option for internal insulation - bitumen, outside a home-made sewer object can simply be coated with clay. If the walls of the pit were built of brick, they can be plastered.

The standard design of a sealed cesspool with a concrete bottom, the walls can be built from concrete rings, laid out with brick or gas silicate blocks, make a monolithic container, pour concrete into the formwork
Brickwork will take significantly more time than the installation of concrete rings. At the bottom, by analogy, a concrete screed is arranged, and bricks can be laid both in a circle and by “drawing” a square or rectangle in the perimeter. The poured concrete platform must “ripen” before laying, standing for 7-8 days.
Important. During the laying period, it is necessary to form holes for the supply of a sewer pipe. The connection point is located below the level of freezing recorded by local weather services.
The sewer pipeline to the waste collection point should be slightly inclined to ensure spontaneous movement of the contaminated mass.

The pipe introducing wastewater into the pit must be located below the freezing level, the pipeline must be laid at an angle to ensure spontaneous movement of waste masses
Installation of ready-made complexes
It is impossible to think of anything easier and more convenient than their use; the arrangement of a cesspool from precisely sized components is carried out extremely quickly. The only drawback: the volume parameters specified by the manufacturer. But they produce a factory product mainly with the expectation of an average consumer. That is, it is not difficult to find the necessary kit.

There are many ways and methods to make a cesspool. From the variety of options, it remains to choose the optimal type of construction that meets the needs. Which costs are more important, what is the best way to save money, choose the owner and contractor himself, and knowing the design differences will help you make the right decision.
If you are faced with the acute question of choosing the type of device autonomous sewerage then this article is for you. This will be a series of 4 articles on the topic of autonomous sewage. In these articles, we will look at different kinds autonomous sewage, find out what is the difference between the wastewater storage tank, cesspool, septic tank, biofilter, dry closet and aeration tank. This material will help highlight the pros and cons of each device, limitations in use and, finally, the cost of their installation and operation. Part 1 is devoted to the construction of a wastewater storage tank.
The concept of autonomous sewage and cesspool
Solving the problem of autonomous sewerage can require a significant amount of time, effort and money. How to choose the best option that suits you?
To begin with, by and large, 2 types of autonomous sewage can be distinguished:
- sewage storage tanks;
- facilities designed for biological wastewater treatment.
Let's consider each of them in more detail.
Waste water tanks
The sewage tank can be installed in principle in two ways:
- a so-called cesspool (without a bottom) is arranged on the site;
- on the site, a sealed container is buried in the ground (this option can also be called a "hermetic cesspool." The container can be ready-made (made of plastic) or assembled on site (for example, from reinforced concrete rings and a concrete bottom).
Cesspool
We will immediately make a reservation that it is forbidden to use containers or wells without a bottom with filtration of effluents into the soil if the daily volume of effluents is more than 1 m 3 (SNIP 2.04.03 - 85 p.3.9). If the pit has no bottom at all, then the untreated drains directly fall into the ground. If the volume of wastewater is small (up to 1 m 3), then with the help of bacteria that live in the soil, natural water purification occurs. If the volume of sewage is significant, then the land simply cannot cope with such a volume of sewage. Everything harmful substances along with runoff will fall into the soil and groundwater, worsening the already not very favorable environmental situation. If there is a well within a radius of 30 meters from a cesspool without a bottom, all harmful substances along with waste will directly get there, and using water from this well will be hazardous to health.
Bottomless pits were actively built in villages and towns during for long years. But let's not forget that a few decades ago people did not use so much water: they bathed in baths, and did not take a bath and shower every day, no one knew about the existence of automatic washing machines, not to mention dishwashers.
Often there are pits, the bottom of which is lined with rubble. Usually, during the construction of such pits, a layer of rubble is covered with coarse sand from above, which improves the quality of wastewater treatment. But this is no longer a cesspool, but a single-chamber septic tank.
Output: in modern conditions, it is not recommended to build a cesspool without a bottom (therefore, we will not talk about its device). And a cesspool with a crushed stone bottom is already a single-chamber septic tank (we will talk about it in the next article).
Sealed container (sealed cesspool)
Sealed cesspool: HDPE pipes for draining wastewater and a bin for collecting wastewater (the bunker can replace a sewer well)
The principle of operation of the wastewater storage tank (sealed cesspool)
A sealed container is installed on your site, into which wastewater from the whole house flows through pipes. Wastewater is stored in this tank until it is pumped out by a sewage machine.
For a family of 4-5 people, the container should have a volume of at least 8 m 3.
Resources required for the operation of the sewage tank (sealed cesspool)
Drains, which are called liquid household waste, are taken out by special machines - vacuum trucks. If you enjoy all the benefits of civilization, including a bath, an automatic washing machine and dishwasher, then it is necessary to call a sewage truck 2-4 times a month.
Restrictions on the use of a sewage tank (sealed cesspool)
There are no restrictions on application.
Advantages of a wastewater storage tank (sealed cesspool):
- environmentally friendly - waste is removed to discharge stations, there is no pollution of soil and groundwater, because the drive is sealed;
- ease of installation and operation;
- does not depend on the level of groundwater;
- soil type does not affect the quality of operation.
Disadvantages of a wastewater storage tank (sealed cesspool):
- the cost of operation (call a car to clean the pit will cost from 18 to 30 dollars. The frequency of calling the car is once every one and a half to two weeks, with permanent residence in the house);
- availability of space for the entrance of a sewage truck. The dimensions of the sewage truck, on average, are 6.7x2.5x2.6 m. A hose is used for pumping. The hose has a length of 7 meters, of which 3 meters of the hose is lowered into the pit, i.e. remains 4 meters;

Cesspool truck dimensions
- available bad smell if a well storage is used (plastic containers will help to avoid unpleasant odors). If a pit with a gravel bottom is used, that is, a single-chamber septic tank, and the number of drains does not exceed the volume for which your pit is designed, then there is no smell.
The main stages of the installation of a wastewater storage tank (sealed cesspool)
- We calculate the volume of the storage. If the house has a bath and water heaters that run on solid fuel or electricity, then 1 person consumes an average of 150 liters of water per day, but if the water heaters run on gas, then about 180 liters of water are consumed per 1 person. If there are 4 people in the family, then 150x4 \u003d 600 liters or 180x4 \u003d 720 liters. The rate of water consumption per day is 0.6 - 0.72 m 3 . With a storage volume of 8 m 3 it is necessary to pump out waste every 10-13 days.
- We choose a place on your site where the drive will be located. In accordance with building codes and regulations (SNiP), the drive must be located at a distance of at least 5 meters from the house and at least 2 meters from the fence.
- The storage tank itself can be of various designs: from factory-made plastic containers to a well made of reinforced concrete rings and a concrete bottom (the finished design is a reinforced concrete bottom, or put a reinforced concrete slab instead of the bottom);
Plastic containers are more airtight than wells. The most acceptable eurocubes are large plastic tanks with a capacity of 1000 liters in a metal crate on a plastic or wooden pallet, have either 2 plugs on top and bottom, or a plug on top and a tap on the bottom. They are used to transport liquid substances: liquid glue, paint, etc. You can buy used. They are quite light (2 people can easily lift them), compact (they fit in a trailer for a car) and relatively inexpensive (used ones cost $60-100). meters, monolithic concrete or clay bricks. The bottom of the well should be located no deeper than 3 meters from the surface of the earth, otherwise the sewage machine will not be able to completely pump out the drains. Internal waterproofing is mandatory, and if there is a sufficiently high groundwater level, external waterproofing is also performed. The accumulator is covered with a lid having a heat-insulating gasket made of foam or mineral wool, which will protect the pipeline from freezing.

eurocube
- A plastic float level switch makes it easy to tell when it's time to call for vacuum trucks. It is sold separately. (costs from $10);

Plastic float switch
- A ventilation riser with a diameter of at least 100 mm is installed in the overlapping of the storage tank. It is brought out 700 mm above the planning mark of the earth;

Septic tank made of reinforced concrete elements (dimensions in mm)
1 - reinforced concrete ring with a diameter of 1000 mm; 2 - wooden cover; 3 - reinforced concrete ring with a diameter of 700 mm; 4 - supporting reinforced concrete ring; 5 - cast-iron hatch (or wooden cover); 6 - ventilation riser; 7 - floor slab; 8 - plate-bottom; 9 - cement screed.
- We lay sewer pipes (most often they use special PVC pipes with a diameter of 100 mm) so that trees do not grow in the place where the pipeline is laid, otherwise access to the pipeline will be limited when repairing or replacing pipes;
- If the pipeline is laid below the freezing depth (1.2-0.8 m), then it does not need to be insulated. Map of soil freezing depths throughout former USSR can be viewed in the Questions section, in the material.
Estimated cost of a wastewater storage tank (sealed cesspool)
The cost will depend on what type of storage you choose. Below is the approximate cost of materials needed to build all types of storage tanks
- used eurocube - 600 hryvnia ($75);
- reinforced concrete rings for sewerage - 300-700 hryvnias, depending on the diameter ($ 37-90);
- the bottom of the well - 300-900 hryvnia ($ 37-110);
- reinforced concrete cover with a hole for the hatch - 300-800 hryvnia ($ 37-100);
- clay brick 2000 pieces - about $ 600, if you use a used brick, then the costs are reduced to $ 400;
- concrete 4 m3 - 2600 hryvnia ($ 325).
Calling 1 sewage truck will cost 150-250 hryvnia ($18-30).
Attention: Prices are valid for 2009.
Living in a city apartment is good because there are usually no problems with the discharge of effluents. In this regard, private houses lag behind, since central system there is no drainage in them, and the only way to provide comfortable accommodation- this is the arrangement of a cesspool into which waste products would be dumped and.
Without a cesspool, sewage discharged to nearby areas will quickly pollute the soil and can harm not only nature, but also people.
Classification of cesspools
There are several options for the design of the cesspool, so you should first deal with them.
- A simple pit is a structure without a bottom in which the liquid is absorbed by the earth. This option is the most popular, because pumping in this case is carried out quite rarely. But with increased water consumption (over 1 m³ per day), the earthen "filter" simply will not cope. Moreover, this is environmentally unsafe, especially if toilet drains are diverted into it. Of course, it can be filled up from time to time, but this will reduce the usable volume, and the characteristic sewer smell will still be present.

- The sealed pit needs periodic cleaning, but it is absolutely safe for environment. The arrangement of a sealed structure is much more complicated than described above, and the costs increase, but the numerous advantages fully justify all this.

- - a modern analogue of a cesspool. Its bottom is laid out with gravel, stones or brickwork, which allows mechanical water purification (read: the soil is not polluted). Moreover, the filling of the pit is rather slow.

Now let's find out how to make a cesspool.
Arrangement of a brick cesspool
Before proceeding directly to construction, determine a suitable location and calculate the required dimensions of the structure.
Stage one. Location selection

The construction of a cesspool in a suburban area is regulated by SNiP. The location of the pit, as well as the distances to certain buildings, are clearly regulated by sanitary standards. When planning, these requirements must be taken into account.
- The distance between the pit and the fence should exceed 1 m.
- The distance to the premises in which people are planned to live should be at least 12 m.
- If it is planned to create a simple pit, that is, without a bottom, then the distance from it to the nearest well or well should exceed 30 m.
Based on these requirements, select the optimal place, and then proceed to the calculation of dimensions.
Stage two. Dimensions
There are a number of parameters that need to be taken into account when calculating the dimensions of a future structure.
- First of all, the sizes depend on the type of rocks that occur in a particular area. And if the soil consists mainly of permeable rock (for example, marl), then the volume of the structure should be 40% of the waste that is produced during the month. And if these are rocks that do not pass moisture well (for example, clay), then the volume should be equal to the monthly norm + a small margin.
- This also includes the number of permanent residents of the house. On average, one person produces 180 liters of wastewater per day. And if the family consists of, say, 3 people, then the monthly volume of wastewater will be 12 m³.
- According to SNiP, the distance to the surface should be at least 1 m. If this condition is not met, the sewage can go beyond the structure, and unpleasant odors will definitely appear.
- The depth should be a maximum of 3 m. This is the optimal depth, because sooner or later you will have to resort to the help of vacuum cleaners for cleaning. And if the pit is airtight, then such cleaning will need to be carried out several times a month.
Stage three. Preparing the necessary equipment
The work will require:
- bayonet and shovel;
- trowel, container for mixing cement mortar;
- roulette;
- cord with small wooden pegs;
- building level;
- ladder.
Stage four. Digging a pit

You can cope with the construction of a cesspool on your own, without resorting to the help of a construction team with special equipment. This will save you a lot. But remember: you will have to manually remove about 20 m³ of earth.
On a note! If possible, a hole should be dug at the stage of digging a foundation pit for the foundation of the house. After that, only a small part of the work remains.
Mark the perimeter of the future structure. Often the width of the pit is 1 m, and the depth is 1.5 m. The length depends on the volume of wastewater. You can distribute the fertile layer of soil over the site, the rest will have to be taken out. Leave only 1.5 m³ for backfilling the floor.

Pit excavation almost complete
At the same stage, a trench should be dug into which the sewer pipe will be laid.

Stage five. Base

If you plan to build a sealed sewage pit, then arrange a “pillow” of sand 15 cm thick at the bottom of the pit. Lay a layer of concrete of the same thickness on top of the sand, and then pierce the solution with a sharp object to remove air bubbles. Then it remains only to lay a 4-centimeter cement-sand screed over the concrete.
You may be interested in information about what it looks like
Wait for the base to dry completely, then lay the sewer pipe to remove sewage.
Prices for concrete rings
concrete rings
Stage six. Wall masonry


We’ll make a reservation right away that you don’t have to try too hard on the quality of the masonry, since no one will see it anyway. Do it in ¼ or ½ bricks, in a checkerboard pattern, use a cement-sand mortar. On both sides, plaster the masonry with the same mortar - this will extend the basic operational life of the structure. Bandage the corners.

Having finished with the masonry, isolate the walls with bituminous mastic.

Stage seven. overlap
Follow the steps below to mount the cover.
Step 1. First, dig in the soil about 20 cm on each side - this will provide additional support for the overlapping slab.
Step 2 Build the formwork. It is advisable to use corrugated board for this, so that the overlap is as rigid as possible. Make the formwork also around the hatch and the hole for the ventilation pipe.
Step 3. Lay the reinforcing bars, keep a distance of about 10-15 cm. Bandage the intersecting bars using steel wire.

Step 4. Fill the floor with concrete mortar, level it.

Bayonet the concrete so that it completely fills the reinforcing mesh. After pouring the solution to the desired thickness, wait for the strength to set. This often takes at least 28 days.


On a note! On top of the floor, you can lay a layer of waterproofing material - for example, roofing felt or PE film.
Stage eight. Backfill
Once the concrete has gained strength, proceed to backfill the cesspool. It is recommended to use for this clay soil to create additional groundwater protection from runoff. It is possible to lay thermal insulation material (for example, expanded polystyrene sheet) on the ceiling, and fill the soil on top. Finally, install the ventilation pipe.
On a note! It is advisable to build a double hatch - this will prevent the spread of an unpleasant odor, especially in the warm season. Install the first cover at ground level, the second - at the level of the overlapping slab. You can fill the space between the covers with slag or expanded clay.
from concrete rings

There is another option - it costs more, but the finished design will look more organic. Brick pits are often rectangular or square, but the use of reinforced concrete rings allows you to achieve ideal round shape. This will prevent excessive load on the walls and, as a result, their destruction. The only drawback of the option is that special equipment may be required for work, because concrete cylinders weigh a lot.

Stage one. Selection of rings

Today, concrete rings are produced in several modifications that differ from each other in diameter (it varies between 70-250 cm). For a cesspool, products with a diameter of 1 m and with the same height are most suitable. For an average house, you will need five rings, the total useful volume of which will be 5 m³. If, according to calculations, the volume should be large, then take other reinforced concrete rings or buy products with a larger diameter.
| Dimensions (inner diameter × outer diameter × height), mm | volume, m3 | Weight, kg |
|---|---|---|
| 700×800×290 | 0,05 | 130 |
| 700×840×590 | 0,10 | 250 |
| 700×840×890 | 0,15 | 380 |
| 1000×1160×290 | 0,08 | 200 |
| 1000×1160×590 | 0,160 | 400 |
| 1000×1160×890 | 0,24 | 600 |
| 1500×1680×290 | 0,13 | 290 |
| 1500×1680×590 | 0,27 | 660 |
| 1500×1680×890 | 0,40 | 1000 |
| 2000×2200×590 | 0,39 | 980 |
| 2000×2200×890 | 0,59 | 1480 |
Such rings are also classified according to the design features into two large groups:
- flat;
- with lock.
In the first case, the edges of the products are ordinary, flat, and in the second case, they are equipped with tongue-and-groove locks. Rings with a lock are very convenient, because they not only provide ease of installation, but also reliably seal the entire pit.

On a note! In the manufacture of reinforced concrete rings, at least "five hundredth" cement and a metal reinforcing frame are used. There are also products with a lid and a bottom, which greatly facilitates construction.
Stage two. Construction
Step 1. First, dig a pit. It is important that its dimensions are approximately 40 cm larger than the diameter of the rings. The depth of the pit should exceed the total height of all rings by about 25-30 cm.

Step 2. Level and compact the bottom of the pit, then fill it with a 2-centimeter layer of coarse sand. Pour the sand with water, compact. So you will create a kind of "pillow", on which further installation will be carried out.
Step 3 Further developments will develop according to one of two possible scenarios:
- the bottom ring is installed first;
- ordinary rings are installed.
In the first case, you will get rid of the laborious procedure for pouring the base; this is the simplest option, so it is recommended to use this. But if for one reason or another it was not possible to purchase a ring with a bottom, then you will have to fill the bottom with concrete.
To do this, lay reinforcing bars in the form of a lattice at the bottom of the pit, and then tie them together with steel wire.
On a note! Raise the reinforcing mesh above the surface so that it (the mesh) is completely in the body of the concrete base. Use pieces of bricks for this.
Then proceed to prepare the solution. For this, mix cement, water, sand and gravel in a ratio of 1: 0.5: 2: 3. Use a minimum of "four hundred" cement, and if the brand is lower, then reduce the volume of fillers. For mixing, you can use a concrete mixer, or you can do the work manually using a shovel. But remember: the solution must be prepared in such a volume that the bottom of the pit is filled in one go, without subsequent kneading.
Pour concrete, spread it over the entire surface. Poke it with a sharp object to remove air bubbles.
Stage three. Installation of rings

Do not lower the rings manually into the pit, because they weigh quite a lot. This will require a crane. Each ring has four fasteners made in the form of ears (for which the products are lifted). For the manufacture of such ears, a wire rod is used, the diameter of which is at least 0.6 cm.
On a note! The rings should be lifted at the same time by all the ears, and the cables should be evenly stretched. The whole procedure must be carried out carefully, slowly.
Once the first ring is down, line it up and set it up with a spirit level. After that, you can drop the rest. Seal the joints between the rings with a cement-based sealant, and treat all the walls of the structure - external and internal - with bituminous mastic.

At the end, a cover is installed. When the truck crane lifts and sets the cover in place, seal the joints between it and the last cylinder. After that, fill in the voids between the walls of the structure and the walls of the pit.

As you can see, there is nothing complicated about this. Of course, you will have to perform labor-intensive earthworks and pay for the rental of special equipment, but good sewerage in a private house is simply necessary, so all costs are fully justified.
Video - How to make a cesspool with your own hands
Reinforced concrete rings or brick - what to choose?
Each of the options is quite simple to implement, but both concrete rings and brickwork have their own advantages.

- The strength and practicality of a cesspool made of reinforced concrete rings is noticeably higher.
- A brick pit rarely needs sewage cleaning.
- Rings withstand more load than brickwork, albeit made "in a chess way".

As a result, we note that the construction of a cesspool on the site requires a solid investment, at least if we are talking about a really good design, for the manufacture of which quality materials are used. You should not save on materials that will come into contact with moisture (do not use cinder blocks or silicate bricks in construction), because everyone knows that the miser pays more than once. Act carefully, if necessary, ask for help from friends and acquaintances, do not rush - and the sewage pit will serve you for many years.
Table. Water consumption for a private house. The choice of the volume of the cesspool
| Water consumers: individual or block residential buildings | Specific average daily (for a year) household and drinking water consumption in settlements per inhabitant, l / day |
|---|---|
| with plumbing and sewerage without bathtubs | 120 |
| with water supply and sewerage without bathtubs, with gas supply | 150 |
| with plumbing, sewerage and baths with solid fuel water heaters | 180 |
| with plumbing, sewerage and bathroom with gas or electric boilers | 190 |
| with plumbing, sewerage, with fast-acting gas heaters (columns) and several baths | 250 |
Good luck with your work!
The device of a storage septic tank made of concrete rings