How to ennoble the arched opening with your own hands. Do-it-yourself decorative decoration of arches in an apartment: types and design options. Arch trim with polyurethane molding
After acquiring a land plot outside the city, the question arises of the need to preserve materials, inventory, tools, overnight stay and rest during the period construction works for building a house. Do-it-yourself construction of a change house in this case- a great way out.
You can buy a change house, but you will have to be content with the proposed dimensions, although you might like other dimensions of the structure. As a rule, ready-made models are more expensive, and a do-it-yourself wooden change house will turn out cheaper and last longer. It can be designed according to your desires and requirements, you can choose the location of windows, doors. A change house can be made in one room, or you can make several rooms or with a toilet and shower.
Where to start building

We offer you to consider step-by-step instructions with a photo of building a change house with your own hands. At the very beginning, you need to decide:
- In subsequent years, will there be a need to transport this structure to other facilities. If this option is possible, then it is better to build a change house near the entrance to the site.
- In the future, the change house will be used as a place to store things (bicycles, inventory), as a bathhouse or summer cottage garden house. Depending on this, the question of whether it will be necessary to additionally insulate the room or not is being decided.
- What change house to build wooden or metal.
- Plan and draw up drawings of a change house trailer, decide on materials, make an estimate.
Foundation laying

Wooden change house is quite light. If it is erected for a while, then the foundation is made simple columnar of cinder blocks or bricks, on a previously cleared and leveled surface of the earth:
- for each pillar make a recess;
- create a pillow up to 30 cm from sand or gravel, spill it with water, tamp;
- lay blocks.
If the construction of a construction change house is being built for permanent use, then it is better to make it from pipes filled with concrete. At the same time, it is important that the lower part of the pipe is in the ground below the freezing level of the soil.
Try to observe the gaps along the perimeter between the supports (1.5 - 2.5 m). It is advisable to put them under the bottom of the partitions on which the beam will rest.
Do-it-yourself construction of a change house - wooden frame

The supporting frame of the change house made of wood should be constructed from dry material, pre-treated with antiseptics. The following work is carried out step by step:
- Perform the lower strapping from a bar 100 x 150 mm. The crown of the second is laid from a board 100 x 100 mm. Thanks to this installation, then it will be possible to build an insulated floor. Logs from a board 100 x 40 mm are laid out on the shelves formed between the lower and second crowns.
- All racks: corner, load-bearing and door are formed using a 100 x 40 mm board, and window and intermediate ones are made from a smaller beam of 50 x 50 mm.
- Racks with mounting corners are attached to the second crown. Be sure to use the building level - the structure must be perfectly flat!
- The upper strapping is made with a board, its dimensions coincide with the dimensions corner posts. Also, after measurements and docking, the frame is fixed with corners.
- The next stage is the assembly of the roof, it can be single or double-pitched. The first option is easier. Strapping is set at different levels to adjust the length of the racks.
- The intermediate racks are fixed with corners at the top and bottom, after the upper trim. The distance between the racks depends on the selected coating for finishing and thermal insulation. The parameters of windows and doors must correspond to the dimensions of the drawing.
Roof and ceiling

It is better to fasten the rafter system to the upper harness with strong metal brackets. roofing cake collect step by step:
- rolled waterproofing is attached to the rafters;
- the crate is laid out;
- thermal insulation, protection against moisture, leakage;
- roofing material is being installed.

Necessary step after roofing works This is ceiling insulation. The following works are recommended:
- waterproofing and mineral wool;
- wood slab or OSB.
One of the most economical options are change houses from OSB. For such structures, a gable roof is perfect. OSB boards quickly and conveniently sheathe the roof and walls. You can even make a door out of OSB. After sheathing on the roof, the installation of the roof is carried out. The walls are either painted, pre-treated with an antiseptic, or lined with siding, clapboard at will.
Floor and walls of the shed

It is very important to responsibly approach the insulation of the change house with your own hands. Floor insulation works are as follows:

To make the walls of the change house warm, it is better to resort to a common method of insulation - a sandwich. It consists of several layers: inner lining and vapor barrier, moisture and heat insulation, and outer, protective, decorative lining.
The step-by-step instructions for building a frame change house with your own hands are not complicated, and this building will be reliable, strong, and will last for many years. 
The final stage of construction is the installation of doors and windows.
Metal construction

An alternative to a wooden structure is a change house from a profile pipe. This option is much more durable, but also more expensive:
- The frame is assembled from profile pipes 6 x 4 cm in size, which are cut according to the dimensions of the building drawing. Pipes are welded into a edging. The edging floor is formed from the same profile pipes, and a galvanized metal floor is welded under them.
- Racks are welded, the first in the corners and crossbars. Work is carried out with constant measurements, all corners must be even. Next, intermediate racks are welded, taking into account the openings of windows and doors.
- Next, a roof frame is made of pipes 4 x 2 cm, welded in the form of triangles, covered with a profiled sheet. Metal elements are coated with a primer, followed by painting.
- The interior arrangement is the same as in a wooden change house. Do-it-yourself modular change houses can always be re-planned to suit your requirements and desires.
Construction trailer
 If there is no time to build a change house, then you can buy a trailer and convert it into a change house. They have a big advantage - no need to prepare the foundation. It is enough to clear a flat surface of the earth for the installation of the structure. It is recommended to insulate the structure, and all other, additional arrangements, finishing the trailer inside are optional.
Most requested drawing construction change house 6 x 3 includes: three rooms, heating, a corridor (dimensions 1.5 x 1.5 m), which acts as a barrier from the cold, a pantry, a toilet (dimensions 1.5 x 1.5 m).
Following a certain order of construction work, you can easily cope with the construction of the structure on your site. Drawing up a drawing, purchasing materials according to an estimate, will help to avoid mistakes.
 Any step-by-step instruction how to build a do-it-yourself change house 6x3, or 4.5 x 9, or 4.5 x 6 m are identical to each other, they have the same order of work. The result of the work done will be a high-quality and useful structure that will serve you for many years.
Comfortable do-it-yourself change house - video
Currently, the acquisition of suburban areas is becoming more and more popular.
Many people build houses and cottages in the country for year-round use. After a land plot is acquired, several questions arise before its owners: where to store?
Where to hide from the sudden rain or relax on a hot day, hiding in the shade? After all, the construction of the house is still ahead, and the utility room on the territory is needed now.
An excellent solution to this problem will be a small change house, which you can buy or build with your own hands.
Why do you need a utility room in the country?
Country change house is a small room or house, which is used for household needs in a suburban area.
Very often, a good change house is used as a temporary home or an economy version of a country house.
In the future, after the construction of the main house or cottage, this room is suitable for storing work and garden equipment, unnecessary toys, folding beds, work clothes, and various items that are temporarily not used for household needs.
This room is perfect for storing fishing rods, and equipment: lawn mowers, electric or gasoline trimmers.
And if you bring water supply to the change house and make a sewer, then it will be quite suitable as a sanitary unit or even a bath.
Economic owners of summer cottages can use the building as a mini-garage, a winter shed for rabbits, birds or beehives. In general, depending on the activities of the owner of the cottage, this room can be used for various purposes.
A change house is a multifunctional room, which in any case will become indispensable in a summer cottage.

Change house in the country - a multifunctional room
Change house as an element of the overall design of the site
Due to the fact that the change house is a room that performs various functions, it is necessary, before starting construction, to decide how the owner plans to operate it and the location on the territory of the dacha.
You should also consider some nuances:
- Firstly, it is necessary to determine the period of use of the premises and the possibility of moving it to another place. For example, if a change house is built on one summer cottage for temporary operation for one or two years, and subsequently it is planned to be moved to another place (another plot or village) or simply sold, it is recommended to locate the building as close as possible to the entrance. Otherwise, the evacuation of the assembled change house will be extremely difficult, and it is not advisable to disassemble the building, since some of the materials may become unsuitable for further use.
- Secondly, the location of the room depends on its purpose. If the building will be used purely for household purposes, storage of tools, inventory or garden furniture, then it is desirable to locate the building approximately in the middle of the long side of the site. This will provide free access to the change house from any corner of the cottage. If in the future it is planned to operate the building as a bathroom, shower or bath, then it is necessary to build it in the farthest corner, which will fully comply with the rules and regulations of fire safety.
- drawings, step-by-step instructions with photo and video materials, and tips for building a building in our article.
Medicinal and colorful sage: planting and care different types plants. that the plant pleased the soul and body?
The main types of structure
Several options for the construction of a building on a summer cottage are used. The choice of construction technology also depends on the expected period and purpose of the operation of the premises.
Building a switch house with your own hands is the easiest and cheapest. This is the most economical building option.
For the manufacture of the base of the building (frame), bars are used, the outer skin is made with clapboard, and inside - with sheets of chipboard or MDF.
Styrofoam or glass wool are the most common insulators for panel houses. To cover the floor surface, you can use an unedged board, which is covered with inexpensive tiles.
The roof can be made both single-pitched and double-pitched. Roofing material can be used quite thin, profiled sheets are quite suitable.
The main and perhaps the only advantage of this type of change houses is their cheapness and quick assembly. They also have quite attractive appearance.

The negative side is a short service life - the room is suitable for use only one season and summer period, since there are no stiffeners in the building, the walls are susceptible to deformation under the influence of wind force, and the insulation settles, and as a result the building freezes heavily.
Most often, change houses of this type are used as temporary structures in which you can cook food in the summer, change clothes and store some tools during the construction of the main house.
Frame building
This construction option is more expensive, but also much stronger and longer in operation.
As a basis, a timber with a size of at least 10X10 cm is taken, which ensures stability and prevents deformation of the structure. Inside, the room is sheathed with clapboard, since plywood or fiberboard is not recommended because of their strong hygroscopicity.
Mineral wool is used to insulate the room, and vapor barrier is also provided by using special materials, such as glassine.

In addition, the ceiling and floor are made in two layers. Thanks to these techniques, the inside of the house is warm and dry. And the appearance will be given by the lining under the timber. Frame houses can be operated for several seasons, which distinguishes them favorably in comparison with panel cabins and is an undoubted advantage.
The only one the disadvantage is that the interior space is rather small, but this does not interfere with the full exploitation of the change house as summer kitchen, storage of working clothes and tools.
In the video, a do-it-yourself frame change house - making a base:
Fabrication and installation of frame walls:
Change houses from a bar and logs
This type of building is distinguished by its high cost, because bars and logs with a cross section of more than 100x150 cm are used for its construction.
There are many advantages to building from logs - long term service, nice view, warm inside. The disadvantage is the high cost.

Container as a basis
Often in summer cottages during the construction of a cottage or house, temporary change houses-containers are installed.
Such buildings can be made from a metal channel welded in the form of a frame, the gaps of which are filled with sandwich panels.
The huge advantage of such change houses, including durability, reliability, strength, warmth, still does not contribute to their wide demand and long-term operation in summer cottages.
Due to the fact that the structure is metal, and most often all the buildings on the site are wooden, it is very difficult to fit it into the overall design. Therefore, as a rule, containers are purchased for the period of construction and sold after its completion.

Change house-container
Independent construction of a building: plan and stages of work
When the decision to build a change house with your own hands is made, the place and purpose are determined, it is necessary to make a small drawing of the future structure. It can be the simplest room, or a more complex building:

Drawing for the construction of a change house
More drawings, according to which you can build a change house with your own hands in a photo selection:
Only after that you can start work.
Territory preparation
First of all, it is necessary to prepare the site on the site.
To do this, the top fertile soil layer is removed, the earth is tightly compacted and covered with waterproofing material.
Foundation laying and frame assembly
After that, the area on which the change house will be placed is covered with sand, and again compacted. Now you need to arrange the cinder blocks symmetrically at a distance of no more than one and a half meters from each other.

Laying blocks for the foundation
They will serve as the foundation. In order to prevent the destruction of blocks, they must be wrapped with rubiroid.

After the lower part of the change house is assembled, you can begin to mount the support posts at the corners of the structure. For fastening, metal corners are used, which are fixed with self-tapping screws.
It is very important that the base of the change house is strong, and the bars are securely connected to each other. After all, it is on this that the durability of the building primarily depends.

Fixing racks with corners
Vertical racks on the front and back sides of the building must be made of different heights, since in the case of using a pitched roof, there must be a sufficient slope for atmospheric precipitation to drain.
Roof installation
The installation of the roof begins with the attachment of the rafters, on which the crate is then made. Roofing material can be used different.
It can be a profiled sheet, slate or ondulin, it is imperative to lay vapor barrier and insulating materials under the roof.

Roof of change house
Double layer floor and sheathed walls are the best choice
It is desirable to make the floor from two layers: rough and finishing, between which mineral wool is laid as a heater.
The walls of the change house are mounted in a similar way, which can be lined outside various materials: siding, clapboard, block-house. It remains only to carry out internal Finishing work and build a beautiful porch.

Ready change house
Watch a video on how to make a change house with your own hands for 54,000 rubles:
A change house is a multifunctional utility room, without which it is quite difficult to manage in the country.
Depending on the use of suburban area from a change house you can make both a place for storing inventory and a small house. And build it with my own hands under the power of every person who knows how to hold a hammer in his hands.
Change houses in the modern sense are compact and, as a rule, mobile premises for temporary residence of various functional purpose. It is precisely because of their convenience and versatility that change houses are considered the most simple and economical option for construction and can be used with a minimum amount of additional functionality in the form of internal partitions, extra doors, complex electrical and thermal equipment. Next, we will talk about the calculation of the materials necessary for the construction of change houses.
To comfortably accommodate personnel on a construction site, it is enough to get by with a basic household trailer. The most simple design it is made in the form of a frame-panel support with a power metal frame and facing panels.
The price of materials and the cost of work in Moscow
A turnkey change house will cost you in Moscow from 70 to 150 thousand rubles. In this case, you will spend significantly more money, but save yourself from having to build it yourself for at least a few days.If you are planning independent construction change houses, then with the same dimensions, as a rule, it can cost half as much as a purchased one - further in the text we will indicate prices first for ready-made options, and in brackets - respectively, the likely lower costs for self-construction.

Note that it will be inconvenient to build alone, you will need at least one assistant - to saw off, hold, and so on. Also, when there is nothing, a saw will be needed for construction - better with good canvas, bow; as well as shovels and bayonet shovels, a hammer and, probably, a sherhebel.
It all depends on the requirements that you place on the functionality of the room. If the budget is running out, then you can completely get into 50 (25) thousand rubles, but it will be a wooden change house. Ultimately, there is a direct dependence of the price on the dimensions of the change house and the type of assembly.
Wooden
The advantage of a wooden change house, in addition to its price, is that it is easy to heat it. But! It is not practical when moving and will quickly become unusable. If you expect to transport it no more than twice during the entire period of operation, feel free to install it.- Price for wooden structure starts from 40 (20) thousand rubles, this is when finishing fiberboard; with clapboard trim, add 8-10 thousand. This will be an option without a vestibule.
- The swing option will already cost around 60 thousand (30 thousand if you build it yourself).

metal
When choosing a metal change house, you will pay one and a half times more. This choice is justified when you need to move the structure frequently. It stands up to dozens of trips. The simplest option with a fiberboard finish will cost from 60 (30) thousand. The swing version, trimmed with clapboard, is already at a decent 80-90 (40-80) thousand.
Add. expenses
Keep in mind that there will be additional expenses. Below are some of the possible cost items:- Timber, 10 units 100X100 mm - 2600 rubles;
- 12 units boards, 50 × 100 mm - 1600 rubles;
- 8 cubes of mineral wool - 9600 rubles;
- self-tapping screws, staples for a stapler - 700 rubles;
- vapor barrier rolls - from 800 rubles. per roll;
- polyethylene sheets - 200-500 rubles. / meter;
- Fiberboard - up to 1200 rubles.
Any owner of his own house or cottage will agree that it is impossible to do without a place to store tools, fertilizers, hoses, and so on on the site. Moreover, not all Construction Materials can be left on the street and they also need a “roof”. In any case, you can’t do without a change house. The topic of this article was a do-it-yourself change house. Types of buildings, stages of creation, choice of materials, all this you will find in this material.
Types of cabins:
Homemade cabins. Perfect for summer cottages, storage of garden tools and similar purposes. The main plus is the cheapness of construction;
Frame cabins. These mainly include buildings made of sandwich panels;
Timber and log cabins. Perfectly fit into your suburban area;
Panel houses. Built for temporary use. For example, during the construction of the main house and for workers. After that, they are quickly dismantled for formwork or firewood.
Do-it-yourself change house from OSB
This is one of the cheapest and most common types of change houses that are built on their own. To begin with, let's decide on the list of materials and tools necessary for the construction:
- For grounds we need crushed stone, rebar, cement, sand;
- Walls will be erected from timber, lining and OSB boards;
- Roof will also contain elements from the beam. Roofing material at the request of the owner.
Stages of building a change house
The first step is to prepare a place for foundation cabins. Choose the right place so that after the construction is completed you will not regret it. Usually people choose one of the corners of the site, since in this arrangement the change house interferes least of all.

Do-it-yourself change house step by step instructions. A photo
After choosing a place, it is necessary to clear the site and level it. After marking inside the area for the foundation, it is necessary to remove the soil with a thickness of about 15 cm - this is necessary to better link the building with the ground. Next comes the multi-layer pillow» under the foundation of the change house - a layer of sand, then a layer of rubble. After exposed wooden formwork, the size of which is calculated based on the future height of the floor of the building.
Next step - pouring. The concrete is poured into the formwork evenly and, until it is dry, foundation bolts must be installed in it around the entire perimeter. Without this preparation, installing the walls will be a big headache. As a result, you should get a base similar to what is shown in the photo.

Let's move on to building walls. Remember foundation bolts? Now they are coming to the fore. 4 medium-sized beams are installed along the perimeter of the foundation. Now you can start installing the vertical bar.

Do-it-yourself change house step by step instructions. A photo
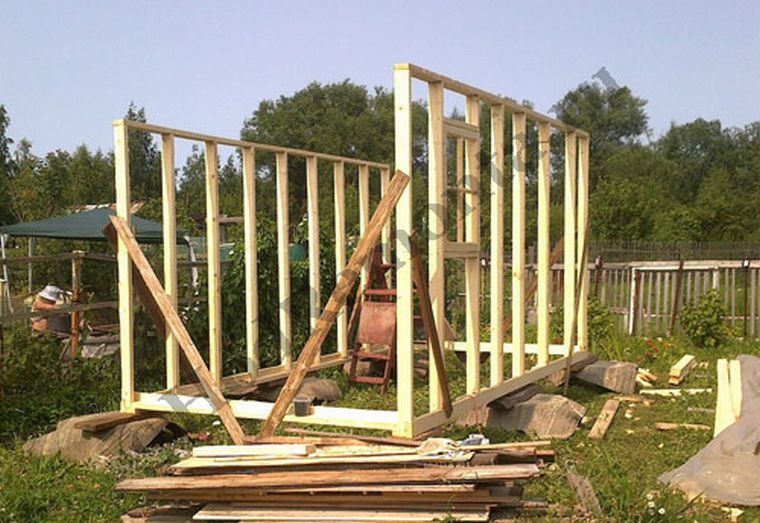
First of all, they are exposed in the corners supports, according to the level. All bars are connected by a transverse bar on top of the walls. For stability during construction, support beams are installed, which can either be hammered into the ground, or they can be supported in the form of a wedge, as shown in the photo. By exposing one wall, you will complete the change house faster, since you already have practice.


Strictly observe the level, since one incorrectly installed beam will lead to a further error. This in turn will affect the installation of the roof.

How to build a shed. Instruction with photo
For a change house from OSB boards gable roof. First of all, beacons for rafters are installed on both sides of the change house, as shown in the photo. Between themselves, they will be connected by a transverse beam, which can be fixed with clamps.

Do-it-yourself country house. A photo


rafters it is best to fasten with special corners and screws. But if the building is very small, you can use nails. It all depends on the size.

Construction of the roof of the change house. A photo


Now you have a complete frame future house. It remains to tell about the cladding and roofing.

sheathing
Here we come to main feature this type of change house is a sheathing OSB boards. This material is suitable for sheathing both walls and roofs. The door can also be built from OSB boards. The basis for it can be a frame made of beams that were used in the construction of the change house.

How to build a shed. Wall cladding. A photo


The penultimate stage is roof cladding. Here you can use any materials convenient for you, whether it be metal tiles, slate, or just the same OSB boards. In the latter case, they will have to be painted and treated with an antiseptic so that the material does not deteriorate.


The last step is painting building. Here everything is at your discretion - you can cover it with ordinary paint and an antiseptic, you can line it with clapboard, siding and anything.


Ready change house with your own hands. A photo

Do-it-yourself change house with a pitched roof
Let's move on to the instructions for the shed roof change house. In some cases, when a gable roof is inappropriate (for example, in winter with an abundance of snow), this option is suitable. The difference is not only in the roof, but also in the foundation.
Training
To begin with, as usual, a place for construction is selected. After preparation is carried out - garbage is removed, the site is leveled. The soil layer will not have to be removed, because the foundation will stand above the ground. The site is also covered over the entire area with sand mixed with rubble. Next laid out concrete blocks along the perimeter of the future base. Do not forget about the outflow of water. Around the change house, it is necessary to make a slope in opposite directions by one meter with a difference of only a couple of centimeters.

Do-it-yourself frame change house. A photo
Installed concrete blocks are covered with several layers roofing felt. With the help of a bar and the usual level, the perimeter of the future change house is ringed. The beam must be no thinner than 100 mm, otherwise the base can be considered not very reliable. The advantages of such a foundation for construction are as follows:
- The change house is not tied to one place. It can be moved or completely transported to another place;
- Guaranteed dryness, which is one of the most important aspects in working with wood. If you additionally process the timber, then the change house will serve you for many years.

Do-it-yourself country house step by step photos

Walls
Construction begins with the installation of corner pillars, which are attached at the base with reinforced corners. All racks are tied with horizontal beams around the perimeter and opposite each other. Since we should get a change house with a shed roof, one wall should be about 50 cm higher than the opposite one.

Do-it-yourself country change house step by step photos

Roof
Next step - rafters. They are installed on the roof in increments of approximately 60 cm. Do not forget about the visors on both sides of the change house - make the rafters a little longer than they should be. It is best to fasten with the help of special plates, corners and self-tapping screws, as was the case with the previous change house. The roof can be absolutely from any material.

How to build a change house with your own hands. A photo


Let's take a closer look at creating gender. It is necessary to do it in two layers - a draft and a finishing floor. The first layer of boards is attached directly to the transverse bars of the base. Next, the floor is covered with plastic wrap, after which insulation is placed. Already on top, a finishing floor is laid from a processed board or OSB sheets.


How to build a change house with your own hands. A photo


Thus, we made a change house with a shed roof with our own hands, which can be moved and transported.


Change house from sandwich panels
A more expensive and more practical type of building is a change house made of sandwich panels. Insulated options are used not only for storing tools, but also as temporary housing. This material is gaining more and more popularity. Not only temporary living quarters are being built from it, but also full-fledged houses with summer cottages.
Foundation
Usually, such change houses are sold ready-made in disassembled form and instructions for assembly and installation are attached to them. But in any case, it needs a foundation. As in the previous two cases, you can make either a flood foundation or on concrete blocks. Now consider the third option with piles. To do this, four piles are driven along the perimeter of the future building and poured with concrete. Formwork for the future foundation is installed on top of them and a second pour is made, the third layer is poured already with reinforcement lashing. This option is good for a permanent stationary change house. If you plan to constantly disassemble and rearrange it, then it is better to look at the foundation option from point 2.
The walls of the change house and the roof of the change house consist entirely of sandwich panels. List of benefits:
- Excellent sound insulation;
- Preservation of heat for a long time;
- Durability and practicality in use.

The only disadvantage is high cost such a building. So, if you need a change house only for storing inventory, it is better to look at the previous options. A change house made of sandwich panels is perfect for those who are just starting to build their own house from scratch - you can spend the night in it and hide the tool.
Second step - frame for installation of sandwich panels. Strictly according to the manual attached to the purchased change house. Observe the level of all elements - otherwise the assembly will not go according to plan and you will not be able to complete the construction. Do not forget to reinforce the walls with transverse stiffeners, taking into account future windows and doorways. Taking it seriously installation work take 2-3 hours if available necessary tools under the arms. AND roof change houses, and the walls of the change house are assembled from metal and aluminum parts, as well as from corners and bolts for connection. This approach allows you to quickly disassemble and fold the change house for storage or prepare for transportation, which once again confirms its practicality and versatility.

The sheathing of the construction of the change house begins with the floor, then the walls are sheathed and, last of all, the ceiling. A ready-made change house made of bare sandwich panels is only suitable for summer living. In any case, she will have to insulate. The last stage is the installation of windows, doors, conducting electricity and so on.
change house container
Making a do-it-yourself container change house is also not difficult. Buying such a premise ready-made is a very expensive pleasure. In addition, there will be problems with delivery and unloading, because such a change house is not collapsible. The difference from other types of change houses is that the container is sheathed on the outside with metal, and not with panels or ordinary wood. Let's take a look at the construction steps.

Training
As with any construction, here, again, a flat area and preparation in the form of foundation. Once again, it is not necessary to describe the methods of building the foundation - they can be found above.
After that, it is built base around the perimeter of a metal corner or channel. Four corner beams are welded in a vertical position at a right angle and then tied with horizontal jumpers from above. Thus, we have an uncomplicated "box". Now you can plan the location of doors and windows. Their openings are also welded from metal. Container change houses are also called a frame made of timber. However, it was from the metal buildings that the name came.

sheathing
The principle is the same as with sandwich panels, only the change house gets off professional sheet or any other metal. Inside, the walls are insulated (if the change house is intended for living) and sheathed with chipboard, fiberboard or any other material. Chipboard or fiberboard sheets look more attractive in terms of construction speed.

Verdict on change houses containers
It is possible to build a container change house with your own hands, but it is not always justified. Firstly, construction will take much longer than a building made of sandwich panels or a panel house. Only the construction of the foundation with the frame will take a couple of days, not to mention the sheathing. It is best to buy such buildings ready-made. The pluses include good heat preservation inside the room, because of which it will good option for temporary housing.

Log cabins
Too expensive and beautiful - this is how this material can be characterized. A log structure will last you a very long time if you take good care of the protection of the tree. To do this, it is necessary to cover the entire area of \u200b\u200bthe walls of the change house with an antiseptic, and then paint it in the color you like or varnish it. These measures will help prevent the rapid blackening of the logs.
The basis of such a change house lies bars or strip foundation, optional. Rarely, concrete bases are poured for log buildings.
This change house will not only be useful and practical on your site, but will also perfectly complement the appearance of a private house or garden plot. It makes no sense to build such beauty for temporary or construction needs.
Examples of do-it-yourself cabin projects
Consider several different change houses that you can build yourself and in the shortest possible time:
First option - classic frame change house with a pitched roof. One small access window daylight and a door. The outer skin is lining coated with an antiseptic for durability. The roof is covered with an ordinary profiled sheet. The foundation is not flooded - the change house stands on bars or concrete blocks.

Change house with a porch- a more exotic option. It makes sense to put such a building on permanent use. A spacious room with two windows, a small vestibule and two doors to a small porch with a canopy that will protect from rain.


Third project- a similar option. It is worth noting the main difference - here the roof is gable, unlike the previous change house. A similar porch and two doors with windows. Sheathing of the building - lining. The base is made of timber.

More expensive home option. Material - conifer tree. On either side of the door are two large windows. Total area - 13 square meters into three small rooms inside. The base is made of timber. The roof is shed.
Shed project. Blueprints
Utility room with porch and balusters. Heated variant. The walls provide protection from wind and moisture, so the change house can be used as a living space. The porch has a small side with balusters. With the right finish from lining or wood imitation, this building will perfectly decorate your garden plot.
Shed project. Blueprints
Big change house, built according to the frame principle of timber. Lining is chosen as lining, corners are marked with platbands. gable roof covered with metal tiles. The change house stands on a base of concrete blocks, which reliably protects it from wet ground and the rainy season.

Small barn house. Includes one room, one window and a door. The roof is shed. The bars are the basis. Lining from lining. Perfect for small areas. For temporary residence due to the small area is unlikely to fit.

something in between between the previous option and a change house with a porch. In this case, you only get a canopy over the door. The structure, also, with one window and common room. The roof is shed, the foundation is tape. A budget option roofs - two-layer roofing material.
Shed project. Blueprints
Large insulated house. The walls are made of OSB boards, as is the floor. Sheathing of the outer side - lining. The roof is shed, covered with ruberoid.
And these are just a few examples of how you can make a change house with your own hands. In this case, you are not limited by the quality of the material, area, height and design, which is specified in the standard models by the manufacturer.
Outcome
Let's define the main rules for building a change house on your site:
- Choose your location carefully. You probably won't want to rearrange the structure. And if the change house is transportable, then make sure that in the future the crane will easily get access to it and be able to take it away;
- Responsibly treat the preparation of the base and the foundation, especially if you are going to use wood and other natural materials in your work. Also take care of the processing of these materials;
- If you are building a change house for permanent use, decide on the type of roof so that you are not covered with snow in winter;
- For residential change houses, it is best to use a frame type of building made of sandwich panels or OB slabs, which will be insulated inside.
The variability of building a change house with your own hands is simply huge. You can build a similar hozblok from almost any material. The main thing is to know the order of construction stages, technology and some nuances that are worth remembering. But, after reading this material, you are completely ready to build a change house with your own hands.
Many novice summer residents often ask themselves: what is the best thing to do, buy a ready-made change house or make it yourself? As practice shows, finished products often turn out to be of poor quality and short-lived. Therefore, we definitely recommend self-construction. You can learn about all its nuances and subtleties from this article.
Why do you need a home?
Before proceeding with the design and construction of a change house, it is necessary to decide on its purpose, because its dimensions, layout and other points largely depend on this. As a rule, the change house performs the following functions:
- residential premises - the building can be used as housing for the period of construction of the main house. Subsequently, it will not be difficult to re-equip it for other household needs, in addition, the change house can serve as an additional summer house, for example, for meeting guests;
- economic - in the room you can store summer equipment, work clothes, etc .;
- sanitary and hygienic - a change house can be equipped with a bathroom, for example, here you can perform an outdoor shower and install a dry closet.
If desired, a country change house can be equipped with a bathhouse or other functions. The main thing is to think carefully about all your needs and wishes in advance, so that later you don’t have to do alterations, as is often the case.
Design - we create a change house on paper
Having decided on the requirements for the change house, you need to create a plan on paper and indicate the dimensions of the structure. Most often, the building is a trailer 2–3 m by 5–6 m. Of course, it is not at all necessary to make it elongated. The main thing is that the shapes and sizes allow you to implement all the intended functions.
In order not to puzzle over the layout, you can take ready-made drawings as a basis. Adjust the dimensions if necessary. The only thing, we note that it makes no sense to make a building too large, since it will no longer be a change house, but a capital building with completely different construction costs. As a rule, a building measuring 6x3 m is quite enough for all household needs.
Next, you need to decide on the design and materials. Since the change house is an inexpensive and lightweight structure, which, if necessary, can even be moved from one place to another, we recommend making it out of wood. Next, consider two construction technologies using this natural material:
- frame - this is the cheapest, fastest and easiest way to build, however, keep in mind that the strength and durability of frame change houses is not their strongest point;
- from a bar in the form of a log house - like log houses, such change houses are strong and durable, but more expensive than frame counterparts.
The basis of the frame structure, as you might guess, is a frame made of timber. It consists of racks located in increments of 600 mm, and connected to each other by the lower and upper strapping (horizontally arranged boards or timber). To strengthen the racks, braces and horizontal lintels are additionally used. The frame space is filled with insulation and sheathed.

The distance of 600 mm between the racks is indicated for a reason - it is for this step that heat-insulating boards, as well as OSB, are designed. If desired, the step can be changed, but in this case you will have to cut the insulation and sheathing.
Before you start building a frame change house, draw up a diagram of the walls and floors, indicating the dimensions of all the details. This will allow you to calculate the amount of lumber and make an estimate. More details about the materials that will be used in construction, we will talk below.
Calculating lumber for a bar change house is even easier: to find out the number of crowns, simply divide the height of the wall by the height of the bar section. The length of each crown is already indicated on the plan. Therefore, an additional project can not even be done.
Foundation - even a change house needs a good foundation
If you install a change house for a month or two, then it is not necessary to build a foundation for it. It will be enough to add crushed stone, aligned in a horizontal position. To protect the bottom of the building from moisture, several bars or bricks / blocks should be laid on the bedding.
If the change house will be used as a permanent structure, you can’t do without a foundation. Of course, in our case, there is no need to carry out a massive tape structure. It is more expedient to make a lightweight base in the form of separate columns interconnected by beams (grillage). Construction begins with the preparation of the site: we get rid of the vegetation layer of soil, after which we mark the site according to the design dimensions of the building.

Then it is necessary to prepare holes for posts with a depth of about 40 cm, located at a distance of one and a half meters from each other along the length and width of the building. Cover the bottom of the holes with a layer of sand and gravel 150–200 mm thick. Be sure to compact the bedding well and align it horizontally. Then build columns of blocks or bricks 30-40 cm high above the soil level. Treat the surface of the posts with bitumen, then cover with several layers of roofing material.
Next, you need to lay the beams (bar 150x150 mm) around the perimeter column foundation. To fasten the beam to the posts, use special fasteners, the so-called studs. When laying the grillage, make sure that the beams are horizontal. If necessary, you can align the position of the beams by laying bars or boards under them, but in general, try to ensure a horizontal plane even at the stage of erecting the posts.
Between themselves, the beam can be connected "in half a tree" - in this case, even grooves are made at the junction of the beams with a depth of half a beam. The grooves must be reciprocal, i.e. in one beam, the groove is cut from above, and in the second, respectively, from below. Additionally, joints can be strengthened with self-tapping screws and steel corners. In the same way, floor beams are laid and cut into the extreme bars.
We build a change house quickly and cheaply - the nuances of frame technology
To build a frame change house, you will need the following materials:
- timber 100x100 mm;
- boards 35x100 mm;
- mineral mats with a thickness of 100 mm and a density of 25–35 kg / m 3;
- vapor barrier;
- wind and moisture insulation;
- finishing material - lining, block house, etc.
We begin the construction of walls with the installation of corner posts, which are made of timber 100x100 mm. To fix them, use the corners and screws, strengthen them with braces. After making sure that all the racks are vertical, connect them with an upper harness, which use a 35x100 mm board.
If the roof of the change house is single-pitched, do not forget to make one long wall 30-40 centimeters higher than the other.
Then you can install intermediate racks made of boards. They are attached to the upper and lower trim with metal corners. To give the structure rigidity, fix horizontal jumpers between them in a checkerboard pattern. In addition, install horizontal strips from the same boards above and below the openings.
If the roof of the structure is gable, lay the floor beams on the frame of the walls. Since the beams will carry practically no load, the same boards of 30-100 mm can be used. Install them with an edge on the harness and secure in this position with the help of corners. The step of the boards can be made about 40 cm.

After that, you can proceed to the insulation and sheathing of the frame. It is better to start from the roof, but we will consider this stage separately, and now we will insulate the floor and walls. Thermal insulation of the floor begins with laying the rough flooring on the floor beams. Since it will not perform a supporting function, any boards can be used for these purposes. Waterproofing is laid on top of the rough flooring, and then floor logs are installed. Do not forget to align the logs in a horizontal plane.
All roll materials, i.e. vapor barrier, wind protection and waterproofing, are mounted with an overlap of 15-20 centimeters. Moreover, it is desirable to glue the joints of the canvases with butyl rubber double-sided sealing tape, which will ensure complete tightness of the joints.
Next, the lag space must be filled with heat-insulating material, for this you can use both mineral wool and any other insulation. The surface of the log and thermal insulation must be protected from moisture with another layer of waterproofing film. Then you can install the boardwalk.
The ceiling ceiling is insulated in approximately the same way - the space between the floor beams or rafters is filled with insulation (if the roof is shed). To fix the plates, you can zigzag a wire or a nylon cord between the beams. Then, from below, a vapor barrier film is attached to the floor beams with a stapler. On top of the vapor barrier, a crate is made of a 20x30 mm lath, to which a lining or other finishing material is attached.
If the thickness of the rafters is not enough to fix the insulation between them, build them up with a bar or boards.
One of the most important points is wall insulation. Not only the comfort of staying indoors and the energy efficiency of the building depend on it, but also the durability of the entire structure. We start thermal insulation with the installation of a vapor barrier film, which is attached to the frame from the inside of the walls. Previously, it is desirable to stick a sealing tape on the racks so that later there is no depressurization of the circuit in the areas where the film is attached to the frame. The vapor barrier is fixed using a stapler - the staples are driven in increments of 100-150 mm.
Then the frame space must be filled with mineral mats. In the process of insulation, observe one main rule - there should be no gaps anywhere in the walls. If cracks have formed, they need to be filled with scraps of mineral wool, otherwise cold bridges will form. Upon completion of the thermal insulation of the frame, fix the moisture-wind protection on the outside. The membrane is mounted according to the scheme described above.

A crate is attached to the frame over the windscreen. As a rule, the rails are arranged vertically. To fasten the crate, use self-tapping screws, screwing them in 25 mm increments. Then the wall cladding is done outside the OSB. The plates are also attached to the crate with self-tapping screws. In order not to cut the skin in advance, door and window openings can be cut with an electric jigsaw in place, i.e. after installation of plates. Keep in mind that 5 mm thick expansion joints must be provided between the plates. Be sure to fill these seams with building sealant or mounting foam.
Next, you need to finish with clapboard, corrugated board, siding or any other facade coating. Install doors and windows immediately. On the inside, a crate is attached to the frame in the same way as on the outside, after which the walls are sheathed with clapboard or even drywall.
As necessary, you can complete the frame structure, expanding its area, or even build another change house nearby and connect it to the first one. In this case, you get a whole house of change houses, which can be used for any of your needs.
We make a Russian folk change house-log house
If you want to make not a temporary structure, but a change house "for centuries", then it is better to build it from a log or timber in the form of a log house. For this we need the following materials:
- timber 150x100;
- wooden dowels;
- interventional heater.
Lay the first crown of the house on the grillage. Be sure to align the beam with the grillage, and also make sure that the corners are 90 degrees. Connect the beam to each other "in half a tree" according to the scheme described above. Immediately lay the first crown of partitions, and in the same way cut it into the first crown of the outer walls. Then, on the first crown, fix the interventional insulation with a stapler.

Lay the second crown in the same way. To connect both crowns to the grillage, drill vertical holes according to the diameter of the dowels. To do this, use an electric drill and a special long drill. The holes should reach the middle of the lower beam and be located in the walls in increments of one and a half to two meters. Carefully hammer the dowels into the holes obtained.
Then two more crowns are laid and in the same way they are connected by dowels to the lower pair of crowns. The only thing is that the pins are installed with an offset, i.e. in a checkerboard pattern, as shown in the diagram above. According to this principle, the walls, together with the interior partitions, "rise" to the design height.
The result is a box without windows and doors. Therefore, you need to mark the door and window openings on the walls, and then cut them out with a chainsaw. First, to the left and right of the opening, temporarily fasten all the bars with boards. After making the openings, immediately install window frames made of boards. They will fasten the trimmed bars of the crowns together, preventing them from crumbling.

I must say that it is possible to make openings in the process of building walls. In this case, the bars are fastened to the left and right of the openings with dowels. You can use any option you like.
As for the floor and ceiling, all work is carried out in the same way as during the construction of a frame change house, so we will not repeat it.
If you decide to finish the change house, please note that you can start this operation no earlier than one and a half to two years after the completion of construction, i.e. after the structure has collapsed. The exception is change houses made of profiled glued laminated timber, which practically do not shrink.
Installation of the roof, or how many slopes do you need for complete happiness?
The type of roof construction depends on the purpose of the change house. If it is to be used in summer time, better - it is easier to perform and cheaper. For its construction you will need the following materials:
- timber 50x150 mm;
- super-diffuse moisture-proof membrane;
- slats 20x30 mm;
- boards 100x20;
- roofing material.

Step-by-step instructions for installing a shed roof looks like this:
- 1. Rafters are laid on long walls that have different heights. You need to put them vertically, i.e. to the edge. To fix the rafters in the Mauerlat (the upper crown of the walls or trim), you can make grooves. Additionally, use corners and screws. Since a shed roof will carry a large snow load, do not make the distance between the rafters more than 40–50 mm.
- 2. Fasten the moisture-proof membrane over the rafters, and then fasten the counter-lattice - slats 20–30 mm. The counter-lattice should be parallel to the rafters.
- 3. Next, boards are mounted on the counter-lattice perpendicular to the rafters. The step of the lathing depends on the type of roofing material, but in any case, the distance between the boards should not exceed 15-20 cm.
- 4. Now we lay the roofing. Since the roof will be flat, overlap the sheets more, for example, when installing slate or tiles, it should be not one wave, but two.
If you plan to use the change house not only in the warm season, but also in winter, do it better. It is based on roof trusses, i.e. isosceles triangles formed rafter legs. From above, i.e. at the top of the triangles, a ridge run is mounted - this is a beam that connects all the roof trusses to each other. In addition, each roof truss strengthen with puffs - horizontal jumpers connecting two rafter legs between themselves.
Waterproofing and laying of roofing material is carried out according to the instructions for a pitched roof. The only thing is that if the change house is winter, it is advisable to insulate not only the ceiling ceilings, but also the roof itself. This operation is carried out according to the same principle as.
So we built a change house with our own hands, now it remains only to conduct communications to it. As you can see, there is nothing super complicated in this work. And it’s not for nothing that the popular proverb says: they don’t mold holy pots.