The location of the bath on the site according to the law. Small bathhouses for summer cottages - some interesting projects for self-construction How to quickly make a bathhouse in the country
- This is a difficult, but quite feasible undertaking. First of all, the owner must choose the right material for the construction of the bath.

Choosing a place to build a bath
Start by choosing a suitable location for the building. The following recommendations will help you with this:

Before starting any construction activities, prepare a bath project.

Determine the optimal size of the structure. One vacationer should account for at least 5 m2 of the total building area. For example, if you are building a bathhouse for 4 people, its area must be at least 20 m2.

The standard bath consists of a steam room, washing department, dressing room and rest room. Set the dimensions and features of the spatial placement of the listed premises that are convenient for you.

Prepare the following drawings:

You can make all these drawings yourself or find in open source. In general, the projects of log baths remain almost the same. If you have the desire and sufficient budget, order the preparation of drawings by a professional.

Materials for building a bath
To build a bath from a bar, you will need a whole set of different materials and devices, namely:
- beam. Traditionally, a material with a section of 150x150 mm is used;

- floor boards. The best option is a four-meter edged board 15x5 cm;

- ceiling boards. Usually used lining with a width of 10 cm and a thickness of 2 cm;

- materials for interior decoration. Lining is perfect;

- vapor barrier material. The best option is modern vapor barrier films;

- waterproofing material. If possible, use penofol. Polyethylene film is also suitable;

- ceiling heater. Mineral wool materials are well suited;

- sheet asbestos. It helps you isolate wooden elements buildings from high temperatures. Insulation sheets must be fixed to the walls near sauna stove. Also, wooden elements installed in close proximity to the chimney need insulation;

- bulk materials for arrangement. The set is standard: cement, sand and gravel;

- material for finishing the roof. Focus on your preferences. The main thing is that the roof of the bath looks good surrounded by the roofs of other buildings on the site;


- insulation for interventional space. Use jute. Tow and moss are also suitable.

It is best to start building a bath in the spring, because. after the completion of the main activities, the wood will need to be left for a six-month "wintering". During this time, the material will dry and give the required shrinkage.
Buy cement immediately before construction begins.
Bath construction guide
The work is carried out in stages - from preparing the construction site to equipping the bath with various accessories.
First stage - Site preparation
Clear the building site different kind debris, shrubs, large roots and, in general, everything that can interfere with the construction of the foundation.


The second stage - Pouring the foundation


Attach the batten boards to the rafters. Lay hydro, heat and vapor barrier materials, the insulation of the bath is one of the most important elements of its construction, the quality of the built bath will directly depend on this. Install your chosen roof finish.
Prices for various types of timber
Fourth stage - Interior fittings
Start by arranging the necessary communications.

You should take care of the installation even at the stage of creating the foundation. To do this, create a pit outside the bathhouse either drainage well, connected to the bath by a pipe laid with a slope.

After completing the arrangement of the sewer, make the floor. It can be concrete or wood. Concrete floors are usually tiled. This coating is more durable.
The wooden floor is traditionally made leaky. The technology is extremely simple: logs are installed, floor boards are nailed to them with some clearance. You can also create a small hatch for drains and close it with a perforated grate. Gender in this case should be done with some bias. As a result, moisture from the floor will enter the hatch, and from there it will be discharged through a pipe into a drainage well or pit.


In order for the wood to last as long as possible, carefully ventilate the bath after each visit.
Insulate the ceiling and walls of the building using suitable moisture, heat and vapor barrier materials. Install doors and windows. Connect plumbing and electricity to the bath. Install the necessary electrical appliances.


Prices for thermal insulation materials
Thermal insulation materials
Fifth stage - Furnace and shelves
Choose the design of the shelves at your discretion. They are built in the same order: first, a support frame is mounted from a strong beam, after which boards are nailed to the supports.
The oven is also up to you. You can lay out a traditional one, install a convenient metal unit or a modern electric heater.

Heavy furnaces require the mandatory arrangement of an individual foundation. At this point, everything is also determined in a separate order, taking into account the characteristics of a particular furnace.
Prices for various types of stones for furnaces
Stones for stoves
Step Six - Optional Accessories


In conclusion, you will only have to supplement your country bath with various kinds of accessories, namely:
- brooms;
- wooden mug for adding water;
- buckets;
- various kinds of wooden gratings, etc.
The internal arrangement of the additional premises of the bath is at your discretion.

Successful work!
Prices for bath and sauna accessories
Bath and sauna accessories
Video - Do-it-yourself bathhouse in the country
It is not necessary to talk about the benefits of visiting a bath for a person. Everyone knows how a Russian banya has a beneficial effect on the body. In addition to this, it is also great way relax after a hard day's work with a cup of herbal tea. Well, what owner of a private house or cottage does not dream of his own bathhouse.
Of course, buying a ready-made bathhouse for a summer residence or hiring workers for construction is not cheap, but any owner, with the availability of opportunities and materials, will turn out no worse than professionals. With basic skills in working with construction tools you can build a bath yourself.

In order to answer the question how to build a bath? First you need to understand some of the nuances:
- First, you need to draw up the right project for the construction of a bath.
- Secondly, to study the literature describing the stages of construction and individual moments.
- Thirdly, to acquire the material necessary for construction.
- Fourth, build a bath building and think about the necessary communications - plumbing, lighting.
- Fifth, decorate the walls inside the room and buy or make special furniture for the bath.

How to choose a place to build?
Country and garden plots, as a rule, are small in size, and in addition to your own desires and preferences, you must be guided by existing standards and safety requirements.


Use these tips when choosing a place for a bath:
- It is better to build a bath on an elevated place. This will greatly simplify the issue of draining water.
- If it is possible to build a bathhouse near a river or pond, then this will be great option.
- In order to control the process of heating the bath, it is necessary to build it so that the entrance to it is visible from the garden or private house.
- The bath building can be attached to the main building on the site.

In addition, there are rules that must be observed during construction in order to avoid problems in the future. This issue can be studied in more detail in SNiP 30-02-97, paying attention to paragraphs 6, 7, 8 of the sixth section.

The choice of building materials for the bath
The choice of materials for construction is currently very large. Let's consider some:

Frame bath - this type of construction copes with its purpose perfectly. In addition, its cost is quite affordable. Due to the light weight of the structure, the construction of the foundation will also be budgetary.

Wood is a favorite material for the supporting structures of baths. Its cost is more expensive than the previous option, but you can save on insulation, since, unlike a frame structure, a wooden one does not need it.

Brick is not often bought specifically for a bath. For a brick bath, you need a very reliable foundation, and this, in turn, additional costs and money, time, and effort.

A wood concrete bath is durable and retains heat well. Its cost, however, is quite affordable. The building can be both monolithic and block.


Ceiling materials
This issue should be given increased attention, especially in the area of \u200b\u200bthe furnace and chimney. For a rest room and for a washing room, materials with low thermal conductivity can be used, and for a steam room, heat preservation is very important.

It is not recommended to use materials with lacquer coating for the bath, as they can release poisons when heated. In the area of \u200b\u200bthe furnace and chimney, it is necessary to make a ceiling of non-combustible material - asbestos or metal.

Room decoration
Since we are talking about a bath for garden plot, then we will not pay attention to expensive and chic materials. Let's talk about the most simple and affordable.

If you look at the photo of the bath inside, you can see that the best option for its design is a tree, for example, a lining. The lining has properties and qualities that are ideal for a bath, and, in addition, gives it an aesthetic appearance.

Building size
Having studied the photo of the bathhouse in the country, we can conclude that the optimal size of the building is 6x6 meters. In such a room, a veranda, a relaxation room, a shower room, a steam room, and even a bathroom will fit.


If the possibilities of the land plot do not allow such a scope, then build a mini-bath 3x3 meters in size with a steam room and a relaxation room. The benefits and pleasure of visiting the bath are unequivocal, regardless of its size.


Photo bath in the country


The steam room is the central part of the bath, since the quality of bath procedures, the formation of steam, as well as the safety of visitors depend on it. That is why during the construction of a bath, a lot of attention is paid to the steam room project and the owners often do not hire builders, but do everything with their own hands.
Steam room in the bath - a common device
The device of the steam room should be quite simple, but at the same time convenient and comfortable for people who will bathe in it. The main thing is that it should contain required amount shelves and racks.
The stove is the main element of the steam room, since it is it that is designed to provide the necessary temperature and microclimate in the room. To date, any type of stove can be installed in the steam room: brick, stone, metal or electric.
Stove-heater in the steam room
Shelves in the steam room are traditionally made of wooden planks leaving small gaps for the free flow of water. The wood from which the shelves are installed must be non-coniferous. Usually the shelves are attached to the walls of the room so that there is as much free space as possible and it can be easily removed after visiting the steam room. Under them are various bath accessories: buckets, ladles, brooms, etc. The distance from the floor to the shelves should be as high as possible, since the coldest air is located exactly below. From the ceiling to the top shelf should be a little more than 1 meter. They can also be folding or retractable.

Two-tier shelves in the steam room
The steam room should have optimal dimensions so that it can warm up to the required temperature. Experts recommend designing a room area of 2x2.5 meters (height 2.1 meters). This is a convenient and economical steam room device.
The walls of the room must be insulated with a special material that can retain heat for a long time and not release it into the air. harmful substances. The floor in the steam room is usually arranged from wooden boards or tiles are laid, which can be easily and quickly washed.
The door to the steam room should be as small as possible, as it is an additional source of heat loss. The best option door devices are considered near the stove. It should open and close very easily, and also not have any constipation, as it can jam due to high humidity in the room. Windows in the steam room are not provided, but if they need to be installed, then they must be very small and deaf. It is recommended to place them as close to the ceiling as possible, where the air is least hot.

Wooden door to the sauna
The ventilation system is required so that it removes excess moisture from the room and provides fresh air. Traditionally, this is used supply and exhaust system. Openings for air intake are located near the stove, and the hood is opposite.

Ventilation duct in the steam room
Since there are no windows in the room, lighting fixtures cannot be dispensed with. Luminaires should be made specifically for wet rooms where there is a temperature difference. It should be noted that in Finnish sauna there is no artificial lighting, as it is created by smoldering coals in the furnace.

Steam room lighting system
Preparatory work: determining the optimal size of the room
The steam room project must be developed even before the construction of the bath begins, since its dimensions may depend on a large number factors.
When designing, indicators such as:

Steam oven types

Material selection
A bath, including a steam room, can be built of brick, natural stone, gas or foam blocks, but the best "bath" material is considered good tree. Usually, planed and rounded logs or timber are taken for a steam room. Glued laminated timber, which has the maximum degree of resistance to moisture, is excellent. But it is the most expensive of all materials.
The most accessible and convenient in laying, as well as resistant to various kinds of deformations, is profiled timber.
The steam room is best built from larch, aspen, birch, linden, as these species do not emit resins. But if, nevertheless, you decide to choose a pine tree, then it is best to build only walls from it, and interior decoration produced from non-coniferous wood.
Calculation of the amount of material and the necessary tools
To build a bath (steam room) we need:
- Beam 15x15 for the construction of walls. For two or three lower crowns, we take larch, and for the upper ones, pine timber.
- Bar 15x10 for the construction of partitions.
- Concrete solution.
- Sand, gravel, clay.
- Armature for the device of the base.
- Second-rate formwork boards.
- Waterproofing materials (roofing material).
- Flat stones.
- Refractory brick.
- Insulation (jute or tow).
- Aspen, linden or alder lining (recommended 12 mm thick for wall cladding and 50 mm for ceiling).
- Tile.
- Foil or special foil material for heat and vapor barrier devices.
- Minvata.
- Slate, roofing material and galvanization.
- Antiseptics.
- Fixtures, cables, fan, switches and junction boxes.
Instruments
- Shovels or a small excavator.
- Electric or petrol saw.
- concrete vibrator.
- Axes.
- Electric drill.
- Hammers.
- Electric screwdriver.
- Mallet and caulk.
- Construction stapler.
- Rule and level.
Do-it-yourself steam room - step-by-step instructions for building and finishing
After the project is fully drawn up, you can proceed to the foundation and the construction of walls.
- We lay the foundation. To do this, we need to dig a rectangular pit. The depth should reach ½ of the freezing of the soil. The height above the ground is about 15–20 cm. If there is no plinth, then we raise it by 60 cm. The width of the foundation should be approximately 10 cm greater than the width of the timber. We install the reinforcement on top, on which we will mount the first crown.

Formwork with reinforcement for the construction of a wooden bath
- We make the formwork and fill the foundation with concrete and remove the bubbles with a vibrator.

Pouring concrete into formwork
- Digging under the sink drain hole 1.8x1.8x1.5 m and fill its walls with concrete.

Digging a drain hole under the sink
- Let the foundation stand for about 5-7 days. In the upper part we make holes for ventilation, which are located on opposite walls.

Ventilation channel in the foundation of the bath
- We make a blind area around the entire foundation (1.2–1.5 meters). To do this, we take clay and mix it with rubble. We pour a layer of 5-10 cm.

Blind area around the foundation of clay with rubble
- On top of the perimeter of the concrete foundation, we lay roofing material in several layers. It should extend beyond the base by 5 cm.

Foundation waterproofing with roofing material
- For the construction of walls, we can take factory wall kits. And we can cut the timber ourselves into blanks of the desired length. Then cut the necessary grooves and spikes. In the initial row, we mark in accordance with the installation of the reinforcement and drill holes Ø25mm.

Laying the first crown of the walls of the bath
- We lay the first crown on the pins, connect the bars, and seal the connection points.
- We put the second row, drill holes, which will go to ½ of the height of the first row. We remove the second row and hammer dowels into the holes of the first one in one and a half parts of the height of the timber. Then we fill the next row on them. We connect the crowns with dowels. We warm the grooves with jute. Leave space for doorways. Thus, we build a bath with a steam room up to a certain height.

We build the walls of the bath by driving dowels
- We cut the floor beams into the upper crown, and in them the lower ends of the rafters. We connect the upper ends in the ridge. We take a step between the rafters of about 1–1.2 m, and nail a board for the ridge and a crate to them. From above we lay hydro and vapor barrier, and then slate or other roofing material. We provide for embedded pipes in advance.

Bath roofing
Floor Installation Instructions
The floor is installed immediately. In the steam room, its level should be higher than in other rooms. Consider several ways of laying the floor.
- For the device of a wooden floor on the prepared foundation we put logs from a wooden bar.

Laying the support legs
- We nail boards on them with a step of 5-10 mm. The distance between the floor and the ground should remain at least 50 cm.

For a pouring floor, we fill boards on logs
- In advance, we made holes in the foundation for ventilation.

The device of a wooden floor in the steam room
- Concrete flooring is much stronger and more durable, but it costs much more. In the steam room and washing room, we dig a pit (depth 10–15 cm) for a drain. The walls are fixed with concrete mortar. We put a metal crate on top. From the pit, waste water will drain into the sewer drain pipe.

Installation of a concrete floor with a pit
- After the drain device, we make a screed. First, on the walls, we mark the points to which the floor level will be brought. We mark from them down the distance for pouring the screed.

Floor screed scheme
- Carefully level the ground, removing a little of the upper part.

Ground preparation for flooring
- We pour sand with crushed stone (30–40 cm), pour it with water and tamp it well. We provide a slope towards the drain.

Pillow with reinforcing mesh
- Pour the first layer of concrete mortar 5 cm.

Pouring the first layer of concrete
- After the screed dries, we roll out roofing material or glass isol on it.

We lay the roofing material on the screed
- We lay a heat-insulating thick 50 mm material on the waterproofing.

Laying thermal insulation material on the floor
- We lay rigid metal reinforcement from the mesh.

Laying reinforcing mesh
- Pour the second layer of concrete mortar 10 cm.

Laying the second layer of concrete
- We level the concrete, not forgetting the drain slope.

Align the floor with the rule according to the arrows

Laying tiles in the steam room
Instructions for vapor barrier and ceiling installation
- We attach material for hydrovapor barrier to the floor beams. To do this, you can use foil, a special foil penoizol or a hydrovapor barrier membrane. We mount the material with a stapler and staples 8–12 mm. We lay the sheets with an overlap of 20 cm, and strengthen the joints with adhesive tape. We wrap them on the walls with a ledge of 15 cm.

Vapor barrier of the ceiling in the steam room
- We fasten wooden slats (50x25 mm) to the floor beams in increments of no more than 70 cm. We maintain the level. Before fixing, we treat with an antiseptic solution.
- We fasten the lining to the rails with carnations or kleimers perpendicular to the crate.

We fix the lining to the ceiling
- We cut grooves in the beams and mount fasteners for the chimney device in them.
- On the ceiling we cut an opening for the chimney pipe.

Opening for the chimney in the ceiling of the steam room
- We put insulation between the beams in the attic compartment (it is better to take 150–200 mm).

Laying insulation in the attic of the bath
- From above we lay out the windproof membrane and fix it with staples with a stapler.

we spread the windproof membrane on the insulation
- We carry out laying boards on the floor of the attic.

Laying the floorboard in the attic of the steam room
Wall insulation instructions

Instructions for installing the oven
- We install the selected oven on a flat base. If it is a metal or electric oven, then it is necessary to make a concrete base under it. For masonry brick wall a special foundation is made.

Base for oven installation
- We cover the oven with bricks, passing along the walls adjacent to it and inside the adjoining partition. The gaps are sealed with basalt material. For lining the stove-heater we use refractory bricks.

lining the oven with refractory bricks
- We fix a metal sheet in the opening on the ceiling to create a chimney outlet. In advance, we make an opening for the pipe in the sheet.

We fix a metal sheet with a hole for the chimney to the ceiling
- We install a galvanized or stainless steel pipe and a gate on top of the furnace. We fix the tank and let out a reinforced chimney with two walls through the ceiling. We make insulation with non-combustible materials.

We isolate the pipe from the wooden coating
- We nail an iron sheet on the roof, with a hole made for the pipe.

We nail a metal protective sheet on the roof
Installation of an electric heater

Installing a brick oven

Door Installation Instructions
At the very end, we install the door. It should be very tightly closed so that the heat from the steam room does not come out.
- We assemble a pigtail from a bar (100x150 mm). Under it we adjust exactly the doorway.

Scheme of the pigtail device
- On the end parts of the beam in the opening, we cut out a spike a little smaller than the dimensions of the groove on the pigtail. At the same time, we do not forget that we will lay a sealant (tow or jute) between the box and the beam.

Scheme for cutting a spike for a pigtail
- We install a threshold in the opening, and then the rest of the box details.

Installing the door frame in the bath
- We fix the upper element of the box in such a way that it is a few centimeters below the doorway. This is necessary so that the beam has free play during shrinkage. Caulk between it and the wall all the cracks.

We maintain a gap for shrinkage
- We hang the door and nail the trim with small carnations.

hang doors and fasten platbands
- You can also install the door in the second way. To do this, we cut grooves in the opening. We put the bars in them so that their ends do not touch the top of the opening 5-10 cm. And then we mount the door frame to them.

The second way to mount the box is a pigtail in the groove
Shelf instructions
The number of shelves depends on its size. The standard solution includes three-level shelves, each of which has a height of 35 cm. But two shelves can also be made.

Instructions for the ventilation device
There are several ways to arrange ventilation in the steam room. The choice depends on the dimensions of the room, as well as the convenience for the owners of the bath. The opening should be at a distance of 25 cm from the floor. The air is discharged naturally through the hole on the opposite side.
- We make ventilation ducts in the wall near the stove. The lower one is for air intake, and the upper one is for ventilation. We install a fan in it.
- Oxygen enters through a small hole behind the stove, which is made 20 cm from the floor. The output is carried out through the genital gaps. A channel is created next to the building, which will draw out the exhaust air from under the floorboards.
- We drill a hole 10x10 cm in the floor for the flow of cold air. We install the ventilation duct in the wall opposite the furnace. We make an exhaust opening under the ceiling. A channel with a valve will be led out to the street through a wall hole.
- If there is a firebox with a blower in the room, then it is necessary to make an opening in the floor 10x10 cm and close it with a grate. Air will pass through it and exit the chimney.

Various ventilation schemes in the steam room
- For ventilation ducts, we take stainless steel or galvanized pipes.

Galvanized pipes for ventilation in the steam room
- Having chosen a ventilation system, we make openings of the required diameters in the walls or floor (but not less than 10 cm).

Hole for the device of the ventilation system in the steam room
- Inserting into openings ventilation ducts. We fill the gaps between the wall and the pipe with non-combustible material.

We insert ventilation ducts into the openings
- Outside, we install a protective grille.

Protective grill outside the bath
Instructions for the device of electricity
At the last stage of the steam room, we carry out the installation of electrical wiring.

Video: how to make a steam room in the bath correctly
Building and installing a steam room in a bath is not an easy job, as it requires certain skills to work with various types materials and tools. But if you do everything with high quality and approach the issue responsibly, then you can make an excellent bath with a steam room on your site, which will serve you and your family. long years and will delight with its healing steam.
Independent construction of a sauna on suburban area- this is a procedure that is performed quite simply, subject to the main steps and features construction works. The article will talk about how to build a sauna in the country with your own hands, and also provides the main recommendations of experts for those who want to get a high-quality, reliable and safe structure as a result, where each visitor will take bath procedures with comfort and pleasure.
Sauna at their summer cottage
A standard summer cottage sauna must meet the main condition: maximum closeness with complete tightness of the structure. Such a building should be equipped with the main communications: ventilation system, electrical wiring and water supply.

Linear proportions are selected in such a way that at least 3 cubic meters of space is allocated for each visitor. Only if such proportions are observed, you can get a sauna that will look aesthetically pleasing in the photo and during visual inspection, and will also be comfortable to use.
If the property does not have a building of suitable size, then you can think about such a phenomenon as a sauna in a country house, but again, various risks should be taken into account. The article is directly devoted to the phased construction of a sauna in a summer cottage.
Construction of a sauna in the country
The sauna building can be built using various materials: wood, brick, cinder block, etc. To date, the choice of material is the prerogative of the owner. When choosing a material, you can rely only on how the building will look in the photo and during a visual inspection, as well as on the final estimate of the construction work. There will be no detailed consideration of the construction process, but the main stages will be affected. To begin with, each owner will have to decide what linear dimensions their small sauna in the country will have, unless of course they want to make the building more dimensional.

After finishing the floors of a mini sauna for a summer residence, you can proceed to wall cladding. On the brickwork glassine is first laid, but this condition applies exclusively to the specified material for creating walls. The specified material has waterproofing and vapor barrier effects, and is sold in the form of rolls. Also, glassine can be replaced with bituminous paper. As fasteners for glassine, special slats are used. Laying the material is overlapped with a spade of 10-15 centimeters.

Then, above the walls and under the ceiling, a solid frame of wooden beams with a cross-sectional area of \u200b\u200b5x5 or 4x6 centimeters. You can also use a metal structure, which will naturally be more durable. On the frame under the ceiling, you can lay electrical wiring, mount ventilation and fire extinguishing systems.

When a do-it-yourself mini sauna is built in the country with an additional installation of a security system, the “dry pipe” technology is used. It consists in placing pipes under the walls along the entire perimeter of the sauna. Special corner holes are made in the pipes, directed directly to the center of the room. Also, for localized fire elimination, it is possible not to bring special sockets into the room with the laying of the rest of the system under the frame sheathing.
Also an important element of the fire extinguishing system is the valve on the ventilation system. Its purpose is quite simple. The sources of ignition are usually located inside the baths, saunas, cottages or other buildings, and any knowledgeable person will say that the supply of oxygen supports the combustion process.
When the fire extinguishing system automatically closes the valve, the smoke does not spread outside the room. The ventilation valve is especially important in cases where the sauna is combined with a private house.
Wall insulation
Naturally, for a comfortable stay in the sauna, it is necessary to produce its high-quality insulation. Only in this case, the heat loss of the room will be minimal. The following materials are used as a heater: basalt or mineral wool. They fit into the voids between the frame and the wall. You can also apply a foil layer on top of the frame, which will make a kind of thermos out of the room.

The foil is fixed in such a way that the shiny reflective side is directed into the room. Reflecting thermal energy, this layer does not allow the room to cool down quickly and contributes to its rapid heating. The foil is fixed with buttons, brackets or special adhesive tape. At proper insulation any sauna can be made comfortable for visitors.
Ceiling and wall finishing

After wooden clapboard walls and ceiling of the room are upholstered, it is necessary to install a ventilation valve on top of the place where the stove is installed. In diameter, the valve should be in the range of 10 to 15 centimeters. When fixing the lining on the ceiling, it is necessary to lay the insulation at the very end.

When choosing a lining, it is necessary to study the characteristics of the main varieties of the material:
- linden- has a pinkish tint, pleasant smell and has a beneficial effect on human body. The material has low thermal conductivity, which allows you to achieve warmth and comfort in the room;
- alder- the most practical material with a long history of use. It has a large palette of colors from pale pinkish to pronounced red;
- Abasheva- is made from African wood, resembling polystyrene in structure. The material is pleasant to the touch, and also has a remarkable property: it adapts to the temperature of the body with which it interacts. Thus, it is best to upholster benches with the help of an abash lining to make it pleasant to sit on them;
- pine- inherent in saunas that came from the Scandinavian Peninsula. This material has a characteristic coniferous aroma. The disadvantage of coniferous material is the release of resin when the wood is heated. Hot resin, when interacting with the human body, can lead to burns. With the right combination of different materials, you can achieve an original finish in the sauna.
Installations of benches and other sauna equipment
The correct sauna should have a room height of 1.9 to 2.1 meters. When installing benches, it is necessary to take into account that a person sitting on the upper tier should feel comfortable without resting his head on the ceiling (in more detail: ""). Then the lower strip of benches will have a height of 65 centimeters. If this design creates discomfort for visitors, then under the bench you can make a step 20-25 centimeters high.


Other conditions for arranging a paired compartment:
- to eliminate the effect of a closed space, you can install combined doors with glass or tinting. It is very important that the door was without any constipation and opened to the side from the steam room;
- it is worth considering that a wood-burning heater is very difficult to lay, and therefore it is best to opt for electric stoves, which can be purchased at many stores. Such a furnace is placed with a gap of 20 centimeters from the floor, and fastened to the wall with screws;
- to increase safety, the stove must be fenced with a wooden fence at a distance of 5 centimeters. Stones are laid in the voids between tubular electric heaters at a minimum distance;
- Lastly, lighting fixtures and switches are mounted, after installation of which you can put the sauna into operation.
Features of the selection and laying of stones
The effectiveness of the healing effect of the sauna depends on how high-quality stones are used. It is important that their surface is perfectly smooth, and specimens of stones that burst during operation must be promptly replaced. After the stones are laid, cracking may occur during their operation, but this is not terrible.

The most popular types of stones:
- it is best to use diabase in the sauna, which can withstand about 360 cycles of heating and subsequent cooling;
- porphyrite is also considered very effective, relieving headaches and favorably affecting the functioning of the lungs and the skin of the human body;
- soapstone heats up to very high temperatures and then retains heat for a long time. The stone is considered very useful for normalization blood pressure and fortifications immune system;
- jadeite is an expensive stone and is considered semi-precious. When it is heated, silver ions are released, which positively affect the work nervous system person. See also: "".
Outcome
The article provides a sufficient amount of information in order to understand how to equip a sauna in a summer cottage in accordance with all the rules. Do not refuse the advice of professionals, as they will be able to tell you with confidence how to make the sauna comfortable and cozy.
Washing in a country bath is a pleasure available to everyone. Its construction does not require large financial investments. In the minimum layout, such a structure is being built in a few days.
In this article we will consider the topic of how to build the simplest bath in the country quickly and inexpensively.
Let's start by studying ready-made options, we will discuss the designs of walls, floors, stoves and sewers that are popular among masters.
Design features
The main conditions for the comfort of any bath are:
- Walls, floor and ceiling well protected from heat loss.
- Reliable isolation of structures from water and steam.
- Compact fast heating oven.
- Efficient sewerage and ventilation.
Examples of country baths
In photo No. 1 we see the simplest bath, reminiscent of a barrel of Diogenes. You can only steam in it. It will not be possible to wash here, because there is no sewerage in the building. However, if desired, it is easy to do. To do this, you need to install a standard shower tray in the corner of the bath and bring the drain pipe into the septic tank.

Photo No. 1 Build such a “barrel bath” in the country and take a steam bath
An important advantage of this design is its low weight, which allows it to be placed on a wooden terrace.
The device of the simplest bath from the container category is shown in photo No. 2.
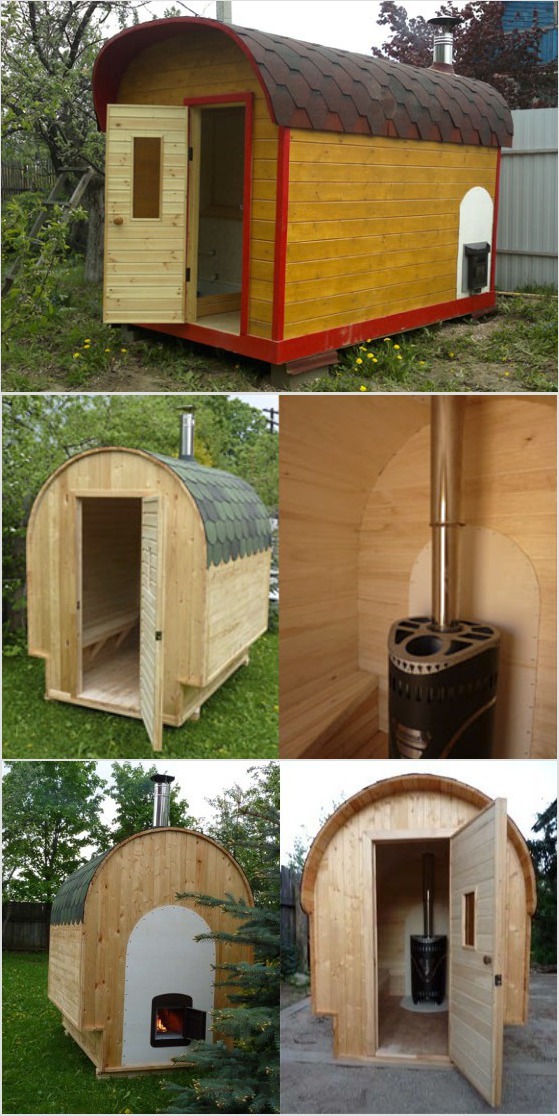
Photo No. 2 Option container country bath
It consists of one steam room. For washing, the owner needs to attach a canopy with a summer shower or supplement the room with sewage, and the stove with a tank for heating water.

Improvising on the theme of a barrel-shaped bath, let's pay attention to cellular polycarbonate. From it you can quickly and easily assemble the original design. In order for it to keep heat well, you will need two large sheets of this material and a frame made of metal or wooden bars. Between them, a mineral wool insulation, 10 cm thick, is laid.

The ends of the structure can be made of boards by stuffing them onto a wooden insulated frame. Put such a bath anywhere: in the country, on a polar ice floe or on the top of Everest, and you will always be comfortable in her steam room (photo No. 5).
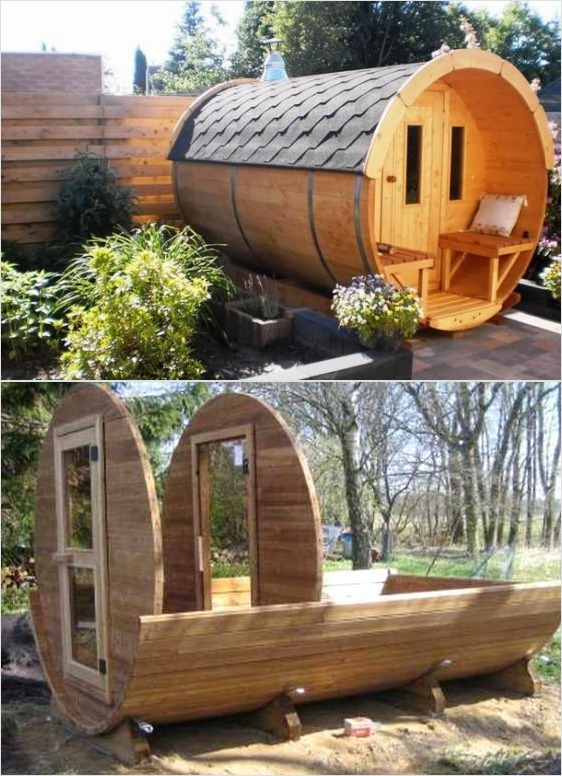
Photo No. 5 A simple barrel-shaped bath
A small Russian bathhouse made from timber scraps can be installed on oak posts. We see an example of such a structure in photo No. 6.

Photo No. 6 Oak posts - an excellent support for a small wooden bath
Larger structures need their own foundation. There are three options here:
- Concrete tape.
- Brick pillars.
- Piles from asbestos-cement pipes.
Do not forget that the type of foundation affects the choice of material and the design of the walls. Pile and column bases are used to install a wooden frame, as well as for baths made of timber or logs (photos No. 7 and No. 8).

Photo No. 7 Sauna from SIP panels on screw piles

Photo No. 8 Brick columns - the best option for timber, log and frame structures
The "tape" of rubble concrete is suitable for any walls (from gas silicate blocks, logs and frame).

A cheap, reliable and simple version of the bath is obtained by technology. For such a structure, you will need a little: a firewood truck, a cart of straw and a clay dump truck (photo No. 10).

The best shape of a wood-burning structure is round. It eliminates the need to reinforce the masonry corners, looks aesthetically pleasing and original.
Borrowing from birds the technology of building nests from branches and clay, you can build just such a simple and warm bathhouse (photo No. 11).
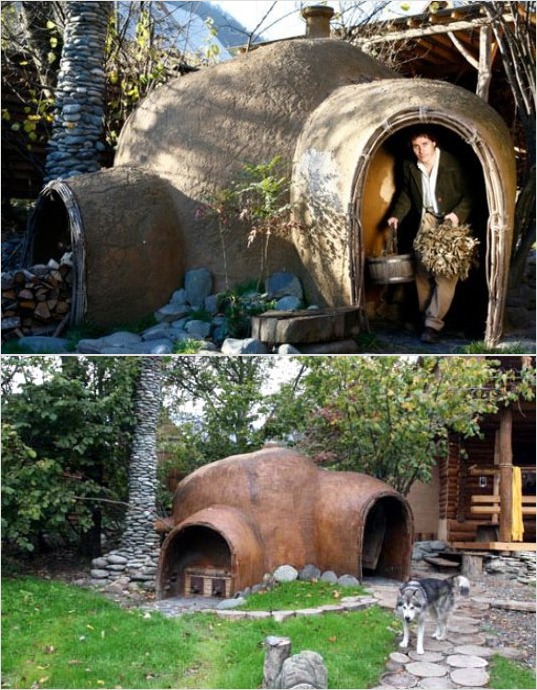
Photo No. 11 Wicker frame coated with clay - "know-how" of an inexpensive bath design
Recommendations for the choice of finishes, insulation, sewerage, floor, roof and stove
For the exterior of the frame bath, you can recommend the following materials:
- Wooden blockhouse.
- Metal tile or profiled sheet.
- plastic siding.
- Cement particle board (DSP).
- OSB board.
- Flat slate.

Photo No. 12 A simple, but at the same time very nice version of the exterior of the bath with the help of unedged boards
As a heater, it is best to use ecowool. It does not accumulate moisture, does not rot and does not burn. If there is no ecowool in your area, then you can buy a regular mineral insulation in the form of a semi-rigid slab. It is easily and simply placed in the gaps between the racks of the frame.
To protect the mineral wool from water vapor and reduce heat loss, the walls are lined with sheets of foil polyethylene. After that, a frame of slats is attached to them and trimmed with wood: alder, linden or pine clapboard (photo No. 13).

Photo No. 13 Steam and heat insulation of the walls of a country bath built from any material
We do not recommend installing OSB board indoors. This material releases toxic gases when exposed to high temperatures.
Variants of steam and heat insulation of the walls of the frame structure, as well as a bath built from blocks or logs, are shown in Figure No. 1.

Building a simple do-it-yourself bath includes a sewer. It can be made from standard plastic pipes, derived in cesspool or drainage well.
The water intake funnel is placed in the center or in the corner of the room, and the floor is made in the form of expanded clay concrete screed with a slope towards the drain. Before concreting, it is necessary to compact the soil and cover it with several layers of waterproofing. Wood flooring is a great option, but in a bath it rots quickly and needs to be replaced. Instead, we recommend making gratings from wooden slats and laying them on a concrete screed. After washing, they can be removed, taken outside and dried.

The design of the bath ceiling is standard. First, a vapor barrier film is “shooted” to the rafters and counter-rails (3x4 cm) are stuffed. They fix the lining of the lining. The gaps between the rafters are filled with insulation and covered with a roofing film. It protects it from weathering and atmospheric moisture (Fig. No. 2).

Fig No. 2 Design of the ceiling of a country bath
A counter-lattice is stuffed onto the film, creating a ventilated gap between the roof and the insulation. The work on the installation of the ceiling and roof is being completed by installing the main crate and laying roofing material(slate or metal tiles).
The main "detail" of any country bath is a stove. It should provide rapid heating of the air and maintain a high temperature. The metal stove heats up the fastest.
To accumulate heat and create steam, it must be equipped with a compartment for stones. There are a lot of options for stoves for simple baths, so we will not dwell on them in detail. Let's just say that the simplest heat generator can be made from steel pipe large diameter, old gas cylinder or barrel (photo No. 15). Another easy-to-use material is a steel sheet 3-5 mm thick (photo No. 16).

Photo No. 15-16 A simple pipe stove and a ferrous metal stove
Knowing the simplest welding techniques, you can assemble such a structure without outside help.


