The procedure for installing handles on interior doors. How to put a door handle on an interior door - we will master any mechanism How to mount hidden handles for interior doors
Installing door handles with your own hands is a rather troublesome business, especially if a person is faced with this task for the first time. In order to avoid difficulties during the installation process, it is necessary to consider the design and the main ones. Depending on this, the work may be performed with some differences.
Installation technology various kinds door handles has its own differences
Handle design
Before installing door handle it is necessary to delve into the design features of modern models of this type of fittings. Of course, the specific type of system is of great importance, but several general defining points can still be distinguished.
The design of a standard handle is the presence of such parts:
- lever;
- ring;
- kernel;
- socket;
- stroke limiter;
- stoppers.
You should also take into account such details as the tongue and lock mechanism, the metal lining on the box, the coupling screw. The last detail is used in the case of mounting the handle on hollow interior doors. It performs the role of self-tapping screws, fixing the system by tightening the opposite sides. Also, one should not miss another important piece of the design - the latch. If this type of locking system is present, you must additionally insert a rotary screw.

Push type door handle with tongue for secure door locking
You should not take on a case if you are not sure that you can collect everything in correct sequence with your own hands. Otherwise, you may lose important details or completely destroy the product.
Types of handles
The process of installing handles on interior doors with your own hands may differ depending on the type of mechanism used. Usually, the following types of handles are installed on interior doors:
- On outlet- they are easy to install with their own hands, since it is not necessary to drill a large hole, it is enough to ensure free movement of the rod. Externally decorated with an overlay-rosette.
- Nobs- This is a rotary system that looks like a round handle with a latch or keyhole. It's pretty convenient option, especially if you put such a system on the bathroom door, but when using low-quality materials, it quickly fails.
- pressure– to open the door, you need to move the handle to the lower position by pressing it. Thus, the latch is removed, which returns to its place immediately after releasing the handle.

The most popular types of door handles
Required Tools
Before trying to install the handle on interior door you need to prepare the tools. You don’t necessarily need everything, especially if you have purchased the simplest fittings. In order to put handles and latches on the door with your own hands, you will need:
- drill;
- screwdriver;
- a set of drills, including a "feather" and crowns of different diameters;
- chisel;
- a hammer;
- self-tapping screws;
- square;
- pencil;
- stationery knife;
- awl;
- roulette;
- conductor.
The last tool is a template for installing handles. It will facilitate the process of marking and drilling all the necessary holes.

The work of installing the door handle will be greatly facilitated by a screwdriver
Installing a handle on an interior door
Before you insert a standard door handle into an interior door, you need to mark up. For this, a square and a pencil are used. Measure the required height from the floor. Usually this value varies between 80-100 cm. If you have a prepared conductor, everything is much simpler. Just screw it to the door from the end. The holes will subsequently coincide with the tongue lining. So, let's look at how to insert a handle into an interior door with your own hands:
- Drill a through hole in the canvas with a drill and crown.
- Using a pen drill or smaller hole saw, drill through the end of the door.
- Then you need to put the tongue with the locking system inside and check its operation.
- Trace the contours of the pad and remove a thin layer of material so that the piece of iron is flush. Screw the part with self-tapping screws.
- Insert the rod inside the already installed part. From above put on the handle with a ring and a rosette. If the ring rubs against the door, you need to drown it by grinding off a small layer of coating with a chisel around the circumference of the hole.
- Screw the handle with three self-tapping screws or secure with tie pins.
- Fasten the decorative trim on top. The connection in most models is adjusted with a hex wrench.
In order to install the metal plate on the frame, you need to mark the position of the tongue. It is convenient to do this at the stage of installing this very part in the canvas. Drill or scrape a desired size recess in the box. Then circle the iron pad, drown it flush and fix it with self-tapping screws.
lock inset
It is one thing to install simple fittings, but how to put a handle with a lock on an interior door? To do this, it is better to remove the canvas from the hinges in order to carefully insert the lock.

An example of a well-embedded door handle of a simple design in a new leaf
Now let's look at how to properly install a handle with a lock on the door with your own hands:
- Mark the position of the lock on the end of the door, circle the contours of the system.
- With a pen, drill several holes in the marked area, and carefully gouge the rest with a chisel, periodically checking the passage of the lock.
- Remove a couple of millimeters of cover to sink the iron pad.
- In order to insert the handle, you need to drill a hole on both sides of the canvas, suitable in diameter for the free passage of the axis. To mark its position, make a mark on the lock with a pencil, set it temporarily in place and transfer the mark to the door, and then measure the required depth.
- Secure the lock with screws.
- Insert the axle inside and deepen the ring.
- Install the handle, lock it in place.
On the frame, make a recess for the pin and tongue to enter. Drown the nozzle flush and fix with self-tapping screws.
If a backlash is formed, it is necessary to file the axis of the handle with a grinder. Some manufacturers put special marks on it to make it easier to do this.
Latch Installation
Another question - how to put latches on door handles? In most cases, this is no more difficult to do than inserting the handle itself. Let's look at how to quickly install a latch handle on an interior door with your own hands:
- Drill an additional hole in the door. It must match the position of the latch mechanism.
- Pass the axle through the lock and place the cap on top . You need to put a plug or turnkey lock on the back of the room. A swivel latch is attached inside.
- Fix the position of the parts with self-tapping screws and mask the fastening with decorative caps, if any are provided for by the design.
- An additional hole is cut on the frame for the latch tongue, if any. If the operation of the lock is based on the principle of fixing the latch tongue, an additional recess is not required.
As you can see, installing interior door handles with your own hands is a troublesome business, but quite affordable even for a beginner. Please note that the displacement of parts can lead to a quick breakdown of the fittings.
This article will describe the work being done on installing latch handles on interior doors, which are by far the most popular in use.
The latch handle has the following design.
The visible part of the handle can be completely different and look like this:

Or this way:

All such latch handles basically consist of two parts, from the handle:

and latch:
 Each of these parts of the latch handle requires a separate cut into the canvas.
There are different types of latches on sale, with a latch that have an additional mechanism installed in the handle itself, which allows the door to be locked from the inside, and from the outside on the handle there is a mask for a key that allows the door to be locked. Also, such handles are available and without a latch they are not locked. Latch handles from different manufacturers have different design features that in no way can affect the process of inserting into the web. The weight of such handles has a latch on the inside, so the whole process of installing the latch handle is the same for everyone.
Therefore, if there are any differences, then because of this you should not doubt much and you should gain courage and begin to work. And you should start with the preparation of tools.
To do this, we need tools to work..
- Screwdriver or hand drill.
- Crown with a diameter of 50 mm on wood.
- Reduced the size of 23-24mm on wood.
- Pencil
- Chisel
- A hammer
In order to maximally facilitate and speed up the process of installing the latch handle in the door leaf, you can purchase a special kit in specialized stores.

Starting to install the latch
1. In order to proceed with the installation, it is necessary to make markings for drilling from the beginning on the canvas. If you purchased a special set for inserting such a latch handle, then this set already has a marking scheme.

If you do not have such a scheme, then the markup can be done manually. Why, at a distance of approximately 1 meter from the bottom of the door leaf, we make a mark, then along this mark from the edge of the leaf we measure 60 mm and make a mark for drilling, as shown in the photo.

2. On the side of the door leaf, we also find the center and make a mark for drilling.

3. Next, we take a chisel and for the front plate of the latch on the door leaf we hollow out a recess equal to 3mm. It is better to drill the center of the thickness of the door leaf with a slightly thin drill, so that later you do not have to make markings again.

4. With a crown with a diameter of 50 mm, we make a through hole. It is better to make a through hole on the door leaf on both sides so as not to damage the leaf.


5. As a result of the manipulations done, we get a hole.


7. As a result, we get several holes on the door leaf.

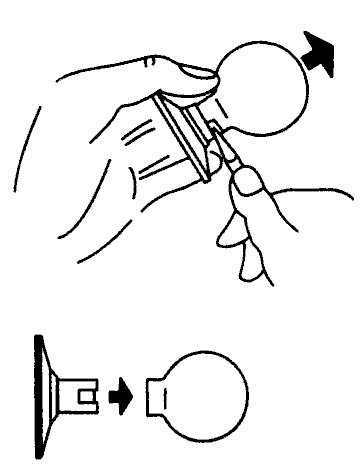
8. Insert the latch into the hole on the side of the door leaf and screw it.


With the help of a special key that should be included in the kit or any thin and flat object.

We press in the hole on the tongue.

and remove the handle.

10. After the handle, remove the decorative cap and expose the mounting holes.


12. We insert the other half, after which we tighten both halves of the handle with the screws that come with the kit.

14. We cover the door leaf and mark the place where the tongue touches the jamb, in this place we hollow out a recess for the latch tongue.

15. A plastic pocket must be installed in the hollowed out recess.

16. Install a metal lining on top of the plastic pocket and screw it on.

As a result of the work carried out, the latch door handle is installed, now the door is ready for operation. 
Interior doors are sold without fittings. Therefore, the purchase and installation of door handles is carried out separately. To do this, you can use the services of a carpenter or insert it yourself.
Types of door handles
When choosing accessories, you need to know what types of handles are, and how they differ from each other. The variety offered in stores allows you to choose them for the style of the room and ensures ergonomic use. Depending on the installation method, products are divided into two classes:
- invoices;
- mortise.
Overheads are attached to the surface and, as a rule, there are no difficulties with them. And mortise require pre-training holes in the door leaf.
Mortise products can be of two types:
- Rotary, they are also called knob knobs, which, when the handle is turned, open or close the latch that holds the interior door closed. In most cases, they are made in the form of a ball or disk.
- Pushers work on the same principle as rotary ones, only the mechanism is activated by pressing the handle. As a rule, they are sold together with a lock or latch, hence another name for them - lever latch handles. Fittings with a push mechanism are widely used for both interior and exterior doors.
Which type of product is better to choose depends only on your preferences. You should also consider the style of the room. Designers advise buying them for all doors in the same room the same.
The height at which the door handle should be is not clearly fixed by any standards. On average, it is located at a distance of 1 meter from the floor. This value can fluctuate up or down depending on your preferences. It may also depend on the height of those who will constantly use the door. When installing, you can build on the level at which other handles in the room are located so that their height is the same.
Instruments
In order to insert a handle into an interior door, you need to have a certain set of tools. It includes:
- tape measure, square and pencil;
- chisel;
- screwdriver, drill;
- drill, crown.
Use of all necessary tools greatly simplifies the work process. It is quite possible to embed fittings without a screwdriver and crown, but in this case, the work will take much longer.
Fittings are ideally installed when the canvas is removed from the hinges. If this is not possible, then you need to securely fix it in order to qualitatively and evenly perform marking and tie-in.
Before starting the tie-in, carefully study the instructions for the door handle. All sizes are listed there, and you will know what diameter of the crown and nib you need for work.
The instructions below will help you put the handle on the door leaf and avoid mistakes. And for those who first encountered such a case, it will be useful to watch a video on this topic in order to have a visual idea of \u200b\u200bthe upcoming installation work.

Step-by-step instructions for installing a door handle
- Canvas marking.
- Drilling a hole for the handle and lock.
- Lock installation
- Handle notch.
- Luke marking.
- Cutting a groove in a hole
Let's pay special attention to each stage of work, analyzing it in detail.
Web marking
Installation begins with markings on the door leaf. First you need to decide what height will be chosen for the location of the handle. With the help of a square, tape measure and pencil, places on the canvas are marked in which holes need to be made. To do this, we measure the required distance from the floor and draw a horizontal line with a pencil, first on one side, and then transfer it to the end and the other side.
At the end in the middle of the drawn line, we mark the place where a hole will be made for the lock tongue. On the same line on both sides at the same distance from the beginning of the canvas - this is usually 60 mm - we mark the places where the handle itself will be inserted.

Drilling a hole for the handle and lock
Using a drill and a crown, we make a hole for the door handle. You need to check on each side of the canvas to a depth of half the thickness of the interior door. For convenience, experts recommend making a mark on the outside of the crown with a marker. First, on one side, we drill to the required depth, and then on the other until the drilling is complete. This is done so that the crown does not go to the side and so as not to damage appearance when selecting material for fittings. You need to hold the drill at an angle of 90 degrees and not allow it to deviate either vertically or horizontally. With the help of a chisel, we smooth out all the bumps.
We make a hole for the lock with a drill and a pen. Work should be carried out carefully, since the distance between the pen and the corner of the butt is not at all large.
Some experts prefer to first make a hole for the latch, and then for the handle. In what order you will do it does not matter.

Lock installation
To install the lock, it must be inserted into the corresponding hole. Overlay, apply on top and circle it around the perimeter with a pencil. Now you need to use a chisel to select the material to a depth equal to the width of the lining in order to drown it in the canvas. For convenience, you can use several chisels of different widths.
The trim is attached to the door with screws. Holes for them are recommended to be made in advance using a thin drill, attaching an overlay and marking the right places with a pencil.

Handle inset
There are products in which the screws are outside. You don't need to parse them. Putting one part in place, you need to get into the holes of the latch with two guides, in which threads for bolts are provided. Then you need to attach the second half and tighten with bolts. You need to twist them evenly so that the handle works well and the latch easily returns back.
Products in which screws are hidden must be disassembled. Included with them are instructions and a key for disassembly. The handle can be easily removed if you find a stopper on it and press on it with a key. The collapsible part is bolted, after which the handle is put in place. Don't use force, assembly should be easy if you do it right.

Loot marking
After installing the handle, you need to make an appropriate hole for the tongue in the loot. Therefore, first of all, it is important to correctly mark the door so that the door closes well and the lock enters the groove without effort and friction.
We close the interior door and mark the top and bottom of the tongue with a pencil on the loot. Using a square, we determine the exact middle of the castle and mark this value on the loot. We make a hole with a drill and a pen and remove excess material with a chisel.
Cutting a groove in a hole
Before screwing the trim, it is important to check how the door closes. This will allow you to be sure that the groove for the tongue is made correctly and there will be no difficulties during operation. When closed, the door should have a slight play, that is, it should stagger a little. This is necessary because the thickness of the latch striker metal will be added to the groove.
The strap is fastened flush with the loot. To do this, as with the installation of the castle, it must be drowned in the loot to the required depth.
A slight play may remain even after you have screwed on the pad. This defect is easy to fix. The striker always has a tongue with a small hole for a screwdriver. It is designed specifically to bend it. Using a flathead screwdriver inserted into this tab, you can adjust the doors by bending it slightly.
The entire described process can be clearly seen on the video on fitting fittings into interior doors. The installation of the handle can be considered successful if it turns easily and the latch enters the groove without friction and effort.
Installing a handle on an interior door is an activity that does not require special skills and secret knowledge. Any man can cope with this task, if at least once in his life he held tools in his hands. Difficulties can arise only if a person has never been involved in any repair and construction work and has not been interested. But even in this case, there is nothing to worry about: from our article you will learn how to correctly, quickly and efficiently install the handle on an interior door. We will also talk about how to decide on the model of the handle, and how to correctly calculate the required height of its placement on the door leaf.
What does it consist of
To make it easier to cope with the installation of door fittings, we will find out what parts and elements are included in the handle.
- Lever. This is the main decorative part of the product.
- Each handle has a special ring that is attached to the door.
- Rod and rosette- also two integral parts of the door handle.
- Stroke limiter. This element prevents the sash from hitting the wall when opened.
- Stoppers.
And here is how the handle is repaired plastic windows, can be read in this
In addition to the above, the following elements are also sometimes included in the "composition" of the door handle:
- lock mechanism;
- tongue;
- metal box overlay; (so be sure to know)
- screw for tightening the structure. This detail is necessary when the handle is installed on a hollow interior door.
It happens that the “composition” of the handle also includes a latch. In order to install such a model, you will need to insert an additional rotary screw. Keep this in mind.
How to choose
Let's find out what types of handles for interior doors are now on the market, what are their features and advantages.
On outlet
This type of handle is the easiest to install. A large hole is not required here, it is only necessary that the rod of the product freely passes into the prepared round opening.

On outlet
Outside, the hole is closed with a convex rosette handle, most often round and decorative.
Noba
This is the name of a handle with a rotary system that has a latch or provides a keyhole. This is a convenient option for those interior doors that must be locked: to the bathroom, toilet.

However, the choice of such a model should be approached especially carefully: a noba made of low-quality material with active use will quickly become unusable. You should also pay attention to how it looks and how it can be installed.
push
In order to use this handle to open the door, you need to press it and move the handle down.

push model
Everyone came across these types of structures when they visited the offices of officials in some government agencies: it is in such offices that these concise and practical models are most often found. But they are also installed at home, especially if the style of the home is also concise and minimalistic. But how to choose a lock for the entrance metal door, can see
Latch
This type of handle consists of two parts, each of which requires a separate mortise. This type of door hardware can be made with or without a latch. If the product is not equipped with a lock, the door will not lock from the inside. The latch allows you to both lock yourself in the room from the inside, and close the room from the outside with a key.

handle latch
In addition to choosing the principle of operation of the handle mechanism, it is necessary to take into account the external design of the product, its shape, and the material from which the product is made. But this is what a multi-point lock looks like on an aluminum door, and how you can install it yourself, this one will help you understand
Most often, handles for interior doors are made of wood or metal.
But there are specimens made of glass, plastic, and even stone. A lot of people choose metal models with different types external coating: chrome, nickel, brass, etc. In addition, pay attention to the fact that some types of handles are designed to be installed on the right side of the door, and some on the left. Check this point with the seller.
You may also find it useful to know
Instruments
What arsenal of tools will be needed to professionally and efficiently install a door handle. 
- A drill and a screwdriver are indispensable tools for drilling holes and tightening self-tapping screws.
- Various drills. Necessarily - a pen, as well as crowns of different sizes.
- A hammer is a tool that is in every home.
- Self-tapping screws.
- A pencil and a square will help position the handle on the door leaf perfectly even.
- Stationery knife, as well as an awl.
- A tape measure will help determine the height of the handle to be installed.
- The conductor is also useful - a kind of template used to install handles. It will make it easier to take measurements and drill holes.
Here's what it looks like and how you can install it
Determination of the desired height
We will find out what tips will help you correctly calculate the required height for installing the handle.
But it should be noted that if we start from GOSTs, then these standards clearly indicate the height of the handle - this is one meter from the floor. Of course, we are not at all obliged to follow such recommendations in our apartments and houses, since in this case they are intended rather for professional builders.
It is best to observe the same height of the handles throughout the apartment, especially if the doors are located nearby. And in general, this approach is much more convenient, because, having got used to it, you will already be “on the machine” to open the doors throughout the house.
If you install the handle in the nursery, and the child is still small, it will not be superfluous to take into account this nuance and provide the door to the baby's room with fittings located within its reach.
How to install
We will find out what steps you need to take to install the handle on the interior door yourself.
Before starting work, it is necessary to mark up so that the product is located correctly, evenly and at the required height. For measuring work, you need a simple pencil and a square. First, measure the desired height from the floor. As already mentioned, this height varies from 90 to 100 cm. Consider your height and arm length - select this parameter individually, guided by your feelings: the main thing is to be comfortable.
In order to properly markup with your own hands, draw a horizontal line at the desired height using a square. The handle usually cuts 6 cm from the end of the door. Mark this point on the resulting horizontal line. Do all the same actions on the other side of the door, having precisely determined the area where the product will be installed. It is possible at the same stage to mark a place for inserting a recess under the tongue, if it is provided by the model.
Having decided on the height and exact location of the handle, attach the jig from the end of the door in this place. He will make it easier further work by drilling. Take a drill and make a through hole in the door leaf with it: it is clear that in the place where you intend to place the fittings.
With a pen drill or a crown of a smaller diameter, make another hole in the same place, but from the end. Inside the resulting “tunnel”, insert the tongue of the product with a lock, and immediately check on the spot how it works. And here is how to install an electronic combination lock on front door, and how to do all the work with your own hands, this will help to understand
On the video, how to install a handle on an interior door:
Circle with a simple pencil contours of the lining, and then remove a small layer of material so that the part is installed aesthetically. Screw on the cover with self-tapping screws.
Place the core of the product inside the lining, and put the handle itself on top of it, equipped with a ring and a decorative rosette. In the event that the ring is too tight against the door and rubs against it, it is necessary to grind off a little of the door covering with a chisel so that the ring is recessed into the door array.
Screw the mechanism with self-tapping screws (usually three are enough), or secure with special pins. Fasten the overlay with the decor on top of the structure. This most often requires a hex wrench of a suitable size.
Latch Installation

Sometimes for doors in the house it is very convenient to use a model with a latch, which will allow you to close the door tightly and securely if necessary, providing a person in a separate room with peace and privacy. Let's find out how to install a handle on an interior door with a latch lock.
Drill a hole in the door leaf - it must necessarily coincide with the area where the latch mechanism itself will be located.
If the latch has a tongue, then you need to cut another hole on the door frame for him. But in the case when the lock works by fixing the so-called latch tongue, there is no need to cut an additional hole.
We examined the features of installing a handle on an interior door leaf. And, as mentioned at the beginning, there is nothing complicated here. Therefore, having chosen the right product, armed with simple tools and our recommendations, you can easily equip the doors in your house with stylish and necessary fittings.
Requires a minimum set of tools:
- Drill
- Chisel 19 mm
- Crown diameter 50 mm
- 23 mm spade drill
- Drill for wood or metal 4 mm
- A hammer
- crosshead screwdriver
- And a pencil
So, let's start embedding the lock.


Drill a hole in the center with a 4mm drill

We put the lock flush with the door and make a mark in fact

We drill through the hole with the same drill, observing a right angle.

With a 50 mm crown, we make a tie-in on one side of the door.
Attention!
Your specific case may require a different size crown.

We finish on the other side.


We take a self-tapping screw of a suitable length, close the door when the box lands, and through a 50 mm hole, we insert a self-tapping screw into the remaining 4 mm hole and, by pressing, make a mark in the door frame.


According to the mark with a 23mm drill bit, we cut a hole to a depth sufficient for the lock latch to enter.

With the same drill at the mark, we drill a hole for the lock.

We insert the lock and make a mark with a sharp pencil to drown it in the door leaf.


With a chisel we make notches strictly according to the marks and make a selection so that the lock sits in a pot, then we fasten it with self-tapping screws.

We begin to assemble the castle, insert it into the grooves outer part(it usually does not require disassembly).


Then carefully remove the decorative "cup" sitting in the grooves, then press the latch and remove the handle.


We connect the two sides with screws.

We insert the handle so that the latch works.

We snap the decorative "cup".


We attach the reciprocal bar, make a mark, select the excess with a chisel and fasten it.

Done!))) Properly embedded lock is freely closed by pressing the door leaf until it clicks.
Video explanation for installing the lock
Instructions for installing a door lock (knob)
1. Door marking

On the door leaf, apply markings for installing the knob (lock) according to the template. The recommended distance from the floor is 965 mm.
2. Hole marking

After you have marked, drill two holes: 50 mm in diameter for the knob (lock) and 23 mm in diameter for the latch mechanism.
H. Mounting the striker

Install the keep at the same height as the latch in such a way that the additional tongue of the latch remains recessed into the body of the latch when closing, which is an obstacle when wringing out.
4 Dismantling the knob (lock)
To disassemble the knob (lock), press the spring-loaded latch at the handle attachment point with a special key and remove it.
5. Latch length adjustment

6. Latch installation

Install the latch in the groove of the door (make sure that the bevel of the latch is directed towards the closing of the door). Install the cover plate with the rod so that the rod and withdrawal sleeves exactly fit into the grooves on the latch body.
7. Installing the knob cover(of the castle)

First, put the inner plate of the jujube overlay on the rod and fix it with screws (or screws). Then wind up outer part overlays.
8. Installing the handle

Install the handle in such a way that the groove on the rod coincides with the groove on the knob handle, press the handle until it “clicks”.
9. Rearrangement of the mechanism in the file handle

Latch models with a square handle (options 01 and 03) can also be installed on both left and right doors. To do this, it is necessary to remove the cylinder mechanism and the locking mechanism from the handle body and swap them (according to the figure), in accordance with the side of the door opening.
Installation order.
1.Determine the location of the knob and apply the markup, guided by the template and installation instructions.

2. Based on the installed latch body, mark the installation location of the striker on the door jamb and select the groove for the striker.
3.Install the keep and fix it with screws.
4. Alternately check the functionality of the knob outside and inside the room.
5. For models of latches with a square handle (options 01.03), installation on left and right doors is also provided. To do this, it is necessary to interchange the locking mechanism and the cylinder mechanism from the handle body.

As you can see, inserting a lock into a door is not such a difficult task, the main thing is not to rush.
—————————————-
Photographer: Vladislav Mazitov


