Flower from a notebook sheet. Creating original paper flowers with your own hands - interesting ideas and step-by-step master classes. Paper flowers on the wall
Paper flowers will greatly decorate your interior and bring aesthetics and comfort to your living space. For everyone who wanted to learn how to make paper flowers with their own hands, we will show a few simple tutorials/i>. A step-by-step photo for beginners will show the whole process in detail, and our tips will help you get the job done quickly and without too much fuss. From our article you will learn how to make a paper tulip, how make voluminous flowers for decorating the interior, how to cut a rose from colored paper and much more.
To cut out all this flower-paper variety, we have selected for you beautiful schemes and templates so that you can complete this task easily and quickly.
Paper flowers have a number of advantages that you will not find in living plants. Firstly, they do not fade, do not require special care and do not cause allergies. With the help of multi-colored paper flowers, you can advantageous to decorate the interior or clothing, volumetric flowers are attached to the wall or on the door, they are placed in large vases and solemnly presented for the holidays. How to make flowers from candies with your own hands, you can find out in one of our previous articles.
But to make your first paper flowers with your own hands, schemes, templates can be printed on a printer. And then - glue the petals according to the proposed instructions.

Do you dream of being presented with a scarlet flower? Make it yourself! Cut out several templates of different sizes and glue the petals on a special sponge located in the middle of the flower.

And for this purple flower you will need:
- white sheet of paper;
- watercolor paints;
- scissors or stationery knife;
- aluminum wire;
- Cork tree;
- paper tape;
- green tape or floral tape.
- Cut a sheet of paper into even strips, not reaching the edge of the sheet.
- Fold the cut leaf into a flower shape.
- Make sheets of paper and fold as in the photo.
- Connect the flower with the leaves and secure with tape.
- Fasten a small piece of cork to the wire and twist it in half.
- Insert the wire into the middle of the flower instead of the stem.
- Wrap the stem with tape and then tape.
- A delicate purple flower is ready.


For a stock, for example, March 8th or May 9th, you can make several origami tulips according to the scheme shown in the photo.

If you have a special stencil, you can make a whole bouquet of scarlet roses and give them to a loved one. Detailed instructions for creating flowers just present in the photo. If there is no stencil, draw the flowers yourself on a sheet of A4 paper yourself.
For other decorative experiments, we offer you a selection of videos for children and adults with detailed instructions on how to make crafts in the form of flowers.
Paper cut flower templates
And in this part of our conversation, we will introduce you paper cut flower templates. The shapes and sizes of flowers for every taste - from the most delicate color of an apple tree to bright blue cornflower and fiery red poppy.


A few more templates will diversify your flower gallery.


Large paper flowers for decorating the hall with your own hands: templates and schemes
Paper flowers are a win-win option for decorating any room.

Note the short but very detailed master class for the production of volumetric paper flowers.

Application from such a "pink heart" decorate the gift box or a greeting card.

Crepe paper flowers are the most beautiful trend of this season. Such giant paper roses can be formed into a chic bouquet, or you can decorate the hall of a restaurant, cafe or your own apartment with them.
It is not difficult to make a flower with your own hands out of paper, especially if you have instruction and manufacturing scheme. Beautiful roses can be made from simple paper templates.
Popular flowers such as carnations can be easy to make from a regular napkin. These delicate flowers will certainly not wither soon.

Scrapbooking is another popular form of creativity for both children and adults. From special colored paper cut simple flowers for cute bouquets or decor.

Easy scrapbooking ideas - try cutting out roses, leaves and petals from special sheets of paper. And then glue everything on a postcard along with bows and decorative ornaments.
Making flowers can get you so engrossed that you won't notice how you transfer your hobbies to other materials, such as fabric. Such cute flowers can make unusual garland or delicate flower basket.

Unique growth flowers will decorate your holiday.
Mk for the production of growth flowers greatly diversifies your creative life. Purchase a special frame in the store, on which a flower of extraordinary beauty will be attached.

paper sakura, like other spring flowers, will give you a gentle and warm mood.

Try to make this flower using the origami technique.

Or cut from a template.
Video: how to make original paper flowers with your own hands
You may like:
- Crochet knitted rugs: interesting models, patterns and ...
Let's review everything. what is usually needed for production.
- Paper
: watercolor, corrugated, color for printers, velvet (great for violets), self-adhesive.

- Glue
: PVA, "Moment" or just stationery in pencil. Some needlewomen find it more convenient to use glue in a gun. But it is expensive and more often used by professionals.

-
: ordinary or curly, and sometimes for delicate work it is more convenient to use small children's or manicure ones.

-
or wooden skewers.

-
, scalpel. When dividing paper into pieces, I use a stationery knife, and when cutting curly pieces of jewelry, I use the second option. The lines are clearer, and the work goes faster.

-
required for toning workpieces.

-
. They make good, even stems of plants.

In art salons and shops for a creative person, a huge selection of materials is offered. You can also find specialized tools. But they are not cheap. If you are going to try yourself as a master of applied art for the first time, you can do without extra costs.
The best DIY paper flower ideas
I love to make compositions and give them to friends or relatives. I use different techniques. I will briefly describe some of them.
modular origami
Currently, flowers created from many individual elements, that is, modules, are very popular. The performance of such work will be within the power of both adults and diligent elementary school students.
Modules - these are sheets of small size, folded in a certain way. There are ready-made kits for sale, but you can make blanks yourself. An A4 sheet is divided into equal parts, 16 or 32. The parts of the product are assembled together without the use of glue. Parts are simply inserted into each other.
I prefer small triangles. Works come out small and look neat.
An interesting way to process paper - twisting . Thin long strips are used. Parts for work can be cut by yourself from an ordinary thin sheet of a suitable color.
This type of handicraft is suitable both for use on the plane: for postcards or decorative panels, and in voluminous bouquets. If you try, you can create a wonderful miniature. The main thing is to start with simple options. .
Corrugated cardboard is suitable for working with a child. You can find packages with ready-made paper ribbons in office supply stores.
Application
It all depends on the imagination.
- Paper spiral flowers
You will need paper, pencil, scissors and PVA glue.
I experimented with thick and thin paper, as well as cardboard. The appearance of the roses is different. And each one is very easy to do.
On the square we draw a spiral, which we then completely cut out. The workpiece is gradually twisted: from the outer part to the inner circle. The top edge can be slightly bent. Visually get the petals. The central circle of our curl becomes the base of the flower (glue it at the bottom of the bud, fix the size). In my opinion, such roses will look better on a decorative panel than in a bouquet.
- From wide colored stripes
Here the material will be paper, glue, scissors and a stem of your choice.
We divide the standard sheet into 4 long strips. Fold each strip 4 times. Cut on one side. The width of the petals should be small for greater naturalness. In this way, you can make chrysanthemums and dandelions.
- Compositions from waste material
You will need several tubes of paper towels or toilet paper, paint (preferably gouache), brush, scissors, glue, juice tube, corrugated sheet, stapler.
Tulips will be great. I used a soft tube (paper that melts in water) for my spring flowers. Just cut the cylinder horizontally into 2 parts. Half - 1 bud.
I drew the outline of the petals on the form, cut it from above and below. I cut it completely in one place, treated it with paint and twisted it so that the fourth petal was inside. I stapled the bottom of each leaf with a stapler. It remains only to insert the stem and secure.
- From individual petals (according to the template)
: soft colored sheets (for example, corrugated paper, tracing paper, napkins). You will also need scissors, glue, thin twigs, wire or drinking straws.
We make several layers of future petals using a template. Glue the central part of the inflorescence onto the branch. After we proceed to the gradual formation of the bud. Your masterpiece will look more interesting if the middle differs from the petals in brightness.
- Corrugated paper roses
For such work, it is necessary to take special paper, threads, glue and a basket or other container in which the bouquet will be placed.
One flower will require : 1 sheet of corrugated paper about half of A4 size (approximately 10 cm x 29 cm).
I twist the workpiece into a tube along the long side. After that, I form a rose. I fix the foundation imperceptibly with a thread. Attached to the stem. A branch wrapped in green paper can serve as a flower leg.
Personal workshop on making paper flowers for beginners
"Bouquet in a Vase"
- pink and light green printer paper;
- scissors;
- wire;
- sewing needle;
- glue stick;
- vase.

Stages of making a flower arrangement
STAGE 1
We will need paper squares of various sizes. To collect one flower, you need to prepare 6 leaves. The largest one is 10x10 cm, then each subsequent one can be reduced by 0.5-1 cm. The middle in my case has a size of 3 cm in diameter (if we consider the flower itself).
 1 STEP Cut out paper squares
 STAGE 2
Fold each square into a triangle and carefully cut out with scissors. Don't be discouraged if it doesn't turn out perfect. This will only add naturalness to your product.
 STEP 2 We add triangles from squares
 3 STEP
Prepare the layers of the future flower.
To do this, you need to curl each petal a little with a scissor blade. Moreover, the largest bottom sheets are curled in two different directions. The tips of the petals are up, and the middle is vice versa. This is done to achieve greater volume. STEP 4 Assemble the layers of petals
5 STEP
Collecting a flower.
To do this, we impose one layer on another: from the largest to the smallest bud. For the convenience of the subsequent connection, I use a needle. I pierce all the blanks and thread the wire into the hole, as if I were starting to sew on a button. There is a small stripe on the front.
 STEP 5 We prick the middle of the flower with wire
 6 STEP
We make a stem for a flower. The wire (which the leaves are connected to) is wrapped with a thin strip of green paper. The sharp end of the metal can be bent and hidden inside the greenery.
 STEP 6 We wind colored paper on the wire
 7 STEP
We make leaves.
I cut out the leaves without preliminary drawing. I take a wide strip of paper, fold it several times. I fold in half along a long line and cut, giving shape.
 STEP 7 Cut out the leaves
 8 STEP
Glue the leaves to the stem.
Everyone can choose the height and size of the leaflet to their taste. It seemed to me that they should be higher to the bud.
 STEP 8 We collect all the finished parts of the flower
 9 STEP
We collect our bouquet. Putting flowers in a vase
 STEP 9 Bouquet is ready
 Paper is a simple and surprisingly easy-to-work material. From bright colorful sheets you can create a whole botanical garden of ever-blooming plants. Easy-to-use corrugated, interesting and affordable printer paper - you will definitely find an option for yourself here. Worth a try. And you will feel how exciting it is to create decorative compositions with your own hands.
Summary: Flowers with their own hands from paper. How to make flowers out of paper. Corrugated paper flower. Paper flower master class. Volume flower from paper. Scheme flowers. Handmade gift for mom.
March 8 - "International Women's Day", a holiday of Spring and Love. On this day, you can’t do without a bouquet of flowers for your beloved women: wives, mothers, grandmothers, daughters! And if these flowers are made with your own hands, then they are doubly pleasant both to give and receive! In this section, we have collected for you a large number of master classes on making paper flowers with your own hands.
1. Paper flowers. paper flower
tulip origami
With older children, you can make a more complex version of a paper tulip. For a master class on making a tulip using the origami technique, see the link >>>>

And here is another very beautiful paper tulip. you can download ready-made templates for making this paper craft, and read the instructions at this link.
 Paper flowers. DIY gift for mom
 Another spring paper flower invites you to make the Krokotak.com website. Read detailed instructions on how to make a paper hyacinth

You can make a beautiful paper origami flower as a gift for your mother or grandmother with your own hands. For instructions on how to make such a flower out of paper, read the link.

How to make paper flowers
The stems of paper flowers can be made from plastic tubes. Multi-layer flowers cut out of colored paper of different colors look beautiful, as in the photo below. Flower stand - half of a cardboard tray from chicken eggs, painted with green paint.

How to cut paper flowers. To cut a flower out of paper, use the diagram shown in the photo below.


How to make a paper flower
To make a festive bouquet of paper flowers as a gift for mom on her birthday or on March 8, see the instructions on this site.

2. Paper flowers master class
3. Volumetric paper flowers. Volume flower made of paper
In general, egg cartons are a very suitable material for making flowers with your own hands. For detailed instructions, see the link >>>> To decorate home-made flowers, the author of the craft used buttons. Flower stalks made of the so-called. chenille (fluffy) wire.


Flowers can be made from plain or corrugated paper. Attach them to the twigs with tape, glue gun or thread.


You can also decorate tree branches (with or without green leaves) with small paper roses. These roses are very easy to make. A spiral is cut out of double-sided colored paper, which is then twisted from the outer end into a multilayer cone. You can wind the spiral on a toothpick. For detailed instructions, see the link >>>> If you want to make such flowers for your mother by March 8, then cut a few branches of trees in advance and put them in the water at home. When green leaves bloom on them, decorate them with paper roses.

5. Paper flowers master class. Flowers from circles
This flowering twig is made in mixed media. Petals and leaves - in the technique of origami from circles. The techniques of twisting into a tourniquet and rolling into a lump are also used. For a detailed master class on paper flowers, see the website
While paper flowers will never replace the charm of real flowers, they can still be a great party decoration or gift addition. They are relatively easy to make, but you are always surprised how subtle and elegant the result can be.
In this tutorial, I will show you several ways to make paper flowers with your own hands with unique step-by-step photographs in a variety of techniques. Paper flowers have become quite a fashion trend over the past few years.
It's incredible how "alive" some paper flowers can seem, and how beautiful "fantasy" flowers can be. However, what they will be depends on the craftsman who creates his paper flower. Some may be large, others small. They can shine and sparkle and look almost natural...


How to make paper flowers with your own hands
Astra - a beautiful lush flower
For the design of any holiday, appropriate decorations may be required. Often they are flowers, with which they decorate the room. It is easiest to make such decorative elements from paper. This master class shows the creation of a lush flower, which can be of different sizes.

To make such a paper flower, you need to take:
- several sheets of colored paper (depending on the estimated size of the finished craft);
- scissors;
- ruler;
- pencil;
- glue.

We cut out several squares of various sizes from paper. In our case, the largest is a square with a side of 13 cm, and the smallest is 6 cm.

Each of the cut out squares will be in the subsequent layer of petals. We start making a flower with the largest square, fold it in half.

Then we make another fold in the transverse direction.

Now fold the resulting square diagonally.

Finally, we make another fold, folding the workpiece in half.

Using scissors, cut off the edge in a semicircle.

We unfold our workpiece.

We cut with scissors between the petals, not reaching the center.

Make folds on each petal with your fingers. This will give volume to our paper flower.

We do the same with the rest of the blanks of the petals.

We begin to connect them together with glue. To do this, on top of the largest one, we impose a circle of smaller petals.

In this way we connect all the petals.

For the middle of the flower, you need to cut off a strip of paper (about 2.5 cm wide) and fold it in half lengthwise. Then, using scissors, make cuts along one edge with scissors, not reaching the other edge.

After that, we begin to twist the strip, periodically fixing it with glue.

So we formed the middle of the flower.

Glue it to the center of the flower.

Our lush paper flower is ready.


paper water lily
Very cute and soft piece.
Moderately difficult, it requires accuracy and patience rather than special skills. A real find for those who like to wield scissors.

For crafts we need:
- green cardboard;
- blue one-sided paper;
- yellow double-sided paper (just a little);
- white sheet A4;
- notebook sheet in a box;
- green marker;
- pencil and eraser;
- ruler;
- scissors;
- glue.
Shall we start? We take a notebook sheet and draw on it a leaf of a water lily about 14x12.5 cm in size. If you can draw, you can skip this “intermediate” stage and draw directly on cardboard. If not, no problem. We select a picture of a suitable size on the Internet (request: “water lily leaf coloring, drawing or picture”), put a notebook sheet on the screen and carefully redraw it.

Cut out the piece.

We put it on the back of the green cardboard, circle it.

Cut out.

We take blue paper and cut off the corners, turning a rectangular sheet into an oval (ideal shape is not required, so you can cut by eye). Glue the lily leaf as shown in the photo.

We cut strips-waves, stopping a couple of millimeters from the sheet. Do not make them too thin - you are tormented by curling + they will easily break away from an unsuccessful movement. The width shown in the photo is the minimum. You can make the strips much thicker, the craft will not suffer from this.

We curl the waves with the help of scissors - the blade of the scissors is on the white side, the thumb is on the blue.

Now let's decorate our leaf with a natural pattern. Draw a drawing with a pencil and color it. For coloring, I chose a felt-tip pen. Its main disadvantage is that it smears great (here it also depends on the cardboard) until it dries. When painting, try not to touch the already “passed” areas with your hands. If you are left-handed - paint from right to left, if you are right-handed - vice versa.

While our handsome leaf dries up, let's take care of the main "decoration" - a lily. To do this, take a white sheet of A4, fold it in half 2 times and tear / cut. We will get four identical rectangles.

Take one of them and fold it 2 times. Using a ruler and a pencil, draw a petal 5 cm long (along the fold line).

We cut out, erase the traces of the pencil, lay out and bend the petals (more precisely, 2 of them) so that they are all “opened” in one direction.

We make another 5 cm and two 4 cm flowers.

We glue flowers from paper.

Now you need to make the core of the lily. To do this, we need a small piece of yellow double-sided paper. We tear it into small pieces and crush the balls out of them (I ended up needing only 3).

Glue them to the center of the flower.

We've reached the finish line! All that's left to do is take the lily and glue it onto the sheet. Try to press it only in the center so as not to damage the volume of the petals and the waves. Ready!


Large decorative flowers from office paper with your own hands
In this master class, we will make such bright and beautiful crepe paper poppies.

Materials and tools:
- corrugated or crepe paper in green and red;
- black threads;
- wire;
- scissors;
- glue gun with a stick of glue.

Cut a wide strip from a roll of red crepe paper.

Then, on a piece of cardboard, draw a poppy petal template and cut it out.

We apply it to the crepe strip and cut out the petals along the contour.

Without laying out the petals, we stretch their central part to form a recess.


From black threads we create poppy stamens. We wind 20-25 turns of thread on the index and middle fingers. In the center we tie the turns or clamp with a thin wire. We remove the resulting bow from the fingers and cut the ends of the loops.

We roll the middle of the poppy from a piece of green paper. Then we wrap the paper ball with a piece of black thread. We fix the intersection of the turns with a drop of hot glue.


Now glue the ball to the bunch of stamens and spread the tips evenly around the pestle. The core of the poppy is ready.

Glue six petals to its lower part.

The first flower bud made of crepe paper is ready!

We form stems from the wire and tightly wrap them with a green crepe strip. We make leaves from the same paper.

Tulips are the absolute symbol of spring and the favorite flowers of many women. Fortunately, in our time, tulips can be bought all year round. And some men are ready to give their loved ones fresh cut flowers every day. But why throw so much money down the drain?
To keep tulips in your house all year round, make them out of paper. Very beautiful flowers are obtained using the origami technique.

For work you need the following materials:
- a set of bright colored double-sided paper;
- long wooden skewer;
- scissors;
- tube with PVA glue.

We take a sheet of bright colored paper, always double-sided. For example, lilac.

We turn the corner to the opposite side and cut off the excess part of the paper.


It turns out a square (rhombus).

Fold it into a triangle again.

Expand to original position.

Fold in half to make a rectangle.

Hide the corners inside.

It turns out here is such a small triangle. Place it upside down.

Bend the bottom corners to the top. First left, then right.


After we turn our workpiece over to the other side and repeat the manipulations again.


We open the resulting figure so that the folds are in the middle.


At the bottom we place a corner that does not open, and at the top one in which there are many corners. Bend the right and left corners to the center so that they overlap.


We do the same process on the reverse side of the workpiece.

We insert these corners one into the other on both sides.

Cut off the bottom corner.

Holding the connections on both sides with your fingers, we inflate the air into our paper flower.

It is now voluminous.

It remains only to bend the upper corners.

Here is a tulip bud.

Cut out an oval leaf from green paper.

We form a flower stem from a thin green strip of paper and a wooden skewer.

With PVA glue, glue a leaf on it.

And fix the flower on top.

Tulip is ready!


Other options on our site are how to do with step by step photos.

3D origami flower


Iris in the technique of origami

Lotus in origam technique

banknote flower

In this master class, we will make a very simple, but magnificent and beautiful paper carnation. It can be used to make holiday cards.

To make a carnation you will need:
- colored paper in red and green;
- scissors;
- glue;
- ruler;
- simple pencil.
Such a flower is made very simply and quickly, so in a short time you can make a lot of carnations. It is advisable to use red or pink paper.
First we need to add 12 identical modules. To do this, cut out 12 identical squares. In this case, their size is 5 by 5 cm, but absolutely any squares can be cut. The larger the square, the larger the finished carnation will be.
We cut out 12 squares of red color and 1 square is exactly the same, only green. It is needed to form the sepals from the bottom of the flower.
We take 1 square. We begin to fold the module. The main thing to remember is only 1 time, all subsequent details are added in the same way.

We will need to bend the square 3 times. First, bend diagonally, forming a triangle.

Then bend 1 more time. We get a smaller triangle.

Now it is important to correctly position the part. Rotate it so that the opening sides look to the left. Take the top right side and fold it back.

This completes 1 piece! It is very important that the last fold is exactly on the right side. Otherwise, then we simply will not be able to collect the flower. So you need to make 11 more exactly the same red parts and 1 green one.

And now let's start collecting paper flowers. We take 1 part and open it, bending the right side slightly back. This is the side that we folded at the end of each piece.

Now we need to insert the back part into the left side of the other module. A pocket is formed there from the first fold.

You can grease the side a little with glue so that the parts hold better. And bend the right side of the first part back.


We will have only 2 red modules left. We collect them and glue them on top of the part of 4 modules below.

Now we take the green modules and glue its sides so that they do not bulge. Glue the pieces on the bottom. This is a sepal.

The paper carnation flower is ready!


Blooming cactus is unusually beautiful! But because of the prickly needles, not many people breed cacti and you can see their flowering only in the pictures. Let's make a cactus that is both safe and very beautiful!

We will need:
- Scissors;
- PVA glue and glue stick;
- Round small jar or container (for a flower pot);
- Paper napkins (green, yellow / orange / red - for a flower, burgundy or brown - for the soil;
- stapler;
- Decorative tape;
- A small long box (for perfume or medicine).

Let's start "growing" a cactus! First, decorate the flower pot - fix the decorative ribbon on the jar. You can wrap once or twice as you see fit.

Now take green napkins and cut them into 4 parts. You can cut several napkins at once.


We proceed to the "growing" of greenery on the trunk. We take a box and apply glue to it with a glue stick.

And then glue the resulting "leaves" on all sides. It must be glued tightly so that there is no gap. At the top we leave free space - a paper flower will be located here. Here is such a "cactus" is obtained!

Cactus flowers are very bright and lush. Take 2-3 bright-colored napkins and connect them in the center with a stapler, crosswise. Draw a circle and cut it out.

Now we begin to crumple the edges of the napkins to the center, starting from the topmost circle. It should be such a magnificent flower!

We glue the flower to the place that we left empty on the trunk.

From dark-colored napkins we make blanks for the soil, just like greens were made.

We apply glue to the bottom of the pot, especially in the middle. We glue the cactus first, and then the soil around it.


With the help of a thin brush and white paint, you can mark the needles. Here is such a handsome cactus turned out! Bright and not scratchy at all!

Every day we are faced with different, at first glance, completely unnecessary things. But, if you think well and imagine that this is not just rubbish, but a future work of art. So are egg cartons.
We buy eggs all the time, but the boxes seem unnecessary and go into the trash can. But it is from them that many interesting things turn out.
Here we will try to make a wonderful picture with beautiful daffodil flowers from them.

To make a painting you will need:
- one cardboard egg tray;
- acrylic or other paints;
- brush;
- scissors;
- glue in a pencil and silicone glue;
- pencil;
- green colored paper.


So, let's begin. Take an egg tray and cut it across into two cells.

Now cut out the petals from each cell. As shown in the photo.

From one such mold you get four petals. Out of the whole box, there will be eight flowers for ten eggs. But you can not cut everything, but make five colors.

In addition to the petals, you need to cut out and there should be as many small circles as there will be flowers. Petals will stick to them. Also cut out the little things five small petals. They can be easily cut out of the remains of the box.

Also, flowers need stamens. They can also be cut from any leftovers. And cut with scissors into small strips. Also, the core. For it, you can cut off the top of the cell. And bend the edges with your hands so that the paper flower looks more like the original.

When all the details are cut out, they need to be glued. Glue six petals on a small circle in a circle. There are just as many of them in a real narcissist.

Finished flowers are painted with acrylic paints. You can paint them with any shade, but so that they look like flowers.

While the painted flowers are drying, you need to cut out green leaves and grass from colored paper. Approximately as shown in the photo.


So the spring picture with paper daffodils is ready.

In this master class we will make chamomile flowers from corrugated paper.

Let's start from the middle of the flower - cut out a square 7cm by 7cm. We make a blank from cotton wool and wrap it with paper, giving it the shape of a pyramid. We tie.

Apply bright yellow flock powder on the flat part.

For chamomile petals, cut out a rectangle - 8cm by 18cm ..

We wrap the middle in it, as shown in the photo.


We bend the edges of the paper.

And we start with small scissors to cut neat petals.


Our delicate paper chamomile is ready.


Corrugated paper sunflowers are made in the same way.

The only difference is the middle. We made it from dome-shaped sweets.

And for decoration, they used not flock powder, but a silver mesh.


This is how a bright sunflower is made from corrugated paper so simply and quickly.


Corrugated paper flowers are very realistic and beautiful.


bells

thistle flower


Ranunculus
See step-by-step master classes here -.
Corrugated paper flowers are usually used to decorate gifts. But if you decorate a photo frame, a wall clock with them, make a panel or an elegant one, then they will decorate the interior and bring lightness to it. Before you learn how to create do-it-yourself corrugated paper flowers, you need to understand what material is suitable for this and what else is needed to make the craft look like a real plant.
Getting to know the material
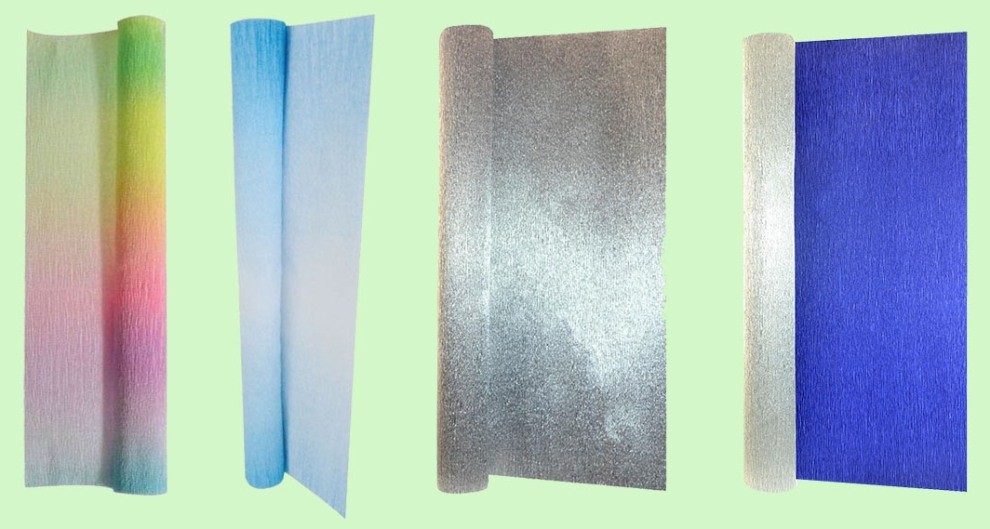
Corrugated paper is also known as crepe or crepe paper. The only difference is that gaufrer is a French name, while crepe is an English name. There is also an analogue in Russian - a reaper, pressed paper. There are several options for corrugated paper on sale, but the main classification is divided by sheet density:
Paper for creativity and gift wrapping: density 30–50 g, small folds, the height of which is not regulated. It is not very suitable for floristry, because it does not stretch well, it breaks and gets wet from the glue.

Floral paper is used for flower wrapping and sweet designs. Its density is in the range of 120–180 gr. Deep folds provide just the right amount of stretch to create true-to-life colours.

Corrugated cardboard has a high density and is only suitable for making gift boxes.

Please note that "fine crepe" is listed on the packaging of the craft paper. Floral paper marking contains the inscription "crepe extra", and on the sheets themselves there are transverse textured stripes.

Folds on floral paper are called flutes, which are divided into three types:
- E-flute up to 1.6 mm high - for making small flowers;
- V-flute up to 3.2 mm high - for growth paper flowers;
- A-flute up to 4.8 mm high - for packaging.
The color palette includes not only plain paper, but also metallized double-sided, with gradient and rainbow colors.
Also, for creativity, we need auxiliary materials:
- Type tape, which is used as colored tape to decorate the base of the flower and stem;
- Scissors and stationery knife;
- PVA glue (thick), thermal gun;
- Threads for attaching petals, sheets;
- Floral and regular wire;
- Wooden sticks for stems;
- Styrofoam balls or candy for the center of the flower.
And also: ribbons, frames, baskets, vases and even cups and saucers - the decor is limited only by the master's imagination.
Basic techniques and secrets of creating flowers from corrugated paper
Master florists have come up with hundreds of ways to make do-it-yourself corrugated paper flowers. However, there are basic techniques, combining and transforming which you can achieve an almost perfect resemblance to the original.
Stem
Please note that the stem for any type of flower is created according to a single principle:
- The base is a floristic wire, a wooden stick or a paper tube.
- It is necessary to attach the stem to the flower head at the initial stage (it is threaded through the layers of paper that forms the petals) or the flower is collected directly on the stem.
- The stem can be decorated with either a thin strip of corrugated paper on glue or green type tape.
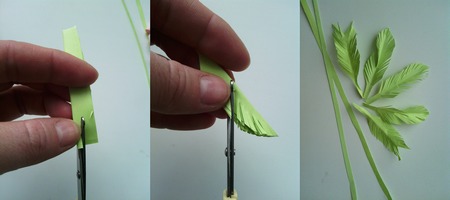
- For a greater resemblance to a real branch, it is necessary to cut the leaves and attach them to the stem, masking the junction with tape.
How to easily roll a thin paper tube is explained in this video:
stamens

A ready-made strip of corrugated paper of two or more colors is used, or you can cut it yourself from a sheet. On layers grind off.
Gathering should be done immediately - then it will not be possible to pull the thread without damaging the paper.
Then the workpiece is spirally wound on a rod or attached to the surface, and the collected waves create volume.
Also twisting are made for this ball.

But in this case, a strip of corrugated paper is folded in half, and then rolled into a roll. To prevent the flower from falling apart during the assembly process, it must be glued as the roll increases. In conclusion, fingers should gently straighten the curls, forming an open rose. The base is a foam ball on which roses are glued.
Corrugated paper flowers made in a similar technique are shown in a master class on creating a rose with an original twisted edge:
This technique is popular for making chrysanthemums, daisies, daisies, carnations, and other flowers with many small petals. The base is a long strip with cut fringe or carved rounded petals. For example, this charming rose.

Flowers from individual petals
These delicate flowers are made without a base, by joining individual petals cut according to a pattern.
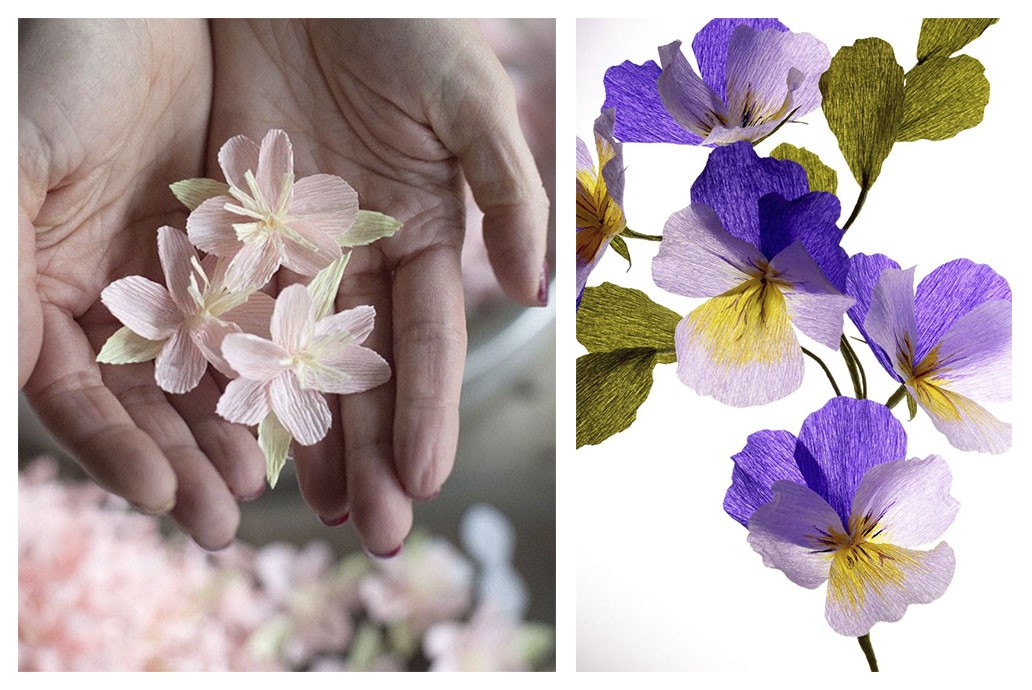
For cherry blossoms you will need:
- three long rectangular strips with rounded edges for the petals,
- one long rectangular strip with pointed edges for leaves,
- for the core, a short strip with transverse cuts.
The blanks of petals and leaves should be folded in half, mark the center and straighten the edges, forming a bend. Assembly is carried out with the help of glue by simply connecting the blanks one on top of the other, a twisted core is attached to the center of the resulting flower.
Blanks for pansies are cut out of multi-colored paper; if desired, the middle can be tinted and veins can be drawn. The assembly of the flower is carried out by connecting the petals to each other also with glue or thread. As a stem, floristic wire would be appropriate here.
This chamomile is assembled using a similar technology, but for the possibility of making a bouquet, a stick is used as the basis.
To make this tulip as similar as possible to a real one, it was necessary to create a core using a special technology.

Flowers on a fixed basis
There are many options for flowers that are made using this technique: chamomile, but the most common is the English rose.

The peculiarity is that the petals are wound onto a base - a foam or paper ball, which can be replaced with a small round candy.
MASTER CLASS ON THE TOPIC
Just according to this principle, this
1. Cut strips of corrugated paper approximately 6 cm wide and 10 cm long. The colors can be combined as you like: a delicate milky core and rich yellow, orange or red outer petals.
2. Fold the blanks with an accordion along the width of the petal, round the edges.

3. Spread the corrugations a little with your fingers, forming a wavy edge, then wrap the petals with toothpicks, giving a natural shape.

4. The blank of petals should be stretched, giving a semicircular shape - this will facilitate the formation of a flower.
5. We wrap the base of the flower with a rectangular strip without cuts, pulling the corrugations so that the paper tightly wraps the ball or candy. We fix with a drop of glue, and pull the bottom with a thread.
6. We overlap all subsequent petals in a circle, tightening with a thread. At the end of the work, we decorate the assembly place with a sepal of green or any other color in accordance with the intended composition.

Advice. If you want to make a bouquet on stems, then the sticks should be glued with hot glue to the base of the flower - a ball or candy before the flower begins to form.
Here is a slightly simplified, but no less spectacular version of this flower.

Master Svetlana Bormotova suggested a simple technique that turns an ordinary rose into an exquisite flower:

This decorative artichoke is also created on a fixed basis. Incredibly beautiful decorative element!

It’s not immediately possible to guess that a candy is hidden in a graceful narcissus - you will definitely be sorry to violate such grace:

Original compositions and examples of decor creation
Traditional decoration - bouquets in a vase. You can collect a bouquet of daisies, roses, tulips, and for experienced florists it will not be difficult to create a gladiolus branch:
If you love indoor flowers, but don't have time to grow them, then a crepe paper orchid flower is just what you need. This is a difficult job that requires certain skills, but the result is worth it.
You can decorate a room not only with bouquets of paper flowers. For example, for indoor wedding ceremonies, you can create a photo zone of paper flowers. They are attached to a perforated wall with a wire bent in the form of a hook.

Using the described techniques, you can create a topiary. A foam ball is taken as the basis, which is pasted over with corrugated paper petals.

This "classy magazine" harmoniously combines the warmth of the created bouquet and the sweet filling of the box. Such a gift will definitely be remembered for a long time!

Your guests will immediately pay attention to decorating the interior, but they will not immediately understand how this cup does not fall ...

With a little patience and diligence, you will create elegant decorations for your room, make a celebration unforgettable, or simply and loved ones with a non-standardly decorated simple gift.

Master classes from the unique master Lia Griffith
Lia Griffith makes incredibly beautiful crepe paper flowers! Her step-by-step master classes are accessible and understandable, despite being presented in English.


Inspiration and beautiful flowers!
Categories

