What to make a frame for a square mirror. Frames for mirrors: ideas for decorating with your own hands. rules for decorating interior mirrors
One way to give your home a personal touch is to decorate it with DIY items. A wide field of activity opens up when decorating. The most ordinary item can be turned, at least, into an original one. For example, mirror decor turns an ordinary piece of glass into a stylish and original thing.
Basic principles of decorating mirrors
Do-it-yourself mirror decor is made using the most various materials, including those that usually go to the dumpster, and if bought, they cost very little. For example, tubes from old newspapers or magazines. In some cases they are used without staining, in others they are dyed. Spray paint is more convenient - it is applied in an even thin layer, staining occurs many times faster than when using a brush. You can also use broken chinaware, a mirror, colored glass, shells, pebbles, rhinestones, glass drops, buttons, ropes, plastic bottles, branches, wooden planks and sticks, plastic spoons and other strange things.
All this wealth is usually glued onto transparent silicone. It is sold in hardware stores, is available in small tubes or larger cartridges for a construction gun. It is more convenient to work with a gun - it is easier to control the force and get the right portion of glue, which is problematic with an ordinary tube.
Please note that silicone is acidic and neutral. Acid until it dries, it smells very much like vinegar and you can only work with it in a well-ventilated area. Neutral silicone sealant doesn't smell like anything but costs more. Still acidic, until it hardens, it can corrode the paint that is applied to the decor. When buying, pay attention to the setting time. This is the time during which you can still fix something, move it. As soon as the glue begins to polymerize, nothing can be done - it is covered with a rigid film. The average time for the formation of a surface film is 10-20 minutes, but there are also more "long-lasting" compositions.

There are two decorating techniques:
- The decor is outside the mirror. In this case, a base is cut out of thin fiberboard or thick cardboard, which is sized more mirror. In shape, it can be any - round, square, arbitrary shape. The decor is glued to the base, after the glue dries, a mirror is inserted into the finished frame.
- Decorating the mirror around the edge. In this case, the glue and all fragments are applied directly to the mirror surface.
It seems that there are small differences, but the design in different techniques looks different. The second allows you to get an openwork decor of the mirror, which, as it were, is illuminated by a reflection.
Examples of round and oval mirror decor
First, let's talk about the decor that is "built" around the mirror. The circle is beautifully decorated. You can make a sun, a flower, a star, etc. out of it. Lots of options. Most often, the decor is also built in the form of a circle, but it can be a square, a multi-beam star, or any arbitrary shape.

From sticks or tubes of paper
You can decorate a round mirror with chopsticks for Chinese food or tubes twisted from sheets of a newspaper or magazine. If the tubes are rolled up from a newspaper, they will have to be painted. Made from thin, glossy magazine-printed paper, it can be used without dyeing. Sticks can also be painted, you can leave it as is.
For painting, find acrylic paint of the desired color in a can, lay the tubes on a sheet of unnecessary paper, paint on one side from a distance of 20-25 cm. After drying, turn over all tubes / sticks and apply paint on the other side.

The next step is silicone. Apply glue to the back of the mirror. You can - with a short strip (so that you don’t have time to freeze while you lay out the rays), you can drop it. If the back of the mirror is not protected by anything, the silicone must be neutral. The acid will dissolve the amalgam and the mirror will be damaged. Put the rays on the glue, wait until the glue grabs. After 24 hours, you can safely hang a unique mirror in place.
The mirror can be with or without a rim - your choice. Instead of sticks / straws, you can use strips of glass, wood, plastic, etc.
From plastic spoons
In this embodiment, a circle of a larger diameter is cut out of thin fiberboard or thick cardboard. how much more - choose for yourself. Lay the mirror in the center, circle it with a pencil or marker. The decor should not protrude beyond this line.
We take plastic spoons, cut off the handles from them, and glue the scoops around the perimeter of the mirror. There are three or more such layers. They look like petals. When gluing, try to place them very tightly to each other so that the substrate does not shine through. They can be set straight or slightly rotated to one side.
For best effect they can also be dyed. The paint can be with a metallic effect, you can paint the entire decor in one color or in different ones.

After the frame is ready, glue a mirror to the center on the same silicone and admire. After drying, you can hang on the wall.
Using the same technique, you can decorate the mirror with buttons, shells, cut into circles with branches of different diameters. They even use trailers and models of cars. They are painted in some unusual color and also arranged in a circle.
The decoration of this mirror is toy cars
Something similar can be done with a rectangular mirror. In any case, it will look good with branches and buttons cut into circles. The rest of the options are unlikely.

From plastic or cardboard rings
You can decorate the mirror with the help of rings. They can be cut from plastic pipes or glued from cardboard. The sizes of the rings can be of the same diameter or different, their width is about a centimeter or a little less.

If the rings are made of cardboard, you will need a base on which we will fix them. Suitable for these purposes plastic cover slightly smaller diameter than a mirror. We will glue the first row of rings to the sides of the lid. The second and all subsequent ones are attached to them. One of the rings of the first row is additionally fastened with a screw with a ring. We will then hang our mirror on it.
After the whole structure is glued together, we take the sequins and glue them to the ends of the rings. The work is painstaking, it takes time and patience. It is easier to hold and move sequins with tweezers and better with thin tips. This mirror decor is universal - in winter it is associated with a snowflake, in summer - with the sun.

Using the same technology, rings are glued from plastic pipe. But they do not need a base, as they themselves are quite rigid. From them we assemble a ring of the desired diameter, glue it. When choosing an adhesive, make sure that it is designed for plastic. In fact, there is a special glue gun and glue in the rods for it. It is much more convenient for them to work, but you can adapt to ordinary silicone.
The edges of the rings do not need to be pasted over with something. They look good on their own. But in this case, they must first be processed from bumps and burrs that remain from the saw. If they were cut with special scissors, there will be almost no irregularities, but the edge will still be straight, and the rounded one looks better. The ends are processed with fine-grained sandpaper. Then they are wiped from dust, degreased (wash in water in detergent, wipe dry or dry). Only after that you can start working with glue.
From the rope
We take a thick rope. It can be synthetic or hemp. For larger sizes, you can even use a rope. From cardboard or fiberboard, we also cut out the base, which is larger than the size of the mirror. A thin layer of glue is applied to this base, a rope is laid out coil by coil.
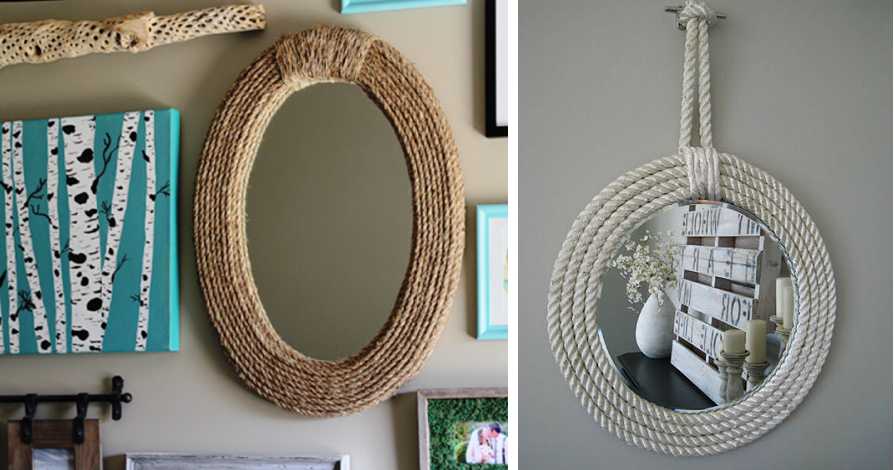
AT this case it may be better to first glue the mirror in the center, and “wind” the ropes around it. So it turns out recessed in the frame.
Mirror decor
It is not always desirable to make a border around the mirror surface, and the decor that is applied to the mirror turns out to be more voluminous due to reflection. Therefore, basically another rule applies here - there should be free space between the decor elements. These techniques will allow you to decorate a square or round mirror - almost no difference. The main thing is to choose the right pattern or decoration method.

transparent stones
The most simple technique- pick up the decor you like, place it along the edge of the mirror. First, you can decompose without gluing - so that there is an opportunity to correct something, move it. When the result satisfies you, we apply a drop of transparent silicone to each fragment and return it to its place.

This mirror design looks best with the use of transparent and translucent stones. They can be colored, transparent, plain.
hand-painted decoration
For this work you will need special materials. You will need:
- Glass outline. This is a transparent or colored composition in a tube with a sharp spout. It is applied to glass and mirror in the form of a thin strip. Usually outlines the contours of the picture, which is why it is called so. The contour on glass can be with roasting and without. Naturally, at home it is easier to use those without firing.
- Stained glass paints. They differ from ordinary ones in that after drying they become transparent. They are applied with brushes or squeezed out of the tube into the contour, after which they are distributed using the same brushes, swabs, cotton swabs.
- Glitters. These are shiny small fragments in the form of hexagons, stripes, circles, etc. used in decoration. Can be added to paints, varnishes (including for nails).
You will also need the usual materials: alcohol for degreasing, cotton wool, cotton buds, brushes (preferably with artificial bristles), toothpicks. You will also need a drawing that you are going to transfer to a mirror, carbon paper, adhesive tape.

We put a carbon paper on the mirror, put the drawing on top, fix it with adhesive tape, circle the drawing along the contour. Carefully remove paper and carbon paper. We take a tube with a contour and circle the applied lines. Nearby is a solvent, cotton swabs and toothpicks. They remove the flaws that appear during work.

Next, the contour should dry. This takes several days, and you can speed up the process with a regular hair dryer (not a building one). After the contour has dried, we take stained glass paints, pour a little of it into the contour, spread it with brushes, fix it with toothpicks so that there are no unpainted places inside the contour. After the stained glass paints dry, they become transparent. If you wish, you can add glamor with the help of glitter - sequins.

The mixture of the two described technologies looks very good - painting and stones. One example is in the photo above. The work is painstaking, but it turns out very beautifully.
Beaded mirror edging
In this technique, it will not work to use ready-made drawings - there are a lot of accidents and it is far from always possible to predict the result. But it's important to have a picture of what you want to see (or a prototype photo) in your head. For this work, you will need transparent glue (the same silicone), multi-colored beads, stones and other decor that you plan to use. You will also need masking tape and brushes, toothpicks.
We stick adhesive tape on the mirror at some distance from the edge. It separates the finish from the rest of the surface. The border does not have to be exactly, it can be of any arbitrary shape. The width of the decorative border is usually not very large, since the wide one looks rough.

We apply silicone to the separated area of \u200b\u200bthe mirror surface with a snake. At one time we spread a small piece - a strand of 5 cm. Quickly distribute the glue over the entire surface. You can do this with a piece plastic bottle. We pour beads on a sheet of paper, and from it we scatter over the glue. We straighten with a brush, toothpicks. Don't use your fingers, it's hard to clean. We apply glue further, continuing the decoration. As soon as you have gone around everything along the contour, remove the adhesive tape and leave to dry.

Full dry time depends on the silicone, but is usually 72 hours or more. Then nothing will spoil your work, and you can hang it neatly in a day.

Several practical advice. If you want to get diagonally displaced stripes of different colors (as in the photo), apply glue in the same areas. So you get a clearer separation of colors and the work will move faster. If the borders should be blurry - with a smooth color transition - different colors lay the beads on different pieces of paper, sprinkle it slightly shaking from side to side. Well, immediately after application, you can fix everything with a brush or a toothpick.
Beautiful mirror frame
This method of decorating the mirror has already been described - we take the decor and glue it. But not on the mirror surface itself, but on the frame. The frame can be made from the same piece of fiberboard, or you can buy a mirror in a plastic (for example) frame.

From a mosaic
To create a mosaic, you will need pieces of a mosaic, you can use fragments of ceramics or colored glass, mirrors. You will also need glue (silicone) and ceramic tile grout (can be white, colored).
From fiberboard (cardboard will not work, as the decor will turn out to be heavy), cut out the frame for the mirror, place it in the center, outline the outline. Next, we apply strips of glue to the frame, lay out mosaic tiles or pieces of glass on it.

After everything is laid out and the glue has dried (three days), they take the grout, dilute it to a state of thick sour cream (the proportions are written on the package). This composition fills the gaps between the tiles. When all gaps are filled, the excess is removed with a damp cloth. To prevent the mosaic from looking dull, you need to remove all the grout so that the tiles are clean. And you need to do this before the grout dries.

This mirror decor is perfect for the bathroom. The décor is washable and fits well with the design concept of the bathroom. Such a mirror will look especially decorative if the mosaic is matched to the tone of the tile.

The number of mirrors in each house is different, but it is impossible to imagine a situation without them at all. The functionality of this piece of furniture is beyond doubt.
But in terms of aesthetics, not all mirrors look as good as possible. Therefore, if the house has a mirror in the old frame or without it, it is worth trying to fix it. We share simple but effective ideas for transforming a mirror.

1.In a ceramic environment
If the bathroom is planned to be renovated, then the mirror can be mounted directly in ceramic tiles. Fix it to the wall with a suitable adhesive, and then proceed with the laying of tiles or mosaics.
2. With memories of summer
To decorate the mirror, use small river or sea pebbles. It can be glued directly to the mirror with silicone adhesive. If this option is not suitable, cut out the base on which the mirror is glued from thick cardboard, and the upper part with a hole for it. Glue the top part with stones, and then glue both parts together.
3.Original plastic frame
Ordinary disposable plastic spoons become excellent material for decorating a mirror with your own hands. To make the frame look even more spectacular, we recommend covering them with acrylic paints.
4. For the most economic
The frame for the mirror, which can be made in just a matter of minutes, is made from ordinary wooden clothespins. They can be pre-painted. Just attach the clothespins to the mirror.
5. In stained glass style
Such a mirror, reminiscent of stained glass techniques, is easy to make on your own. To apply dark lines on its surface, use special paint for glass or black tape.
6. Futuristic mirrors from the future
To fix several mirrors, you can use a single base. For example, wooden. Just glue the mirrors with silicone glue.
7. Return to nature
Short branches will be an excellent material for decorating a mirror, especially if they are painted in a bright color. They can be glued directly around the perimeter of the mirror or on the frame.
8. In a nautical style
A frame for a mirror made of thick rope will perfectly fit into the interior in nautical style. Additionally, it can be decorated with shells or pebbles.
9. Spring is coming
Artificial flowers will help create a delicate frame for the mirror. Also, the composition can be supplemented with green leaves and fruits. Everything you need for such a mirror decor with your own hands can be purchased at a florist shop.
10. Beads and shells
The combination of beads and shells in the decor of the mirror creates an unforgettable effect. Such an interior detail will harmoniously look in the room of a beautiful lady of any age.
11. A new look at the usual tree
To make such wooden frame you need a thick branch. It will need to be cut into thin slices, which are then used as decoration.
12. Affordable paper decor
The most affordable and affordable option for decorating a mirror with your own hands is the use of paper strips. Glue paper strips to the cardboard base, and a mirror on top of them.
13. Decor for the kitchen
Cutlery that has not been used for a long time will become an unusual material for decorating a mirror. An ordinary plate can be used as the basis for this composition. Both a mirror and cutlery are glued to it.
14.Mirror for needlewomen
Those who are fond of sewing or embroidery will definitely like a mirror decorated with spools of thread. Just glue multi-colored coils around the perimeter of the mirror.
15. Bright frame from old magazines
Reading magazines can be useful when decorating a mirror. Cut the page into two or three parts, twist each of which into a tube. It remains only to glue the paper tubes to the mirror or frame.
16. New life for an old T-shirt
Cut the knitted T-shirt into several fairly wide strips and weave a pigtail out of them. Then glue it around the perimeter of the mirror, leaving the edges free, and hang it on the wall.
17. Edible decor
Legumes, cereals, pasta can be made into an unusual material for decorating a mirror with your own hands. Apply a generous layer of glue to a flat frame and sprinkle edible decor over it. After drying, we recommend covering the decorative composition with acrylic varnish.
18.Useful buttons
Mirrors for the most sporty.
Old rackets can also act as a frame for a mirror. Finding a ready-made, suitable mirror can be problematic. But you can cut the right size and shape in a workshop that specializes in working with glass.
20. More shine
Decorative glass pebbles are used to decorate a regular frame. You can buy them in stores specializing in the sale of goods for animals. Most often they are used to decorate aquariums.
Of course, every owner dreams of making the interior of his residential building in an interesting unique style that will not be like any other. For these purposes, accessories from famous designers are used, but this will require a considerable amount of money from the family budget.
A completely ordinary do-it-yourself mirror frame will help to complement pieces of furniture, and even surpass many design masterpieces.

It is no secret that a mirror in a home is an important and necessary item, but besides this, it serves as a beautiful component of the interior environment, which will advantageously expand the free area and fill the room with additional lighting.

The mirror surface itself does not attract the eye; the framing itself (frame), made in a unique style, makes it beautiful.

Frames from improvised materials
Even an ordinary old rarity can be reborn and decorated on your own, using the most common improvised items and even products.

For decoration, a variety of food products are advantageously used: dry pasta, coffee grains, peas and cereals. The photo frame for the mirror shows a variant of the frame made of pasta different configurations and shapes, which are carefully glued around the entire perimeter.

To perform a certain conceived pattern, it is necessary to evenly distribute them along the entire mirror canvas. In any case, the frame will be individual: both products lined with a certain ornament, and laid out in a chaotic manner.

At the end of the work, it is appropriate to close the product with a cloth (masking tape) and spray spray paint onto the surface.
Skirting for ceilings perfectly imitates wood, and it is much lighter in weight category. It is recommended to start work by fixing the mirror on a plywood sheet or chipboard in order to achieve a more reliable fixation of the fasteners on the wall.

We cut out each side of the frame in the same type of wooden version, correctly aligning the corners. But the size of the inner edge must exactly match the length of the side of the mirror. You can easily connect all the parts with a glue gun.


The effect of an old luxurious piece of furniture will be given by golden paint, which is applied with an ordinary sponge in strokes. This frame will be light in weight and unique in its design.

If there are stucco details in the interior of a residential building, it is wise to use a similar decoration for a mirror. Market building materials offers a wide range of decorations made of plaster or plastic materials, which in the future can be turned into an amazing picture.

The base should protrude beyond the edge of the canvas and be painted in a light, white, or colored shade. Having fixed the canvas, the stucco molding is fixed along the entire base of the mat with silicone glue.

Mosaic pieces in the interior
This design, most often, is created for a bathroom of absolutely any style, since the fragments left after repair, unnecessary ceramic tiles, serve as the basis for decoration. The main task is the correct selection of the pattern.

The modern minimalist style suggests the presence of complex geometric ornaments, abstraction. Floral motif, plants and grass are appropriate in a rustic interior.


Before making a frame for the mirror, the canvas is mounted on a sheet of wood, and the selected pattern is applied in a circle. Then, with a flat cutter, parts are cut out of the tile, giving them a certain shape and applying them to the frame.

If the initial sketch turned out to be successful, you can safely fix the fragments with adhesive on the frame, then wait for the product to dry completely (maximum one day)


An ordinary mirror without a frame, of course, will not replace an exclusive product in a luxurious frame, moreover, it will favorably emphasize the theme of the interior and its originality!

Photo frames for a mirror


“The mirror completes the space,” Jean Baudrillard once said. Indeed, we do not represent modern house without this important element. But in order for the mirror to fit harmoniously into the interior, it definitely needs a frame - a frame, a baguette or a frame. You won’t surprise anyone with standard rectangular or oval frames, today the design of mirrors requires a creative approach. We offer you to look at mirror frames from a new angle and make a beautiful frame with your own hands.
1. Cassettes with staples for a stapler can be an excellent material for decorating a mirror. A few hours to work - and a shiny frame is ready. (ideafrom here)
2. On the one hand, a budget frame made of wooden clothespins looks original, and on the other hand, it is functional, because it is very easy to attach reminder notes to it. (details )
3. Excellent decoration with a mirror frame, which you can easily do with your own hands, is obtained from barbecue skewers. (MK )
4. Reflecting in such a mirror, you will always feel like a queen, surrounded by a scattering of precious stones. (original idea)
5. Wood is a unique material that will always be in fashion. That is why frames made of wooden slats will always be relevant. ()
6. Oriental-style decoupage mirror frame is cozy and, most importantly, fashionable. (details)

7. A broken cup is a blessing, especially for those who plan to decorate a mirror frame with broken shards. ()
<
8. The painting on the frame will always be relevant, even if you are a beginner artist. (idea)

9. The best way to imagine the future design of the mirror is a photo that is posted online by frame makers. But even upon closer examination, it is sometimes difficult to understand what the frame is actually made of. For example, such an interesting and bright decor is obtained from old newspapers and magazines twisted into a tube. (MK )
10. A mirror decorated with shiny sequins will always attract the eyes of guests. (detail
<
11. This frame will appeal to those who are looking for non-standard design solutions for the mirror. The graceful chrysanthemum framing the mirror is made of disposable spoons and then painted with an aerosol can of paint. (MK )

12. Good frames can be obtained even from a piece of old embossed wallpaper. ()
:
13. A DIY mirror frame can easily shape a mirror into any desired shape. For example, the shape of a heart. (ideafrom here )
:
14. Pieces of tiles and glass, large beads and rhinestones ... Combining all this, you can perfectly decorate a frame for a mirror. ()
:
15. Interesting solutions offered by some designers seem absurd only at first glance. Decorate a frame with pasta in different shapes? Why not! ()
.jpg)
16. The buttons, laid out on the frame in a skillful pattern, will perfectly refresh the bored interior and bring a little intrigue. (
19. Shells, as a finishing material, are liked by many designers and decorators. They look good, including on mirror frames. (detail)
<.jpg)
20. A bent wire mirror frame looks great. Virtually indistinguishable from the factory. (idea)

Of course, the photo cannot convey all the beauty of a frame, or a frame for a mirror. Therefore, leave the theory and move on to practice, because you can create so many unique things with your own hands!
- What can you make a frame out of?
- Manufacturing process
- Taking measurements
- Oval mirror frame (no wood)
- Branch frame
- Advice for a beginner
A frame for a mirror is not only a part of the design of the mirror canvas, but also a decorative element in the composition of the room. Framing can become the accent of the room, harmonize with the surrounding space or stand out from it with its originality. The frame can be any. Its shape, size and appearance depend on the dimensions of the mirror and the imagination of the master. Here are a few master classes that will help you realize the idea and create your own unique frame.
What can you make a frame out of?
Creating a mirror frame is a creative process. It is made from anything:
- Wood is the most common material. In the course are slats, old and new boards, saw cuts of trunks. The variety of solutions is limited only by the imagination of the author.
- Polyurethane foam ceiling moldings are another option for creating a classic frame that works well for decorating.
- Metal baguettes and forging are organically combined with a mirror surface. These materials are used by craftsmen who know how to work with metal blanks, forging and welding.

- Remains of any building materials - drywall, slats, ceramic tiles, wood chips, etc.
The main thing in manufacturing is an idea that should be well thought out and implemented, then the mirror composition will bring aesthetic pleasure and complement the interior.
Decor is an equally important stage in the design of the frame and baguette. If the frame is made from a ceiling plinth, it should be supplemented with decorative elements or covered with paint, enamel, since the plinth itself is often white and faceless. The same goes for plastic rails. It is different with wood: the material already has a structure, a beautiful pattern, a shade. It is enough to cover wooden baguettes with protective paint or varnish, but you can always add accessories to the frame.
Requirements for framing mirrors for different rooms
When choosing materials for creating a frame and its decor, it is important to take into account the specifics of the room in which the mirror will be installed:
- For the bathroom, it is imperative to use materials that are resistant to corrosion. It can be wood treated with an antiseptic or galvanized metal, polyurethane is suitable.
- Near the heating radiators, in the kitchen, in the room opposite the window, they hang a baguette made of heat-resistant materials that are not subject to linear expansion (it is not recommended to use plastic).
- The frame opposite the window must be UV-resistant; special compositions are used to cover the frames.
- Ease of care is an important requirement for framing and decor.
In addition to practical qualities, the frame should be combined with the surrounding space, in harmony with the interior and match the style of its design.
Manufacturing process
The most convenient material for making mirror frames is wood. Natural raw materials are suitable for almost any interior style: from classic to modern. For manufacturing, you can use different forms of wood:
- longitudinal cuts of trunks;
- cross cuts (circles);
- finished slats;
- wood materials (chipboard, OSB);
- thick and thin branches.
The tree does not need additional decoration, but if necessary, you can do anything with it: paint, tint, glue applications, etc.
Taking measurements
The first thing to do before starting work is to correctly take measurements of the mirror sheet. To do this, measure the length and width of a quadrangular product, and the diameter of a round product.
When creating a rectangular baguette frame, it must be taken into account that the mirror will partially go beyond the frame (1-2 cm) from the front side. When preparing rails, measurements should be taken on the inner shelf, if any.. When gluing a mirror onto a base canvas, this allowance can be neglected and the actual dimensions can be transferred.
Master class: composition from slats
The easiest way to decorate a rectangular or square mirror is to make a frame from ready-made wooden or polyurethane ceiling slats. They can be bought at any building supermarket or framing workshop. The width of the blanks is determined by the aesthetic preferences of the artist:
- From the rails, it is necessary to cut blanks according to the size of the canvas. It is important to take into account the size of the inner shelf so that the mirror does not move in a large frame.
- Then you need to cut the rails at an angle of 45˚, clean the cuts with sandpaper.
- Now on the table we fold the frame corner to corner, to the outer ones - we attach metal corners.
- We take one blank and coat the ends with carpentry glue.
- When all the blanks are missed, we attach the metal corners again and pull the structure with a rope to fix the position of all components. It is important to stretch the rope as much as possible so that the glue grabs.
- After a while (see the instructions for the glue), we remove the stretch. The frame is ready. It is necessary to strengthen its corners - we put brackets with a stapler.
The video shows the process of assembling a frame from finished profiled rails.
Then you can decorate the front side: paint, paint the resulting frame, make an application.
- To fix the mirror in the frame, cut out 4 corners from plywood.
- We insert the mirror into the frame, attach the corners to the base. This is done with glue or a stapler. It is better to combine these methods.
- We attach a loop to the frame for hanging.

Instead of a profiled rail, use a regular one. Then the profile can be made on carpentry tools, if any. If skill allows, glue joints are replaced with grooved ones.. To do this, in the angular planes it is necessary to make a spike and a groove, which are subsequently coated with glue and firmly connected to each other.
Another option is to connect the rails at an angle of 90 0, not 45 0.


We use a vertical saw cut of the trunk
Sometimes nature itself creates masterpieces that you just need to see. For example, an old snag or a lopsided tree can have an interesting shape and become the basis for an artistic frame for a mirror:
- We take a barrel of any diameter (depending on preferences).
- We make a longitudinal cut, set the thickness of the workpiece.
- We process the board with sandpaper, soak it with antiseptics.
- We connect the strips at a given angle.
- To fix the mirror, we fasten plywood corners on the back of the frame.
- We mount a loop for hanging the structure.


Framing round and oval mirror
To decorate an oval or round mirror, you will need a plywood substrate for an oversized canvas. We make the basis for decoration:
- A mirror sheet is attached to the base with glue.
- On the reverse side, a loop is mounted for hanging the structure.


Oval mirror frame (without wood)
It is not easy to enclose an oval or round mirror in a frame, but it is easy to decorate with a border. For example, cable car:
- For glass, you will need a base of a similar shape, only larger.
- A rope or rope is taken with a length equal to the circumference of the fabric being formed.
- We attach the mirror to the base with thermal glue.
- We lay the edging around in one or several rows, lubricating it with hot glue along the entire length.
- We hide the edge of the rope under the decorative elements. You can make the usual transverse dressing with the same rope.
The made base goes well with beads, marine theme accessories.


Branch frame
Branches can be found everywhere: in a park, forest, square on the way home or to work. Why not use them to decorate a mirror frame?
- The collected branches must be thoroughly cleaned of microflora: remove the raw and broken bark, treat with boiling water or an antiseptic that makes the shade of the wood more saturated.
- It is necessary to prepare a cardboard base for glass.
- We press the processed branches tightly against each other to the base, after soaking them with hot glue.
- If necessary, color the composition. It is convenient to do this with aerosol paints.


Most master classes are based on the use of a substrate under the mirror, to which all the elements are attached - a mirror sheet, decor, loops for hanging. Otherwise, no difficulties - just enough imagination, and the result will certainly please you and your loved ones!