Painting a wooden window: preparation, choice of paint, tips. Old windows: methods of restoration and painting. Painting wooden frames: is it possible to paint with your own hands How to paint wooden windows
With your favorite bike, time flies by. During frequent trips, sometimes it is not possible to see how the bike gradually loses its attractiveness: it fades, becomes covered with small scratches, chips and even rust. All this has a negative impact not only on appearance frame, but also for its service life: pipes that are susceptible to corrosion due to scratches will not last long.
If the old bike goes “retired” forever, then it makes no sense to extend its service life. But many cyclists do not want to abandon their comrades and resort to their complete and partial renewal.
One of these include the elimination of defects, painting and varnishing the frame. Spray painting has become widespread, and not by chance. It will not work to apply an even layer of paint on the frame pipes with a regular brush. Due to its ease and speed, this method has found active independent application. How to paint a bicycle with a spray can at home will be discussed in this short article.
Dismantling the bike and preparing the frame
So, we found out that the color of the bike determines its frame. You will also have to paint the fork and, possibly, the trunk. Before painting, you need to completely disassemble the bike:
- Remove all overhangs: brakes, shock absorbers, etc.
- Remove the front wheel from the fork dropouts and (if equipped).
- Unscrew the steering wheel from the fork.
- Remove trunk.
- Dismantle rear wheel and wing.
When only the bare core remains, remove the fork from the front pipe.
Preparatory steps:
- Removing the old layer of paint.
- Smoothing out irregularities.
- Degreasing the metal surface.
What is necessary? Old paint is removed with a solvent. With a clean rag soaked in it, we carefully go through all the pipes and especially through the welding joints. You may need to repeat the procedure. It depends on the thickness of the factory paint layer. After cleaning, the frame is carefully wiped with a dry soft cloth. If light stains remain, it is not recommended to wet the surfaces with water, it is better to go through the solvent again.
The next step is sanding. All small scratches, chips and corrosive areas are removed with sandpaper. Depending on the depth of the scratches, the grit of the emery is selected: 240 emery will cope with small defects, number 80 will do to eliminate chips and rust.
"Sanding" cleaning from bumps
Grease stain removal- also a necessary procedure to properly paint the frame and fork of the bicycle. Grease reduces the adhesion of the primer and paint to the metal, which can cause the paint to fall off very quickly. To prevent this from happening, it is imperative to go through a degreasing agent, for example, white spirit.

The cleaned bike frame can be primed
Priming surfaces for painting
The finished frame and fork are freely placed or suspended. The second option is more convenient, there will definitely not be any unprimed areas. Work should be carried out in well-ventilated areas. If you paint at home, then this is a shed or utility room in a private house and a balcony in an apartment. Hang the parts firmly and at the same time freely so that it is easy to apply the primer. In advance, you need to take care that the composition and paint do not get where they should not, as well as your own safety: prepare gloves, a mask and glasses.
We buy a can of primer in the store and evenly distribute the composition over the surfaces of the parts to be painted: frames, forks, trunk. The optimal number of applied layers is 3. Before applying the next portion, you need to wait for the first layer to dry.
When all the primer is applied, the parts are left for a day. The place where priming and painting is carried out should not be too wet, and there should also be no source of open flame. After a daily break, the primer is cleaned with fine-grained sandpaper (from 400 to 600) in places where the layer is thickened. The bike is now ready to be painted.
Applying paint with a spray can
Using a disposable spray can is very simple, so there are usually few questions about this type of work. However, there are several rules for obtaining a better result. Follow these simple guidelines to quickly and at the same time correctly paint:
- apply paint gradually, in a thin layer;
- keep the sprayer at a distance;
- paint from top to bottom;
- avoid excessive amounts of paint.
The recommended number of layers is up to three. The lack of paint will give it a quick abrasion, and its excess - cracking and chipping. Let each layer dry before applying the next one. Fully painted parts must be cured for 1 to 2 days.

Applying paint to the frame
Acrylic paints in spray cans are best suited for a bicycle. They lay down easier and grab faster. The color scheme in stores is presented for every taste, the main thing is to think over the shade in advance. One spray is unlikely to be enough, so it is recommended to take two or three at once. Is it necessary to sand dry paint? In principle, if it was distributed evenly and accurately, then not necessarily. Small smudges are removed with fine grit sandpaper. We pre-wet it in water so as not to leave even small scratch.
Finishing touches: drawings and varnishing
Some will not be limited to the monochromatic color of their two-wheeled friend, and rightly so. Emblems and symbols will give the bike its own originality, and it will look more elegant. You can also use stickers simple option, but labels applied with paint look much more reliable and beautiful.
Additional elements are created using stencils - special self-adhesive films with free cut out patterns. Available for sale various options: stripes, patterns, figures, letters, etc. If desired and a penchant for creativity, stencils can be cut independently from plain sheets adhesive film.

Film with a pattern for coloring
Important: when gluing stencils, you need to make sure that the main paint is already dry, otherwise, when removing the film, it will peel off or smear, and everything will have to be redone from the beginning!
The procedure for creating patterns is simple. You need to do the following:
- Attach the template firmly to the frame tube or fork.
- Spray paint onto the stencil using a spray can.
- Wait for complete drying.
- Peel off the film from the surface. The drawing is ready!
When spraying, it is allowed that the paint enters the film itself - the picture will have smoother edges. We make sure that it does not flow outside the stencil. For safety, you can additionally paste over the surface with a simple film along the edges of the staining area.
And finally, the last stage is the application of varnish on the surface. It is easy to guess that the varnish must be bought in spray cans, as well as paint with a primer. It is necessary to apply a protective coating in the same way as layers of paint, the number of layers is one or two. Do not leave free unvarnished areas, otherwise in these areas the paint will begin to age faster. There is an opinion that varnishing is a waste of time. This is debatable because lacquered surface Not only does it look prettier, it also lasts much longer.
Spray painting is simple and effective method upgrade your bike without professional painting skills. One time is enough to remember how and what is done to gain invaluable experience in this area.
For that part of the population that does not want to part with wooden window structures, it will be interesting to learn how to paint windows and extend their life. Periodic staining of frames is a laborious process. The main thing is to choose the right materials and follow the execution technology.
Painting a wooden window is not at all difficult. Today in stores and markets you can find a huge range of paints and varnishes for self-coloring. In order to choose the right product, you need to clearly know what characteristics it should have. There are several selection criteria that are recommended to be guided by when buying:
- resistance to atmospheric phenomena;
- protection against the formation of fungus and other harmful organisms;
- good coverage;
- resistance to UV rays and discoloration;
- pollution resistance;
- do not prevent the wood from "breathing";
- fast drying.
All these properties will help the old window frame to acquire a beautiful appearance and improve the performance of windows.
For painting wooden frames indoors, it is better to give preference to special oil-based alkyd paints. They are moisture resistant and detergents. It is easy to work with such material due to its elasticity. The same property allows the painted surface to remain intact and unharmed as a result of the swelling and drying of the tree. If the work is done correctly, the frame painted with an alkyd composition will have a presentable appearance for up to 5 years.
Acrylic paint is suitable for work from the side of the street. It is more affordable, not afraid of water, dries quickly and has no bad smell. The advantage of acrylic paints is that, if necessary, they can be diluted with water or change the color by adding color to the base. There are also universal compositions for indoor and outdoor work. Choosing a domestic product or an imported one depends on your wallet and personal preferences.
The color of the coloring material is selected based on the interior of the room. Basically, they choose a standard range: white, some shades of brown, brick. To create bold design solutions you can experiment with bright options.
If in doubt about the selection of paint, consult with the seller. It will help you choose the right product for your product, operating conditions and climatic features region.
Materials and tools for painting windows
Before you paint old wooden windows with your own hands, you need to prepare for necessary materials. Carefully check if you have everything and, if necessary, buy more things that are missing. To paint a wooden frame, you will need the following tools:
- grinder manual and electric;
- scraper;
- putty knife;
- foam roller;
- small brush;
- construction tape;
- container for paint;
- hammer, screwdriver, carnations;
- old rags and newspapers.
You also need to purchase materials such as:
- primer on wood;
- putty for wood;
- solvent;
- White Spirit;
- paint.

Additionally, prepare a stepladder or stool to reach the top of the window. It will not be superfluous to take care of the means of protection against harmful fumes. These can be special glasses, a respirator or a medical mask, gloves, old clothes, which, if you get dirty, will not be a pity. You will also need a piece of plastic film to cover the space under the window and not splatter everything with paint.
How to paint a window, preparation
How to paint a wooden window with your own hands so that in a year you do not have to repeat the procedure again? Without preparatory work it is impossible to paint the windows with high quality.
It is important to choose the right day for work. Strongly scorching sun or, conversely, wind and rain will not have the best effect on the final result. Under the wrong conditions, the paint will start to crack, peel and flake, so everything will have to be repainted.
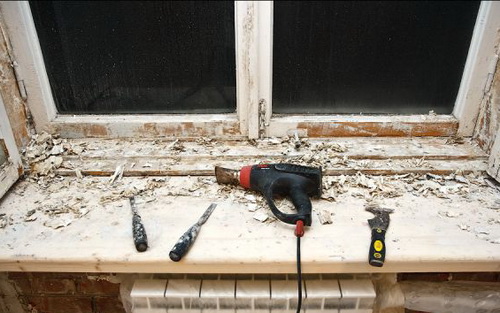
Removing old paint
Before painting old wooden windows the old layer of paint must be removed from the frame. For this, a scraper and sandpaper are used. If the layer does not want to peel off, you can connect a grinder or a drill with a special nozzle to the process. The cleaning procedure must be carried out very carefully so as not to damage the tree. For convenience, it is better to remove the fittings from the window or seal it with masking tape, and dismantle the structure itself and place it on a horizontal surface. It is also better to seal the glasses with adhesive tape around the perimeter at the junction of the glass and the frame, stepping back a couple of millimeters. This will allow the paint to get deep into the joint and not leave bald spots.
If there is little time for painting, you can purchase a special paint remover. So the work to remove the strictly layer will be faster.
After the old paint is removed, the frame is carefully inspected for defects. If there are, then they must be eliminated. To do this, the surface is polished with fine sandpaper. The serviceability of the mechanisms of handles, hinges and bolts is checked. With each repainting, the glazing beads that fix the glass are replaced with new ones. They are painted separately and already installed in finished form on the windows. Sections of the frame that have been affected by fungus or rot need to be repaired or replaced.
Surface putty
The next stage of preparation is putty. It will help fill microcracks on the frame, level its surface after grinding. Under oil paint it is better to take the same putty, under all the others - acrylic. The window is pre-cleaned of dust and, if necessary, dried with a hairdryer. Apply an antiseptic and wait until it dries. The putty layer is applied with a rubber spatula, carefully leveling the composition over the surface. If the damage is deep, then the paste is applied in several layers of no more than 3 mm with an interval of 2-4 hours.
 Putty - one of the stages of window painting
 If the wooden frame is made of softwood, then resin may appear on the surface. The paint then lays down badly, and the varnish will not stick to the tree at all. Additional processing required. Small areas with resin are easiest to cut out with a sharp knife and repair with putty. If the area of streaks is large, you need to use any solvent, for example, white spirit. There may be metal elements on the frame that cannot be dismantled. They are treated with putty for metal. After the entire frame has been plastered, the surface is once again passed over with a grinder and the window is cleaned of dust. A clean and dried window is examined from all sides and, if necessary, the puttying process is repeated again.
Wood window primer
final preparatory stage- priming. This is an intermediate layer between the paint and the surface of the frame. It is necessary to protect the tree from external influences and better paint adhesion to it. In order not to have to degrease the frame later, choose a primer already with this function. After application, the product forms an invisible protective film on the surface, which allows you to provide protection against insects and decay, as well as preserve optimal balance humidity.
How to paint a window, painting technology
Finishing the window is carried out only after the primer and putty have completely dried, otherwise the paint will lag behind. For work, you can use any convenient tool: roller, brush, spray gun. The space around the workplace is cleaned and cleaned of dust and small debris so that its particles do not accidentally fall on the freshly painted surface.
Paint preparation
Whatever type of paint is chosen for finishing a wooden window, it must be thoroughly mixed in a jar. Further required amount poured through a metal sieve into a separate container. Straining will get rid of lumps that will interfere with further staining. Prepare several types of brushes and a roller. A large flat or roller is suitable for a large area, a small one for painting hard-to-reach places.
Look at the consistency of the paint. If it is too thick, it is better to dilute it, otherwise it will be difficult to apply a uniform layer to the surface, and subsequently there will be sagging. It is recommended to pour a little paint into a separate container and gradually dilute it with a thinner. So you can understand what consistency to make it and what kind of liquefaction is best.
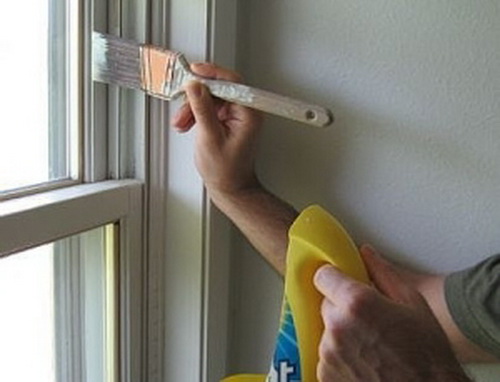
Paint application procedure
The first coat of paint must be liquid so that the product is well absorbed into the wooden surface. After application, the window is left until the first layer is completely dry. It is better to pick up paint on the brush to the middle, and remove the excess on the side of the container.
The number of layers depends on the quality of the paint, its consistency and the condition of the frame. Usually 2-3 coats are enough, but more may be needed. The next is applied in the same way as the first, making sure that each of the layers dries well. Remember that liquid paint should only be applied when applying the first layer. All subsequent ones are applied thicker. Remember a few rules for painting wooden windows.
- The material will lay down better if applied along the wood fibers.
- Do not press hard on the brush, make small, light strokes.
- Start working from the side of the street.
- Work with flat brushes 2.5-3.5 cm wide.
- Fittings are installed after complete drying of the painted surface.
In order not to waste time while the frame dries, you can paint the glazing beads, window sill and others. wooden surfaces adjacent to the window.

There is another way how to paint wooden windows. By old paint you can also paint the frame and refresh the appearance of the structure. Compared to the above process, when multi-stage work is done, such painting will not take much time. Applying paint to the old layer is suitable if there is no visible damage on the surface and the same composition is selected for work.
Before painting wooden windows with old paint, the top layer is removed with sandpaper. This is done only superficially, until a smooth matte surface is achieved. After that, the frame is wiped with a clean cloth, checked for defects. In their presence, irregularities are puttied. Further actions are carried out in the same way as with full processing with complete removal of paint.
Proper painting of old wooden windows with your own hands is not a difficult process, if you follow all the subtleties and stages of the procedure.
Despite the fact that modern PVC windows have a number of positive qualities, when renovating, some owners are not in too much of a hurry to change their old wooden frames to fiberglass or plastic. It is for such connoisseurs of wood that our article will be, in which we will reveal the secrets of how to remove old paint from window frames and how to paint wooden windows with your own hands. Our article will help you avoid repairs every year and extend the life of your wooden frame.
Window painting
A window frame made of wood is one of the most labor-intensive areas in the repair of an apartment:
- outside, it is exposed to ultraviolet radiation and precipitation;
- from nutria - elevated temperature, condensate and dry air;
- both outside and inside the apartment, insects can start in it;
- Mold and fungus easily develops on external surfaces.
Such adverse factors destroy the structure of the tree, so it is better to treat the frame with special impregnations that will help to avoid such troubles in the future.
What tools and materials do you need?
Preparing tools for painting windows
Repairing a wooden window frame with your own hands requires careful preparation of the base. You need to start by inspecting the condition of the material, both from the outside and from the side of the apartment, after which everything is prepared necessary tools and materials.
We will talk about the paint itself a little later, but besides it, you will need:
- solvent;
- putty for woodwork;
- brushes with different sizes of the working canvas;
- rollers of different diameters;
- a scraper so that peeling paint can be removed;
- sandpaper of different grain sizes;
- empty containers for paint and primer.
Also, don't forget to protect yourself. Be sure to prepare goggles, a respirator, gloves.
How to choose paint?

Choosing paint for wooden windows
Given that the window is an integral part of the apartment, which protects the room from atmospheric influences, the outside frame should easily cope with external factors, to endure excessive heat or cold, not to be afraid of high levels of humidity, etc.
The paint must provide:
- resistance to high humidity and not succumb to rotting outside;
- tree resistance to shrinkage and swelling;
- sufficient air exchange in the apartment.
A comparison table of the most popular paints for wooden windows is given below.
| View | Paint characteristic |
| Acrylic paint, water-based, odorless | It is highly resistant to moisture, can be used both indoors and outdoors, and is also perfect for further painting gratings; has a vapor-permeable breathable structure and a rich color palette; available in price and application; does not have a strong odor. |
| Silicone resin paint | The paint is odorless and very similar to acrylic counterparts; elastic; has a thick consistency; forms a glossy film; dirt-repellent features. |
| Silicate waterborne paint | Deeply penetrates into the structure of the tree; does not have a pungent odor; resistant to moisture and natural disasters; has a high level of adhesion. Fiberglass has antiseptic properties. |
| Polyurethane paint | Dries quickly; wear-resistant; frost-resistant; non-toxic; without smell; does not fade in the sun. |
| Water-dispersion paint | Eco-friendly, quick-drying composition; does not fade and does not fade under the sun's rays; frost-resistant; lends itself to tinting; odorless, can be used even in children's rooms |
| wood stain | Has no smell; allows you to save the texture of the tree; unpretentious; easy to apply and dries quickly; does not form spots; has a different color. |
Here are some practical tips from experienced decorators to make your life easier:
- For do-it-yourself painting of a wooden frame, it is better to use oil-based alkyd paint. This is a more durable and elastic material, which has excellent decorative features and does not have a persistent odor. The purchase of such paint for the frame will save financial costs for painting window grilles, because this material can also be used for metal.
- "Repair" of the frame should be done in this way: for outdoor work it is worth picking up acrylic paint, and for interior work - alkyd. Using different formulations paint outside and inside the apartment, you will be able to preserve the texture of the tree, as well as in the future to paint the grilles for the windows.
- You can also use the universal composition - atmospheric glossy enamel. This paint is equally good for both outdoor work on a wooden frame and for indoor work, because it does not have a sharp, persistent odor.
Please note that the color of the frame depends on where it is installed:
- If the windows face the sunny side - pick up the paint as light as possible. This contributes to the reflection of sunlight from the surface of the tree, because of which it will not dry out quickly.
- If your windows are in the shade all the time, you can paint them outside with darker coloring compositions, but it all depends on your wishes.
I would also like to mention such a process as painting plastic windows.
We are all used to the fact that PVC windows are only white, but this is absolutely not the case. Coloring pvc windows it can be completely different, but if you once installed white frames, and after the repair, they do not fit into your improved apartment design, you should not even think about replacing them (unless, of course, their quality suits you). It is allowed to paint a PVC frame, just be careful, because not all paintwork materials are equally good for this. If there is a great need for painting, think carefully about the whole process and get special materials and tools.
Surface preparation for painting

Preparing windows for painting
In order to do a quality repair of your frame from the outside with your own hands, choose the most optimal time of the year so that you are not hindered by burning sun rays, heavy rains and, especially, snow. The ideal season is spring.
The window frame made of wood dries well at a temperature of at least 5 ° C, at a humidity of not more than 80%.
Please note that it is not recommended to paint a wet surface, because the paint may bubble and the entire finish will have to be done again. Also, the paint can peel off from dampness, soil Bad quality and poorly prepared surfaces.
First of all, the restoration of the frame should begin with the dismantling of the window grilles, after which it is necessary to proceed with the preparatory work.
Surface preparation, first of all, consists in its high-quality cleaning, which is performed in the following sequence:
- Remove the old coating with coarse sandpaper or a scraper. Try to act carefully during the work so as not to damage the tree. A special solution will help speed up the cleaning process. To do this, the frame is covered with a special liquid, and after a while the paint turns into "cottage cheese", which is easily removed with a spatula. After that, the frame is simply cleaned with sandpaper.
- Unscrew all fittings from the window, or remove all the sashes completely. It is also necessary to remove all gratings. In order not to stain the paint, protect all parts that could not be removed with masking tape.
- Then you need to prepare the glass. To do this, it is best to use newspapers and tape.
- Replace all old glazing beads with new ones. Please note that the new ones need to be painted separately, and then nailed to the finished window
Applying putty and primer

Do-it-yourself window painting
The stage of priming and puttying is as follows:
- With your own hands, cover with primer for metal work all metal products that can succumb to corrosion.
- Next, you need to use antiseptic substances that should cover the tree - this will protect it from decay.
- Putty all kinds of gaps, cracks and other defects. But, be careful not to overdo it with a layer of plaster, because too thick sections can fall off. To do this, you can use putty, which is designed for woodworking, it is based on acrylic. If you do not want to use paint, but decide to get by with a stain, pre-tint the putty in the same shade so that it does not show through.
- After applying the putty and drying it, the surface is cleaned with sandpaper, then the remaining dust is removed and the evenness is checked.
- Then it's time for the primer. To do this, you can pick up a primer together with an antiseptic - 2 in 1. The primer forms a transparent protective film on the surface, which does not interfere with the preservation of the natural wood pattern. Also, the primer does not allow the frame to rot even when exposed to high humidity. But before applying the primer, it is worth degreasing the surface with white spirit.
window painting technology

We paint windows ourselves
When making repairs, before you start painting the frame with your own hands, you need to clean the room well, wash the remnants of the saw, which can settle on only the painted surface.
Today in the construction market you can find compounds that are designed specifically for woodworking. The following manufacturers can be distinguished from the total number:
- Deluxe;
- Caparol;
- Remmers.
As practice shows, imported brands at their price surpass domestic counterparts at times. The average cost of painting a wooden frame varies between 600-10,000 rubles, if you entrust the work to the master, and not use your own hands.
When repairing a window frame with your own hands, before applying paint to the surface, it is thoroughly mixed in a jar.
The first layer is diluted with a solvent to a watery consistency, which will allow the paint to soak into all cracks and bumps. After applying such a layer, the surface is left to dry.
The paint for the second layer is stirred in a thicker consistency so that the mass does not form smudges. If this could not be avoided, a solvent will help wash off the smudges, but until the paint is completely dry.
In the event that the second coat of paint did not help to achieve the desired result, a third coat can be applied.
Therefore, if for some reason you do not want to say goodbye to the old wooden frame, you can repair it yourself, both outside and inside the room. By following our advice and recommendations, you can easily extend the life of your wooden windows and forget about painting them for several years.
Due to the fact that most of the population of our country uses wooden windows in their homes, the problem of staining them remains relevant to this day. Every year we are faced with a dilemma: how to properly paint a wooden window.
Indeed, periodically the window needs to be painted, this is due not only to aesthetic factors, but also to practical ones. A painted window lasts longer and is not affected environment such as decay, pollution and destruction.
Properly done staining allows you to reduce the frequency of processing. The sun, rain, dust and temperature changes act on the window frame from the street. To prevent damage to wood, painting should be carried out according to the rules.

What tools and materials are used
To paint and repair a wooden frame, you will need the following tools:
- scraper or sandpaper;
- Grinder;
- brushes and roller;
- putty knife;
- masking tape;
- polyethylene film or paper;
- rags;
- container for paint;
- primer mixture and putty;
- White Spirit;
- solvent for diluting paint and washing tools;
- ladder or stool;
- carpentry tools: hammer, chisels, screwdriver, nails;
- protective equipment: mask, gloves.
Important! To paint the outer frame, use acrylic paint for outdoor work, and inside alkyd composition oil based.
How to paint windows?
To properly paint the surface of a wooden frame, you must follow the basic rules.
Painting algorithm:
Stage number 1. Preparatory work
Preparatory work in this matter is a must. First, painting is carried out under suitable weather conditions. The scorching sun, excessively high air temperature, as well as a cold and rainy day, can affect the quality of staining. This is due to the fact that the above factors can destroy the structure of the paint, as a result, it will peel off and exfoliate. Blisters and peeling may appear.
Preparation of frames for painting begins with the removal of the old layer. For this, a scraper and sandpaper are used. If the paint is removed poorly, then it is better to use grinder or a suitable nozzle on the drill.
Important! Cleaning must be done carefully so as not to damage the frame itself.
Hardware is removed during painting. In addition, during the process, it is better to remove the window from its hinges and disassemble it. This will allow you to paint the entire surface correctly, and the window will look aesthetically pleasing.
Advice! Now in any hardware store you can buy a special paint remover. Its use will significantly reduce the time for repair and painting the frame.
In the case when it is impossible to remove the fittings, it is recommended to use construction tape, which is used to seal the locks and wrap the handles.
To prevent the surface of the glass from getting dirty with paint, it is sealed with tape and paper. In this case, you should step back from the edge of 1-2 mm - this is done in order to fill the joint between wood and glass with paint. If you are an experienced painter, then you can only use masking tape, which is applied around the perimeter of the wings.
Stage number 2. Window repair
If the window frame has any defects, then they must be eliminated. In addition, it is worth checking the serviceability of the mechanisms of handles, hinges and bolts. The glazing beads that fix the glass are changed to new ones with each staining. Moreover, they are painted separately and ready-made attached to the main frame.
If there are areas on the frame that have been damaged by mold, rot or mechanical damage, then they need to be repaired or replaced.
Stage number 3. Frame putty
After the analysis of the state of the frame and its repair, it is necessary to prime and putty. An antiseptic composition is also applied to the surface. This treatment prevents rotting, the development of fungus and insects.
Important! The putty layer should be thin, as a thick coating tends to flake off.
For wooden frames, a special wood putty is used, as a rule, it has an acrylic base. If you decide to varnish the windows, having previously treated them with a stain, then you should add color to the putty in the color of the stain. This is done so that the putty does not show through the transparent layer of varnish.
Advice! Putty can be prepared by yourself at home. To do this, we prepare a mixture of wood flour, PVA glue or epoxy resin.
After the first layer has dried, we process it with fine sandpaper, brush off the dust and again examine the frame for defects. If any are found, then apply a second layer of putty. Thus, we must obtain a perfect surface.
Stage number 4. Surface primer
This process is mandatory, since the film formed during the processing protects the wood from external influences and improves bonding with the paint. Depending on the type of wood and paint, you need to choose desired type primers. On the shelves of modern construction stores - a wide range for every taste and budget.
Important! Use a primer only for wood, the mixture is not suitable for metal products.
Before applying the primer, the surface is treated with an antiseptic. Priming is done with a brush.
Stage number 5. Coloring
For coloring, it is preferable to choose an oil-based or acrylic-based paint.
Before painting, the paint is thoroughly mixed in the factory can, after which it is poured into a special tray. For best results, the paint can be filtered through a sieve.
We apply the first layer with diluted paint, since its task is to fill all the microcracks. To do this, we use a solvent.
The second layer is applied after the frame has completely dried. It is applied by brush or roller with undiluted paint. If the quality of staining suits you, then you can limit yourself to two layers. If there are defects or gaps, the final layer is applied.
Usually, several brushes of various sizes are used, this is necessary in order to paint over all parts of the window, including hard-to-reach ones.
Stage number 6. Final work
Newspapers, adhesive tape or paper that protected the glass must be removed before the paint is completely dry, preferably immediately after the work is completed. This is done so that when they are dismantled, the main canvas is not damaged. Dried paint may chip off and must be repainted.
After the paint is completely dry, you need to fasten the fittings and hang the sashes on the hinges.
Paints dry differently depending on the type, composition and manufacturer. Usually, the duration of this process is approximately one day. It is important to remember that all final work must be done after the paint has completely dried.
In addition, experienced painters recommend wiping a freshly painted window with a sponge dipped in soft water. Soft water is easy to prepare. Vinegar, lemon juice or citric acid are added to a basin of warm water. To understand what solution should be obtained, dip your hand into the water - the water will become softer. Proportions: 1 bucket of water 2 tablespoons of vinegar, 1 tsp. citric acid or juice of 1 lemon. Such processing is necessary so that the freshly dried paint does not stick and acquires a gloss.
Simply following the rules will allow you to get the desired effect. Happy repair!
HideDespite the fact that most houses are now equipped with more modern plastic and aluminum structures, which have won universal love, many apartments have wooden windows. Painting windows is a procedure that sometimes owners of wooden windows have to carry out. This is done so that the frames retain an attractive appearance and fulfill their purpose for as long as possible.
How to paint a wooden frame
Take note of a few rules that will help you and tell you how to paint correctly. This applies to the pre-work phase and will greatly facilitate the application of the coating.
- Wooden windows are painted only at the right time of the year. It is better to do this at the end of spring, when warm and dry weather sets in, precipitation is almost impossible. A suitable time is the end of summer, when the intense heat subsides, but the autumn rains have not yet begun.
- Before you paint the window, you must eliminate all defects and damage.
- All surfaces to be painted must be cleaned, removed the previous paint, sanded.
- Be sure to apply the paint in several coats, at least twice the application interval, so you will increase its service life.
- Before painting the frame, it is recommended to cover the puttied areas with a primer. It is recommended to seal the glass with masking tape or paper strips to prevent paint from getting in.
- Do not forget to dilute the paint from the can with thinner, as the composition in the can is too thick.
- When working with paints and solvents, be sure to wear gloves and a respirator - take care of your health.
Window painting step by step
So, how to paint with your own hands? Do not forget that painting window frames depends not only on the quality of paint and tools, but on the correctness of the preparatory stage.
- Prepare the necessary tools. It is better to cover the surfaces around the window with newspapers, seal the glass and fittings.
- The window must be cleaned of old paint - remove with a spatula and sandpaper or use a special liquid sold in stores.
- Remove all dirt and dust.
- Degrease frames or rinse with water.
- Putty cracks and chips that are on the frame. Then prime the window. Do not forget that surfaces must be thoroughly cleaned before puttying and priming. We recommend that you first go through the puttied areas with a primer or paint, so that the paint is absorbed and dried, this will give uniformity in painting.
- Let the frames dry well. Now you can start coloring. The frames are painted first from the inside, then from the outside. Apply the paint from top to bottom, first covering the horizontal coatings, then the vertical ones.
- Apply the paint in one layer, let it dry! Then apply the second and third layers, the strokes should lie on top of each other. Walk on the surface with a roller, which will smooth out the bumps.
- Paint with a wide brush, paint over corners and hard-to-reach places with a thin brush.
- Cover the outside of the window in the same way.
- Remove the masking tape and paper before the paint dries, otherwise they will stick and come off with the new coating.

How to choose window paint
How to paint - a question that must be approached carefully and responsibly. Choosing the right material is not the last thing in the whole frame renovation process, because good paint will not only change the look of the window, but also increase the life of the window.
When choosing which paint is better to paint a wooden window, look at moisture-resistant materials - this will protect the frames from the penetration of unnecessary water and protect the wood from cracking. The paint must be elastic in order to protect the frames from deformation and shrinkage.
The best option is alkyd paint or acrylic. As a rule, these paints are good because they do not turn yellow and do not have a smell. Do not be afraid that the paint is water-based (diluted with water), after drying it is very resistant and will last for many years. Answering the question of how to paint window frames outside - choose light colors that can reflect the sun's rays and thus prolong the life of the frames.

Starting repairs and, some choose varnish as a coating. How to paint old windows with varnish? Applying varnish is no different from applying paint. It is better to choose acrylic lacquer, which is water-repellent and environmentally friendly (on a wave basis), in addition, it can advantageously change the appearance of windows.
Even if you decide to paint the windows with expensive ship varnish, it will crack in a couple of years. Therefore, this is not the best option.
Coating the old layer
If you are thinking about how to paint wooden windows with old paint, then it is better to abandon this thought. No wonder one of the main conditions for competent window staining is the removal of the old coating. If you apply a new layer to an old one that has already cracked from time to time, then you risk not getting the result you expected. The new paint will begin to bubble over the old layer, bumps and roughness will come out - it will not look aesthetically pleasing and will nullify all efforts.
Painting with the help of professionals
If you do not want to think about how to paint old wooden windows with your own hands, are unsure of your abilities, there is simply no free time - entrust the process to professionals. Specialists will perform the work quickly and efficiently, using the most the best materials, which will permanently increase the life of your window. The average cost of work in Moscow, for example, starts at 3,000 thousand rubles, which will not become an unbearable amount.
Painting wooden windows with your own hands will take you a lot of time and will require focus and attention. Sometimes easier at discounted prices.
If you call a professional, after a few hours of painstaking work, enjoy the view of freshly painted windows. In addition, frames do not need to be painted more than once every 1-2 years, so the cost of the service does not seem exorbitant at all.
If you are still thinking about how to paint old wooden frames - stop doubting your abilities, because this process is available to everyone. And if you do not want to do the restoration yourself - call a specialized company.
Keep a close eye on the condition of your windows, timely painting of wooden frames is the best thing you can do to keep the original look.