How to drill a tile without cracking. how to drill a hole in ceramic tile where to drill a hole in tile
Imagine this situation: the master has just laid ceramic tiles - and you seem to breathe a sigh of relief - the repair is completed. However, a day later, in a furniture store, we saw a stunning hanging cabinet or a new mirror, as if created for your outstanding interior. And if you can still think of something with a mirror (for example, stick a mirror to the wall), then with a cabinet it’s not so simple. Joyful emotions from a successful purchase may well be replaced by disappointment if you do not know how to drill correctly. tile on the wall. Indeed, with inept technique, it is quite possible to spoil not only the locker, but also the already beautifully laid tile. We reveal all the secrets of the correct drilling technique in our step-by-step instructions.
Some difficulties to face

It is difficult to say anything bad about ceramic tiles: tiles can withstand the most difficult temperature conditions for decades and are not at all afraid of moisture, while retaining color, gloss and hardness of the surface well. However, this is the main difficulty in processing it with a drill - you will have to try hard so that the tile does not crack.
- hardness- in order to make a hole, it is necessary to overcome the resistance of the extruded ceramic material;
- fragility- incorrect technique can lead to cracks on the surface or complete splitting of the tile;
- smooth texture- in the process, the drill may slip and damage other tile fragments.


From here we can come to a logical conclusion: you should not take drilling tiles on the wall too lightly. This is fraught with a bad result and general dissatisfaction with the work done, since in some cases it is not possible to replace a damaged tile without loss of quality. Removed from production, for example, a specific collection. Or a new batch of tiles is leaning towards a darker tone. Of course, you can always choose an alternative, but any alternative is a compromise with your vision of an ideal interior. You can also completely abandon the tile and use alternative finishes. Read more about this in the article: "How can you finish the walls in the bathroom except for tiles". 

What tools and materials are needed

Of course, without a quality tool and auxiliary materials, you will not succeed. Therefore, one of the main stages of our instruction is its thorough preparation. So, what do you need to "arm yourself" in order to get a great result?
Drill
- for convenience, choose models on a portable battery;
- the tool must maintain trouble-free operation at low speeds.

In fact, your main trump card in the "struggle" with uncompromising tiles. The more drilling modes this "magic" tool supports, the better: a wide selection involves the use of different approaches to solving a problem - while a minimal set seriously limits the range of your actions. 

Separately, it is worth mentioning the good old manual drills, which is driven by the force applied from your side. It turns out that such a tool is best suited to flawlessly drill a hole in the tile on the wall - so you can find the exact number of turns required for this, without the risk of getting an annoying crack in the tile surface. 
Perforator
- can only be used for drilling under tiles;
- creates great risks for the occurrence of defects on the tile.

If there is no drill in your working arsenal, it is better to buy it anyway. And if for some reason it doesn’t work out, then you need to work with the puncher carefully, on low speed
with maximum pressure on the tile. Your task is to reduce the vibration that comes from this tool during operation. 
Drill
The overall quality of the result depends on which drill you end up choosing for the tile. Experienced craftsmen recommend the following options:
- victorious- the most affordable option in terms of cost, such a drill can be used if you need to drill a couple of holes, if more, then it is better to choose a different option, since even 1-2 holes will have to spend several hours of your life;
- spear-shaped- made of tungsten carbide, solid and efficient, balanced in terms of cost option;
- diamond- drilling them does not cause any negative emotions, ideal for the most critical cases, when, for example, a decent number of holes need to be made within a limited period of time, the only negative is the high cost.


It is important to remember that the diameter of the drill should correspond to the size of the dowel you are using, and the diameter of the drill should be slightly less drill. Otherwise, all the work will go down the drain - and the acquired locker runs the risk of hanging no longer than the evening. 


Also prepare for work:
- level;
- masking tape (adhesive plaster);
- pencil;
- a hammer;
- roulette.


Prepare and workplace: protect the floor from the inevitable dust in such cases by covering it protective film. If possible, remove everything superfluous within a radius of several meters from you in order to create the maximum comfortable conditions for drilling. 

Drilling steps

It would seem that there is something to drill? However, such frivolity sometimes plays a cruel joke with the "craftsman". We love good jokes, so we recommend that you take all the stages of drilling seriously.
- mark with a pencil or marker the point of the proposed drilling (or several - depending on how much you need);
- stick two pieces of masking tape crosswise on this mark, while maintaining its visibility - this will help you prevent frequent slipping of the drill from the tile, you can also use a patch as an alternative to tape;
- attach the drill with the drill set perpendicular to your mark and start drilling at low speed;
- do not lean heavily on the tool, and if the drill gets too hot, then periodically stop working for a few minutes;
- once you have completely drilled through the thickness of the tile and reached the base wall surface, change the drill to a hammer drill and replace the drill;
- we draw attention to the fact that the drill used should not touch the tile - choose a diameter a couple of millimeters smaller;
- from time to time cool the drill with plain water in order to prevent overheating.


After the desired hole is made, you can safely remove the tape or patch and hammer in the dowel. Of course, you need to do this with a hammer. 
Sometimes it becomes necessary to make sufficiently large holes in the tile. In this case, crowns should be used instead of a drill. They can help to quickly and efficiently make a hole in the wall. up to 15 centimeters
. There are both crowns, both victorious and diamond. The advantage of the latter is obvious: high drilling speed, safety. However, the price scares off many and makes them content with consumables from Pobedit. 


Some recommendations from experienced craftsmen can be very useful if you do not know how to drill ceramic tiles on the wall correctly or if you are doing it for the first time.
- when choosing a place for a hole, concentrate mainly on the middle of the tile - drilling along the edges significantly increases the risk of cracks;
- if during operation smoke begins to come from the drill, then stop immediately and moisten it with cold water;
- at low speeds, you can successfully use a drill for metal, but after that it will immediately become unusable;
- to obtain holes in a wall of large diameter, a ballerina is often used - a nozzle very much reminiscent of a school compass, however, the holes obtained in this way have torn edges and may not satisfy you in terms of aesthetics.


About how perfectly you can drill a hole in ceramic tiles on the wall, the masters tell in the following videos. Approaches, as we see, are different, but the result is always pleasing to the eye.
Conclusion
Now you definitely should not have questions about how to drill tiles on the wall. By and large, the final result depends primarily on your endurance. No matter how hot your temperament is, but still the main thing in drilling tiles is composure, measuredness and confidence. In this case, you can get the desired holes and keep the laid tiles in their intact form. Well, safely hang the purchased locker, of course. After all, everything was started for him, right? 

Photo: vk.com
The appearance of a particular visit, as well as comfort indicators, directly depend on the quality of the finishing. Usually, after finishing the bathroom with tiles, the question often arises of how to drill tiles in the bathroom in order to hang or install such important items interior decoration, like mirrors, hangers and so on.
The difficulty lies in the fact that the tile is a very fragile material that is afraid of mechanical stress and with one wrong action it can simply crack. There are certain methods that allow you to drill the most accurate hole, while leaving the tile intact.
Tools and materials
In order to drill the tile as successfully as possible without damaging it, you need to prepare certain tools that are suitable for the size of the drill, as well as materials. Among them, it is worth noting such pieces of equipment as:
- manual or electric drill;
- a special drill drill, preferably with an annular tip;
- a special drill for processing the base;
- mounting tape is sticky;
- marker;
- vacuum cleaner.

If it is necessary to drill a large hole in the tile, for example, for pipes or for a socket, you can use a special ballerina drill or cutter.
Basic secrets in drilling
As elsewhere, where a certain responsibility is required, tile drilling has its own characteristics and nuances. Some of these little tricks include:
- The hole does not need to be drilled at the very edge of the material, in gaps and in crosshairs, the likelihood of chips in this case high enough.
- When drilling, it is worth moistening the drill bit with water from time to time. This will help avoid overheating.
Important! The device must first be disconnected from the network.

- If for some reason a drill of the required size was not on sale, you can use a certain “artisanal method”. For example, it is quite possible to use a drill or drill of a higher professional level. The drill is clamped into the cartridge, first it drills the tile in shockless mode, therefore this mode is switched and the wall surface itself is drilled.
- For drilling tiles at low speeds, you can use a special drill for metal. But it is worth remembering that it will only be enough for one time.
Work procedure
Important! Before performing work, you should lightly act on the tile, if the sound is dense, you can fearlessly start the drilling process, the tile will not crack. You also need to first mark out those areas where future holes will be located.

The question of how to drill tiles in the bathroom is solved as follows:
- At the site of the hole, the enamel is slightly chipped, which can be done with a file;
- After that, adhesive tape or masking tape is glued, which will hold the drill at the very beginning of work;
- To prevent slipping, you can use a jig, that is, a plate made of wood or steel. It is applied to the tile in the required place, pressed and a hole is already glued through it;
- Having reached the base of the tile, the drill used must be changed to something that will correspond to the material of the wall, that is, concrete or wood.
Important! The second drill should not be larger than the first, otherwise damage to the material is inevitable. The drilling process is not laborious, but requires mandatory accuracy.
Useful video on the topic: 5 easy ways to make holes in tiles
There is a mass of communications that require channels. In addition, these rooms cannot do without hanging furniture, lamps, shelves, mirrors. The kitchen most likely has one or more outlets. There's nothing you can do if you don't want to pay the master, you'll have to learn how to drill ceramic tiles on your own.
Drill for drilling tiles
Any modern drill is suitable for drilling ceramic materials.
To make it work, you will need certain tools and fixtures.
There are no special requirements for this tool, except, of course, the ability to adjust the speed - for drilling tiles, they should not be large.
A high-quality screwdriver with well-charged batteries will completely cope with such a task.
If there is no electric tool that meets this requirement, then the old faithful hand drill is quite suitable - it will not be difficult to control its speed. Even an undeservedly forgotten by many brace will help drill a hole.
How to choose a drill

how to drill ceramic tiles
This is where things get more serious. An ordinary drill for metal can and will master one hole, but it will be completely ruined. In addition, there is no certainty that the tile under it will not crack.
You can use the view with a victorious soldering, as for concrete. The option is not the best, but quite acceptable for small diameter holes.
In the store you can buy a drill designed for making holes in glass - it is also perfect for tiles. They come with metal carbide or diamond-tipped.
The tile lends itself very well to a tubular drill with diamond chips sprayed on the end. To swing at large diameter holes (under pipes or sockets) the best way- a set of special crowns with corundum or diamond coating.
Crowns are a rather expensive tool, so for home purposes it is quite possible to get by with a “ballerina” with a changing drilling diameter. It is sometimes completed with a protective fence that prevents the possible scattering of broken pieces of enamel and ceramics.
How to drill tile
So, if the tool is prepared, you can proceed to practical drilling. One good advice - an inexperienced master should first practice on unnecessary pieces of tiles. When everything starts to turn out, you can proceed to the finishing work.
How to drill a hole

how to drill ceramic tiles
It all starts with markup. However, just putting a cross in the right place with a marker is not enough - the drill will most likely slip off the right point. There are two solutions:
You can lightly mark the center of the future hole on the enamel. Some use a sharp needle file, a hardened dowel nail, etc. for this. Care must be taken so that it does not crack.
A more acceptable option is to stick a piece of adhesive tape or masking tape on the drilling site, and only then mark the center on it.
To drill a tile that has not yet been laid on the wall, it is imperative to find a flat horizontal wooden surface. It should not have bumps, protrusions, fragments of tiles, should not fit snugly to the surface.

how to drill ceramic tiles in the bathroom
The drill of the required diameter is fixed in the chuck. The drill must be set to low speed - but the exact value will come only empirically.
Be sure to check (in the case of working with an impact drill or hammer drill) that the impact function is turned off.
The most difficult thing is to successfully pass the outer layer of glazing. Drills should be strictly perpendicular.
It is not necessary to press hard on the tool - a heated tile can crack. The drill gets very hot, so it needs to be cooled periodically, for example, in engine oil. Sometimes the drilling site is watered during operation.
You can use the old cooling method. Around the intended hole, the rim of their plasticine is molded with a ring. Coolant is poured into the resulting "capacity".
These were general tips, and now a few more details about specific cases of drilling tiles.
How and how to drill ceramic tiles video:
Drilling ceramic tiles for dowels

Gently hold the drill, try not to put pressure on the ceramic surface.
A very common case when you want to hang one or another on the wall. It is clear that it has already been laid on the wall, the glue has hardened.
You need to clearly define the place. The hole can be made without any problems if it is located either exactly along the seam, or in the middle (this is even preferable).
A center located close to the edge will inevitably either cause the drill to slip into the tile joint, or lead to the formation of a crack or chip.
The hole in the tile should be 1-2 mm larger than the diameter of the dowel. First, the tile is drilled, all the way into the wall. Then a drill of the diameter corresponding to the dowel is installed in the puncher and the required depth is drilled. The fact is that the drill has the property of a slight “beat”, and this can cause a crack.
When hammering the dowel - increased accuracy. An inaccurate blow with a hammer can cause irreparable damage.
Drilling for socket or pipe

You have ceramic tiles.
Now the option is how to drill a tile if a large diameter hole is required (more than 20 mm). This is required for conducting water and sewer communications, for installing sockets or switches.
If you have a “ballerina” at your disposal, then first of all you need to set the desired drilling radius on it (diameter divided in two).
The locking screw must be carefully tightened so that the “compass” does not move under the influence of vibration and centrifugal force.
To make it easier for yourself, you can pre-drill a hole, which will play the role of centering during further work.
The speed of the drill should be low, and the pressure is not strong, but constant. Sometimes drilling is accompanied by the scattering of small chipped debris, so it is better to work with eye protection.
When using diamond crowns, the drilling technology is similar. Crowns have a fixed standard size, just select the desired diameter for the pipe or outlet.
 You may encounter a situation that crowns do not have a center drill. In such cases, special templates or guide jigs are used, which, for example, can be attached to the wall with suction cups.
Some models of flat cutters are equipped with a special removable device that makes it easy to manually drill a hole of the desired diameter in the tile.
So, there is no special magic in drilling tiles. Accuracy, slowness, careful observance of technology - and everything should work out!
In bathrooms, the need to drill a hole in the tile arises either when it was necessary to hang a shelf, a hanger, a wardrobe, a mirror, or during repairs, when it is necessary to drill large diameter holes for pipes and sockets. In the first case, the tile is already glued in place, the holes are small, under the dowel Ø 4 - 12 mm. In the second option, work is performed before gluing the cladding, since a cold water / hot water pipe, sewerage pipe is already sticking out of the wall / floor, or there is an air duct opening. The holes are large, usually crowns, contour drilling, figured cutting with an angle grinder diamond blade or an MFP nozzle are used.
To solve such problems, only drills for tiles of small diameter are used, but not of the same design. You will need a drill, hammer drill or screwdriver with adjustable speed.
The technology actually consists of two stages. First, at low speeds, a hole is created in the tile, porcelain stoneware. Then a wall or floor screed is drilled to the desired depth.
Regardless of the design, before starting work, it is necessary to check the sharpening of the cutting edges of the drill. Glazed glossy tiles are inconvenient to mark with a pencil, marker, so the surface of the cladding in the right areas is usually pasted over with adhesive tape or masking tape.
Drill "spear"
The industry produces two types of similar equipment that allows you to quickly drill tiles in the bathroom with a minimum repair budget:

A two-bladed drill can be sharpened as the cutting edges wear. The equipment is inexpensive (diameter 6 mm from 60 rubles), it drills very quickly. A four-bladed spear cannot be sharpened by hand, it costs more than the previous version (diameter 5 mm from 170 rubles). In fact, this is a disposable expensive maintenance-free tool.
Both types of drills are not suitable for passing through concrete / brick walls. After getting a hole in the tile, the drill will have to be replaced with a standard drill for a hammer drill or an analogue for an impact drill with a cylindrical tail.
The tip of the spear is quite sharp, so you can do without punching. It is enough to set the tool in place, lightly hit the back of the drill, screwdriver with your free hand.
Drill or drill with a pobedite tip
The tips of the drill for the puncher and the drill for the drill are made of carbide material - Pobedit, that is, VK4 - VK10 alloy. However, the shape of the cutting part is designed for quick, accurate destruction of homogeneous structural materials - concrete, brick.
 Drill and auger with a Pobedite alloy tip
 In order not to damage the ceramic tiles, drilling should be done without impact, at a speed of 800 - 900 rpm, preferably with a new, unused drill / drill. This method is suitable only for ordinary ceramics, it is not suitable for porcelain stoneware, since the drill is initially quite blunt and it is problematic for them to drill porcelain stoneware in an unstressed mode.
This is the only option for drilling with one tool without changing the drill. After passing through the tile, the puncher or drill switches to impact mode.
Regardless of the diameter of the drill, the tip of the tool always slides over the glazed tiles. To improve the accuracy of drilling, several options are used:

In principle, it is enough to slightly damage the enamel at the place of drilling with a steel scriber, self-tapping screw, dowel, in order to drill quite accurately into porcelain stoneware, tiles at low speeds. A drill with a cylindrical shank costs from 30 to 50 rubles. depending on diameter. A drill for a perforator is a little more expensive - from 50 to 70 rubles apiece.
There are two types of tubular ceramic / glass special drill:

The classic tube drill is a miniature analogue of a crown without a pilot drill. The tool destroys the material along the outer ring, the middle falls out at the end of drilling. The price of a tubular drill depends on the method of applying a diamond cutting layer - 250 - 350 rubles.
The sector drill has a much larger contact area with the tile. When the tool is rotated, the entire tile material inside the perimeter of the cutting edge is actually destroyed. The process takes a little longer, but the diamond particles are evenly distributed in the tip.
Unlike a spear-shaped drill, a small-diameter diamond tool equally well drills tiles and porcelain stoneware with a hardened inner layer. Therefore, this option is better to choose for installing a floor-standing toilet on flooring porcelain tile.
Sector drills are produced by a limited number of manufacturers, most often products of the Emar brand are found. The equipment has unique characteristics:
- drill resource 800 holes in porcelain stoneware;
- 70 holes to a noticeable decrease in drilling accuracy;
- diamond tip height 8 mm;
- tool length 80 mm;
- price 500 rubles for a drill with a diameter of 6 mm.
When working with crowns and tubular drills without a guide, it is necessary to have the skill of correct drilling:

Since the tool is expensive, after passing through the tile it is replaced with an ordinary drill, the wall is drilled with this budget equipment.
Large diameter holes
Large-sized holes are made on the tile before it is mounted on the wall or laid on the floor. They are required to output engineering systems outside - water sockets, sewer pipes, socket boxes, ventilation system channel.

It does not make sense to drill them on the wall, since the wiring of electricians, pipes is made in the concrete of the wall or behind a false plasterboard panel. There are two types of special tool that allows you to make holes in the cladding very carefully. In the absence of such equipment, you can use a small-diameter drill, a grinder with a diamond blade, or a multi-tool.
Crowns
Crowns for ceramics for making through holes in tiles are classified according to several criteria:

Tungsten carbide bits are used to cut holes in ceramics. With the same diameter with diamond equipment, their cost is 2-3 times lower. However, the abrasive layer begins to fall off when you try to drill porcelain stoneware.
The cylindrical shank tool is considered the cheapest, the hex tip raises the price, but not by much. Hammer shank bits are the highest priced. In addition to ceramics, diamond porcelain stoneware confidently and evenly cuts glass and mirrors.
Crowns are sold individually and in sets. A tool coated with tungsten carbide Ø33 mm costs 420 rubles, a set of 4 crowns (33 mm, 53 mm, 67 mm, 83 mm) with an adapter costs 1600 rubles.
The cost of diamond crowns of domestic, foreign manufacturers starts from 700 rubles. or 1000 rubles, respectively. Depends on shank type (SDS+, cylindrical), diameter, cutting edge shape (tubular, kerf), presence of pilot drill, brand and other factors.
In a set, crowns are cheaper, special devices and accessories are added to them. However, the required tool diameters are rarely present there, you have to buy them individually.
LBM with diamond blade
At limited budget a confident angle grinder user will always be able to carefully cut a large-format hole in the tile with a diameter of 50 mm or more (pipe sewer pipe) with a diamond disc.
To do this, use a disc Ø115 mm. Work is carried out at an angle to the surface of 45 ° from the front side of the cladding.

You can partially remove the tile inside the marked hole with straight cuts. For example, crosswise in the middle, then a square inscribed in a circle.

Then the remnants of the tile inside the circle are removed with nippers with a lateral arrangement of sponges.

Works with angle grinders can be performed from the reverse side of the finishing material. The marking in this case should be symmetrically applied on both sides of the tile. A tool with a diamond disc rotates uniformly in a circle about its center. The tile must be fixed with a clamp with a soft gasket.

When marking the hole, the gap between the tiles should be taken into account to ensure the standard thickness of the joints. In case of insufficient experience in using angle grinders, it is recommended to use a special holder, with which the required disc overhang is set relative to the base of the device.

If the hole is not hidden under the ventilation grate, decorative washers of the mixer, the edges must be further processed with an abrasive tool - a rasp, a file, sandpaper attached to a piece of the handle.

Multi tool
For especially precise, responsible work with almost any structural, finishing materials, a separate category of power tools has been created. Different manufacturers (or in different stores) do not call them the same:
- MFI is a multifunctional tool;
- renovator - universal cutter, electric chisel;
- multitool - vibratory cutter, multimaster, oscillating tool.

The principle of operation is similar to the delta grinder, the dimensions are much more compact:
- the renovator spindle fluctuates within 3 - 4 ° relative to the central axis;
- vibration frequency is 10000 - 25000 min-1;
- several types of nozzles are used for wood, ceramics, metal, plastic.
There are network and battery options for MFIs that allow you to make holes of any size, shape in the tile before and after gluing it to the wall. With the same success, a heated towel rail is connected by a renovator or a wall shelf is attached.

For tiles and porcelain stoneware, diamond-coated segment saw blades are used. Or nozzles in the form of a hammer, teardrop shape.

Engraver
Another highly specialized tool for precision work, often in the arsenal home master, is a miniature drill - engraver.
This power tool can be used independently - the equipment is mounted in a collet clamp, or with a flexible shaft.

Moreover, flexible shafts for drills and grinders with emery wheels are commercially available.

By analogy with the MFI nozzles for the engraver, the industry produces a huge amount. However, they cut the material due to rotation, not vibration. To make holes with an engraver, it is most convenient to use a device that turns this power tool into a miniature analogue of a milling cutter.
 Engraver with a device for milling holes.
 Use a tile bit (Dremel part #562) or a diamond blade (#540 DSM).

Due to the high strength of the hardened layer of porcelain stoneware, tool life is reduced compared to drilling ceramic tiles.
Perimeter drilling
When installing an electrical or water outlet in the absence of an angle grinder, crowns, an engraver and other special tools, you can use a drill with a spear-shaped, tubular, small-diameter drill bit:

ballerina
Special tool for making holes in ceramic cladding- ballerina - available as a nozzle on some manual tile cutters or sold separately as an accessory for an electric drill.

In any case, the destruction of the facing material occurs with a cutter during rotation around the central guide. The process is long, dusty, and the material may crack at the exit.

hacksaw
On sale there are special canvases for ceramics for ordinary hand saws.
 Diamond string.
 First, a hole is drilled in the tile with a drill, then the canvas is inserted into the hole and fixed to the seats in the hacksaw. Next, the figured hole is sawn.

This method is good because you can cut a hole of any shape.
Thus, it is possible to drill tiles in the bathroom before or after gluing with various tools with different types snap. This should take into account the repair budget, the size of the hole, the required cleanliness of the edges.
Ceramic tile is an excellent finishing material that is widely used in private construction and when carrying out repairs in apartments. Durability, water resistance, high hygiene, practicality, ease of maintenance, relatively low price and plus all this - excellent decorative effect make the tile an almost indispensable material for kitchens, baths, bathrooms, for finishing entrance groups - porches, verandas, hallways, etc. P .
Learning is quite affordable for the average owner of a house or apartment: a little diligence, diligence - and experience will come very quickly. But it is equally important to know how to drill through tiles. Holes, one way or another, will be needed, for example, for hanging furniture, interior accessories, for wiring pipes or other communications, for mounting sockets and switches, and for other needs. It's okay - we will learn to drill ceramics.
What you need to drill ceramic tiles
What, in fact, is the essence of the whole problem of drilling ceramics? Peculiarities technological process production of tiles - high-temperature firing, the high density of the material and its surface strength (especially if there is a layer of glazing) have, in addition to the obvious advantages, a logically consequential disadvantage. Ceramic products are distinguished by fragility, the absence of any kind of plasticity, and the tile, with careless handling, cutting or drilling, can easily crack, chip, or even fall apart into several fragments.

In addition, the material itself, during processing, has a very strong abrasive effect on cutting tools, and ordinary drills will become dull in a matter of seconds.
Conclusions - for drilling it is impossible to apply excessive load, vibration action, a large number of revolutions of the tool. And, accordingly, the drills themselves must be made of high-strength materials that can pass through a dense structure, and have an appropriate configuration or sharpening.
So, what you may need to drill tiles:
| Picture | Short description |
|---|---|
 | Electric drill. The main condition for it is the mandatory presence of smooth speed control. |
 | A high-quality screwdriver with a powerful autonomous power source may well be enough. |
 | No need to write off the already forgotten hand drills. For drilling small holes, such a tool will be quite enough, and adjusting the speed of rotation is generally not a problem. By the way, sometimes even a regular brace can come in handy. |
 | Standard carbide-tipped drills. Frankly, not the most the best choice- this sharpening option will create difficulties when passing through the most durable top layer of the tile. Rather, they will be needed to deepen into the thickness of the wall after the holes in the tile are made with other drills. More designed for shock-rotational action. |
 | Special spear-shaped drills for working with tiles. Very convenient when making holes of small diameter (for example, for dowel fastenings). They may have a conventional cylindrical shank for clamping in a drill chuck. There are also drills with a hexagon, the size of standard bits - it is convenient to work with them when using a screwdriver. Typically, these drills are enough for a couple of dozen holes in a regular tile. It is more difficult with porcelain stoneware - they cannot overpower more than two or three holes. |
 | Special tungsten carbide drills with one-sided sharp-angled sharpening. Well "bite" into the tile, easily pass the outer, most dense layer. Similar drills from good manufacturer will work a lot. |
 | Special core drills with diamond or corundum coating. They already belong to the category of professional tools, they are able to cope with both tiles and porcelain stoneware. They are a hollow tube, which facilitates the drilling process - there is a free outlet for waste. Most often produced for large diameter holes. |
 | Similar to those already mentioned - crown drills with tungsten carbide coating. They can be used not only for ceramic tiles, but also for natural materials - marble, granite, etc. Usually they are sold in sets for a number of diameters, that is, they are purchased more often by professionals who are constantly faced with such a technological operation. |
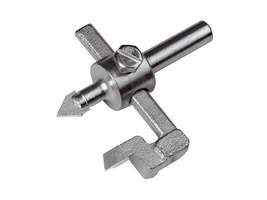 | For one-time work, if it is necessary to make holes of large diameter, it will be more profitable to purchase a special drill - a "ballerina". It is inexpensive, but allows you to completely cope with the task in the range of diameters from about 30 to 90 mm. The design is simple - a central drill (usually spear-shaped) and a carbide-tipped leg located parallel to it. the leg outreach can change - this is how the desired hole radius is set. |
 | Some models of tile cutters are equipped with a built-in manual "compass" - a device that allows you to cut a hole in the tile without resorting to other tools. The scheme is similar to the "ballerina", and the rotation is transmitted manually, using a handle. |
 | For the convenience of work, for precise drilling of even holes, special devices can be used - conductors. They are attached to the surface, usually with suction cups, and do not allow the drill to go to the side, which is especially important when starting drilling. |
 | When drilling some types of tiles, the tool quickly becomes hot, and the quality of work decreases. We have to resort to artificial cooling with water. To do this, use special superchargers that supply water under low pressure to the cutting site. |
After you have decided on the tool, you can proceed to practical work.
Prices for the popular line of electric drills
Electric drill
First, a few general tips:
- If possible (there are fragments of unnecessary tiles), then it makes sense to start with a little training. When everything starts to turn out, it will be possible to proceed to the execution of the desired task.
- It is very important to make accurate markup. You can, of course, apply the future drilling point with a pencil or marker directly to the surface of the tile. However, firstly, not every pencil will leave a trace on a tile (especially on a glazed one). Secondly, this mark is very easy to smear with an awkward movement. A very simple way seems to be optimal - the hole area is sealed with a piece of ordinary masking tape, and after that you can already mark up - everything will be perfectly visible.
The positive "influence" of adhesive tape is not limited to this. Practice shows that it is much easier to start drilling this way - the sharply sharpened edge of the drill will not slip from the intended point. This is much better than trying to core the center. When working with a core (let it be a hardened dowel-nail or a sharp needle file), there is always a chance of damaging the surface of the tile or even allowing a chip (crack).
- Never use high speed when drilling tiles. Speed range - from 100 to 400 rpm. It is difficult to specify the exact value - it depends on the type of drill, and on its diameter, and on the thickness and material of manufacture of the tile itself. But in practice, the required frequency is very quickly found empirically.
- It must be taken as a rule - if a drill is used that has a percussion function, then it is imperative to check that this option is disabled before starting work.
- If a tile that has not yet been laid is being drilled, then it is necessary to prepare a comfortable workplace for work. The surface must be flat, stable and not vibrate. From below, material should be laid that will not become an obstacle to the drill - it can be wood, plywood, or even an unnecessary piece of drywall.

It is imperative to check that there are no solid fragments left on the desktop that will prevent the tile from firmly adhering to the surface.
- The cutting tool can get very hot during operation, and overheating of the drilling site often leads to cracks in the tile. This means that excessive efforts should not be applied - it is better to give a little more time to get the hole. It is fashionable to periodically cool the drill itself, lowering it, for example, into engine oil. Sometimes, when working on horizontal surfaces, they resort to “local cooling” - an annular shaft is fashioned from plasticine around the intended center of the hole, and the resulting “ container" is filled with water.
If the hole is drilled on, then you need to be extremely careful with the oil setting of the drill - drops of oil can get into the grout, and you will have to suffer a lot to get rid of such spots.
Sometimes you have to resort to the forced supply of coolant. Many professionals have a special tool for this purpose - usually a pressure vessel in which excess pressure is created by a hand pump, and a special jig that centers the drill and ensures the flow of fluid into the drilling area.

- The drill should always be perpendicular to the surface of the tile - if there are no special holding devices, then you will need to constantly monitor this yourself.

- Drilling ceramics (especially when making holes of large diameter) can be accompanied by the scattering of microscopic, but very sharp fragments. We should not forget about this - it is necessary take action to protect the hands and especially the eyes.
Now that the basic concepts have been outlined, we can proceed to consider the most typical ceramic tile drillings - small holes for dowels, and large diameter holes - for laying communications and installing plumbing, sockets or switches
Drilling small diameter holes
A typical situation is when you need to hang some piece of furniture, a mirror, a towel rack, a cabinet or a shelf, or another bathroom or kitchen accessory on the wall. In this case, driven plastic dowels are usually used, with a diameter of up to 12 mm. The situation is considered when work is carried out on an already tiled wall, the glue under which is completely frozen.
First of all, you need to determine the location of the hole. The fact is that it is desirable that it be located no closer than 15 mm from the edge of the tile. Otherwise, it is very likely that either the drill will slip into the seam between the tiles, or the edge from overheating or vibration during drilling will simply crack or even break off.

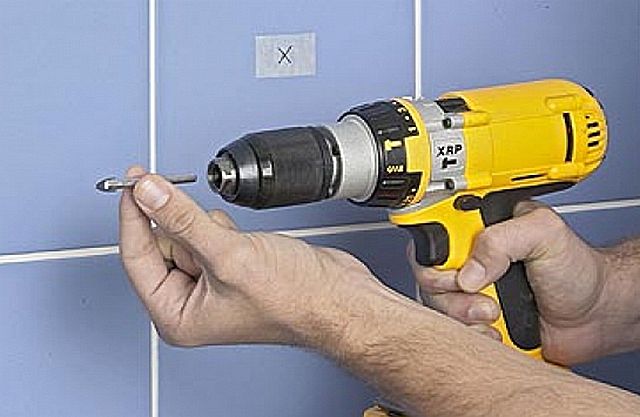
- After marking, it is necessary to insert a drill of the desired diameter into the drill chuck. We proceed from the dimensions of the dowels being prepared for installation - the hole in the tile should be 1 ÷ 2 mm wider than the diameter of the dowel plug.
- The drill is installed in the intended center (adhesive tape should not allow the tip to slip), and then drilling begins at low speeds. The most difficult thing is to go through the top layer of tiles - further drilling will go "more fun".
- As soon as the thickness of the tile has been passed, and the drill has reached the wall, it is removed - it makes no sense to blunt an expensive tool. An ordinary drill is taken for perforating walls, with a diameter exactly corresponding to the size of the dowel.
- The drill should pass freely through the hole in the tile, and then you can continue drilling in the wall itself to the required depth. Of course, this is done very carefully so that the edges of the hole in the tile are not damaged by accidental distortion, since a long drill may have a slight “beat”.
- Then it remains only to put the dowel into the hole made and carefully hammer it. Remember, an awkward movement can ruin all the work done - from an accidental blow to the surface, the tile can crack.
- After that, nothing should prevent screwing in a hook, self-tapping screw, or other fastener.
Drilling large diameter holes
Holes of large diameter (from 20 mm and above) are most often drilled in tiles even before laying it on the walls or. Careful marking is carried out with the definition of centers, and the tiles are laid on a workbench.
Here, the drilling technology may vary somewhat - it largely depends on the type of drill used.
1. If a “ballerina” is used, then for a start it is advisable to go through the tile in the center with a drill of small diameter (about 3 ÷ 4 mm) - this will greatly simplify the further process.
When installing the ballerina's movable leg, do not forget that in this way we set the radius, that is, half the diameter - do not make a mistake here. After setting the desired radius, the locking screw is firmly tightened, with force so that the movable leg does not move under the influence of vibration and centrifugal force.
 The process of drilling tiles "ballerina"
 When drilling, small revolutions are maintained, the position of the drill is perpendicular to the surface and not too large, but constant, uniform downward pressure. With excessive force, the drill can jam, and it will be extremely difficult to keep the tile on the surface of the workbench. The sharp cutting edge of the tool should do its job.
Care must be taken to maintain the same depth cutting along the entire length of the resulting circle.
 Sometimes there is a need to somewhat “earn” the edges of the resulting hole
 Sometimes the edges of the hole will require a little refinement - this can be done with pliers, and then sanded with sandpaper.
When drilling with a ballerina, extra care should be taken - it is an eccentric in itself, so the process may be accompanied by increased vibration. For greater safety, it is recommended to use a "ballerina" with a protective plastic casing.
 Drill-“ballerina” with safety cover
 2. If the master has diamond, corundum or tungsten carbide crown drills, the process is simplified.
Such drills can have their own shank for fixing in the drill chuck, or be a collapsible design with a replaceable crown for several diameters.

Please note - the photo shows crowns with a central pilot drill. Working with them should not be particularly difficult - the center is set at the intended point, and then drilling is performed with a little pressure at low speeds. The holes usually come out very regular, with smooth, unrefined edges.

However, you can find crowns that do not have a central drill - this is especially true for small diameter tools.
How to center them, how to correctly set the center of the drilled hole? For this, the already mentioned devices are used - conductors. Often they are even sold in one set with drills.
 A convenient set - bits with a conductor that can be connected to forced cooling
 The conductor is attached to the wall (usually on a suction cup) so that the hole of the desired diameter on it is located exactly above the intended center. After that, it will be simply impossible to make a mistake - drilling will take place exactly where necessary.

There are also "light versions" of such a device - templates that are applied or glued with tape to the wall in the right place, and then a hole is drilled. Convenience, of course, in this case is less, but the accuracy will be observed. By and large, such a template is necessary only until the moment when the crown does not deepen slightly into the surface of the tile. By the way, some craftsmen, saving money, cut out such patterns for themselves from a regular sheet of 10 mm plywood.
3. Finally, we can mention the most "folk" way of making holes of large diameter in ceramic tiles. They resort to it when there is no way to find a suitable drill.

The point is that a series of holes of small diameter are drilled along the intended circle. Then it will be necessary to carefully break out the central fragment, and then modify the resulting opening to the required round shape- files, needle files or sandpaper.
You can’t call this method quick and easy, but nevertheless, it has the right to exist.
And at the end of the article - a visual lesson on how to drill tiles from a professional:
Video: several options for drilling ceramic tiles