What tools do you need to install laminate flooring? Laminate Laying Tool: Tools, Features and Useful Tips Laminate Laying Tool
Laminate is a practical and beautiful floor covering affordable price and ease of installation. The interior of the entire living space depends on how carefully the laying of the material is done. To achieve the perfect laminate floor, you need to take care of the necessary tools in advance: prepare a set for laying laminate, choose how to saw the panels, prepare additional fixtures, decide on the use of electric and hand tools.
Each tool has its own characteristics, technical capabilities and operating techniques, which we will discuss in this article. Therefore, after reading to the end, you will understand what tools are needed for laying laminate flooring in order to avoid mistakes and not spend a lot of effort.
Household and professional tools
The floating laminate floor connection system allows for installation work by device floor covering much simpler and lighter than parquet or porcelain stoneware. Before starting work, you should decide what tools are needed for laying the laminate with your own hands, prepare them or buy them if necessary.
When selecting fixtures for laying laminate, first of all, the skill and professionalism of the performer, as well as the amount of work to be done, are taken into account. Given such criteria, the classification of instruments can be presented in two categories:
- household tool;
- professional tool.
The difference between the second and the first lies in the higher intensity of use and improved ergonomics of the design. To withstand increased loads, manufacturers of professional tools use better materials in their construction, which naturally increases their price.
Advice: If you want to lay a laminate floor with your own hands in an apartment or house on an area up to 100 square meters, then you should not overpay for a professional tool. Enough to buy household. And if you plan to install the floor in a cottage with an area of more than 100 square meters. m., it is better to purchase a professional tool. This will allow you to get the job done faster and you will be less tired.
Do-it-yourself laminate laying tools include:
- roulette;
- pencil or marker;
- construction square or metal ruler;
- plastic or wooden block;
- mallet or hammer;
- expansion wedges;
- mounting bracket for laying the last laminate panels;
- any cutting tool for wood or chipboard.
Most of these items are probably available to every owner in the house. Let's take a closer look at each separately.
A tape measure is a measuring tool that almost everyone in the house has. With its help, it is more convenient than a metal ruler to measure the lamellas before cutting. It is recommended to use a product that has an ergonomic shape and a clear division. This will ensure the correct measurements and the duration of operation. To make the tape measure sit well in your hand, use a product with a rubberized case from trusted manufacturers.
Pencil
A pencil is required for marking the sheet. It is most convenient to use building pencils with a thick lead and a shell with an oval or rectangular cross section, which prevents it from rolling over the surface. But if you are not going to lay a laminate floor of more than 100 square meters. m., then it is quite possible to use a simple clerical pencil.
When marking the laminate, you can use a marker, but it is better not to do this. If you made a mistake and made the markup in the wrong place or on the wrong side, then it will be very difficult to remove traces of the marker.
square
The construction square is a tool for carpentry. It is necessary for checking planes and mutual perpendicularity between parts. For domestic use, the tool is presented in the form of two rulers (one thicker than the other), connected at an angle of 90 °. In a professional square, you can additionally measure angles and mark the radius. When laying laminate with a square, it is very convenient to mark perpendicular lines to cut off an excess piece of panel.
Hammer or mallet
Each laminate lamella must be pressed tightly against the previous one so that the coating looks as solid as possible without gaps and cracks. For these purposes, the board is beaten with a hammer or mallet. It is not always possible to accurately execute a strike and calculate strength. Therefore, in order not to damage the delicate locks of the laminate, an impact bar is additionally used. It is sometimes referred to as a sling bar.
A medium-sized hammer or mallet should be used to control the force of the blow well.
Undercut block
An impact block made of wood or plastic is used when tamping lamellas during installation. It is made of impact-resistant plastic or ash, beech, walnut wood. The bar is installed on the opposite side from the panel fastening and with a mallet or hammer, the panel is beaten to the already installed ones. Its task is to distribute the impact load over a large area and prevent damage to the locking element of the bar.
expansion wedges
Spacer wedges are designed to set expansion gaps around the edges of a laminate floor. They are pegs of different thicknesses with a slope from one edge to another. For the manufacture of plastic or hard wood is used. For repairs in a small area, as an alternative, you can use pieces of laminate or drywall. Professional parts have a special profile for connecting 2 or more elements in different directions.
Mounting bracket
The mounting bracket for laying the laminate is a metal part for lining the last lamellas to be laid in the direction towards itself (as opposed to a bar). It can be sold separately or in a set with a bar and wedges. In the domestic version, the bracket has a simple design, and for professionals it has a larger area and felt linings.
Laminate laying tool kit
Everyone has almost everything you need for styling (tape measure, pencil, hammer, hacksaw, corner) home master. Manufacturers combined the missing tools into a set for laying laminate and parquet boards, which includes:
- expansion wedges made of wood or plastic (usually in a set of 30 to 50 pieces);
- wooden or plastic impact block for tamping panels;
- mounting bracket for laying the last laminate lamellas.
Such a set of tools for laying laminate flooring can be purchased at stores specializing in the sale of laminate flooring. Fixture prices are affordable. The effectiveness of the use of assistive devices fully justifies the cost of their acquisition.
Experienced flooring installers always have a curve measuring template in their arsenal. It allows you to accurately fit the trims in hard-to-reach places, near ledges or around communications. Using the template, you can easily and quickly draw a cut line with minimal error. The use of such a tool will help to better lay the laminate flooring.
Cutting tool
Laying laminate flooring is not complete without adjusting the panels to the required dimensions. It is not possible to lay only one-piece sheets of laminate. Panels of material have to be cut to size when installing each row. For these purposes, you can use any wood cutting tool, since the composition of the laminate is very similar in structure to wood. by the most simple option is a hand saw or a hacksaw, which a diligent owner has in every home.
Advice: before you start cutting, masking tape should be glued to this place, which will prevent the formation of chips at the cut site. In this case, it is recommended to lay the board with the front cover up.
If you want to speed up the process and reduce physical costs, it is advisable to use an electric tool: a jigsaw, grinder or circular saw.
There is an opinion among craftsmen that in order to lay a laminate, it is enough to have a minimum set of tools, including a tape measure, a construction pencil, a square, a hammer, a jigsaw or a hacksaw, and the most valuable thing is skill. Such a minimum set can be dispensed with if you have to lay the laminate in a small area, with clear, even surfaces without protrusions and partitions.
Among the desirable accessories during the repair of the floor should include:
- masking tape to protect the decorative layer when sawing off unnecessary parts of the laminate planks;
- a screwdriver or drill equipped with a crown nozzle for cutting holes for pipes and communications;
- construction or clerical knife for opening packs of material;
- hydro or laser level to check the horizontalness of the base;
- personal protective equipment: gloves, goggles, respirator, etc.
Important! Do not neglect the use of PPE. Gloves will prevent the master's hands from accidental scratches, light blows and splinters. When sawing laminate, a lot of sawdust and fine wood dust is formed. Goggles will keep shavings and sawdust from getting into your eyes, and a respirator will protect your lungs from fine wood dust, which can be soaked in resins containing formaldehyde.
Professional tools for laying laminate, as a rule, have an extended range of components. A professional needs to quickly make decisions in the most unforeseen and non-standard situations, which requires the presence of various non-standard devices and styling devices: a mounting clamp, various templates, a professional square, a goniometer, a metal bracket, multi-level finishers and much more.
A professional tool is always of high quality workmanship. The use of such a tool is designed for a long period of time and intensity of operation. Therefore, it is characterized by the best ergonomic solutions and competent engineering study. individual parts. For the production of such products, materials with a high level of strength and quality are used. Therefore, the price of such tools is much higher than that of household ones.
findings
When preparing for the installation of a laminate floor with your own hands, think in advance how you will cut the laminate (with a hacksaw, grinder or electric jigsaw) and prepare essential tool for styling (tape measure, pencil, square, hammer and other accessories). The impact block, wedges and mounting bracket can be purchased as a laminate laying kit from specialist retailers.
If you are laying the floor in your apartment and do not regularly repair floor coverings, then there is no need to overpay for professional tools. The benefit from their acquisition will appear only with intensive use.
Laying laminate flooring can be done if desired by any property owner with a minimum of building skills. To do this, it is enough to familiarize yourself with the installation technology of this flooring and have some free time. You also need to know what kind of do-it-yourself laminate laying tool is required in order to do the job efficiently.
Preparing Consumables
In addition to the fact that you need a set of tools for laminate flooring, you need to purchase building materials.
Among them:
- film for waterproofing;
- masking tape (to limit the jigsaw);
- ordinary adhesive tape of any color for gluing the joints of the substrate, with its help they prevent the material from slipping during the installation of the laminate;
- substrate under the floor covering, which will eliminate small irregularities of the screed and perform the function of a heater;
- silicone sealant, capable of filling small defects in the concrete surface, such as cracks and crevices;
- leveling mixture, which is necessary to eliminate pronounced flaws on the basis of the floor structure.

If you have materials for laying the flooring, you can begin to select the tools necessary for installing the laminate. Some of them are already at home, others can be searched from friends and relatives, and others need to be bought.
List of required tools
Most of the tools that will be needed to repair the floor are used by home craftsmen in everyday life. The rest can be purchased as a set or separately.
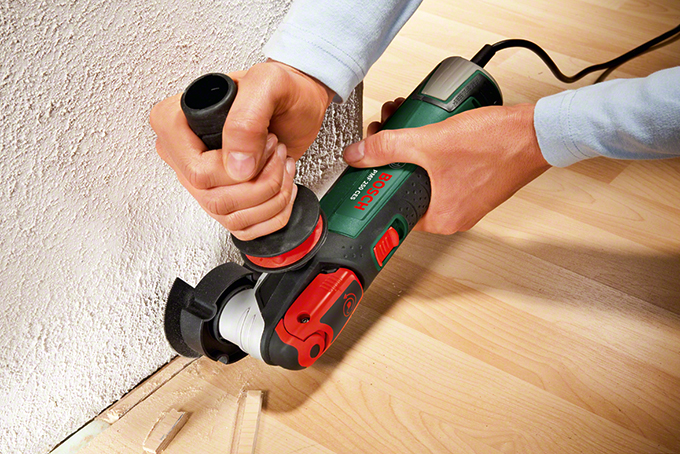
The main instrument is electric jigsaw shown in the photo, with a power of at least 500 watts. It is advisable to choose products from a well-known manufacturer in the middle price category. You should not purchase a model that is too cheap, as it will quickly become unusable due to its inability to withstand the load. In the event of a jigsaw breakdown, work will have to be stopped until a new tool is purchased.

Basic set of tools for laying laminate flooring, which should be available:
- Hammer or mallet. Needed for fitting and making an accurate connection of floor planks. With the help of a hammer, both the snapping of individual boards and their padding are performed. The reverse side of this tool can easily insert the last row of slats.
- Roulette 5 meters. The main thing is that the sealed iron end stays firmly on it. It is used during the preparatory work for accurate measurement of floor area.
- Stationery knife. In the process of work, it will be required to open packages with building materials. They are cutting the substrate. Truth, modern material breaks easily along special lines.
- simple pencil. It is desirable that it be with a soft lead. With it, mark the laminated coating. In case of an error, a thin mark can be easily removed.
- Square (25-30 centimeters). Used for marking materials.
- Hacksaw (jigsaw). Used in the process of cutting and sawing dies. A hacksaw with a wide blade with fine teeth will certainly be required if there is no gap between the base of the floor surface and the bottom of the door frame. Alternatively, you can use a grinder, but it is not easy to make an accurate cut with it, especially for a non-professional.
- Protractor or goniometer. It may be necessary in the case when it is decided to lay the laminate diagonally. You need to set it to an angle equal to 90 degrees, and mark the lines along which the elements will be trimmed.
- Finisher for laminate. This toolkit is needed for the final padding of the panel.
- Drill. Can be manual or electric. It is used, if necessary, to make a hole for self-tapping screws when arranging a screed from plywood sheets. Also, a drill will be required to prepare the base for the installation of flooring.
In addition to the above tool, you will need the following additional (auxiliary) tools:
- Clamp for laminate (metal bracket).
- Restrictive wedges.
- Knockout bar.
- Feather drills.
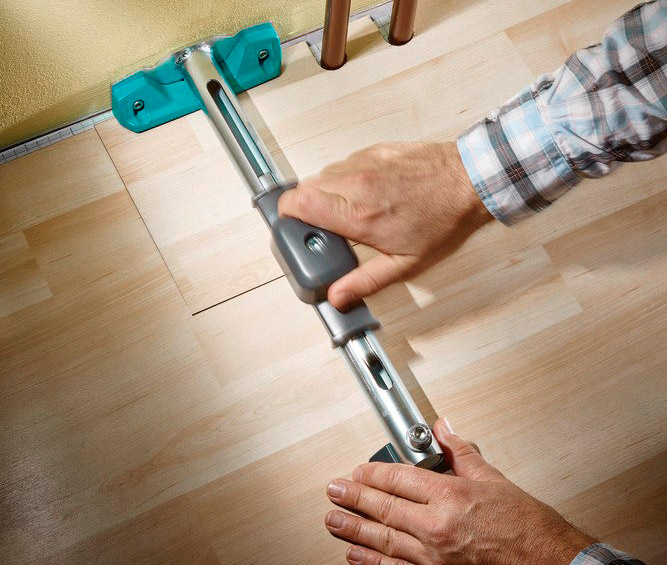
Clamp for laminate
With its help, padding of the extreme laminated boards mounted along the walls of the room is carried out. A laminate clamp is used to evenly distribute impacts along the entire length of the coating. The clamp is a curved plate. To provide efficient work, its thickness should be at least 5 millimeters. At the ends of the metal plate there are bends located in different directions at right angles. One end of the brace is wider than the other.

For tamping, you will need to make some effort and therefore it will be difficult to do without a hammer. Laminate laying bracket helps to keep the edge of the boards intact. The clamp can be made by hand. Its wide end is applied to the end part of the lamella, and the narrow end is beaten with a hammer.
Restriction wedges
Needed to lay planks near the walls. With their help, it will be easy to provide a gap of 8-12 millimeters. This distance is necessary when expanding floor tiles as a result of changes in temperature and humidity in the off-season. The created gap gives the planks some freedom, as a result of which the floor covering does not warp.
Laminate wedges are removed after installation is completed. By the way, the gaps are not visible on the finished floor, they will be covered with skirting boards.
tamping block
As the name implies, its main function is to tamp each die. It helps to clearly join the boards to each other. Thanks to its use, all locking connections remain intact and undamaged.

A tamping bar for laminate is made not only from wood, but also from plastic. In order for it to serve for a long time, when buying it, you should pay attention to the cost of the product and quality. The bar should weigh approximately 1.5 kilograms. When tamping, you need to ensure that the edge applied to the board is even. In the event that the surface of the bar is even slightly damaged, it must be replaced.
If there is no tamping block available, do not use a laminate hammer. You can solve the problem with the help of an unnecessary segment from the bar. It is necessary to dock the locks and carefully knock out the die. The effect of applying the segment will be similar to that of the bar.
Fountain drills
They are used for precise and accurate drilling in the manufacture of holes in the laminate for heating drains or laying other utilities, including plumbing. Holes must be made 4-6 millimeters larger than the cross section of the laid pipes.

Thus, almost all auxiliary tools required for laminate installation can be easily replaced by a more convenient and not so expensive analogue that does not affect the quality of assembly work.
Using new tools
Most of the modern tools that have recently appeared on the domestic construction market are recommended by the engineers of the German company Wolfcraft:
- PVC Floor Board Cutting Machine. It provides silent cutting of panels without generation of dust. Therefore, when cutting lamellas, you will not need to use a hacksaw or jigsaw. The cut is made at an angle of 90 degrees. Design feature The application of this device lies in its ease of use, since special efforts do not need to be applied. This is possible due to the special structure of the machine blade.
- Square with automatic angle division. Such a device allows you to quickly and effortlessly measure the angle of the adjoining walls and easily transfer the measurement result to the laminate board. The working scale of such squares begins with a 30-degree mark.
- Cover marking template. Helps to very quickly mark the place of the cut of the last row. An analogue of such a tool can be found among everyday items.
- Contour for applying curves and lamella shapes. The device is necessary for quick marking of cut lines. It easily copes with the display of shapes and their subsequent application to the laminate for further cutting, for example, a semicircle for utilities or decorative elements. Through the use of an outline, it is possible to combine the design of different templates.
This article provides information on what tools are needed for laying laminate flooring and what kind of work they are needed for. A home craftsman will have a basic set of tools or a somewhat expanded one in his hands, this will not affect the quality of the work. For example, the cut result is not affected by what it will be done with - a hacksaw or a jigsaw. This nuance will only affect the timing of the work.
Every professional who installs parquet or laminate has a set of the right tools.
Many ask the question: how to be a person who does not professionally install laminate, and what to do if there are no tools.
The set is necessary in order to lay a laminate or parquet just once.
This article will discuss what tools exist for laying laminate flooring and whether it is possible to perform floor finishing work without them.
Styling features
It is worth noting that laying laminate flooring is a process that is quite laborious. Therefore, each person who plans to do these works himself needs to be patient, gain certain skills, and also be attentive and accurate in relation to every detail, including when laying a moisture-resistant bath laminate.
Of course, you definitely need to have the tools to help you do the job perfectly. Today there is no problem to buy any instrument.

Helpful information! In order to use it, you need to have some skills. Therefore, in order to save money, it is necessary to focus on inexpensive tools that are suitable for a novice master at home, including for painting a laminate.
It must be borne in mind that such an inexpensive tool will not last long. You may have to get rid of it after the first work on laying the flooring - laminate or linoleum.
If you want to install laminate flooring professionally, you need to get a professional set, which will cost a little more than usual.

What is a laminate flooring kit?
Most kits that are used for laying laminate flooring include several items. This is a bar for tamping a laminate slab, wedges, and a metal bracket. Next, you need to consider what each of the items serves.

Wedges
Wedges are designed to leave a gap between the coating and the wall. Also, the wedges perform the functions of fixing the coating and limiting the sliding of the laminate over the surface. Wedges are needed to fix and provide clearance.
If there are no special wedges that are made of plastic, you can make your own from wood in advance.
Tamping bars
This is a tool, which is the usual bars of wood, with the help of which the laminate slabs are knocked out. Without tamping, it is impossible to lay a laminate. Therefore, you need to buy a bar that will have a rubber backing. The store sells plastic bars.
Helpful information! You can knock out a laminate with a homemade bar. However, it takes a lot of time to make it. Finding the right form is not easy. It is best to buy a ready-made tool in a store.
metal brace

Using this tool, the laminate panel is padded in the last row from the end.
A shackle is a great replacement for wedges and a hammer. If you don’t plan to buy a whole set of tools for laying laminate flooring, then you should look at home for a similar replacement for these tools.
How to install laminate flooring without tools
It makes no sense to buy a whole set of expensive tools if you need to lay a laminate in just one room of the apartment. Every man has many other tools in the house to help get the job done.
The first tool is an electric jigsaw. It will be needed in order to cut the right amount of material. For a small room, a jigsaw of low power is suitable. 500 watts is enough. This is a must have tool that you can't do without.
Next, you need to pick up a light hammer weighing up to 500 grams. It is useful for knocking down panels of the coating. For measuring work, you need a tape measure and a pencil. To cut the panel strictly at an angle of 90 degrees, you need a corner. The length of its attachment should be at least 35 centimeters.
On the door frames often need to cut the material. For this you will need a hacksaw. The hacksaw should have a large blade and fine teeth. You must have a level. A miter box and a corner will help when making corner cuts.

Coating laying
When all the tools are at hand, you can begin to lay the coating. The laminate is laid in a floating way. This means that it is only necessary to connect the plates together.
- First you need to form the first row of coverage.
- Then the second row is attached to it. Laying laminate flooring follows the same principle as masonry.
- The panels of the second row are shifted by half relative to the first row.
- After that, all the other rows are laid to the very end.
- Panels that are installed using glue require the use of a tongue-and-groove technique.
- Other types of laminate are mounted in the same way.
- The laminate that is laid on the locks, you need to join the panels at an angle.
- You should hear a click when connected.
Conclusion
Now it is clear that without special tools, laminate flooring cannot be done. At the same time, you need to remember that it is not necessary to buy expensive kits used by professionals.
Helpful information! Half of the tools can be made by hand, and some can be purchased at the store. Most often, many tools are already on the farm.
Experts note that when laying expensive material, it is best to buy a normal tool so that later you do not spend money on a purchase. additional material, which can be damaged by improvised tools.
In almost every store where there is a laminate, several types of styling kits are also sold. It is enough to buy at least the most inexpensive set, which in the future can be used for repairs in other rooms.
The quality of a laminate coating depends on many factors, one of which is the correct processing of the boards during installation. Despite the outward simplicity of the technology, it is almost impossible to assemble the floor covering with bare hands, so you will need a simple and convenient tool for laying laminate flooring, only in this case you can get even, almost invisible seams and a flat surface like a table.
How to choose the right set of standard tools for laying laminate flooring
In the process of installing a floor covering, you have to perform several basic operations:
- Measuring and marking the length of laminate boards. In addition, it will be necessary to correctly mark the cut lines, strictly maintaining their perpendicularity to the side faces;
- Cutting material into precisely measured pieces. In addition to linear cuts, it is necessary to cut fillets or internal arcs, for example, to bypass heating pipes;
- Fixing a cut-out slab or lamella in a precisely defined position, if necessary, knocking out and sealing the joints in the laminate locks.
All of these operations are almost impossible to perform with one tool. Even if you try to mark, cut and lay the laminate flooring using some universal Chinese hand saw, with a ruler and a square applied to the canvas, there is not much point in such an organization of labor, since each operation must be performed with its own specialized tool or device. This is the only way to achieve good accuracy and quality.
Advice! In addition, when laying laminate tiles, you have to perform a large number of typical operations, so it is best to use a laminate laying kit, otherwise, after a couple of hours of work, your hands will simply “fall off” due to an uncomfortable tool.

You can choose a standard set for laying laminate flooring, which are offered in sufficient quantities by building supermarkets and firms, but it is more important to understand what tools are needed for laying laminate flooring in order to choose the most optimal and convenient option.
Simple tool kit
The minimum list of tools required for laminate installation depends on how complex the laying pattern is planned to be chosen. For the simplest laying option, without corner and parquet dressings, a set for laying laminate from eight tools is suitable:
- Device for linear and curly cutting of laminate;
- Measurer and marking tools - a tape measure with a tape length of at least three meters, a carpenter's corner and a steel locksmith's ruler of a meter length;
- carpentry wooden hammer with a rectangular bar of soft wood;
- Set of wedges and mounting clamp;
- Building level.
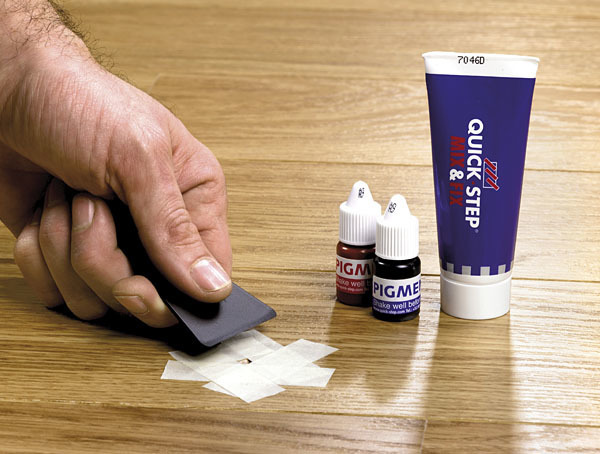
Note! If the laying of the laminate flooring is performed for the first time, or in the repaired wall room with a large number of transitions and niches, there are outlets for water heating pipes, it makes sense to purchase a laminate repair kit.
It includes wax crayons different colors and heating device. If it is necessary to restore a damaged laminated surface of the coating, it is enough to heat up the wax and fill it with a chip or scratch.
Fixtures and tools for measuring laminate
At the first stages of laying the floor covering, the laminate slab and the laying place have to be measured many times before a certain skill and eye is developed. Pre-measurement of long laminates is done with a tape measure. More accurate marking in size for cutting must be done using a steel ruler and a joiner's corner.

The same tools are used to mark the cutting line. Initially, the exact distance is measured with a steel ruler applied to the edge of the lamella. Further, without tearing off the tool, a corner is applied to the steel ruler, and a cutting line is drawn, taking into account the width of the cut.
Tools for cutting laminate
Most often, the cutting of the laminate coating is performed with an electric jigsaw or a cutting nozzle for an electric drill. Blades for cutting wood are chosen for cutting the fiber material of the laminate, but some craftsmen recommend using fine-toothed titanium tools designed for cutting metal. In this case, the cut is smaller, and the quality of the end face of the cut laminate is much higher. The cutting of the laminate is performed at the maximum rotational speed of the power tool. So it turns out faster, and the quality of the cut is higher.

For some models of electric jigsaws, a device is attached in the form of a guide of two aluminum strips. A simple device allows you to cut along the line as evenly as possible. But even in this case, the edge has to be sharpened with a bar stuffed with emery cloth in order to remove traces from the blade and make the butt as smooth as possible.
Before cutting the laminate with a tool, the cut line is sealed with transparent tape. This avoids the lifting of the fibers and the edge of the laminated layer.
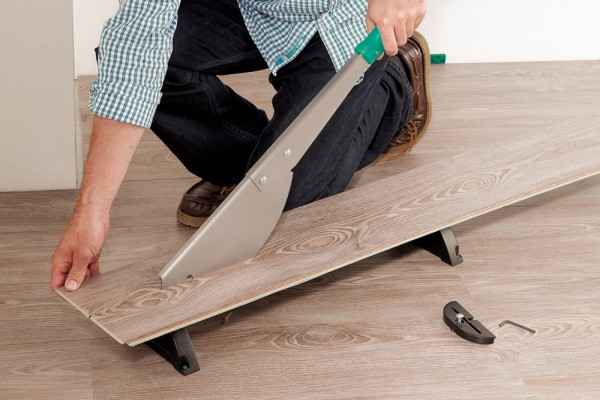
The best option for a cutter for laminated boards is considered to be a swing cutter, as in the photo. Except High Quality and accuracy of the cut, when the cutting edge of the tool moves, the edge of the plate is pressed in a specific way, which significantly improves the resistance of the laminate joints to scuffing.
You can use a hand saw with a fine tooth and a blade length of at least 50 cm, but only if you have the skills to work with a tool in cutting fiber plates. Given the fact that when laying you have to cut the laminate dozens of times, it is still better to use an electric tool that significantly reduces physical stress.
Laminate leveling tool
In addition to marking and cutting laminate sheets, when laying the material, tools are used to align the joints and control the horizontal coverage. Often, masters neglect the use of the building level, motivating their decision by the fact that the horizon was made when preparing the base for laying the laminate. In practice, the joints and locks between individual slabs may not fully snap into place, and after a while the junction of the two pieces may rise slightly. Visually, such a defect can not always be seen, and the building level will immediately show a violation.
In this case, you need to lay a wooden block on the joint and gently tap the entire length of the seam with a carpenter's hammer - a mallet. In a similar way, the joint is knocked out in the horizontal direction. Usually laying kits for laying laminate include rubber mounting hammers, but many experts find that the wooden version is more convenient to work with and at the same time allows you to more accurately dose the impact on the surface of the bar.
Of course, it is impossible to hit the joint directly with a mallet or rubber mallet, without using a bar, this method leads to local destruction of the edge of the laminate. Often the working surface of a wooden block is stuffed with leather tape or a piece of linoleum to soften the transmitted force.

For installation, a bar 20-25 cm long is used; the use of long planks for tamping does not make sense, since they are ineffective. In some cases, for example, when laying a laminate, when the distance to the opposite wall becomes so small that it is simply not possible to hit with a mallet, a T-shaped tool is used from two bars connected by a transverse bar.
Before laying the laminate flooring, plastic wedges or beveled wooden blocks are laid out around the perimeter. This is done in order to fix the gap between the wall and the laminate when laying. The presence of such a gap allows the coating to expand with changes in temperature and humidity in the room.
More than thirty years ago on the market building materials There was a new type of flooring called laminate flooring. The novelty suddenly became very popular among the population, because parquet is not affordable for everyone, and laminate is its excellent artificial analogue, plus at a reasonable price.
The basis of the laminated coating is a fibreboard, which provides each board with the necessary rigidity and strength. The cost of a laminate depends on such qualities as strength, degree of abrasion and water resistance. According to European standards, laminate flooring for residential premises is presented in three classes. So right choice category laminate, will provide you with a reliable and high-quality coating for many years.
Pros and cons of laminate flooring
Like any other flooring, laminate flooring has its pros and cons.
The advantages of the material are as follows:
- Convenient locks on laminate boards allow you to lay the laminate without extra time.
- Ease of cleaning from contaminants.
- Ecological cleanliness and hypoallergenicity.
How important it is to be in harmony with the overall interior and combined with furniture and curtains, find out from the article.
What should be the plan overhaul apartments, read this article. The right advice and sensible recommendations for the implementation of apartment repairs.
The disadvantages include factors such as:
- Low moisture resistance.
- Sometimes high price.
But even despite 2 significant drawbacks, laminate still remains the best solution for aesthetically beautiful and high-quality flooring.
Material laying

Laying laminate is a very easy and simple process. By following simple rules, anyone can install laminate flooring just as well as a seasoned remodeler. All it takes is instructions, free time and a set of necessary tools. What do you need to buy a tool for laying laminate with your own hands? Let's figure it out.
Important! Before starting the laying itself, you need to leave the closed packages with laminate boards in the room where the work will take place for at least 48 hours. This will allow the material to fully adapt to external factors: temperature and humidity.
The floor before laying laminated boards is covered with a special moisture-proof film. If the laminate boards are connected to each other according to the principle of a lock, then laying the floor will not take much effort from you. The cost of such a coating is slightly higher, but it can also be folded and unfolded many times. In any case, using well-chosen tools for laying laminate with your own hands, you are guaranteed to cope with the task faster and better.
Basic Toolkit

You will be surprised, but most of the tools you need for self-laying laminate flooring are already at your fingertips: most of them are often used in everyday life.
So what set of tools for laying laminate flooring will you need in the first place? Of course, a tape measure, a package opener, a hammer (mallet) and a simple pencil. It is better to use a pencil with a soft lead - this will facilitate the process of marking the flooring. We also need a square for easy marking and the most important tool is an electric jigsaw. Choose a device with a power of 500 watts. You can use directly any saw that is convenient for you and is on the farm.
So, a sufficient set of tools for laying a laminate with your own hands includes:
- tape measure (5 meters);
- pencil;
- square (with a diagonal of approximately 25-30 cm);
- a hammer;
- electric jigsaw or saw.
A tape measure is used during the preparation phase in order to accurately measure the floor area. Marking work is carried out with a pencil and a square. Using a jigsaw or saw, you can make accurate and fast cuts of boards. And the panels are knocked out with a hammer and the gaps between them are removed. In addition to the basic set of tools, you will need a few additional accessories.
Special toolkit

The following specific tools that can be purchased at any hardware store will help you make high-quality laminate laying on your own:
- clamp (metal bracket);
- padding bar;
- a set of drill bits;
- wedges for laying.
See how the slatted ceiling in the bathroom looks like in the photo, if you intend to decorate the ceiling in the same way in your own bathroom.
Read about how to lay linoleum on a concrete floor - the secrets of laying linoleum and the nuances of the work are described in detail.
The procedure for insulating walls from the inside with mineral wool is described in the article at:
Let us consider in more detail for what purpose this or that tool is used.
Clamp- this is an auxiliary tool for fixing parts at the time of their processing or for pressing them tightly. The design of the clamp mainly consists of two parts - the main frame and a movable element with a clamp, by moving which you can change the distance between the jaws with a fixture.
The bracket is quite easy to make with your own hands. Its application is the padding of a board pressed against the wall to the rest. To save the edges of laminate boards, they are knocked out not only with a hammer, but also with a bracket. The wide end of the bracket is applied to the end of the board, and the narrow end is hit with a hammer. This will easily allow you to knock the edge board to the neighboring ones.
Wedges are needed for a 10 mm gap between the wall and the laminate. This gap is necessary for contraction and expansion of the hygroscopic laminate. During the repair process, it is covered with a plinth, and the gaps near the pipes are decorated with rosettes.
tamping bar, as you might guess, laminate boards are knocked out. This helps to reduce the impact force per unit area, which protects the boards from chipping and breaking locks. It is made of plastic materials, which makes it possible to make the blows not so hard.
Notice! Laminate cannot be knocked out with only one hammer, this spoils the edges and rejects the joint itself.
If there are batteries in the room, you can’t do without wood drill bits, the so-called “feathers”. Thanks to them, you can drill large holes for pipes.
The diameter of the holes should not be much larger than the diameter of the pipes, approximately 4 to 6 mm.
It can be summed up that laying laminate does not require supernatural tools from you, you can cope with the task even with a minimal set of tools. Your work will go like clockwork if all the necessary parts and tools necessary for laying the laminate are at hand. So believe in yourself, stock up on everything you need, and you will succeed.


