Gilex how to regulate pressure. Self-installation and adjustment of the water pressure switch for the pump. Causes of hardware problems
Reading 6 min.
Immediately after purchase, setting the pressure switch pumping station not required - the necessary manipulations have already been carried out at the factory. The values of these settings range from 1.3-1.9 bar on, and 2.6-3.1 bar to turn off.
But due to many reasons, it is often necessary to re-adjust the pressure switch. Below we will analyze all the main points, after which you will know how to adjust the water pressure switch, why it does not work, does not turn off, etc.
How is the pump relay arranged and how to set it up?
Before you adjust the pressure switch, you should understand its design features and the principle of operation.
The liquid level switch is a metal-based device, in the lower part of which there is a membrane cover with a special fastener that can be quickly removed. On the top of the water flow switch there are several contacts and a pair of regulators.
From above, all these elements are covered with a lid. The latter is attached to one of the regulators. This whole design is quick-detachable - the device can be disassembled using an ordinary wrench.
Manufacturers offer different relays in shape, size, arrangement of working elements, slight differences in design features details. Often these devices are supplemented with fuses from "idle operation".
How does it work?
The relay of the pumping station works on the principle based on the pressure of the liquid coming from the pump - the membrane moves the piston, activating the contacts located on the iron base with two hinges.
These contacts can close and open (depending on the position) - this provides automatic switching on / off of the equipment. The second regulator, at the same time, stabilizes the piston pressure.
The electrician of the device (responsible for turning the pump on / off) “listens” to the spring hinge. As soon as the pressure switch RM (or pressure switch RDM5) rises above the hinge, the regulators snap.
So, one regulator (large) turns on pumping equipment, and the second, smaller one, is responsible for deactivation due to pressure drops in the device.
How to adjust yourself?
If for any reason the initial setting of the pressure switch does not suit you, then it's time to connect your hands with experience and set up the water level switch with your own hands. Setting up a pumping station relay with your own hands is a fairly simple procedure. We only need a box wrench and a screwdriver.
Do-it-yourself pumping station adjustment sequence:
- Power off the device.
- Remove the device panel.
- Set the required pressure.
- Assemble the adjusted unit.
Remember! Under the lid there are two regulators - large and small. The first works with pressure to activate the pump, the second is responsible for the pressure difference and shutting down the system.
Adjustment of the pressure switch of the Pumping Station (video)
Raise/lower system pressure
It's simple - to raise or lower the pressure in the accumulator, you need to loosen or tighten the nut on the large regulator. This setting of the accumulator pressure switch is the fastest and easiest.
Attention! Setting up the relay of the pumping station with your own hands should be carried out strictly with the equipment turned off. De-energize the system before starting!

Next, turn on the configured device and look at the pressure gauge for setting the lower pressure limit. We also check the shutdown pressure. If the new indicators of the air pressure switch for the compressor satisfy you, then the tuning process can be considered complete.
Important subtleties when setting up
Any for a pump requires timely detection of a malfunction and compliance with the operating “correct” temperature. Repair of the pressure switch of the pumping station is an extreme measure, and it is justified only at a very high cost of a new part.
Therefore, it is very important to be able to adjust the equipment yourself, in which it is imperative to take into account important subtleties:
- when adjusting the relay, you cannot set the upper pressure that exceeds the limit for this model by 75% - this is guaranteed to lead to a malfunction. The only way out in this situation is to replace the component;
- before increasing the pressure, it is worth familiarizing yourself with the operating parameters of your device - to see if the pump can withstand it. If you specify a pressure much less than in the device passport, then a breakdown is also guaranteed, because the relay is now constantly activated;
- your pump must be adjusted carefully - do not tighten the bolts all the way, otherwise the relay will work constantly.
The main malfunctions of the pumping station and how to deal with them?
It happens that the pressure switch does not turn off the pump, a leak has formed in the hydraulic accumulator of the pumping station, the equipment constantly clicks, does not turn on the pump, etc.
Of course, it is easier to throw out a faulty water pump and put a new one in its place. But, not everyone can afford such returbations, therefore, let's look at the main breakdowns of pumping systems, and deal with their elimination.
The pump has stopped working: the first thing to do
If the water pump is turned on, but does not show "signs of life" - check the voltage in the mains. Try disconnecting and reconnecting the power cable. It's trite, but many are faced with just such a problem.
Is there still tension? Then check the reliability of all electrical connections.

Does the pump turn on for the first time since purchase? Check if the connections are correct. Nothing happened? Then the reason may lie in the breakdown of the wheel or relay. Your actions are as follows:
- power off the device;
- try turning the motor shaft with your hands;
- if it does not spin, the problem is in the starting capacitor;
- the way out is to replace it. You will need a soldering iron, a similar capacitor and skillful hands.
Air pump does not pump water
In what situations does this happen:
- air has entered the housing of some elements. Check the tightness of all containers, turn off the device, and using a special valve (you need to unscrew it), let the excess air escape;
- a similar problem occurs when the water level is low. Check the water level at the water intake point, and the compliance of the pump installation with the recommendations in the passport;
- the problem may lie in the breakdown or clogging of the ejector nozzle. Clean the valve.
Equipment does not turn off
Is the pump equipped with a hydraulic accumulator and does not turn off? The pressure switch might not work properly. Usually the reason lies in incorrectly set pressure or low water pressure, due to air entering the sealed parts of the device.

The constant operation of the pump may be due to clogging of the fiver - due to too hard water. The way out is to remove and clean the relay, install a special filter to “soften” the water.
If the pump worked and then stopped abruptly, the problem may be hiding in the motor overheating. It is necessary to disconnect the device from the mains, find the cause of overheating and eliminate it. Here you will need experience or the help of a master.
It is necessary to connect all elements of the pumping station very carefully. If you have any problems, then immediately contact the masters!
Do not forget that the water flow with your own hands was done correctly, and never let you down, you need considerable experience, tools and the “right” hands.
Autonomous water supply systems from wells and wells consist of several important nodes: pumping equipment, hydraulic accumulator, automation, pipes and fittings for water points. The pressure difference in the submersible pump raises the water to the desired height. Further, through the pipes, it enters the storage tank, from where it is fed to the points of analysis. This ensures proper pressure and stable operation of the entire system as a whole. For the normal operation of the water supply, it is necessary to correctly configure the automation in order to guarantee a minimum number of on-off pumps and extend its life.
Scheme of an autonomous water supply system
How a submersible pump works
Surface and submersible pumps are used to supply water. The former are installed next to water sources, while the latter are completely or partially lowered into the water (the installation method depends on the design features of a particular model). The housings of submersible devices are sealed. The principle of their operation is approximately the same: the pump draws water into the housing through the inlet and pushes it through the outlet pipe into the pipeline.
Depending on the design, the pressure difference between inlet and outlet submersible pump is created either by an oscillating membrane (vibration models), or by the rotation of one or more impellers (centrifugal devices). Many well owners install centrifugal type devices. They are more expensive, but more productive, versatile and do not destroy the casing during operation.
The duration and safety of the pump depends largely on automatic systems, regulating the mode of their inclusion and deactivation. If the device is connected directly to the water supply, without a hydraulic tank, then it turns on every time the taps at the draw-off points are opened. This mode of operation leads to its rapid failure. When connected to a hydraulic accumulator, it is necessary to correctly set the pressure limits for the device to operate optimally.

Design diagram of a centrifugal submersible pump
Pressure switch in an autonomous water supply system
For normal operation of the pump, a pressure switch is connected. This is a device that turns on and off the water-lifting equipment in automatic mode, when the water pressure changes within the specified limits. When the lower threshold of the set parameters is reached, the device closes the contacts, supplies current to the pump, and it turns on. When the pressure rises to the upper threshold, the automation opens the contacts, the power stops flowing to the equipment, and it turns off.

Pressure switch for the water supply system of a private house
Design features of the device
The design of the relay provides a flexible membrane. Under the influence of pressure in the system, it is deformed and closes or opens the contacts. The operation of the device is regulated by special springs, which are adjusted using nuts - tightening or releasing them. When the nut is tightened, the spring is compressed. The more it is clamped, the more pressure is required for its operation.
The difference between the on and off thresholds of the device is adjusted using the second nut. The more it is tightened, the greater the pressure difference. The relay is connected to the power supply network and to the pump itself using two pairs of contacts. To install the device on the pipe of the water supply system, a threaded hole is provided, the diameter of which is most often ¼ inch.

Submersible pump pressure switch connection diagram
Video: purpose and principle of operation of the pressure switch
How to connect the device correctly
The peculiarity of connecting a pressure switch is that it has to be connected to two networks - electrical and plumbing. The first stage is the connection to the water supply system. To do this, a special adapter is purchased separately if the diameter of the threaded water supply inlet differs from the threaded hole of the device.
For the pressure switch, choose a convenient place on the pipeline with free access. Threaded connections compacted with flax or other material from beginning to end. After that, the device is connected to the thread. The nut must sit exactly on the seal. When working, make sure that the sealing material does not come out and does not gather in folds.
When the device is installed on the water supply, it is connected to the mains. For this, one or two pairs of contacts are provided. Models with two pairs are found on sale more often, usually homeowners purchase them. If there is a marking on the contacts, then when connecting, you should focus on it. If not, you need to carefully study the instructions and understand the purpose of each of the elements.
Before connecting, you must make sure that the device is in order, and that the contacts close and open normally. A three-wire cable is used for connection. The first core is connected to the first contact, the second - to the second, the third - to the screw from the ground wire. The relay is connected to the contacts of the pump using a wire of the appropriate diameter.

Relay connection diagram through a five-pin fitting
Adjustment of thresholds for switching on and off the pump
The devices are sold with factory settings. The lower threshold is usually set to turn on the pump when the pressure drops to 1.5 bar. The device turns off when the pressure reaches 2.5-3 bar. The difference (Δ - delta) is a parameter that can be adjusted with the second nut on the device. When setting, the maximum allowable shut-off pressure must be taken into account. It is indicated in the technical documentation for each model and is usually 5 bar.
When adjusting the pressure limits, it is necessary to check the settings of the accumulator. The optimal pressure indicators are 1-1.5 bar. If they differ, they are corrected. After that, configure the relay:
- Open the cover to access the adjustment nuts and loosen the small pressure spring.
- The switching threshold is adjusted with a large nut. Turning clockwise increases the pressure, counter-clockwise reduces it.
- Adjust the pressure threshold of the small spring.

Video tutorial: setting the pressure switch for a submersible pump
When the device is connected and configured, it remains only to check the operation of the system. To do this, open the tap, let the water drain and monitor the on-off mode of the pump. If the system is working properly, it can be put into operation. If necessary, the pressure switch settings of the submersible pump are adjusted.
One of the reasons why the pump turns on more often than it should and does not provide a smooth supply of water is incorrect adjustment of the pressure switch and setting the parameters of the accumulator. These are two different operations on different devices. And although the tank of the water storage device itself does not have a relay or built-in automatic devices, the pressure in the air pocket of the tank indirectly affects the operation of the entire water supply system.
What and how to adjust in a system with a pump and a hydraulic accumulator
To organize the normal operation of pumping equipment, it is necessary to set three main parameters:
- Adjust the air pressure in the air space of the accumulator;
- Fix the level at which the control relay starts the water pump;
- The limiting level of water pressure at which, using the relay command, the pumping unit is turned off.
Important! All three parameters will need to be adjusted several times, adjusting a more comfortable level of pressure in the water supply and the water flow on the accumulator to the characteristics for your home.
Regulate the pressure in the accumulator
The water storage device is very simple in design. Inside the steel tank is a rubber membrane, which occupies approximately 2/3 of the volume of the accumulator. The rest of the space is occupied by the air chamber. With the help of excess air pressure in the chamber and the elastic forces of the stretching rubber membrane, water is squeezed out as needed into the plumbing system. There is nothing special to adjust and regulate, except for the pressure in the air compartment of the accumulator.
From the factory, the device comes with a preset air pressure of 1.5 atm. Before buying a device, you should make sure that the factory pressure is available. Usually this indicates the serviceability of the nipple and the integrity of the rubber sheath inside the cylinder, we proceed to adjust the accumulator for water supply systems.
First, a hydraulic accumulator is installed in the system and the pump is started to determine the working pressure parameters in the system. They try to regulate the air pressure in the air pocket of the accumulator by 10-13% below the turn-on pressure of the pumping station. Simply put, it is necessary to adjust to 0.6 - 0.9 atm. below the water pressure at which the engine starts. We check the adjusted level with a pressure gauge for an hour to make sure there are no air leaks.
The air pressure in the accumulator cavity must be adjusted when the water pressure is turned off, just turn off the tap. The value must be checked and adjusted at least once a quarter.
How the pressure switch for the accumulator is adjusted
The relay or automatic pressure control for the water supply to the water supply system looks like a small black plastic box with two fittings made of body material and one metal fitting with male or female ¼ inch pipe thread, as shown in the photo. With the help of a fitting, the relay is connected to a five-pin fitting fixed on the inlet pipe of the accumulator.

In other cases, the relay can be installed together with a pressure gauge directly on the body of a surface pump or pumping station.
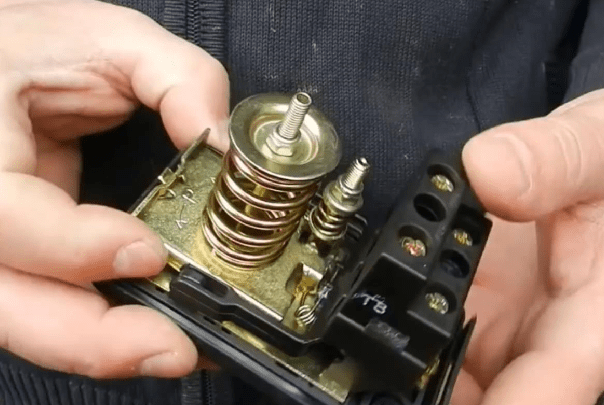
Through plastic tides, wires from the pump winding are brought into the housing. If you unscrew the screw in the upper part with a conventional screwdriver, the cover can be removed, after which two parts of the device become available - a pair of vertical springs on a metal base plate, with which you can adjust the operating parameters of the water pressure, and a contact group to which the wound wiring is connected from the pump. The yellow-green “ground” wire is connected to the metal lower contacts, and the blue and brown wires of the pump motor winding in pairs are connected to the upper pads.

The springs are different sizes. A large spring is seated on the axle and secured with a nut, by turning which you can adjust the degree of compression of the elastic spring element. Here, arrows are applied on the plate to help you orient yourself correctly and rotate the nut to adjust the relay threshold.
Important! In spite of a large number of turns on the central pin, which holds the spring on the plate, the relay and the membrane are quite sensitive even to a small turn of the nut that regulates the level of operation. In some cases, to adjust and change the response threshold by about 1 atm. water pressure, it is enough to turn the nut only ¾ turn.
Therefore, it is necessary to work with nuts carefully, and do not rush to adjust and knock down the factory settings.
Next to the large spring there is a small one, about 4 times smaller. By design, it is completely identical to the large spring, but, unlike the first, a small spring is needed to adjust the difference between the pump start pressure and the maximum water pressure at which the pump turns off.
Under the metal plate is a membrane that contains pressurized water from a water pipe system or a hydraulic accumulator. Due to the water pressure in the membrane, the plate overcomes the resistance of the springs and closes and opens the group of contacts.
A good excursion on the topic of the pressure switch device and its adjustment organs can be obtained from the video:
How to adjust the water pressure switch
Adjusting the water pressure switch type RP-5 is quite simple. Most often, it is necessary to adjust the relay in two cases - at the stage of commissioning the water supply system and after repair, modification or changes to the operation of the water supply system and the hydraulic accumulator. In any case, before you start adjusting, follow a few mandatory procedures:
- Warn the residents of the house that during the time you are adjusting the pressure switch, it is impossible to use taps, a toilet, a shower, in general, all elements of the water supply system;
- Close all faucets and check the integrity of the connection and the absence of water leakage, especially on newly installed or repaired appliances, pay special attention to the toilet cistern. If it remains in operation or leaks, it will be difficult to properly adjust the relay in the system;
- Check the working air pressure in the accumulator, if it is unstable or below normal, it must be adjusted to the factory standard;
Advice! When adjusting, you will need a wrench to turn the nuts, a tap to relieve the water pressure in the system and a control pressure gauge that can be used to monitor the water pressure in the water supply.
To adjust the pressure switch thresholds, perform the following procedures:

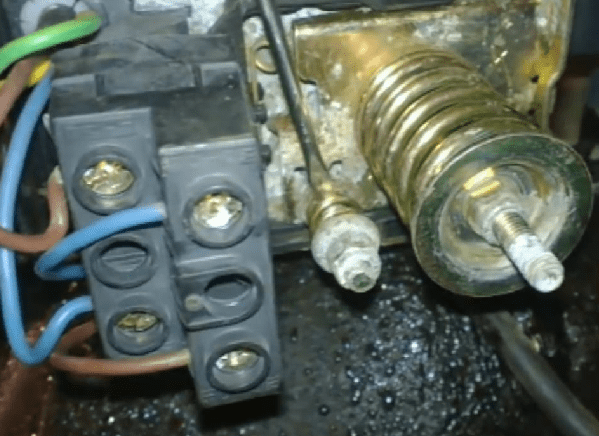
Breakdowns and problems in the operation of the relay
To positive aspects characteristics of the relay can be attributed to its simplicity and reliability of operation. If there is no air in the system, and the response thresholds are correctly adjusted, such a device usually lasts a very long time.
Like any contact device, the relay must be periodically serviced - check the operation of the mechanical "rocker", adjust and clean the contacts. But sometimes the relay starts to operate unevenly, at different on-off thresholds. It happens that the relay simply does not turn off at the upper or lower threshold. If you gently tap the piece of wood on the case, the device will work.

Do not rush to adjust the thresholds or throw the device into a landfill. Most likely, the cause was sand and debris accumulated in the membrane space. To correct the situation, you will need:
- Unscrew the four bolts on the bottom of the relay housing, the metal plate with the inlet fitting and remove the steel cover;
- Carefully rinse the rubber membrane and the cavity under it from sand and accumulated dirt;
- Install all elements in place and tighten the mount;
- Adjust the thresholds and check the normal operation of the relay to turn off the motor.
Even a person unfamiliar with the relay device can easily remove, clean and adjust the device, as in the video:
In addition to the contacts and the membrane, it is possible to lubricate the “rocker” hinge with grease, a similar procedure can be performed no more than once a year.
Conclusion
It is relatively easy to adjust the thresholds for the relay if the water supply system is in good condition and does not poison the water on the connections or on the toilet bowl. Considering the fact that it is necessary to maintain and clean the water supply system from sand and salt quite often, it makes sense to understand the question of how to adjust the relay, and then independently test the device as necessary.
The pressure switch is a small but indispensable unit of a large and small pumping station. And if all its other elements just need to be connected correctly, then it will also have to be additionally configured. It is this device that is responsible for automating the pumping process. It turns on and off the equipment according to the pressure in the hydraulic tank.
Properly performed adjustment of the pressure switch for the pump is a guarantee of comfort and long service life of the equipment. About how it is performed, what actions need to be taken and what data to know for fine-tuning, we detail in the article. You will find out why and in what situations it is produced.
Except step by step description adjustment procedures, we provide valuable recommendations communicated by hydraulic engineers. To optimize perception, the text is supplemented with photo collections, diagrams, video guides.
Numerous varieties, which are equipped with almost all pumping stations, are arranged in approximately the same way.
Inside the plastic case there is a metal base on which the rest of the elements are fixed:
- membrane;
- piston;
- metal platform;
- electrical contact assembly.
Top under plastic lid there are two springs - large and small. When the diaphragm is under pressure, it pushes the piston.
He, in turn, raises the platform, which acts on a large spring, compressing it. A large spring resists this pressure, limiting the movement of the piston.
The small distance that separates the large and small adjusting springs is enough to regulate the operation of a whole range of devices. The platform under pressure from the membrane gradually rises until its edge reaches the small spring. The pressure on the platform at this moment increases, as a result, its position changes.
Image gallery
Complete with a pumping station, the owner of a house or cottage receives a water pressure switch for the pump. It allows you to fill the hydraulic tank automatically, saving the owners from extra hassle but requires the most careful attention. The fact is that this key must, firstly, be connected correctly, and secondly, it must be adjusted for the needs of a particular house and its plumbing system. Neglect these important points can lead to breakdown of the entire pumping station, as well as to a decrease in its service life. Before connecting and configuring the equipment, it is necessary to understand the principles of operation of the device and the accumulator.
Purpose, device and principle of operation
The relay is the main element for regulating the water supply to pumping system. Thanks to him, the entire system of pumping equipment is turned on and off.
It is this node in the water supply system that is responsible for the pressure of water. Thanks to the relay, there is a balance between its large supply and its weak one.
The relay is designed on the principle of opening the contact group when the water pressure changes. It connects directly to the pump via output contacts. The diagram below shows the main components of the water pressure switch device.
Water pressure switch diagram
The two mains contacts serve to electrically start the device. With the help of the pump contact group, the relay is switched on and off. There are two nuts on the top of the device. They are designed to regulate the pressure supply. Each nut is responsible for the force of water pressure in the system. When adjusting the relay, it should always be remembered that the shutdown of the device should work at an average water supply pressure in the pump. The differential adjustment nut regulates the water supply between high and low pressure.
With the help of a relay, the on and off of the device that supplies water to the hydraulic tank is automatically regulated. In this case, experts use a number of concepts, such as:
- Switch-on pressure or lower pressure (Pvkl), at which the relay contacts for the submersible or well pump close, the device turns on and water begins to flow into the tank. The manufacturer's standard setting is 1.5 bar.
- Cut-off pressure or lower pressure (Poff), at which the device contacts open and the pump turns off. The manufacturer's standard settings are 2.5-3 bar.
- Pressure drop (ΔP) - the difference between the previous two indicators.
- The maximum allowable shutdown rate at which the pumping station can be turned off. The manufacturer's standard settings are 5 bar.
The accumulator is a tank in which an additional rubber container, called a "pear", is built in. A certain amount of air is pumped into this “pear” through the most common automobile nipple. The higher the pressure in the "pear", the more it presses on the water accumulated in the tank, pushing it into the plumbing system. This ensures that the water pressure is sufficient for comfortable use.
Membrane accumulators are arranged somewhat differently, but their principle of operation is approximately the same. The tank is divided into two parts by a special membrane, on one side of which there is water, on the other - air, which presses on the water, etc.
Relay classification
The relay can be of two types according to the principle of operation - mechanical and automatic. When buying this mechanism, you need to consider what functions this device should perform.
In addition, automatic relays, although easier to operate, are less durable than mechanical ones. Therefore, most buyers stop at the mechanical version.
In addition, the relays are sold as built-in inside the pumping station or separately from it. Therefore, it is possible, according to individual characteristics, to select a relay that will improve the operation of all equipment.
mechanical type
- SQUARE mechanical pressure switch with dry running protection. The pressure generated by this device is between 1.3 and 5 bar. Required current for effective work the relay is 10 A.
- Cristal pressure switch. The current required for the operation of this device is 16 A. The permissible pressure limit in the plumbing system is 4.5 bar.
Electronic
Electronic relays are more prone to failure due to the fact that when water is supplied, various small particles appear in it, which disable the equipment. To prevent this from happening, a special filter is placed at the supply inlet, which purifies the water and does not prevent the device from breaking. An electronic device is better than a mechanical one in that it does not allow idle operation of the pumping station.
Electronic relay after pressing the button to turn off the water supply works for another 16 seconds. This function is necessary for the device to work for a longer time.
An electronic relay is easier to install and configure. To reconfigure its operation, the entire system does not need to be disassembled, you just need to set the necessary parameters on the electronic scoreboard using the appropriate buttons.
- Pressure switch PS-15A with dry running. This electronic device operates in the pressure range from 1 to 5 bar. The current strength is 12 A. In addition to the listed characteristics, the device has built-in factory settings and full protection against dry running.
- Pressure switch PS-2-15. It has factory settings and protection against dry running. The possible pressure limit in the plumbing system is 5.6 bar, the current strength is 10 A.
Installation and connection of the relay: instructions
To install the relay, you must first make a mechanical assembly of the entire system, then you should connect these devices to the electrical network.
Electrical part
According to this scheme, connect to terminals L1 and L2 electric wires to the general network. Connect the pump terminals to the M terminals, and connect the ground to the corresponding terminals.

Wires must be connected to special terminals
Then carry out work according to the wiring diagram below for the electrical and mechanical part of this connection.

After connecting the mechanical part, you need to connect the electrician
But such a connection system does not save the pumping station from dry running. Therefore, the pump must be installed in the correct position, i.e. one order of magnitude higher than the non-return valve located.

A system connected according to this principle will work in a protected mode.
This is a slightly different option for installing a home unit. But if the entire installation is carried out in accordance with this scheme, the pump will operate in a protected mode, that is, the operation of the pump without water will be excluded.
This principle of operation of the pumping station will save the entire plumbing system from rapid wear and tear and complete failure.
All rules and instructions for connecting pumping equipment must be observed. First of all, you need to determine the required water pressure and, based on this indicator, select a relay.

Video: how to install a pressure controller
Checking the pressure in the water supply system using a manometer
Immediately after purchasing the pumping station, it is necessary to check the indicators that are set in the hydraulic tank by the manufacturer. Usually this figure is 1.5 atmospheres. However, during storage and transportation, leakage of part of the air from the tank is a completely common phenomenon.
For verification, it is recommended to use a car pressure gauge with as little graduated scale as possible to ensure measurement accuracy. Some models of pumping stations are equipped with plastic pressure gauges, but practice has shown that they are unreliable and do not give accurate pressure indicators in the hydraulic tank. Another option is electronic pressure gauges, the readings of which largely depend on the battery level and ambient temperature. Given the high cost of electronic pressure gauges and the extreme unreliability of Chinese plastic products, experts recommend choosing a conventional mechanical automobile pressure gauge enclosed in a metal case.

It is best to use a mechanical pressure gauge to set the pump pressure switch.
To check the pressure in the accumulator, it is necessary to remove the decorative cap, under which the nipple is hidden, connect a pressure gauge to it and take readings. The lower the pressure, the more water can be created in it. To create a sufficiently large water pressure, a pressure of 1.5 atm is considered an acceptable indicator. But even one atmosphere is quite enough to provide the household needs of a small house.
At high pressure the pump turns on more often, which means it wears out faster, but the water pressure in the system is approximately the same as in the city water supply system. This allows, for example, the use of a hydromassage shower. At low pressure, the pump wears out less, but the maximum comfort you can afford is a regular bathtub filled with hot water but not the delights of a Jacuzzi.
Please note that experts do not advise over-pumping the hydraulic tank or reducing the pressure to less than one atmosphere. This can lead to an insufficient supply of water in the accumulator, or damage to the rubber bulb.
After these nuances are clarified, the air in the hydraulic tank is either pumped up or bled until the required indicator is reached.
How to properly adjust (with hydraulic accumulator)
Before setting up the relay, it is necessary to remove the cover, under which there are two springs with nuts: a large one and a small one. By turning the large nut, the lower pressure in the accumulator (P) is adjusted. By turning the small nut, set the pressure difference (ΔP). The reference point is the position of the large spring, with which the lower pressure limit is set.

Before you start setting up the pressure switch for the pump, you must remove the top cover from the device, which hides the large and small springs
After the required air parameter is reached in the accumulator, the tank should be connected to the system and turned on, observing the readings of the water pressure gauge. Note that the technical documentation for each pump indicates the operating and limiting pressure indicators, as well as the permissible water flow rate. It is not allowed to exceed these values when setting the relay. If the operating pressure of the accumulator or the limit value of the pump is reached during the operation of the system, the pump must be switched off manually. The limiting head is considered reached at the moment when the pressure stops increasing.
Fortunately, ordinary household pump models are not so powerful as to pump the tank to the limit. Most often, the difference between the set on and off pressures is 1-2 atmospheres, which fully ensures the optimal use of equipment.
After the water pressure gauge shows the required lower pressure, the pump should be turned off. Further adjustment is made as follows:
- Carefully turn the small nut (ΔP) until the mechanism starts to work.
- Open the water to completely free the system from water.
- When the relay turns on, the value of the lower indicator will be reached. Please note that the pump turn-on pressure should be approximately 0.1-0.3 atmospheres higher than the pressure reading in an empty hydraulic tank. This is to protect the "pear" from premature damage.
- Now you need to rotate the large nut (P) to set the lower pressure limit.
- After that, the pump is turned on again and they are waiting for the indicator in the system to rise to the desired level.
- It remains to adjust the small nut (ΔР), after which the accumulator can be considered tuned.
Adjustment scheme
Here is a diagram that will work for most devices:

The pressure switch for the pump is adjusted using two nuts: large and small. They must be handled very carefully so as not to damage the device.
Video: how to adjust the pump relay
In addition to the initial setup when connecting the relay to the pump, the home owner needs to periodically check the operation of the system and adjust the settings. At least once every three months, experts recommend completely draining the water from the hydraulic tank and checking the air pressure by pumping up required amount or bleed off excess.


