DIY furniture for dolls. Do-it-yourself doll furniture Do-it-yourself furniture for plywood dolls
The desire of the child to play with dolls must be encouraged and supported. doll furniture do-it-yourself will be an excellent tool for rapprochement between the older and younger generations. A variety of furnishings that copy an adult interior contribute to the development of a child's imagination and logical thinking. Dare, create, and the dollhouse will turn into a small masterpiece.
Variety of doll furniture
Doll furniture sets amaze with their variety and elegance. It is easiest to buy a ready-made kit, but it is much more interesting to make miniature furniture for dolls with your own hands. In addition to the standard interior elements in the form of a bed, chair and table, almost any item can be made from improvised materials. The main thing is to be smart and allocate some free time. kitchen and bedroom set found in the set for games with dolls most often. But the child will be delighted with the desk, floor lamp and bath.
The complexity of making doll furniture is determined by the material chosen as the basis. Dimensions must match the height of the doll. It is very easy for little babies to make furniture based on matchboxes. The hostess of the dolls herself is often involved in the process. For larger copies, cardboard and plywood are chosen.

The materials at hand, which are often used in the manufacture of do-it-yourself doll furniture, are presented in the following list:
- Plywood sheets. The most durable option for decorating doll furniture. Processing plywood sheets is not for everyone and often requires the possession of a jigsaw. But the doll furniture, which came out from under the hands of the master, is striking in its sophistication.
- Thick cardboard. Much easier to handle, work with it baby school age can do it on his own without the help of adults. Often, ready-made cardboard boxes are selected as the basis for doll furniture.
- Match boxes. Optimal for a miniature dollhouse, where the main resident is small.
- Plastic containers from under cosmetics. Do not rush to throw away an elegant jar after the cream and the container from under the shampoo. Perhaps they will be transformed into an elegant ottoman or a comfortable doll chair. Even a small plastic bottle can become the basis for a chair. The following video demonstrates how to make a comfortable toilet.
- Viscose napkins and sponges for dishes. They are used to decorate the soft part of doll furniture.
- Egg container, wire, beads, skewers. This list is endless. The choice of additional elements depends on the complexity of the puppet design and the desired decor.
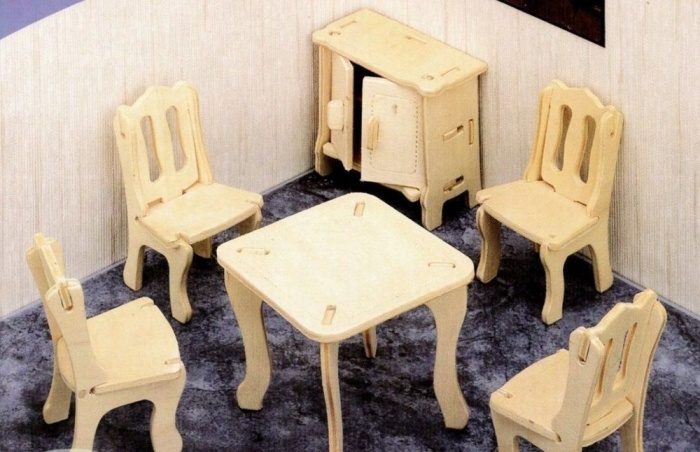
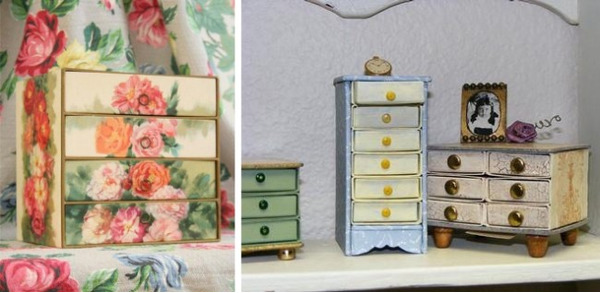
Exclusive sets of furniture for dolls, decorated by wood craftsmen, are shown in the photo:

Chair manufacturing options
There are several ways to make a comfortable doll chair. The choice of material depends on the dimensions of the doll, whether you have a desire to involve a child or you will arrange everything with your own hands. The presented options differ in complexity, so everyone will be able to choose the most suitable piece of furniture for themselves.
Model 1
For work you will need:
- cardboard 1.0-1.5 mm thick;
- foam board about 5 mm thick, it can be replaced by 3 mm corrugated cardboard;
- thick white paper;
- tube Ø 15-25 mm, for doll furniture a thread tube or marker body is suitable;
- thin foam rubber or fleece;
- upholstery fabric;
- glue, scissors, pencil, ruler.
Algorithm for making a doll chair with your own hands:

Comment! The external aesthetics of the doll chair and any other furniture depends on the finish. Therefore, take care of a beautiful upholstery material.
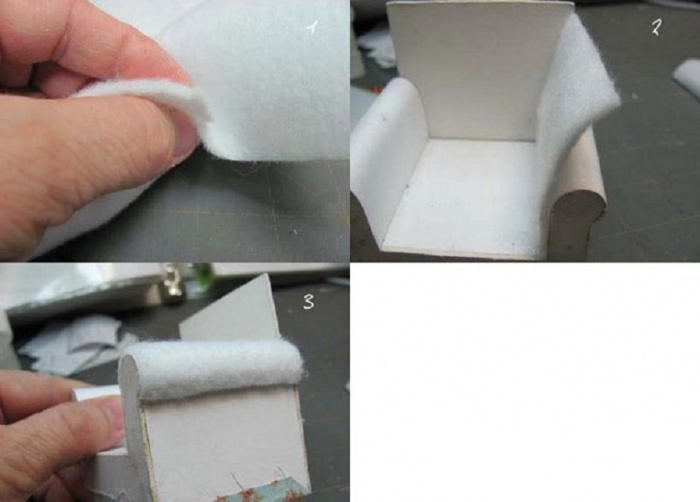
Cut out the upholstery elements according to the previously prepared drawing, only make allowances of 15 mm. Before making out the back, it is initially closed on one side with foam rubber. This element can be made removable or stationary. Making a pillow for doll furniture with your own hands is even easier, the steps repeat the algorithm with the back.


The work, of course, is painstaking, but the result deserves admiration.
Model 2
You can make a chair for a doll even simpler. The base is a small cardboard box. Based on the size of the base, a foam rubber blank is cut out, which will simultaneously be the back and armrests. Tape will help secure it to the seat. The chair is decorated with upholstery fabric, complemented by a miniature pillow. If you take the box not square, but oblong, a chic doll sofa will come out.

Model 3
A plastic bottle can become a frame for furniture. After cutting the workpiece, it is sheathed with a cloth. For sustainability, inner part filled with something heavy. In order for the furniture to correspond to the ideas about the chair, they prepare a pillow and soft seat. You can make a small chair from a 0.5 liter bottle or take a larger container, then it will be something like a throne.

If there is a desire to make a puppet rocking chair, we offer a diagram of an interesting design for study. You will need experience with a jigsaw, reliable and durable furniture is made of plywood.


Bed design methods
Playing with dolls often turns into a real performance when the beloved Barbie is already a mother herself, and her little child cot required. Matchboxes with cardboard are an affordable and free material to make a doll bed. The whole process consists of three steps:
- glue 2 boxes;
- backs are cut out of cardboard;
- for beauty, doll furniture is pasted over with colored paper.
Instead of cardboard, legs can be made from ice cream sticks.

It is not much more difficult to make a bed with drawers. To do this, matchboxes are glued in 2 layers. From the side that will be used as a box, beads are glued or fastened with wire. After connecting with the backs, the furniture is decorated with paper. Additionally, it is desirable to sew bedding.


A small bed can be made from cardboard sheets:
- Initially, they print the proposed drawing or draw it on their own.
- Details are cut out of paper, then transferred to cardboard or plywood.
- Assemble an interesting design of doll furniture.
Comment! If plywood is used in the work, the edges of the blanks are carefully polished so that the child does not get hurt during the game.
Sofa, chest of drawers and desk
Plywood is the most suitable material to make doll furniture. Like a bed, you can make an exclusive doll sofa out of plywood.
Manufacturing master class:
- We draw up a drawing of the future sofa, the diagram includes a seat, armrests, backrest. It is important to consider that the side elements and the backrest determine the stability of the furniture.
- The drawing on paper is transferred to plywood.
- Details are cut with an electric jigsaw.
- A doll sofa is a soft part of the furniture, so the blanks are wrapped with thin foam rubber and decorated with upholstery fabric.
- Connect individual elements of doll furniture with carnations.
The order of operations can be slightly changed. First, the elements of the plywood puppet sofa are fixed together with Moment glue. The finished sofa is varnished and small soft pillows are sewn onto it.

You can make a sofa according to the principle of an armchair, model 1. If you try hard, you will get a masterpiece that is close to the model in the photo:

It is somewhat easier to make a chest of drawers from matchboxes. The main stages of the creative process:
- Matchboxes are coated inside and out with paint.
- When the blanks are dry, they are glued together in a vertical order.
- The contour of doll furniture is sheathed with braid. It will be beautiful and give the chest of drawers strength.
- Beads attached to the bottom act as legs.
- It is also desirable to equip each drawer with beads for ease of use of doll furniture.
Photo collage demonstrates the process of making do-it-yourself doll furniture and the result.

Matchboxes are a kind of constructor, extremely affordable and with an unlimited resource of crafts. A desk or desk is another example of doll furniture that is easy for a child to make on their own.
Key moments of creativity:
- three matchboxes are fixed vertically to each other;
- pre-future boxes are equipped with beads on a wire;
- the function of the second leg of the table can be performed by a matchbox without insides;
- both elements of doll furniture (fastened boxes and a leg) are connected with cardboard using glue;
- the workpiece is painted or pasted over with colored paper.
An approximate result of the work is shown in the photo:

An easy way to make kitchen furniture
First, consider a simple option, how to make kitchen cabinets from matchboxes. The lower part is formed from 9 elements according to the principle of a chest of drawers. The function of the handles can be performed by staples from the stapler. For hanging cabinets 3, the box is fixed on a cardboard wall and cut in the middle to make doors. Of course, it is better to paste over the boxes with paper or paint in advance. Naturally, the entourage plays a big role:
- Complete your dollhouse kitchen with mini lights.
- Decorate the window with a lace curtain.
- You can make a sink out of foil.
Doll furniture will sparkle with new colors. You can complement the kitchen set with a table and chairs made of cardboard.


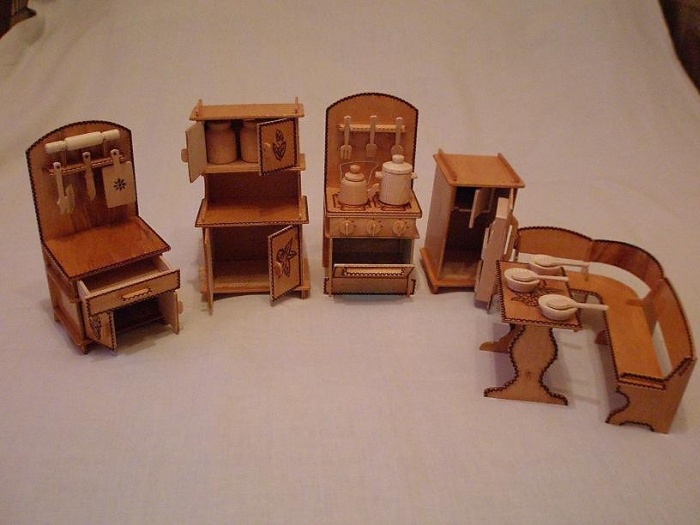
We will not describe complex options on how to make doll furniture for the kitchen out of plywood. Imagine only the result of the painstaking work of the master:


Floor lamp and chandelier
To make a cute doll floor lamp, you will need quite a bit:
- The basis of the lampshade can be thick cardboard or suitable caps from perfumes.
- rod from the handle;
- lace;
- wire.
If there is no lid, we prepare the base for the lampshade from thick cardboard. We glue the workpiece with lace. The wire is passed through the rod. A lampshade is fixed on the upper edge of the rod, and a stand is fixed on the lower edge.

Comment! In order for the floor lamp to gain stability, the stand must be wider than the lampshade and heavy.
An interesting and easy way to make a floor lamp in addition to doll furniture is presented in the video:
Similarly, you can make a chandelier for a dollhouse. The basis of the lampshade is a small container. Decorative candle molds fit perfectly. The chandelier will be attached to the wire. The lampshade is decorated with lace. If you involve dad in creativity, you can make a luminous chandelier. To do this, an LED is fixed inside the lampshade.


DIY furniture for dolls can be simple and intricate designs. When choosing material for crafts, they are guided own experience and having free time. Crafts can be done by adults or in tandem with children, it will be much more interesting. A school-age child is able to cope with the task of making doll furniture from matchboxes or cardboard on their own.
Every girl wants her doll to have her own dollhouse. It should not be just walls, but such a house that it looks like a real one as much as possible, and the game resembles real life.
Of course, furniture is an integral part of any interior, even a puppet one. But buying furniture for a doll house can lead to significant expenses: chairs, armchairs, sofas, and wardrobes are needed here. We must not forget about plumbing, TV, and even carpet.
Fortunately, all the necessary elements of the interior of the house can be made by hand, while avoiding financial costs. For this purpose, you can use almost everything that you have at hand: cardboard, matchboxes, plastic containers, wire, plywood and various fabrics. The main thing is that the furniture is durable: since a child plays with it, poorly made furniture will fail very quickly. When creating miniature interior items, you will have to show the skill of a real jeweler so that the toys are functional and beautiful.
Being engaged in the creative process, you can involve a child in it. This will allow both you and him to reveal his design abilities, help to get closer and have a good time in an interesting activity. You will understand that do-it-yourself doll furniture brings an unforgettable cozy atmosphere, it is truly special.
Pros and cons of self-made doll furniture
There are few disadvantages of making doll furniture with your own hands, but still they exist. This option is definitely not suitable for those who are passionate about branded toys and spend a lot of money on the maintenance of dolls. Not suitable for those who do not like creativity, are not ready to spend their time on painstaking work for their child.
The advantages of self-manufacturing doll furniture can be safely called:
- The uniqueness and special atmosphere of comfort of the furniture that is made by hand.
- This is a very exciting, albeit time-consuming process.
- You can do this together with your child, which will bring you closer.
- Making furniture with your own hands develops your imagination, gives you the opportunity to splash out your creative abilities.
What is the best material for doll furniture?
Doll furniture can be made from a variety of improvised materials and tools. It could be:
- Cardboard. A common and affordable option. But, unfortunately, such furniture wears out quickly, corners and colors are erased. In addition, the cardboard can get wet or swell from moisture, which completely ruins the appearance of the craft. Nevertheless, this material should not be underestimated in any case! It is very easy to use and a child can work with it.
- Match boxes. No less common and affordable option. From the boxes you can make a chest of drawers, a TV, different drawers and even a sofa. The meaning is very simple: glue the boxes to each other, forming the intended element of the interior, and then paint or paste over with colored paper.
- Plastic containers. They are best suited for the bathroom, they can be used to make a bathtub, sink, or jacuzzi. While playing, the child can even pour water into it.
- Wire. Remember the wrought iron bars on the beds? The bed frame and ornate lattices can be made from wire. Designer table, chair, chandelier or floor lamp. The only limit can be your imagination.
- Plywood. For the manufacture of such furniture will have to make some efforts. But in the end you will get strong and durable interior items, almost like real ones. Plywood requires some tools, skills, and a little more time than other materials.
- Paper. Thick paper can be improvised material. It will be possible to make absolutely everything out of it: not only tables and chairs, but even a door. Plain paper will allow you to decorate the walls, making the interior even more realistic: add windows, paintings, posters.
The choice of material depends only on you and what is at hand. It will be interesting for someone to create ornate wire lattices, and someone will be happy to pick up a jigsaw and make a small copy of their bed in the living room.
Stages of work (when working with any materials)
Before you get to work, you should understand what stages it includes:
- To get started, choose on the Internet or come up with your own furniture design.
- Draw on cardboard, paper or plywood individual parts furniture, or use printouts from the Internet. Cut out (cut out) the templates.
- Sand the parts with sandpaper if they are made of plywood or thick cardboard.
- Using glue or special screws, assemble the structure.
- Then paints, varnishes will be used, if necessary, you can use fabric for sheathing.
DIY doll furniture
In order to make your task as easy as possible, we have made a selection of the main elements of doll furniture from various materials. Having become acquainted with the main stages of work on concrete examples, You can independently create a unique toy for your child.
Bed for a cardboard doll
Surely, at home you will find a cardboard box from under shoes or packaging from under an electrical appliance. From it you can make a wonderful bed for a doll.
For this you will need:
- directly the cardboard box itself;
- scissors;
- glue;
- paper tape;
- decor elements: colored or wrapping paper, fabric.
Manufacturing process:
- Cut the box into sheets of cardboard. Draw the details of the bed on cardboard: headboard, footboard, base, sides.
- Glue all the parts together as they should be located.
- Cover the seams with paper tape.
After that, you can proceed to the design of the bed. Paste it with beautiful paper, cover the base of the bed with fabric, sew pillows and a blanket.
Matchbox doll bed
Making furniture from matchboxes is a very simple and fast process.
For this you will need:
- matchboxes;
- glue;
- self-adhesive colored paper;
- bed decor items.
Manufacturing process:
- Using glue, connect the matchboxes together depending on the size of the doll.
- Paste the finished structure with self-adhesive paper, closing the joints and making the surface smooth.
- Don't forget your pillow, blanket and sheet.
plywood doll bed
Over such a toy you will need to sweat a little. But a bed made of plywood is stronger and more durable.
To make it, you will need to prepare the following materials:
- 3 or 4 ply plywood;
- liquid nails or good glue;
- jigsaw;
- decorative elements and paint.
Consider the manufacturing process in more detail:
- First you need to cut the crib frame according to the template.

- Using glue or liquid nails, connect the parts together, let them fix.
- Decorate the head of the bed with drawings, and sew bedding for decoration.
Making a plywood bed with your own hands, only fantasy can stop you. You can carve a headboard and footboard, intricate legs, or even a canopy over a bed.
Cardboard doll chair
You will need:
- cardboard;
- thin paper;
- plastic tube;
- twisted cord;
- glue;
- knife or scissors;
- fabric and paint for decoration.
How to make a doll chair?
- First you need to make the legs for the chair. Cut 4 equal length pieces of tubing so that they are the height required for the chair.
- Wrap with a cord soaked in glue.
You can wrap the tubes in such a way that the legs of the future chair acquire curly outlines.
After that, you will have to postpone work the next day until the legs dry out.
- Cut out the seat and glue the already dried legs to it.
- Use paint and fabric to decorate the toy.
That's all. The chair for the doll is ready!

Sofa for a doll made of wooden blocks and fabric
Another essential piece of furniture that you can make with your own hands.
- planks cut from plywood;
- jigsaw;
- glue;
- fabric for decorating toys.
The manufacturing process will take quite a bit of time:
- First you need to cut out the details of the sofa: the base, back and bottom of the same size, armrests, expanding upwards. The diagram shows the dimensions.

- Glue together the parts of the sofa without using the bottom.
- Cover the design with fabric.
- Separately glue the lower part with a cloth and place it on the sofa.
For covering a sofa the best choice will become dense fabrics that resemble real furniture upholstery.
Dressing table for cardboard doll
Like any girl, our doll is a fashionista. And a fashionista must have her own corner where she can put herself in order. For this, a dressing table is suitable, which is best placed near the bed.
To make it you will need:
- cardboard box, for example from under tea or paint;
- scissors;
- ruler;
- pencil;
- foil;
- glue;
- paper for decorating toys.
Manufacturing process:
Cut off part of the box - this will be the base of the table.
Pay attention to the height you have chosen. It should be chosen so that the doll is comfortable in front of him. For doll standard sizes, for example, Barbie would ideally be about 8 cm.
Cut the cardboard (future mirror) the same width as the table.
!
Use glue to stick them together.
- The part of the table where the mirror will be located can be curly cut, or left as is.
- Paste the table with decorative paper, and glue a piece of foil on the base under the mirror.
That's all. Our dressing table is ready!
Doll chest of matchboxes
In order to make a chest of drawers, we need only three elements:
- matchboxes;
- good glue;
- decorative paper or napkins for decoration.
How a chest of drawers is made:
- With the help of glue, matchboxes are connected in such a way that future "boxes" move forward.
- After that, decorate the chest of drawers by pasting it with paper or napkins.
A chest of drawers can be with one column of drawers or several. The boxes can be glued tightly to each other, or they can turn into a real desk. The only thing that can limit you is fantasy.
plywood doll table
If there is a bed, a chair and a sofa, then a full table is also needed.
In order to make it, you will need:
- plywood;
- jigsaw;
- liquid nails or super glue;
- fabric for decoration.
The manufacturing process is very simple: just cut out the table top and legs, glue them together. Don't forget to sew the tablecloth!
The simplest table is ready. You can carve it or paint it.
Plywood dollhouse coffee table
A very simple interior element in terms of manufacturing.
You'll need:
- plywood;
- jigsaw;
- glue;
- varnish or paint for wood.
Coffee table manufacturing process:
- It is necessary to cut out two circles of the same diameter, legs and racks.

- Next, with the help of glue, we connect the parts together in such a way as shown in the figure.
- Varnish or decorate the table with paints.
If there are no wood paints at home, then acrylic or gouache is quite suitable for painting plywood.
Kitchen furniture for a doll from cardboard boxes
Unlike individual elements, the kitchen is a whole complex of complementary objects. Buying a kitchen for a doll can be quite an expensive purchase. From improvised means, you can easily make a kitchen set yourself, saving money and making it no worse than the purchased one.
For this you will need:
- ruler, pencil;
- scissors;
- glue;
- beads;
- a shoe box with a lid;
- colored cardboard or paper;
- scotch;
- thick cardboard;
- a plastic bowl, for example, from sushi sauce;
- several small boxes.
Manufacturing process:
- Place the cardboard box on its side, after removing the lid from it. If the future table is large, then it must be cut as evenly as possible to the required height.
- From a thick sheet of cardboard we make a wall for the kitchen, it should be 1.5 times longer than the table, while the height does not play a significant role.

If the cardboard you have chosen is not dense enough, then its density can be increased by gluing several sheets together at once.
- In the table, you need to make a hole for the future sink and insert a plastic bowl there.
- Make a continuation of the table by cutting off from another box (for example, from under the powder) the bottom with a height equal to the height of the table. And glue them together.
- Next, make a continuation of the tabletop from thick cardboard, gluing it to the base of the second table, as shown in the figure.
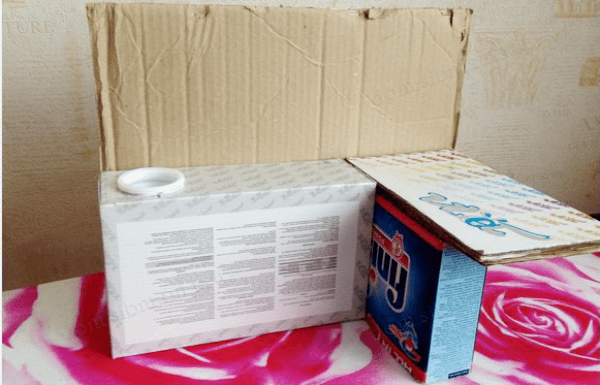
- Then you can decorate it at your discretion, and the boxes will turn into a kitchen set.
On the sink, you can place a piece of the fold from the tube for juice, paste over the wall with "wallpaper", hang a clock and install shelves for pots and products. A refrigerator can be made from a long box of hair dye or juice, pasted over it with white paper.
Dollhouse TV
In order for the interior to be fully developed, you need to put a TV on a table or chest of drawers!
In order to add it to the doll interior, you will need:
- thick cardboard black matte;
- a printed image of the TV, depending on the desired dimensions;
- image on the screen;
- glue;
- scissors.
How to make a TV for a doll?
- Make a box out of cardboard.
- Print a picture of the TV front and back. Cut them out and stick them on the box.
- On the TV screen, if desired, you can paste the "image".
Almost everything you need to Everyday life, collected in a dollhouse!
Doll closet from a shoe box
Another essential item in the house is a closet. You can store clothes and shoes of the doll in it, add the necessary gizmos.
To make a wardrobe you will need:
- shoe box;
- glue;
- straws;
- soda bottle caps;
- buttons;
- decoration paper.
Good luck making your dollhouse cabinet!
Conclusion
Making doll furniture is quite simple. Almost any material from which you can create one or another interior element for a doll can be found in your home. In extreme cases, buying a sheet of plywood, glue or colored cardboard will cost you many times less than filling a doll house with purchased furniture.
Furniture that is bought in a store will not differ in the individuality that is inherent in crafts self made. In addition, do-it-yourself furniture can fit as closely as possible in size to a doll or dollhouse, as well as be exactly what the child wants.
In addition to saving money, you will get the opportunity to do something exciting and developing creativity with your child. You can create a unique and original object with your own hands, bring the designer's old dreams and abilities to life.
Children's games are largely based on imitation of the actions of adults. Children (especially girls) enjoy watching and copying everything that their mother or grandmother does. Every little girl has a mom doll, dad and their children who live their own family life, cook meals, go to work, do their homework, watch TV and go to bed.
For a full-fledged game, dolls, of course, need their own house. Of course, the modern assortment of toy stores makes it easy to solve the problem of furnishing. They have absolutely everything: from bedroom sets to household appliances, plastic products and dishes. However, such doll furniture costs absolutely unimaginable money.
Any materials can become the basis for doll furniture!
It's easier to do everything you need with your own hands. Such an exciting process, of course, will interest your child. The baby will definitely make all possible work when creating sofas, tables and cabinets for your favorite toys. Let's figure out what kind of furniture you can quickly and easily make with your own hands, and also find out what tools you will need for this.
What do you need to make doll furniture?
Do not think that the process of making doll furniture is hard work that takes your time and energy. Try to make doll furniture on your own just once, and you just won’t be able to stop, because this is not just another way to save money!
This is fascinating creative process, in which you and your child can show non-standard thinking and a sense of style. At the same time, you will master all kinds of decorating techniques and get another fun joint activity that will brighten up the long autumn and winter evenings.

Assembling furniture for dolls is a very exciting and creative process.
Look around - you will immediately notice how many items that usually go in the trash can can be used! They will become the basis for the manufacture of all kinds of puppet items. If you decide to make furniture with your own hands, stock up on the following improvised means:
- matchboxes that turn into chests of drawers in a couple of minutes, kitchen sets, cabinets and dressing tables;
- cardboard boxes in which shoes, cosmetics or household appliances were packed, because these are the bases for cabinets, beds and tables;
- plastic bottles from which you can make stylish chairs;
- bright sponges designed for chores and washing dishes, which will serve as an excellent padding for upholstered furniture;
- viscose cleaning wipes;
- plywood;
- shreds of fabric, leather or suede;
- wire and foil;
- cardboard blocks in which eggs are sold;
- threads, buttons, rhinestones and beads that will allow you to create bright furniture of a unique design;
- ice cream sticks, toothpicks, Chinese chopsticks;
- glue, scissors, clerical knife, pens, markers, paints.

A matchbox is one of the cheapest and most affordable materials.
After you have prepared a sufficient number of necessary items, you can start making furniture for dolls.
dressing table for dolls
Dolls love to preen, so they simply cannot do without a table with a mirror! To make such a table, prepare:
- a small cardboard box of hair dye;
- foil;
- colored paper.
Stages of making a table:
- Determine the height of the table by measuring the doll in a sitting position. For example, for a Barbie doll, its height will be approximately 8-9 centimeters.
- Cut out the box and cover with colored paper. Using a marker or gel pen, draw sketchy doors and glue small beads that will imitate handles.
- Do not throw away the rest of the box, but cut an oval or rectangular piece out of it for a future mirror. From the foil, cut a piece of suitable size, stick it on the blank for the mirror. It can be glued around the perimeter with colored paper.
- Lubricate the base of the mirror with glue and attach it to the blank for the table, going to its back side.

A box of hair dye will become the basis of the dressing table
Dresser for dolls
Storing clothes requires that the room has chests of drawers with drawers. To make a doll dresser you will need:
- matchboxes;
- matches;
- dense napkins with patterns.
Stages of making a dressing table:
- Take three matchboxes and glue them together, placing one box on top of the other.
- From thick napkins, cut out pieces for pasting the boxes around the perimeter. It is not necessary to glue the back of the napkin so that the boxes can be pulled out by pressing them with your finger.
- Take out the drawers and stick pieces of napkins on the front.
- Cut the matches into small sticks (discard the heads with sulfur) and stick the sticks on the drawers to create an imitation of handles.

Matchboxes - great material for making chest of drawers
Coffee table for dolls
When the dolls gather for tea in the living room, they need a table on which to put the cups from the set of dishes. This piece of furniture will require the following items:
- sheet of thin plywood;
- chopsticks;
- jigsaw;
- acrylic paints.
Step-by-step process of making a table:
- Cut out a circle from the plywood sheet, which will eventually become a lid.
- Cut the sticks into sticks for legs.
- Glue the cut of the bars and the place to which they will be attached to the lid with glue.
- Glue the legs.
- After the glue has dried, paint the table with several layers of acrylic paint.
Sofa
No living room is complete without an elegant sofa for which you will need the following items:
- flat wooden plate;
- chopsticks;
- cotton wool;
- acrylic paint;
- a piece of soft fabric for pillows;
- decorative braid;
- thick fabric (velvet or velveteen) for upholstery.

In the manufacture of doll furniture, creativity and ingenuity are important
Sofa making steps:
- Measure a wooden plate and prepare fabric upholstery for it (do not forget to leave allowances).
- Lubricate the plate with glue and drape the fabric on all sides.
- Cut the Chinese sticks into 4 bars (the width of the bar should match the width of the wooden block). Cover the bars with paint;
- When the paint dries, glue the two roller legs to the fabric-covered base. Glue two more rollers to the top of the sofa to imitate the side handle rollers.
- Glue decorative tape around the perimeter of the sofa to hide the joints of the fabric.
- To make pillows, cut pieces of fabric into small squares, sew from the inside out on three sides. Turn the resulting squares to the left side. Stuff with cotton and sew with a hidden seam.
Bed for dolls
Not a single dollhouse can do without a sufficient number of beds, because the girls are so happy to put their charges to bed before they themselves go to rest. There are several simple options making beds for dolls.
Option 1: Matchbox bed
For little babies or toys, you can make a mini version bed from matchboxes. For this you will need:
- 2 box;
- a piece of cardboard;
- patches of fabric;
- cotton wool;
- rhinestones, beads, cords;
- microfiber household napkin;
- White paper.
What you need to do to make a crib:
- Place two boxes on cardboard and cut out two rectangles according to measurements.
- Glue the boxes together, fastening the sides with gray. Paste over the top and bottom with pieces of cardboard.
- Paste over the sides with paper or cardboard to hide the sulfur. Do not paste over the back and front of the box so that the crib has drawers for storing linen.
- Cut out a rectangle from a household napkin and stick it on the bed so that the dolls have a mattress.
- Cut out the head of the bed from cardboard, paste over with white paper and glue it to the bed. Decorate the headboard with rhinestones, beads or a decorative cord.
- Cut out one rectangle from the scraps of fabric according to the size of the bed - this will be the sheet.
- Cut out two rectangles for making a blanket in a duvet cover (leave 0.5 cm for the seams). Sew the fabric inside out, turn it inside out. Using sharp scissors, make a diamond-shaped hole in the center.
- Cut a blanket out of a laundry napkin and tuck it into a duvet cover. Sew the bottom of the duvet cover with a hidden seam.
- Cut two squares from a piece of fabric and sew a pillow, stuffing it with cotton.

A cardboard bed is the most sought-after piece of doll furniture.
Option 2: Large crib out of the box
AT this case you need to stock:
- a box of hair dye or a small household appliance;
- sponge or piece of foam rubber;
- colored paper;
- decorative braid, buttons, rhinestones.
Manufacturing process:
- Cut off one of the wide pieces from the box. Cut off 1-2 centimeters from the sides so that the headboard and bottom frame appear at the crib.
- Glue the box along all the folds so that the crib does not fall apart.
- Paste the box with colored paper (the inside can not be pasted over).
- Cut a piece of thick sponge or a few rectangular pieces of foam rubber to the measurements of the box. Place them inside the box to make a mattress.
- Glue decorative cords along the edges of the box, and decorate the headboard with rhinestones, flat buttons and other elements.
Armchairs for dolls
Each doll should have its own place, because for receiving guests, having lunch or preening at the dressing table, little residents of a toy house will definitely need a comfortable armchair.
Option 1: Cardboard chair
To make this chair you need:
- a sheet of thick cardboard;
- stationery;
- thick foam or corrugated cardboard;
- the tube left from the spool of thread;
- sheet of thin foam rubber;
- piece of cloth.
Chair manufacturing steps:
- To make the seat, cut out 4 identical rectangles from the foam board. Lubricate with glue and connect by laying one piece on the other. Cover the top and sides with foam rubber. Stretch and glue the fabric over the foam rubber.
- Cut out a rounded back from a piece of thick cardboard. Glue the foam, leaving a small gap to connect with the seat. The foam must be covered with a cloth.
- Glue the seat and back.
- From the tubes of threads, cut out the part necessary for the manufacture of side rollers. Cover the armrests with fabric. Glue the rollers to the seat of the chair.

With cardboard and paper on hand, you can make a beautiful chair for dolls.
Option 2: Designer chair from a plastic bottle
Such an armchair will be no worse than modern designer furniture, and for its manufacture you will need the simplest and cheapest materials:
- thin foam;
- household sponge;
- the cloth;
- decorative braid.
The manufacturing process includes the following steps:
- Draw a diagram of a chair with a back along the solder line of the bottom. Start cutting, gradually turning the cut line up, so that you get a chair with a high back and smooth armrests.
- Cut out a round blank from a household sponge so that the chair seat is soft. Top with fabric. Place the foam rubber in the middle of the cut out bottom of the bottle.
- Cut out pieces of thin foam rubber to stick on the back of the chair and its armrests.
- Cover with foam rubber outer part armchairs. Cover the back, armrests and outer part of the chair with fabric.
- Decorate the joints with a cord or braid.
According to the same scheme, you can make an armchair for small dolls, only you need to use not bottles for them, but egg boxes.
Ottoman for dolls
A bedroom set would not be complete without soft ottomans, for which you need to stock up:
- carton from a roll toilet paper;
- foam rubber;
- cloth.
To make a pouffe:
- Cut the cardboard sleeve into two parts (it is best to do this with a sharp clerical knife).
- Cut two circles from the foam rubber that fit snugly into the hole in the tube.
- Drape the foam with fabric.
- Cover the tubes with fabric.
- Slip the foam seat into the tube. For beauty, ottomans can be decorated with braid or pieces of thin lace.
Kitchen furniture
The kitchen is the most important place in any home. Dollhouse is no exception. this rule, because little housewives love to play cooks and treat dolls with various dishes. To make furniture for the kitchen space, you will need:
- several dozen matchboxes;
- a sheet of thick cardboard or thin plywood;
- colored paper;

Kitchen furniture can be made from a variety of matchboxes
Stages of making a kitchen for dolls:
- Glue nightstands from three boxes placed one on top of the other. Glue each of these blanks around with colored paper to hide the sulfur.
- Glue the sides of the four blanks.
- Take three matchboxes and cut off the lid on one side so that it opens. Stick colored paper on the box.
- From a piece of cardboard, cut off a part that will be equal to the length of the connected blanks from matchboxes.
- Glue the nightstands to the cardboard, grabbing only the topmost of the boxes (the bottom two drawers will open when pressed with a finger).
- Step back four centimeters and stick the top drawers of the headset.
- Glue a grain of rice on each drawer to imitate handles.
Desk for dolls
Girls love to play school, so dolls will definitely need desks for which lessons can be prepared. To make this doll interior item, you need to stock up:
- 4 box of matches;
- a sheet of thick cardboard;
- matches;
- self-adhesive "under the tree".
The step-by-step process of making a desk looks like this:
- Glue three matchboxes on top of each other to make a cabinet with drawers. Paste the workpiece with self-adhesive film.
- Cut out the table top from cardboard. Cover the top with self-adhesive tape.
- Tape one more box with foil.
- Connect the bedside table and the tabletop, and use an additional box as a second support (its height is just equal to three glued boxes).
- Cut the matches into small bars and make handles on the nightstand.

Don't stop at one piece of furniture - make a set!
Wardrobe for dolls
Dolls definitely need a place where you can hang dresses, blouses and skirts, so the set will not be complete without a spacious wardrobe. To make a wardrobe, you will need:
- a box of paint or a small household appliance;
- self-adhesive;
- buttons "on the leg";
- cardboard;
- Chinese stick;
- wire.
Cabinet manufacturing steps:
- Take a closed box and cut the front part with a clerical knife - so that you get the doors of the future cabinet. Tape the cabinet with self-adhesive tape.
- Cut a piece from a Chinese stick equal to the width of the cabinet.
- Cut out two circles from cardboard, slightly larger than the thickness of the stick. Stick the cardboard on the ends (they need to be sanded a little for a better connection).
- Lubricate two points inside the cabinet with glue, attach a hanger stick.
- Cut the wire into pieces (about 8-10 centimeters) and twist the hangers into triangles. At the top, leave more twisted wire to make a hook.
- Using an awl or a thick needle, make two holes in the cabinet doors and sew on the buttons so that you get handles.
- Place hangers in the closet.
House is built. It does not matter at all whether it is big or small, made of brick or cardboard, Barbie or Snow White with the gnomes will live in it. In any case, he needs an interior, furniture and necessary accessories. In toy stores today you can buy everything. But as you know, the most fashionable things are exclusive, made in a single copy, handmade things. Therefore, we roll up our sleeves and begin work on making doll furniture with our own hands.
Making a real chair for Barbie
In the toy market, working miniature models of real human household items: cars, planes, clothes, etc. are most valued. The smaller the models, the harder they are to make. Let's try to create a similar exclusive piece of furniture.
To make doll upholstered furniture, you need to prepare:
- thick cardboard 1-1.5 mm thick;
- plain paper;
- foam board (thickness 0.5 cm) or corrugated cardboard (thickness 0.3 cm);
- a tube with a diameter of 1.5-2.5 cm from any material. You can use an old marker or a cardboard tube from under the threads;
- fleece or thin foam rubber 0.3-0.8 cm thick;
- upholstery fabric. It is better to choose chintz or staple, so that it is better saturated with glue;
- PVA glue and "moment";
- scissors, knife;
- ruler, pencil.
Making a real chair step by step
- Make drawings of parts on paper and cut them out.
- Cut out the details of the chair according to the drawings. Glue four rectangles of foam board or six of corrugated cardboard together. This will be the base of the chair, the seat. Then glue the back and front of the chair, cut out of thick cardboard. Attach the armrest tubes. Further, after pasting them with paper, they will hold well, but for now they can be slightly “basted” with pieces of adhesive tape.

- Cut out several strips of corrugated cardboard 1 cm wide and equal to the length of the tubes, and put them in a pile under the roller, smearing the layer with glue. Determine the number of layers locally. Paste over the armrest first with thin paper, and then with fleece or foam rubber.

- Cover the chair with fabric. To do this, cut out pieces of material according to the same drawings, but adding a little (1-1.5 cm) in length and width for the fold.

- Cover the back (removable) for the chair first with foam rubber on one side, and then with a cloth on all sides.

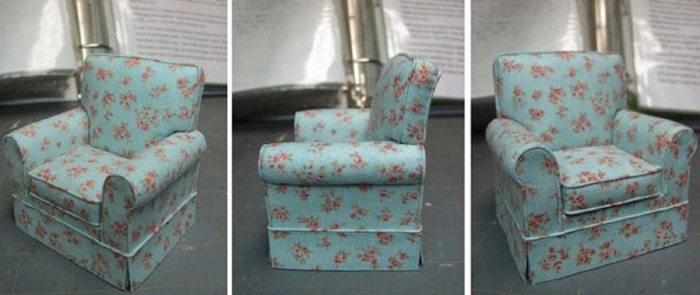
- Set the back in the chair. It can be glued to a stationary back, or it can be left collapsible.

- Do the pillow on the chair in the same way as the back.

- This is how the royal chair for your favorite doll turned out.

The manufacturing technique of this upholstered furniture is similar to the scheme described above, only this chair is not a real model, and therefore the base for it is easier to perform. It consists of a piece of foam rubber, cut according to patterns, 1-2 cm thick and a small box. These parts also need to be pasted over with a beautiful fabric, and then connected.
From a rectangular piece of foam rubber that matches the size of the box, cut out a pillow and drape it with a cloth. If there is a sufficiently long and narrow box, then you can get a chic sofa for a doll.

The desire to make furniture for very often stops the lack of materials. Of course, few people have furniture boards, wooden blocks and springs in the apartment. However, miniature furniture does not require such real details. Half-liter plastic bottles are in any home and can be used not only as containers.
If they are cut in a certain way, they can turn out to be beyond the original chairs. In order to give them a presentable look, you can sheathe or glue the edges of the plastic with a beautiful braid. Next, you need to sew two pillows with your own and fill them with some kind of filler. One of them will be the seat and the other the back.

To complete this work, we need a cardboard tube, which remains from a roll of toilet paper. The manufacturing scheme is the same as in the previous version, only in this case we will not be able to make armrests. Therefore, miniature furniture will be more like an ottoman with a back.
Cut out the desired shape from the tube and paste over it with a cloth. Make a bag, stuff it with filler and put it inside the tubes to make a seat.

Bed for doll baby
Barbie or Monster High are grown girls, so it makes sense that they might have a little baby. It also needs some furniture. For example, a crib.
There is a very simple option for making a cradle for a little Baby - a bed made of matchboxes. For the backs, you can use popsicle sticks. Glue the two boxes together and cover with colored paper. Glue the sticks and paint them. The bed is ready.

Matchboxes - excellent construction material for doll furniture. These are ready made drawers. You can make a whole kitchen set out of them.
- Take 9 boxes and fold them into three rows, gluing them together.
- Tape around the perimeter with colored paper tape.
- Make staples at the ends of the "boxes" with a stapler. These will be the handles.
- Make hanging cabinets from three boxes.
- Glue two pieces in each box.
- Paint or cover them with colored paper.
- Cut the top of the box down the middle. These will be the doors. Handles on them can be drawn with a felt-tip pen or glued on a grain of rice.

From matchboxes you can construct a wonderful chest of drawers. For this we need:
- 4 matchboxes;
- 4 beads for legs and 4 for handles;
- thin fabric or colored paper;
- beautiful braid;
- glue, paint.
Paint all boxes inside and out with a solid color paint. Glue them together and wrap with cloth or paper. Glue a braid along the contour, 4 bead legs on the bottom, and bead handles on each box.

Evgenia Smirnova
To send light into the depths of the human heart - this is the purpose of the artist
Content
Crafts for dolls are a great idea for joint creativity of a child and his parents. Although today you can buy any miniature piece of furniture, independent production toys helps save the family budget. In addition, needlework contributes to the development of perseverance, accuracy and aesthetic taste.
How to make doll furniture from improvised materials

Do-it-yourself furniture for dolls can be made from a variety of improvised materials. In every house there are cardboard, paper, newspapers, pieces of wood and plywood, cans, corks, wire, fabric scraps and interesting, but unnecessary things. It takes inspiration, a little patience, and uncomplicated raw materials turn into elegant interior items. Tiny armchair, chairs, desk, coffee table, a bedside table with a TV, a refrigerator, a sofa and a crib make the two-story dollhouse beautiful and cozy.
DIY cardboard furniture
Do-it-yourself miniature pieces of furniture for dolls are made from unnecessary cardboard packaging. To make a dressing table, you will need materials:
- a small cardboard package (a box of hair dye will come in handy);
- ruler;
- simple pencil;
- foil;
- stationery glue;
- paper (colored, white or decorative).
Procedure:
- Cut the box at a height where the doll can sit comfortably in front of the piece of furniture.
- Make a drawing of a mirror on the remaining part, coinciding in width with the table. Cut out the blank, glue it to the base.
- Decorate the top edge with patterns or simply round it.
- Cover the table with paper.
- Decorate the product with painted drawers and doors.
- Cut out a "mirror" from foil, drawer and door handles.
- Stick the elements on the table.
From paper

Do-it-yourself furniture for dolls is easily made from paper. To make a miniature table with a mosaic top, you will need:
- cardboard or paper of high density;
- ruler;
- simple pencil;
- awl;
- scissors (a clerical knife will do);
- colored cardboard for mosaic;
- wooden skewers (you can take toothpicks) for the legs;
- thick threads;
- office glue.
Procedure:
- Cut out the base of the table top.
- With an awl, make neat holes for the legs and racks that are needed to decorate the table with weaving.
- Cut out small squares from colored cardboard. Glue them in a mosaic pattern to the top side of the countertop.
- Insert the legs into the holes, fix them with glue.
- Glue the end of the thread to the bottom near one post. Braid the legs. Decorate the table with a decorative braid of thread.
- Tie two threads crosswise to the legs or glue the sticks.
- Lay a thick sheet on the base, fix it with glue.
From newspaper tubes

Doll furniture made of paper tubes resembles real interior items made of vines. To make a wicker sofa from this material with your own hands, you will need 200 blanks 30 cm long, a side cutter, a ruler, clothespins, colored cardboard ribbons. Before you make things for dolls, you need to prepare the main material - newspaper tubes. Procedure:
- Cut the newspaper into equal-sized sheets.
- Coat the paper with glue.
- Take a needle (knitting needle, pen core). Roll a sheet over it.
- Take out the thin base.
- Let the tubes dry.
Let's start creating a sofa:
- Weave the bottom on 13 transverse and 5 longitudinal posts.
- Make a side of 5 rows.
- Increase the stands, make 6 legs.
- Cut the blanks.
- Add skewers to the middle racks.
- Break the first blanks at a distance of 4-5 cm, the second - after 5 cm. Secure the racks with glue, clothespins.
- Cut off the legs.
- Insert racks at the back. Weave 3 full, 2 short rows.
- Shape the height with strips of cardboard.
- Weave 3 rows, close.
- Glue the crossbar, crossbars.
- Wrap your legs.
- Decorate the sofa with a pigtail.
From plywood

A rounded coffee table for a plywood doll is simple. To make such a craft with your own hands, you need plywood, a device for cutting it (jigsaw), glue, acrylic paint or varnish. To get this doll interior item, do the following:
- Cut out two round pieces. They will become the surface of the table and the shelf.
- Make racks for shelves and legs.
- Connect the parts together with glue.
- Cover the finished product with paint or varnish.
from wood
For the manufacture of do-it-yourself furniture for dolls, wood is successfully used. To make a sofa, you will need:
- planks approximately 1 cm thick;
- tools for work;
- glue;
- stretching material.
Procedure:
- Cut out the elements of the sofa: the base (6 by 16.5 cm), the back and base of the same size (6 by 14 cm), two armrests (4 by 6 cm from the bottom and 7 cm from the top).
- Glue the pieces together, excluding the bottom.
- Cut the fabric upholstery to fit the sofa pieces. Stick it on the tree.
- Cover the seat, place it on the base.
Matchbox toy furniture

Do-it-yourself doll furniture is easily made from matchboxes. For a glamorous chest of drawers that is convenient for storing jewelry and hairpins, you will need the following materials:
- matchboxes - 3 pcs.;
- paper, cardboard;
- stationery glue;
- stop the pencil;
- stationery knife;
- toothpicks;
- wire;
- pieces of a used rod from a fountain pen or a bead;
- paints for decoration appearance products.
Procedure:
- Make the base of the chest of drawers. You should get a design with a table top, side walls, bottom, partitions between the drawers.
- Insert matchboxes into the frame of the product.
- Glue the toothpicks to the front of the chest of drawers. Cut off the excess.
- Make handles, attach them.
- Paint the craft, fill the piece of furniture with small "treasures".
Video: how to make do-it-yourself dollhouse furniture
The first video shows the process of making a bed for Barbie. The material used is kukuruktor (a toy constructor made of corn). The second video shows how to make a doll bed. The third lesson shows how to make a chair for a doll using the Origami technique. The fourth master class is devoted to making a doll cabinet out of boxes. The fifth video shows the process of building a beautiful soft sofa according to the scheme. In the sixth lesson, learn how to make dinner table and stools made of corrugated cardboard, and in the last master class - a chair made of polymer clay.