Decorations for the room with their own hands in stages. DIY room decor. Ideas and photos. Colored tape or self-adhesive paper
In order for a truly festive spirit to be felt on a birthday, delicious cake and gifts are not enough. The type of room where the celebration will take place also plays a very important role. Therefore, to make this day truly unforgettable, we offer you several ways to decorate the room for your birthday with your own hands.
This is a fairly quick, simple and original way to celebrate a birthday. Materials you will need:
- colored paper rolls
- Whatman sheets (preferably dense),
- stationery knife, scissors and ribbons.


Now let's look at the manufacturing steps.
- You must decide on a color scheme. Draw a design sketch which you want to do.
- Of course, then you can fix something, change it, but having a sketch will give you an idea of how it will look in the end - and significantly speed up your work.

- Lay out the drawing paper - this is the base on which you will work. Depending on the size of the embroidery you planned to make, you can take one sheet of whatman paper, or glue several (by the edges to increase the area). It will be much easier to work with thick paper, as it will remain strong when you cut it and weave the ribbons.
- Place the base of Whatman sheets so that you can work comfortably on both sides of the paper. You can put two chairs at a distance from each other so that you put the ends of the paper on the chairs, pressing them down with books or something heavy so that the paper does not fall.
- You can also hang whatman paper in doorway. But do not lay it out on the floor or a table, as in this case you can only reach the front side conveniently.

- With a utility knife make two cuts in the paper, thread the tape into each of them so that a strip of tape remains on the front side, and both ends are on the wrong side: leave one end small and attach it to the paper (with glue or double-sided tape), the other is longer if you want to continue this weaving, or also fasten if this drawing is finished.
- Repeat the previous steps until do not fill the entire Whatman paper with paper embroidery patterns. In this case, the cuts do not have to be strictly opposite each other, and the lines are even. Take ribbons of different widths and make your own design.
- Hang your creation on the wall and enjoy the work done and the festive mood!

Making a big room for little money
If you need to quickly decorate a large spacious room, while using a minimum of money and effort, this method is just for you. You only need colored corrugated paper in rolls.


Then it all depends on the room that you will decorate. Ribbons of paper can be pulled from the eaves, pipes, chandeliers, cabinets or shelving, in general, everything that will be there. Moreover, you can stretch the paper with different strengths so that the sagging is somewhere large, somewhere smaller.


TIP: You can also twist the ribbons. Hang the colors randomly.
You will definitely succeed in creating a joyful and festive atmosphere! Don't forget - the link is full of ideas
Idea: balloon walls!
Both children and adults are all crazy about balloons. So, by choosing this method of decorating a room, you will definitely cheer up everyone present!

For this you will need the following materials:

Follow these steps and you will soon be admiring the colored ball powder on the walls:
- Divide the ball into 6 equal parts, tying knots on it.
- Using the pump, inflate the first part of the balloon until you get an inflated sausage, tie a knot at the end. Then cut off the inflated part of the balloon as close to the knot as possible. Then do the same with the next part of the ball, and so on until you get six small balls.
- Tape the knots so they don't stick out.
- Repeat the first three steps until you have hundreds of colorful balls.
- Attach the balls to the wall with small pieces of double-sided tape.

This decoration is wonderfully suitable for an original party - a photo shoot. And do not forget to stock up on enough sweets, as the view of the room will definitely have something tasty to eat.

Here are some more great balloon decorating ideas.


Wall decoration with large homemade "lollipops"
Beautiful colored lollipops are not inferior to balls in their ability to create an excellent mood. With their help, you can decorate a party or birthday and provide original photo- an area for those present.


To create a festive atmosphere with your own hands, you will need:
- wooden dowels measuring 12 "x 1/2" (30 cm x 1.25 cm),
- acrylic paint (there should be a wide range of colors: white, purple, dark blue, light blue, green, yellow, orange, red, pink, etc.),
- brush, stand for dowels (a glass or cup will do),
- palette, 4 sheets of A4 paper, scissors, pencil, foam discs measuring 10″x1″,
- glue gun, adhesive tape (regular or double-sided).
Assembly technique:
- Apply white acrylic paint on wooden dowels I. It's best to paint one half first and let dry (in a container with the painted side up) and then paint and dry the other side. While the dowels dry, start making the lollipop directly.
- Cut out 8 identical curls from paper stencils and arrange them on the foam disc as shown. Then lightly circle the stencils with a pencil.
- Choose a paint color and paint with a brush curls through one. Stroke the outlines first so as not to go beyond the edges. You can do several layers to make the color look more saturated.
- By this time your dowels should be dry. Use glue gun on the end of the dowel and quickly press it against the foam disc, hold a little to fix it.
- Do the same for the other disks using different colors for coloring.
- Glue the finished lollipops to the wall. Can be glued with adhesive tape for the leg, or with double-sided tape for the lollipop itself.

That's all and done, enjoy the beautiful background!
Make a big number
A large figure will not only remain in memory, but will also become the central photo zone of the party. Detailed master classes


Birthday fan garland
On hot days, you want coolness so much, and on cold days - reminders of warm days. This garland, which consists of many fans, will wonderfully help to cope with both of these desires! Having made this one, you will be transported to a fairy tale! And surprise everyone!


Materials:
- colored paper for scrapbooking,
- scissors, tape,
- colored cardboard, glue stick,
- ruler, stationery knife.
Garland making steps:
- If you bought accordion-folded decorative paper right away, you can skip this step. If not, fold the paper into even accordions.
- Form half circles from accordions.
- Cut out stripes, circles, triangles or some other figurines made of colored cardboard - they will come in handy for decorating fans.

- Cut out half circles from cardboard(the size should be smaller than the fans). Attach them to some fans with a glue stick. They will perform two functions at once - decorative and strengthening, that is, they will not allow the fan to fold.
- Stick on fans curly molds made of cardboard by combining colors and creating your own pattern designs. As an example, you can take a picture.
- Connect the fans together to garland. To do this, stick them all on the tape. You can pre-fasten the joints of the fans with a stapler to strengthen the structure.
- Hang a garland and cheer up!


Making big paper Martenitsas
These decorations are made very simply and quickly with your own hands. You will need two A4 sheets - red and white, scissors and a glue stick. If you want to make a lot of decorations, then take more paper, as long as both colors are in the same amount.

Products have this color scheme, since Martenitsa comes from Bulgaria and there is a ritual to meet spring with similar products of exactly these colors, as this is a talisman for the good health of the whole family. But if you do not delve into this folklore, you can take paper in colors that you like.
Let's now look at the manufacturing steps:


- Fold each sheet of paper in half (lengthwise).
- On each sheet, draw 10-12 straight lines as shown in the picture.
- Make cuts along the marked lines with scissors.
- Unfold the leaves and glue their ends, glue should be on both ends.
- Form circles, securing them with glue.
- In the middle of the circles, you can also attach strips of paper that differ in color from the circles themselves.
- Hang items around the room.

Garlands without glue
Even a child who knows how to handle scissors can make such an ornament, since the scheme is very simple. You will need: A4 paper (calculated as one sheet of paper for 4 elements of the garland), scissors, pencil.


How to assemble the garland:
- Cut a sheet of paper into 4 even pieces.
- Take one piece, fold it in half (across), and then in half again (also across).
- Draw with a pencil the shape you want to cut out.
- Cut out the shape and carefully unfold it.
- Connect the individual elements of the garland together (as shown in the picture), alternating colors.
- Hang up the garland.


We offer you several alternative sketches for this garland.

Little holiday in a box
On cold autumn and winter days, such a box of positive will be just a great gift and will definitely create a sunny mood! You will need: a box, small helium balloons, as well as paints (or ribbons, colored paper) to decorate the box.


How to DIY:
- Paint or paste a box of rainbow stripes, flowers or any other joyful patterns that come to your mind.
- Place small helium balloons in a box(the number depends on the size of the box. The ends of the ribbons tied to the balloons can be attached to the bottom of the box if you want the balloons to jump out the length of the ribbon when you open the box, or not to fasten if you want them to effectively fly away to the ceiling or into the sky.
- Close the box.
- Present a gift and keep an eye out for the surprise recipient's amazement!

IMPORTANT: It is important to remember that small helium balloons lose their ability to fly in about three hours. Keep this in mind when preparing a gift.


Until recently, your daughter was just a child, but today she has become a teenager. And this means maximalism, first love and the need for personal space. Now the room is not only a place to sleep and play - it keeps its little secrets. How to decorate a teenage girl's room with your own hands so that everyone is happy?


Your task is not to interfere, but only to direct her plans in the right direction. Do not forget to help in the selection of furniture and decor items, keeping an eye on their quality.
What to remember
Entering the transitional age, girls already consider themselves adults, but still remain children. Therefore, the room becomes something between a children's and an adult's room. Even if you didn’t plan to radically repair your daughter’s home, some things are still worth changing.
First of all, choose the size of the bed, find chairs higher and choose a different decor. It is important that you share the interests of the child in matters of repair.

The highlight of the whole interior can be an independent do-it-yourself decor for a teenager's room. A favorite cartoon character, book, movie hero, musician, as well as an uncontrollable children's fantasy can become a fulcrum.

Based on your child's hobbies:
- if a girl likes to draw, then you can select a part of the wall for drawing. Cover the wall with white slate paint, and after drying, this area will turn into a kind of drawing board;
- if the child is a book lover, then equip several bright bookshelves where you can put your favorite books;
- if you are fond of sports, then make sure that there is enough free space in the room so that furniture and other interior items do not interfere with classes.
Stop on one theme of space design: it will be easier to implement and will not confuse a teenager in his own desires.

Every teenager will love having something exclusive in their room that no one else will have. For example, chalkboard for notes.
It's very easy to create it:
- Stock up on primer, sponge, brushes.

- Get a wooden or plywood board.

- Cover the surface of the material with black or gray slate paint.

- Place the product on the balcony and wait until it dries.

- Attach the frame to the board.

Let the girl come up with a place for fastening - she will be pleased that her parents took a little care of how to decorate a room for a teenager with their own hands.
Color versions: solution
Background colors should satisfy both parents and daughter. Listen to your child's thoughts, but correct them. Consider whether gothic-informal colors should be chosen or if you can limit yourself to posters.
Do not forget that the psyche of a growing child is unstable, and therefore pay attention to calm shades. It is best to stop at green, purple, blue, blue, pink or peach. If your daughter loves bright colors, you can use them as interior accents.

Furnishings
At the family council will always be the question of buying new furniture. Heading to the store? Be sure to consider the quality and price of headsets. Make sure that a high-quality orthopedic mattress gets on the bed.
It is good to equip the room with custom-made furniture. To do this, the designer must consult not with the parents, but with the daughter. She will decide for herself what furniture to use and where to put it. The same goes for color design furnishings and their dimensions. Focus on the rules of zoning space.

In the girl's room should be:
- sleep area - a folding sofa or a comfortable bed;
- work area - desk;
- storage area - shelves, racks, whatnots;
- beauty zone - a dressing table with cosmetics and a mirror;
- relaxation zone - a wide window sill, an armchair or ottomans;
- dressing area - closet or dressing room.
To relax, beat the window. By slightly lengthening it and expanding the window sill, you get a comfortable place. Soft mattress, blanket and small coffee table easy to build with your own hands.

Do not forget that your daughter will need her own mirror, it is the most favorite item in any girl's room. It can either hang separately on the wall or be built into a closet. wall variant provides do-it-yourself decor suitable for a teenager's room. The easiest option is to use shells collected from the sea.
DIY mirror decor
- You will need a round or square mirror, seashells, beads, glue gun, bottle of clear glue, glossy carpentry varnish, newspapers and brush.

- Cover the table with newspapers, put a mirror on it. The glass itself must be covered with cloth or paper.

- Apply a layer of glue along the contour of the mirror, glue small shells.

- Warm up the glue gun, apply the composition to large shells, beads and other decor. The gaps can be covered with sea sand.

- Leave the mirror to dry completely for 24 hours.

- Apply varnish and leave to dry for another day.

The resulting beauty can be safely hung on the wall.
Wall decoration
This is perhaps the most painful moment for parents. It is difficult for them to explain to the child why you need to choose calm tones. Find an alternative - use photo wallpapers that will create a special atmosphere. The girl will surely succeed in choosing the right ones from the whole variety of options.
There are other options. They will help in how to decorate your room with your own hands to a teenager. The easiest way is to use vinyl stickers in the form of fantasy plant motifs. They will add tenderness and sophistication to the room.

You can make an accent wall using expensive wallpaper. Progressive parents follow fashion trends, so their daughter will be delighted with soft finishes - fabric, leatherette with foam rubber filler.
Encourage creativity:
- Hang photos printed from your smartphone in original frames. Offer the girl a photo print of pictures with friends as wallpaper for an accent wall. Don't want to ruin the finish? A girl can place a photo on a stand with buttons or on a rope with clothespins.

- Graffiti fans can turn to professional artists or friends who draw well. If a girl is fond of art and knows how to transfer surrounding objects onto paper, give her ... a wall. Choose a place for the future drawing together.
- An effective and stylish solution - three-dimensional letters. They place the right accents, can become a way of self-expression of a teenager. Letters are made from plastic, wood, fabrics, etc. Find the option that your teenager will like.

If your daughter has agreed to a neutral finish, consider what details to use to bring the room to life.
Nails of the program
There are a lot of design options for the room where a teenager lives. But they are realized only when you know how to do things self made. If you want to learn, use the master classes on the network, but proceed from the style of the room. Designers recommend several simple ideas that even a teenager can handle.
- Set up a work area. It can contain a creative wall clock, a note board. A girl can create her own "wish card" - a collage of pictures cut out from the pages of old magazines.

- Collect all decorations in one place. Come up with an original organizer for them made of lace stretched over a wooden frame, cardboard wood, real varnished branches. You can use figures made of papier-mâché or copper wire.
- Find an activity for a persevering child. If a girl likes beadwork, crochet, sewing Tilda dolls, then let these skills become useful. Original interior items are always appropriate, especially in a girl's room.

- Clean out your wardrobe. Sweaters and jeans that my daughter no longer wears can become new pillows, upholstery for ottomans and chairs.
- Find places to keep secrets. In this capacity, old suitcases, boxes and boxes are suitable. Decorate them using decoupage or collage technique.
- Find original places for jackets and raincoats. Get creative: Take plastic cups and glue them onto a board covered with pretty paper.
- Give a second life to old furniture. Chest of drawers, wardrobe, cabinet with original handmade finish will take their rightful place in the space.

- Use modern design ideas. Ethnic-inspired wooden furniture, romantic shabby-chic ruffled pillows, an ultra-modern laptop, delicate Provencal-inspired curtains and a comfortable Victorian sofa in bright colors create a cozy atmosphere in the space.
Create together with the girl, and joint ideas will not only decorate the room, but also help to get closer to the child, to understand his inner world.

Any furnishings of living rooms get bored over time, the owners quickly get used to it, nothing delights guests. Often, the design of the walls requires novelty, since the decoration is obsolete. Original decor do-it-yourself walls from improvised materials is the best way to give novelty without major repairs and serious investments. It is enough just to create a decorative panel on the wall, update old furniture, breathe into unnecessary objects new life making them practical.


No matter how much time is spent looking for something original in hardware stores, nothing can replace do-it-yourself decor from improvised means to transform an apartment. And it will cost much less than the work of specialists who will try to impose some kind of technique or mastered technique. It happens that a designer or decorator will show sketches, tell in all epithets how great the room will look, but the end result does not live up to expectations. The best way- Do what you want on your own.
Do-it-yourself room decor from improvised means is a minimum cost with the possibility of creative self-realization. Interior designers have developed many simple and available ways interior transformations that are easy to do on your own.

DIY room decor

The most common DIY decor methods

DIY interior design decor

Decorating a room with your own hands

DIY room decor idea
An unusually designed wall will be complemented by curtains and sofa cushions, hand-sewn covers and capes. The author's decor from improvised materials can be changed at will, for example, for a certain holiday or for the change of season. In spring, it is reasonable to decorate the wall with a blooming twig or homemade flowers in vases made from bottles.
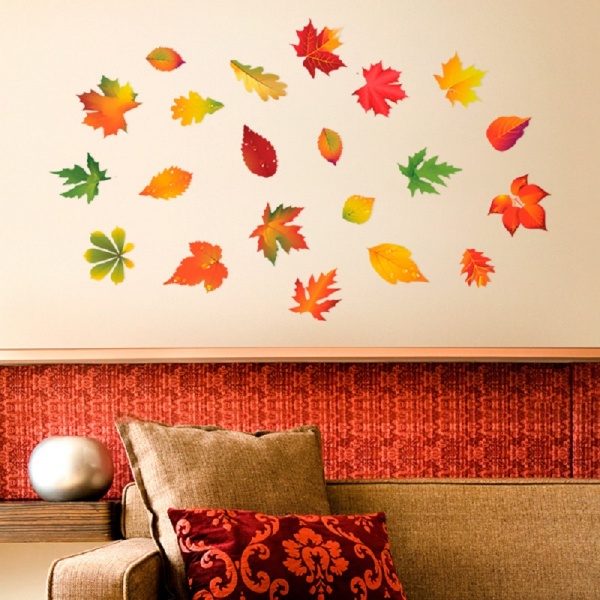
Winter decor suggests snowy and New Year's variations. It will replace autumn leaves flying in a whirlwind along the wall, and in summer it can be butterflies or birds.
The easiest way is to cut out of paper or draw these objects on the wall using a stencil. This technique is available even to those who cannot draw. The main thing is to apply markup to get an attractive composition. Individual objects can be of the same size and shape, but it is better when they are reduced or depicted from different angles.
Do-it-yourself wall decoration from improvised materials is performed using any available technique, but this is also a reason to learn something new. Stencil drawing is the easiest to do, especially with an aerosol spray. But you need to work carefully so that smudges and sagging do not form from excess paint.

Interesting do-it-yourself room decoration

DIY room decor
Stencil panels often combine flat contours of trees and three-dimensional elements:
- flowers;
- leaves;
- birds;
- animals;
- insects;
- clouds, etc.
For the manufacture of overhead elements, thin plastic, cardboard and colored paper are suitable. If your imagination is not enough, use examples from our photo gallery.
Decorative plaster from ordinary putty
Do-it-yourself wall decor from improvised means at home also involves replacing expensive types of plaster with ordinary building mixtures, but using original equipment or tools.
Everyone knows that if you attach an object to wet liquid plaster or paint on the wall and tear it off sharply, you will get a beautiful print. A flat sheet gives sags, a grid with its own pattern, crinkled foil will give an unexpected do-it-yourself wall decor.
Working with a spatula, trowel, trowel or various roller nozzles on wet putty with dyes, you can get an effect similar to "Venetian" or textured plaster. The plastic mass is blurred over the surface of the wall until the desired pattern is obtained in circular motions or pats.
All excess is removed with a spatula. For additional volume, use paint or varnish. After grinding it will original design walls in the hallway, living room or bedroom.
We offer to master a master class on decorating walls with plaster.

DIY interior design decor

Decorating a room with your own hands

DIY room decor idea
We carry out a decorative stone from facade plaster
There are many ways to add volume to wall decor. In the hallway on a solid wall, it is easy to make some kind of masonry out of facade plaster or make an original panel.
To begin with, on a fortified surface, you need to outline the contours of the future drawing, outline the future stones. These are free-form objects that need to be given volume in the process of work, so special artistic skills are not required.
It is advisable to cover adjacent surfaces with masking tape so as not to stain. To create a "stone" texture, you need a thick mortar of plaster. You will have to work quickly to achieve the desired effect when shaping the outline of the stones. Roughnesses are treated with a trowel and a brush for metal.
The finished surface will become more believable after touching up. It is necessary to work out the seams between the "stones" and give volume to the entire decorative trim. First, a light tone is applied with arbitrary spots, then dark colors will add depth, a medium tone will fill the gaps in the wall decor with your own hands.

Interesting do-it-yourself room decoration

DIY room decor
Original wall decor with your own hands from improvised materials
To implement interesting compositions, you don’t need big expenses, creatively thinking person He sees in everything a way to realize creative inclinations. Just as stone cutters find a special angle of ornamental minerals in order to polish the “landscape” cut for a picture, so a beautiful piece of fabric or a cut of wood becomes a picture in a frame in the hands of a creative person.
The most interesting thing is not one decorative canvas, but several similar objects that form a whole “gallery”. Handmade beads and necklaces made of beads and gems do not have to be hidden in boxes. They make a great bedroom or dressing room decor when framed on black velvet against one wall. As an option, hang them on hooks, using a beautiful fabric as a background in wall decor.

DIY interior design decor

Decorating a room with your own hands

DIY room decor idea
After sewing curtains and upholstering of upholstered furniture, pieces of upholstery remain with beautiful pattern such as tapestry, chenille or jacquard. Inserts of interior materials on the walls will not only duplicate a sofa, armchair or corner, they will create a kind of “roll call” in the overall composition.
Wall decoration in the form of fabric paintings fit well into the interior of the bedroom and children's room. Depending on the plot, you can beat the texture of the fabric. Striped jersey is suitable for a zebra, geometric shapes are a giraffe, spotted will be a leopard, and black velvet is a panther. Sparkling eyes will complement the pebbles or sparkles.
As a do-it-yourself home decor from improvised materials, a composition of several objects is used, united by a common color, plot or pattern. For example, voluminous fruits can be sewn from bright fabrics, and the leaves for them can be made from a common material. Frames of the same shape can be common, as well as the background on which all these berries, fruits and citrus slices will be located. It is not necessary to hang such pictures close, common topic compositionally unite the entire interior.
A similar effect can be obtained by picking up trimmings of laminate or veneered chipboard with the texture of expensive wood. Such decorative panels, made by hand, will complement any interior design that uses the beauty of natural wood.
Fabric paintings look good, echoing the materials in sofa cushions, upholstery of ottomans and banquettes. Painted scarves, handmade batik or Japanese silk with a typical Asian pattern can also become art objects, and not just do-it-yourself interior crafts from improvised materials.

Interesting do-it-yourself room decoration

DIY room decor
Tip: Not all fabric paintings require full frames. It is enough to pull them on rectangular or round templates made of plywood or foam and hang them on the wall in a certain order.
Beautiful embroidery in the form of icons, portraits or paintings - great way wall decorations. Embroidery is placed singly and as a do-it-yourself exposition, even if some of them were made by someone else.
Talented children's drawings in frames can also become a worthy decoration of the interior, especially if the child is studying at an art school. Having selected several successful works and giving them a certain compositional plot, it is easy to make a dynamic interior in a nursery or hallway.

DIY interior design decor

Decorating a room with your own hands

DIY room decor idea
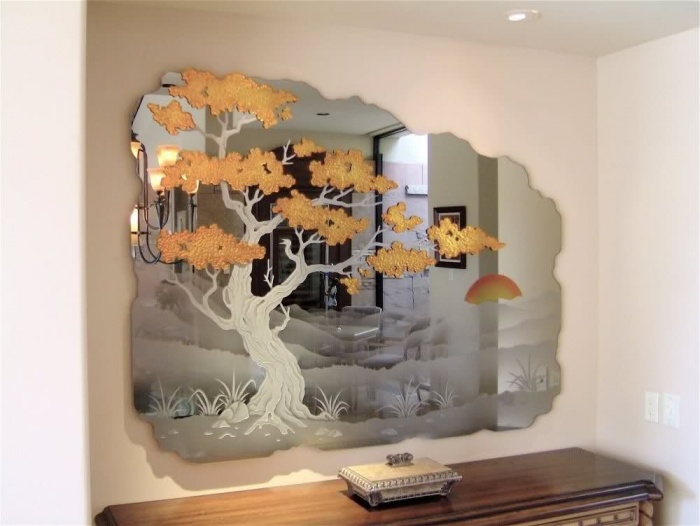
Mirror elements in room decor
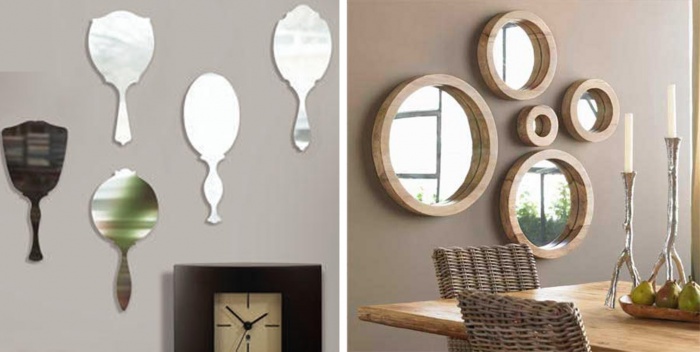
In interior design, a mirror is a completely independent element that takes its rightful place in any room. However, it is not necessary to hang ordinary mirrors in every room, they look much more interesting in different versions:
- mirror wall to visually expand the room;
- rotating mirrors of an unusual shape on stands;
- mirror tiles as wall decoration;
- carved handmade frames for mirrors of different burs and sizes;
- stickers made of foil and mirror paper, forming whole compositions.
An installation will look good on a free wall, which includes clocks, mirrors and decor, united by a common idea or intricate geometry. Other do-it-yourself crafts for the home and decor from improvised materials can organically fit into such an unusual solution.

Interesting do-it-yourself room decoration

DIY room decor
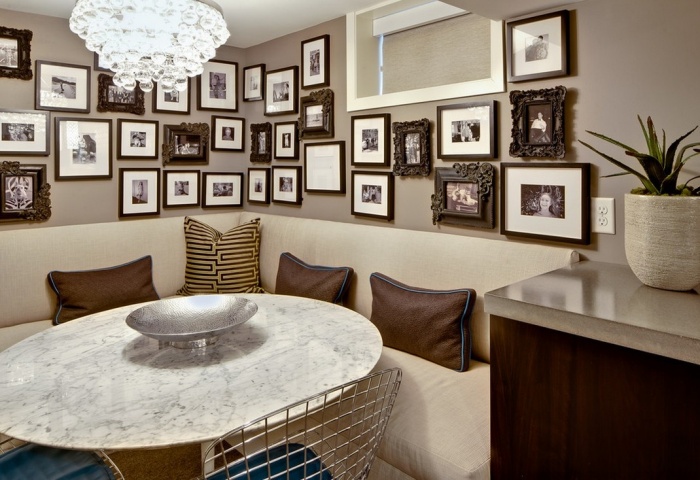
Framed photo as an element of decor
Photo - traditional way do-it-yourself wall decor for the home from improvised means. At the same time, photos from the family album are not always used. A separate topic is travel or personal achievements, which are framed on the wall as “evidence”.
No matter how unique the photograph itself is, its presentation in the overall composition is important. You can choose white frames or wooden frames, they may differ in size and shape, but they should have something in common, including a background if the photos are small.
In the center of such a composition, place the largest photo and a picture reflecting the most significant event. Other photos will form around the central object. It is interesting to study family photographs that reflect changes over time - how a child grew up or how a family was created in terms of addition. If this is a family "board of honor", it should reflect the main stages of the ascent to success. Creativity-related victories can be confirmed in the hand-made things along the wall.
The choice of how to decorate an apartment should be somehow tied to the lifestyle of the owners, their tastes and preferences. Sometimes an interesting decor seems completely out of place in one room, but it will find its rightful place in another room. If you were inspired by some idea of decorating an apartment with your own hands from improvised materials, feel free to take on its implementation. Try to do everything with inspiration, slowly and carefully. Even if something didn’t work out the first time, work on improving the technique, and everything will work out.
Video: DIY room decor
50 photos of interesting do-it-yourself room decor ideas:


To transform a bored interior, start overhaul not necessary. A budget option change the situation - bring fresh notes to the design. There are many diverse ways to decorate a room without significant material costs. Original home design ideas will help to give the room a personality.
Textiles are a great helper when decorating a room
Textiles will help to quickly revive the interior of the room. Curtains and decorative pillows are a favorite attribute of designers to create comfort in a living room. In addition to the key elements, tablecloths and napkins are actively used, the color scheme of which echoes upholstered furniture, curtains or carpet.
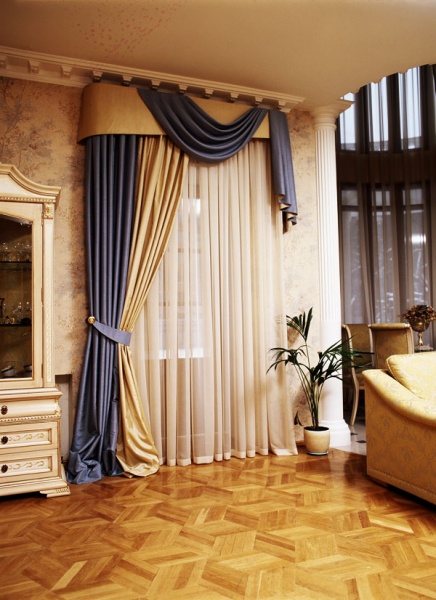
Window transformation
The question of how to decorate a window is always relevant. Properly selected curtains can transform the interior of any room. Focus on the design of the window in different ways:
- choose curtains with an unusual pattern or print;
- stop on solid material without additional decorations;
- select the original pattern (all kinds of lambrequins or other cut options);
- come up with unconventional curtain fasteners and interesting tie-backs.
Advice! If you want to emphasize the design of the room, the fabric of the curtains is selected brighter than the color of the walls by 1-2 tones.
The window should be decorated taking into account the general style prevailing in the room, the replacement of the cornice is only welcome.
We select pillows
An inexpensive way to decorate a room with your own hands is to purchase or make throw pillows. Their design is largely determined by the overall interior. The classic direction involves decorating the soft part with pillows of a standard shape: square, rectangular or round. Plain covers are appropriate if there are other accent areas in the room (a bright window or a doormat). The monotony of the interior is the perfect backdrop to decorate the room with expressive patterned pillows.
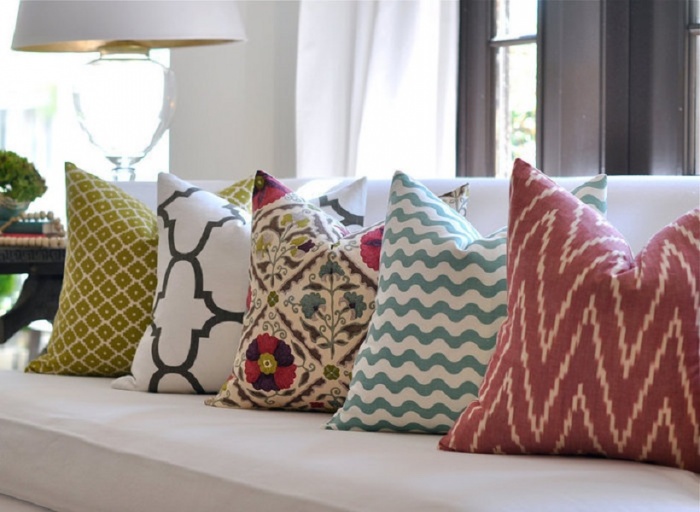
The modern interior of the room will be decorated with pillows of non-traditional shape in the form of puzzles, rollers, letters or animal figures. The fabric for the covers is selected depending on the overall situation, it can be pompous velvet and tapestry or plain linen and cotton. In addition to being attractive appearance, it is advisable to be guided by the following criteria when choosing textiles:
- hypoallergenicity;
- wash resistance;
- good shape retention.
Foam rubber and synthetic winterizer are optimal fillers for decorative pillows. The following photo clearly demonstrates the freshness of the interior of the room due to well-chosen textile decor:

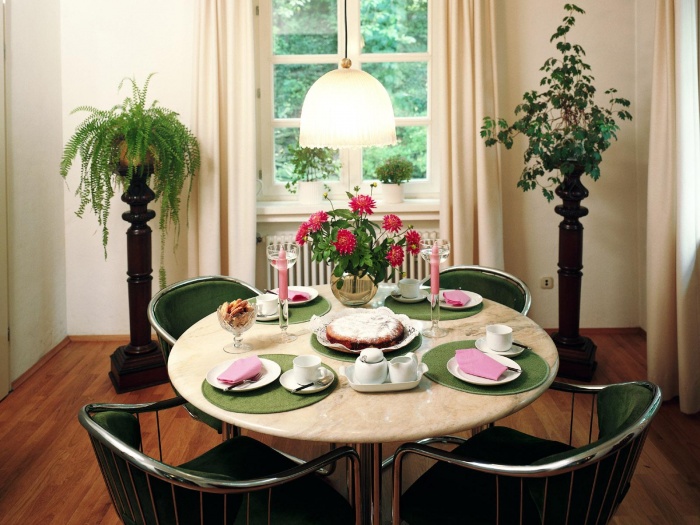
The nuances of phytodesign
Decorating a room with fresh flowers is both pleasant and useful. Green spaces have a beneficial effect on the emotional state of a person, bringing the home atmosphere closer to natural sources.
Advice! In order not to turn the room into a greenhouse, it is enough to decorate it with 5-6 plants. If the flowers are small, feel free to increase the number of copies to 8-9 pieces.
In addition to the direct choice of vegetation, pay attention to pots. A single ensemble of containers will harmoniously decorate the interior of the room, especially if they are close to each other. When placing flowers, take care of optimal conditions for their development: install light-loving ones on the windowsill, it is better to place some species away from the direct rays of the sun.
In addition to green spaces, shelves for them are also capable of decorating the interior of a room in an original way. The choice is extensive:
- expensive forged coasters are appropriate in a spacious room of a classic style;
- carved wooden shelves will complement the Provencal interior;
- a laconic combination of glass and chrome will decorate the interior in high-tech style and other areas of minimalism;
- if natural flowers are replaced by a herbarium and do not require watering, an interesting shelf can be made from a wide ceiling cornice.

In the absence of skills in caring for living vegetation, you can decorate the room with ikebana. Just do not buy cheap artificial flowers, this is a clear sign of bad taste.

We decorate the walls
There are countless options for decorating a wall in a room. Hanging one or two large paintings or several small ones is the most common interior decoration solution. It is worth taking a balanced approach when choosing the subject and framing of the subject of painting. The interior of the living room will be decorated with all kinds of landscapes, images of animals, abstraction and various. It is better to decorate the bedroom with painting, conducive to peaceful philosophical reflections, dynamism is not appropriate here.

In addition to works of art painted in oils, you can decorate the interior of the bedroom with your own creations, be it beadwork, thread or leather paintings. There are other ways to decorate a room with a creative twist.

A photo
The atmosphere of home comfort in the interior is successfully formed by family photos. Images of loved ones can be placed in a frame on a bedside table or chest of drawers.
Comment! Height at eye level is the optimal place for photos on the wall. If they are framed, take care of their compatibility with each other and harmony with other interior items.
Modern approaches to design are diverse. It is enough to place a mirror in the original frame near the photos on the wall, and install an overall vase of flowers on the floor, and the goal of decorating the room without unnecessary costs has been achieved.
collage art
It is quite easy to decorate the interior using a collage on the wall. This will require:
- Prepare a square tablet of suitable size.
- Print on a color printer any images you like with a recurring theme.
- Treat the surface of the tablet with a thin layer of glue.
- Pin images.
For example, if you plan to decorate a room with a panel of 75x75 cm, you need 9 photos of 25x25 cm. But the dimensions are chosen arbitrarily, depending on the availability of free space on the wall. If the repair of the room is just around the corner, instead of a tablet, you can stick images on the wall with double-sided tape.
There is also the opposite principle to decorate the interior of the room with an overall image:
- find an interesting high-resolution picture;
- divide into the required number of parts (in our case 20), a separate picture corresponds to the size of a CD box;
- each image is printed separately;
- the picture is placed in a case, after which it is fixed on the wall in the right order with double-sided tape.
This technique will help decorate the interior of the youth room.

Another simple way to decorate the interior is suggested in the following photo:

Bringing a non-standard idea to life is simple:
- print images with suitable silhouettes;
- cut out the shapes and transfer to thick black paper;
- stick the silhouettes on the base and place them on the wall in such a way that they interact with each other.
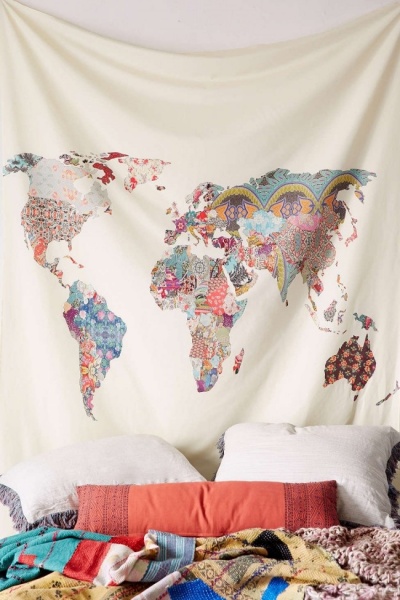
Geography lovers will love the idea of decorating the interior with the outlines of the world map:

Other creative approaches
Photo wallpapers will help to give the interior individuality, the appearance of which differs significantly from samples of 20 years ago. Sharp imagery, vibrant colors and vast themes make it easy to decorate a room to match the existing decor.


A relatively new trend in interior design is vinyl decals in all sorts of colors, sizes and shapes. They allow you to quickly decorate the room without the presence of design skills.

The use of mirrors contributes to the visual expansion of space. This is especially true if you need to even out the disproportionate dimensions of the room.

A popular technique that flawlessly decorates the interior is the placement of butterflies on the wall. Fluttering creatures fill the room with grace and lightness. The flock can gradually move from the wall to the ceiling. A fashionable decor element is enough to simply cut out of colored paper according to a template or draw it yourself.

Safety pins or glue sticks are the ideal fastening option that allows you to easily remove the jewelry at any time. The second way to decorate the interior is to hang garlands in the room, where the butterflies are connected by a thread and flutter from the slightest breath of air.

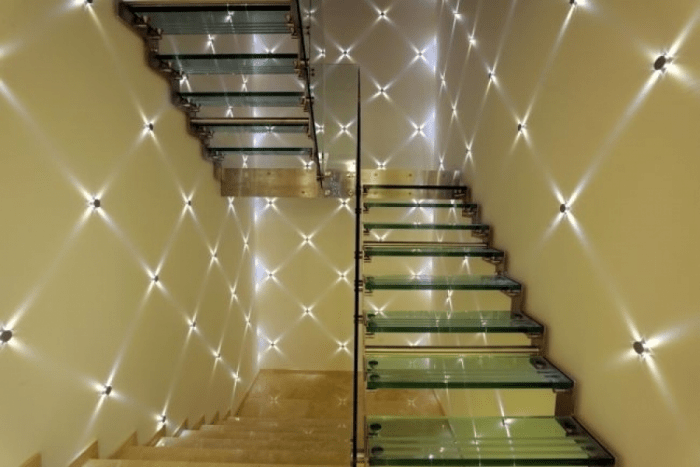
Lighting
Artificial lighting occupies a leading position in achieving the goal of decorating the interior of a room. Complementing a traditional chandelier with wall lamps with a similar design, you can achieve incredible results in transforming the interior.
Comment! The purpose of the room directly affects the choice of lighting: it is optimal to install lamps with warm light in the bedroom, cold radiation is more suitable for the office, helping to concentrate.
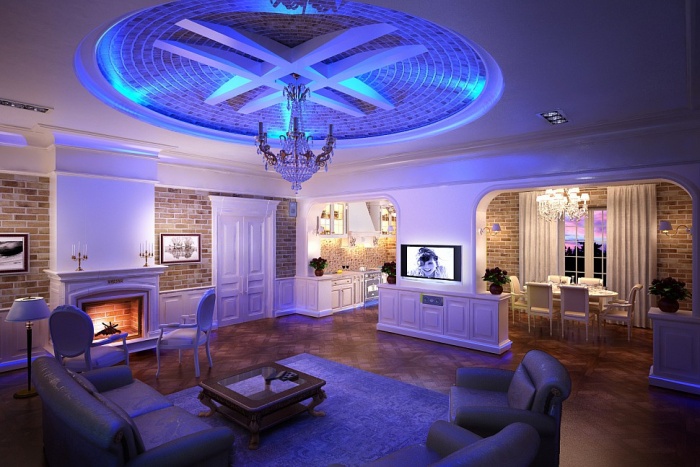
The shape of the lighting fixtures also matters. The interior of the bedroom will be decorated with a ceiling that scatters light, the living room needs bright lighting. Spotlights can fully provide a room with artificial light or work in tandem with a central chandelier. Usually the question of how to decorate a room with the help of lighting is solved at the stage of repair, it is problematic to install additional sources without damaging the interior. An exception may be the usual replacement of an old model of a chandelier or sconce with a more modern copy.
Piggy bank of original ideas for the living room and bedroom
Accessories play a significant role in achieving the goal of decorating the interior. Vases, figurines and other decorative items can quickly enliven the atmosphere of a room. When choosing items, you should observe moderation and not overdo it.
The principle of compatibility with the general style of the interior is required for:
- Frivolous trinkets in the form of charm brooms are appropriate only in the kitchen.
- Wicker baskets for fruit harmoniously decorate the interior in a rustic style.
- The interior of the room, designed in a classic style, is recommended to be decorated with elegant figurines and original vases.
- A collection of soft toys is better to demonstrate in the children's room.
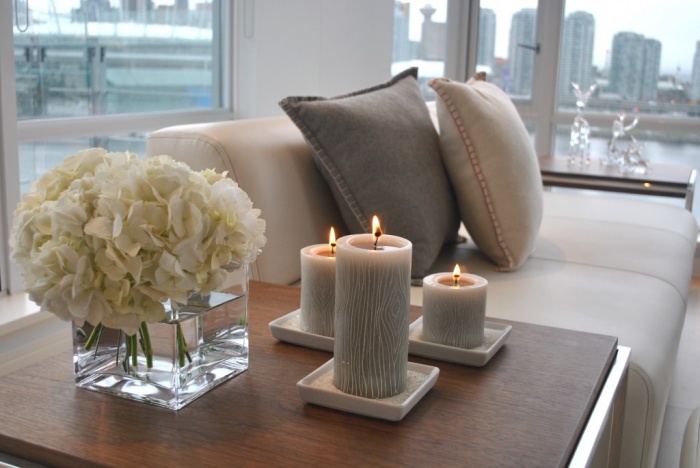
The presence of candles and fancy candlesticks contributes to the formation of a cozy atmosphere in the interior. Live fire is always a symbol of the hearth. An interesting composition can be arranged by combining a beautiful glass vessel, decorative pebbles, dried flowers and a candle. Just don't burn it.

The interior of any room will be decorated with a vase, the decor of which is made with my own hands. Recent times the art of decoupage became widespread. In addition, beads, rhinestones, glass pebbles are actively used in the design of vessels. With minimal drawing skills, you can apply a beautiful pattern.

Even an old suitcase will decorate the interior if it is pre-decorated with lace, paper or fabric, as shown in the following photo:

A dry branch of an interesting shape is another item that can decorate a room. For this you will need:
- pick up a beautiful branch of the right size;
- remove the remnants of the bark and wipe with a dry cloth;
- treat the surface with acrylic paints or spray paint;
- after drying, fix the branch in a pot with expanded clay;
- at the final stage, the snag should be decorated to your liking.

You can also paste old table colored tape:

Bathroom decor
There are several directions on how to decorate a bathroom with your own hands:

For example, here are a few options for decorating a bathroom:

Features of the design of the children's room
You can decorate the interior of a children's room in different ways: use the techniques proposed for the living room and bedroom, or find a special way.

What options are possible:

A teenager's room will be decorated with an inscription made with a thread. For an original piece of furniture you will need:
- Wooden tablet covered with fabric, small nails, strong colored threads and a hammer.
- A simple image is outlined with a pencil, along the contours of which nails are driven in.
Helpful Hints
Interior design experts believe that comfort directly depends on competent and beautiful design rooms. Naturally, builders, designers and other professionals can decorate your room beautifully, but what if you can't hire professionals?
There are a few tips that will help you decorate any room, including the nursery, at a minimal cost.
How to decorate a room with your own hands. Pillows will help.

Whether it's new or old room, you always want to revive it, give it something new, fresh, bright. Accessories may have great importance in room decoration.
You will come to the aid of small things, such as figurines, mirrors, various flower arrangements, paintings, etc.

Perhaps the easiest way to liven up a room is to use pillows. You can use pillows to blend in with or contrast with the overall gamut of the room.

If you lack "joy" in the room, you can use pillows in bright colors and non-standard shapes. And if you want something concise and strict, then choose pillows of the correct shape in seasoned colors.
Also choose suitable pillow fabrics, patterns.
How to decorate a room with flowers

Decorating a room with flowers is called phytodesign. This method refreshes the room, both figuratively and literally, as fresh flowers create a microclimate in the room.

It is human nature to merge with nature, but in modern life it's hard to do. That is why phytodesign will come in handy more than ever.

Flowers can be chosen according to your taste. At the same time, it is worth considering that for plants you need to create suitable conditions. Find out which plants like light and which ones shade.
* You can match the suitable flower pot to match with the interior.

* If you decide to purchase flowers for your room, then you can think about special furniture for them. For example, special shelves will allow the flowers to curl beautifully, decorating and enlivening the room.

* You can try the art of Ekibana. Beautiful, rich compositions of dried flowers, will all year round to decorate room. You can use many different flowers, such as field flowers, and decorate the bouquet with bamboo or other herbs.

* Artificial flowers also look very nice. To date, you can find a huge number of similar flowers, which at first glance cannot be distinguished from natural ones. Artificial flowers can be placed in a vase (glass, wicker) or used in combination with dried flowers.

How beautiful to decorate a room. Use lighting.

A great way to decorate a room is to choose the right lighting. Today, the main thing is a large number of natural light. But it is also important to choose the right artificial lighting.
You can:
* choose the right bra
* replace the chandelier with a more modern one
* use spot lighting that will go along the perimeter of the ceiling

It is not necessary to choose a chandelier for the style of the room. For example, if the room is designed in a minimalist style, you may well dilute it with a classic or oriental style chandelier.
How to decorate a wall in a room. Use paintings, photos, mirrors, watches.
If you have paintings or photographs, then they will help you decorate the room.
* Images of smiling people radiate positive energy. Purchase suitable frames and insert photos into them, and then lead these frames on the wall in the room.

* Also can be used as decoration for the room panel. It is worth noting that it is desirable to hang pictures at eye level.

* A good option will use photo wallpaper. Modern photo wallpaper is a colorful high-resolution photo designed as a sticker. They will not only look beautiful, but it is not difficult to glue them.

* A mirror is also an option for decorating a room. The effect is enhanced if the mirror is hung in such a way that it reflects photo wallpapers, photographs, panels or floral arrangements.

We originally decorate the house and the room with our own hands

How to decorate a wall in a room. Bubble painting.
This project is also very simple.
You will need: a tablet, a large brush, scissors, white acrylic paint, matte decoupage glue (Mod Podge), tissue paper of the desired colors.

Paint the tablet with one coat of white paint and leave to dry

Cut out 3 circles of different sizes from papyrus paper (you can cut out any other shape, any color)

Distribute the shapes on the tablet as you like best, and if you overlay one color on another, you will get new colors

Apply glue to the place where you will have this or that figure

Lay the circle on the glue and gently smooth it out with a brush (it's okay if you can't smooth it out completely)

Repeat the process with all remaining shapes

On top of the already glued figures, you can apply another layer of glue

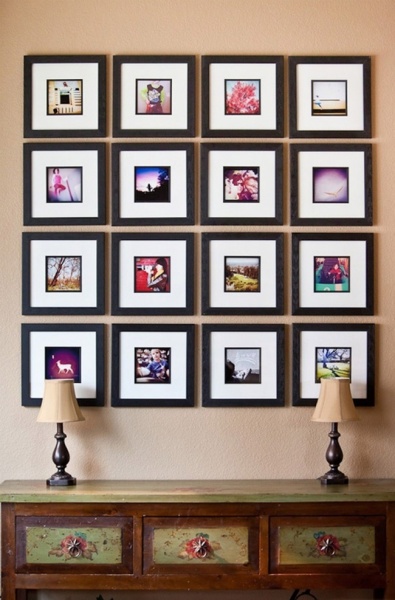
Instagram as a decoration tool or how to decorate a room with photos.

Everything is very simple:
Prepare a square tablet
Print multiple images from Instagram
Apply glue to the tablet with a brush
Paste the images

* In this example, each image is 10x10cm, so the tablet is 30x30cm so that 9 photos fit perfectly.
* You can not use a tablet, but just carefully, evenly stick square images on the wall using double-sided tape.
How to decorate a teenager's room. Topographic threads.

Despite the fact that this work is not difficult, it requires accuracy and patience.
Prepare a wooden tablet, small nails, a hammer and thread.
Apply any simple drawing (or in this case word) on tablet


Put a few dots on the drawing - they will display the places where you will drive in nails (do not apply dots exactly throughout the drawing)

Start nailing your tablet

Start pulling the thread - first tie it to one nail and then randomly wrap the thread around each nail, and then you can choose a different thread color and repeat the process.


Picture from CD cases

This interior decoration is made of 20 disc cases. To make it, you need a little skill in working with graphic programs (Adobe Photoshop).
Find a suitable high-resolution image on a computer, and divide it to make 20 square images, the same size as the CD case.
Print each image separately
For each photo, cut cardboard or thick paper and use double tape to attach the cardboard to the photo
Also, using double-sided tape, attach each image to the inside of the case and close it (of course, you need to remove all inserts from the case, if any)
Carefully assemble your puzzle, and attach it to the wall using the same double-sided tape
Toilet paper art or how to beautifully decorate a room

In fact, in this example, a cylinder from toilet paper, and you will be surprised how competently you can use it in the name of art. The cost of such work is incredibly small, the main thing is to prepare cylinders, a tablet and paint.
Cut each cylinder into several rings of the same size

- "flatten" and arrange the rings as you like on the tablet (you can arrange them in the form of flowers or leaves)
Glue the flattened rings to the tablet

Use spray paint (white in this case) to paint your flowers.

*Best to paint outdoors or in a well ventilated area.
* You can replace the spray with acrylic paint, but in this case it is better to paint the rings before you glue them.

Paper silhouette or how to decorate the room yourself

For this work, you can copy images of people from the Internet, print, cut and circle the silhouette on black thick paper.
You can also do the same but with existing photos of friends and family.


Prepare a photo frame
Frame silhouettes
Hang the frames on the wall so that the silhouettes from each frame "communicate" with each other

How else can you decorate the room. Curtains.

Today in specialized stores you can find a huge assortment of curtains for every taste. Even if you already have curtains at home, consider replacing them with more modern or colorful ones.

When choosing curtains, be guided by the color of the walls in your room. They should be, at least a little, but brighter than the wallpaper. Also, curtains can be decorated with all sorts of decorative butterflies or ladybugs.

The most important thing in everything is to show a sense of proportion, and not to overdo it with the number of paintings and photo wallpapers, with the color of curtains and an abundance of flowers.
How to decorate a room for a birthday
Table

The main thing in the room where the birthday will take place is festive table. For him, you can pick up a colorful tablecloth.
You can also find tablecloths with various riddles and puzzles in stores to keep the kids interested.
Tableware

Some people prefer to use disposable utensils because they are safer and available at almost any grocery store, in a variety of colors and all sorts of designs and patterns.
Advice: if you are going to pick up beautiful, bright dishes, then, in order not to overdo it with bright colors, you can lay a strip of roll paper for drawing on the tablecloth, against which the bright dishes stand out and look very beautiful.
Decorations

Look in the park for a beautiful dry branch of medium size (about 1 meter) and wipe it with a dry rag.
Use spray paint or acrylic paints to decorate the branch.
When the paint is dry, secure the branch with expanded clay in a flower pot.
You can also decorate the room with paper or plastic flowers. Detailed information can be found in the following articles:
Fairy lights

Bright, multi-colored garlands will also create a festive atmosphere. You can look for ready-made garlands, or you can make your own. You can find all kinds of garland options in our article: DIY garlands
houses

Children love to play in the "houses". You can buy one or a couple of these houses and the children will have a lot of fun, or you can make a house yourself or with a child together.

Perhaps your child himself will not often play alone with him, but when there are many children, then such a house becomes very popular.
It is also worth noting that such a house can also be decorated with balls, stickers or sweets.
Favorite cartoon characters

It's no secret that every child has favorite cartoon characters.

Armed with the right information, you can cut out from magazines or newspapers, print, or buy posters and/or stickers featuring your child's favorite cartoons. Then just decorate furniture, walls, ceiling and doors with them.
Sweets

How to decorate a room with balloons

Balloons are also great tools for decorating a birthday room. You can just buy a lot of colorful balloons and inflate them, or you can try to make different garlands of balloons. How to do this, you can learn from our article.