Do-it-yourself incubator rotary mechanism. A simple circuit diagram for an egg turning system in an incubator. Tilt swivel system
Collapse
Guided by the instructions in this article, you can make an incubator with your own hands. It will have the same functionality as a store-bought device, but will cost you much less. In order to assemble an incubator with your own hands at home, you do not need to have special skills and knowledge, follow our advice and everything will work out.
Where to start, what tools do you need?
Before you start assembling, decide on the main material of which the product will consist. If you have an old refrigerator, then you can take it as a basis. Also suitable are large pieces of foam, no less than 40 by 25 centimeters, or a simple cardboard box. The determining factor in the choice of material is its thermal insulation ability.
For heating, you will need to equip the device with a lamp or a heating device, take care of temperature control. In incubators, you can configure auto-rotation by adding additional mechanisms.
Automatic turning of eggs in the incubator is needed to save time. It is usually installed on large devices designed for 200 or more eggs.
All you need to assemble:
- Refrigerator (if you are planning to build an incubator from an old refrigerator), box or foam.
- Standard incandescent lamps with a power of 25 to 40 watts. The number of lamps depends on the size of the incubator, a small device for 100 eggs can be heated with four lamps.
- As an alternative to lamps, you can use electric heaters.
- Incubator tray made from metal mesh or analogues. The mesh should hold the eggs tightly. Wooden trays can be installed in the refrigerator.
- Thermometer, fan.
- thermostat (if you design automatic incubator). For this you can use bimetal plates, electric contactors or barometric sensors.
- Motor reducer (what the coup mechanism consists of). If necessary, bearings - 4 pieces, clamps for their tie.
- Sealant for sealing gaps for insulation purposes, screws, various fastening materials, metal corners.
- A hygrometer is used to monitor the humidity level.
Attention! Heating lamps must be installed at a distance of more than 25 centimeters from the eggs.
Decide on the size of the incubator, decide what you will collect it from. Then pick up all the necessary components from the list above, and you can start assembling.
How to decide on the size?
The dimensions of the incubator must be planned in advance. This parameter depends on the volume of your production, the number of chickens. The decisive factor in this matter will be the number of eggs that you plan to lay in the device. Also, the size of the incubator is affected by the type of heating system, the location of the lamps and the material from which the device is made.
For more accurate work, you will need drawings with dimensions that will look something like this:
Fig1. Drawing example
Here is a drawing of a small size incubator (for 45 eggs) 25 cm wide and 40 cm long.
Model dimensions for 100 eggs
When forming the dimensions of the incubator, keep in mind that the temperature 2 cm from the egg should be in the range of 37.3-38.6 degrees Celsius. Usually they make a medium-sized device, designed for 100 eggs. The cells make about 45 millimeters in diameter and 60-80 millimeters deep. It is recommended to make a replaceable grille so that you can adjust the dimensions under different types eggs.
By assembling a home incubator with your own hands for 100 eggs, you will receive a device measuring 60 by 60 centimeters. The device weighs about 3 kilograms. It can be converted and used to house duck, goose, turkey or quail eggs.
If you are building an incubator at home from an old refrigerator, it will take up more space and hold more eggs than a Styrofoam or cardboard product.
How to calculate the size?
The dimensions for the incubator with your own hands can be determined using the table below. The table shows the dependence of the length, width and height on the number of eggs to accommodate.
Making an incubator for chicken eggs with your own hands, you must take into account that with the same capacity, the foam construction will be more voluminous than cardboard.
Larger models are usually made in several floors, using other technologies. Therefore, the calculations there are made differently.
How to make an incubator from a refrigerator with automatic egg flipping?
The device of the incubator has many similarities with the device of the refrigerator. Therefore, you can easily make an egg incubator out of the refrigerator. The case of this device retains heat well. It can accommodate more eggs, each incubator tray will lie on a separate rack.
In the role of racks will be the shelves of the refrigerator. Inside there will be optimal humidity due to the liquid exchange system located at the bottom of the household appliance. In this chapter, you will learn how to make your own refrigerator incubator by adding a thermostat, heater, and rotary mechanism.

Fig 2. Scheme of a homemade incubator from the refrigerator
Consumables and their price
Knowing how to make a homemade incubator, you will save 70% of the store cost of the device. The simplest incubator from the refrigerator can be assembled without investment. But if you want to make it convenient and efficient, you will have to buy a few additional items.
- An old refrigerator - usually purchased for free, you can buy it on an ad for no more than 1,000 rubles.
- Light bulbs for 220 volts - from 25 rubles apiece.
- Thermostat - from 300 rubles.
- Fan - from 200 rubles.
- Chain with sprocket or metal rod.
- Drive for turning eggs - from 500 to 5,000 rubles. You can get it for free. any will do gearmotor, for example, from a car windshield wiper.
Basic camera requirements
A homemade incubator from the refrigerator must meet the minimum requirements that will make it possible to hatch chickens. It takes about twenty days to hatch the cubs. During this period, incubators maintain humidity at 40-60 percent. As soon as the chicks begin to show up, the humidity is raised to 80 percent. At the final stage, before the chicks are selected, the humidity is returned to the original level.
Eggs require temperature control. Therefore, your device must be manufactured with this fact in mind. Temperature requirements vary depending on which eggs you place in the incubator tray. Select the mode according to the table below.
Temperature table
Ventilation system
Making an incubator from a refrigerator involves installing ventilation system. Ventilation affects the temperature and humidity inside the device. Prevents the formation of an unfavorable climate for eggs. The average ventilation speed should be about 5 m/s.
A do-it-yourself home incubator from the refrigerator should be equipped with two ventilation holes that are drilled in the case. One of them is located below, and the other above. Plastic or metal tubes are inserted into the holes so that the air masses do not interact with the glass wool under the casing of the cooling device. Ventilation adjustment is carried out by partial or complete overlapping of openings.

Fig 3. Ventilation system
Reference: the embryos begin to consume oxygen from the outside already on the 6th day of incubation. In the third week, the egg consumes 2 liters of air per day. IN last days before hatching, each chick consumes 8 liters of oxygen.
Ventilation is of two types:
- Constant is a system that involves the creation of a continuous movement of air, with a constant exchange and smooth distribution of heat.
- Periodic - a device that operates once every 24 hours to actively change the air in the chamber.
Please note that even the highest quality ventilation does not allow you to completely abandon the egg flip. Therefore, a mechanism for turning eggs in an incubator is needed in any case. The auto-flip prevents the embryo from sticking to the shell.
Constant
Permanent ventilation for the refrigerator has the following principle of operation:
- A fan installed inside the chamber drives the air flow into the openings. Due to this, the air comes out. When making a home incubator with your own hands, you should pay maximum attention to this moment.
- When exiting, the air flow mixes with fresh air and passes through the heaters.
- Then the air goes down, where it is moistened by a container of water.
- The device of the incubator contributes to the heating of the air, which subsequently gives off heat to the eggs.
- After heat transfer, the air returns to the fan.
The design of an incubator with constant ventilation is more complicated than with a periodic system. But this allows you to simultaneously solve three problems: air humidification, ventilation and heating of eggs.
periodic
Periodic system. If you are making an egg incubator with your own hands, then most likely it will be a manual mechanism. For installation automatic start you will need an electronic controller. The use of a controller is not always justified, especially if you are making a simple homemade incubator with automatic egg flipping. Ventilation in such a system occurs as follows:
- Heating is turned off.
- The fan is started, which replaces the air and cools the eggs.
- After 30 minutes, the fan is turned off and the heating system is started.
The characteristics of the fan are determined depending on how many eggs the chamber is designed for. If you are making an average do-it-yourself incubator with an automatic flip with a capacity of 100-200 eggs, then you need a fan:
- working from a network of 220 Volts;
- diameter from 10 to 45 centimeters;
- with productivity from 35 to 200 m 3 /hour.
In addition, the device of the incubator must assume the presence of a filter for the fan. The filter prevents dust, dirt and fluff from getting into the blades of the device.
Refrigerator incubator case
This important aspect the topic "how to make an incubator out of the refrigerator with your own hands", since from proper preparation body of the device will depend on the efficiency of its work.
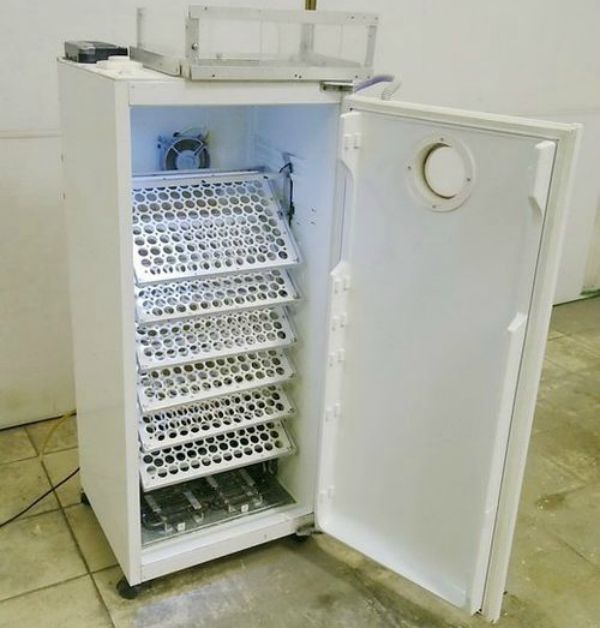
Fig 4. Case from the refrigerator
First you will need to remove freezer and other built-in equipment. Then make holes for ventilation, as described above in the text about installing this system. Install shelves and trays as you see fit.
Heating system installation
When making an incubator with your own hands with an automatic flip, you will have to organize the heating system yourself. To do this, use 4 incandescent lamps of 25 watts or two bulbs of 40 watts. Lamps are equally distributed between the bottom and top of the refrigerator. The lower lamps must not interfere with the installation of the water container intended for humidification.
Before you make an incubator at home, you need to make necessary calculations and prepare tools. Do not rush in the process of work, as this can lead to disastrous results.
Choosing a thermostat
Many are interested in the question of how to make a home incubator with optimal temperature conditions. To do this, you need a high-quality thermostat. There are three types that poultry farmers use:
- An electric contactor is a mercury thermometer with an electrode responsible for turning off the heating when a certain temperature is reached.
- Bimetallic plate - closes the circuit when the desired heating parameter is reached.
- Barometric sensor - closes the circuit when the pressure is too high.
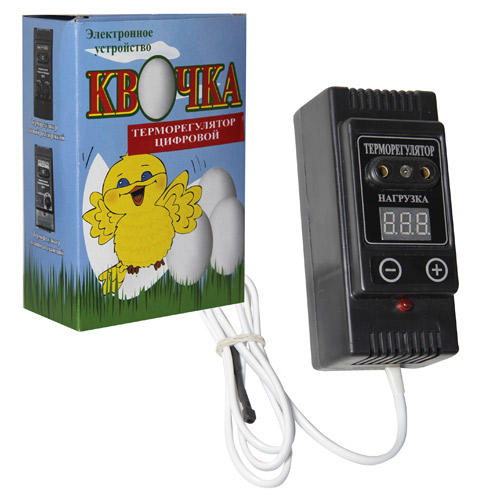
Fig 5. Finished thermostat
If you are thinking about how to make an incubator with convenient controls, then install an automatic thermostat. This will greatly increase convenience and save time.
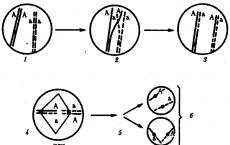
Flip mechanism
According to generally accepted technology, the egg turning mechanism in the incubator should work 2 times a day. Some experts recommend turning eggs twice as often.
Turning eggs in an incubator is of two types:
- framework;
- inclined.
The frame rotary device for the incubator functions by pushing the egg with a special frame, which rotates it about the axis.
An inclined rotary device for an incubator involves periodically tilting the tray with eggs at a certain angle. Due to this, the position of the embryos inside the eggs and their location in relation to the lamps change.

Fig 6. Rotation mechanism
The main principle of the automatic turning device is that the motor drives a rod that acts on the egg tray.
How to make a simple turning mechanism for a refrigerator:
- Install the gearbox inside the refrigerator at the bottom.
- Installed inside the refrigerator wooden frame that will hold the trays. The trays must be fixed in such a way that they can tilt 60 degrees in the direction of the door and also in the opposite direction.
- The gearbox must be firmly fixed.
- A rod is attached to the engine, connected to the tray on the other side.
- The motor drives the rod, which in turn tilts the tray.
Video
Making a device out of the box
Consider the question of how to make an incubator out of the box. This option will be the cheapest of the proposed, production will take several hours. Cardboard is a fragile material, but at the same time, it retains heat well and is easy to work with.
To breed chickens at home, you will need to either buy an industrial apparatus or make an incubator with your own hands. The second option is convenient in that it is possible to assemble the device the right sizes, and under required amount eggs. In addition, cheap materials such as foam or plywood are used to create it. All egg turning and temperature adjustment work can be fully automated.
What you need to create a homemade incubator
The basis of any type of apparatus for breeding chicks is the body. It must keep the heat inside well so that the temperature of the eggs does not change dramatically. Since due to significant jumps, the likelihood of a healthy brood is noticeably reduced. You can make a home incubator case from a frame and plywood, polystyrene foam, a TV or refrigerator case. Eggs are laid in wooden or plastic trays, with a bottom made of slats or mesh. There are automatic trays with motors that turn the eggs themselves. Or rather, they deflect them to the side after the time indicated on the timer.
To heat the air in a do-it-yourself incubator, incandescent lamps are most often used, with a power of 25 to 100 W, depending on the size of the device. Temperature control is carried out using an ordinary thermometer or an electronic thermostat with a sensor. To avoid stagnation of air in the incubator, natural or forced ventilation is required. If the device is small, then it is enough just to make holes near the bottom and on the lid. For a do-it-yourself incubator made from a refrigerator, you will need to install fans, both above and below. This is the only way to ensure the necessary air movement, as well as an even distribution of heat.
So that the incubation process is not disturbed, you need to correctly calculate the number of trays. The distance between the incandescent lamps and the tray must be at least 15 cm.
The same distance must be left between the other trays in the do-it-yourself incubator so that the air movement is free. Also, at least 4-5 cm should remain between them and the walls.
 Ventilation holes are made from 12 to 20 mm in size, in the upper and lower parts of the incubator.
Before laying eggs, be sure to check that the fans are correctly positioned and that the lamps have enough power to evenly heat the incubator. This value should not exceed ±0.5°C in each corner of the machine after it has fully warmed up.
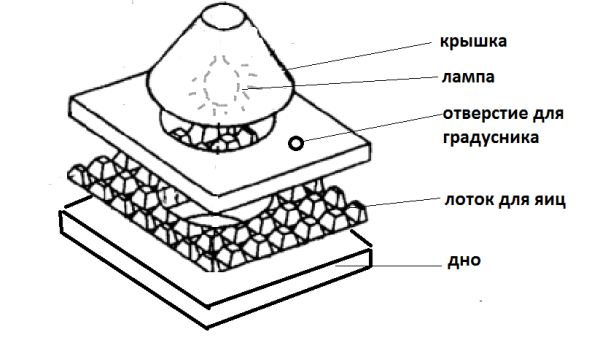
How to make a do-it-yourself foam incubator
 Expanded polystyrene is one of the most popular materials for creating an incubator. It is not only affordable, but has excellent thermal insulation properties and low weight. For the manufacture will need the following materials:
- foam sheets 2 pcs. with a thickness of 50 mm;
- adhesive tape, glue;
- incandescent lamps 4 pcs. 25 W and cartridges for them;
- fan (the one used to cool the computer is also suitable);
- thermostat;
- trays for eggs and 1 for water.
Before you start assembling an incubator with your own hands, you should draw up detailed drawings with dimensions.
Step-by-step instruction:


1 - water tank; 2 - viewing window; 3 - tray; 4 - thermostat; 5 - temperature controller sensor.
- If desired or necessary, a fan is installed, but in such a way that the air flow hits the light bulbs, and not the eggs. Otherwise, they may dry out.
The heat inside the incubator, assembled from polystyrene with your own hands, will be retained even better if all the walls, bottom and ceiling are pasted over with foil insulation.
Incubators with automatic or manual egg turning
For the process to be successful, the eggs must be constantly turned 180 °. But doing it manually takes a lot of time. For this purpose, flip mechanisms are used.
There are several types of these devices:
- mobile grid;
- roller rotation;
- tray tilt 45°.
 The first option is most often used in small incubators, for example, foam ones. The principle of operation is as follows: the grid slowly moves from one side to the other, as a result, the eggs lying in its cells turn over. This process can be automated or done manually. To do this, it is enough to attach a piece of wire to the grid and bring it out. The disadvantage of such a mechanism is that the egg can simply drag through and not roll over. Roller rotation is less commonly used in homemade incubators with automatic egg turning, as it requires a lot of round parts and bushings to create it. The device works with the help of rollers covered with a mesh (mosquito).
 So that the eggs do not roll, they are in the cells of a wooden lattice. When the tape starts to move, all the eggs turn over.
A swivel mechanism that tilts the trays is used in larger incubators, such as those made from a refrigerator. In addition, this method performs its task better than others, since in any case each egg leans. There are automatic egg turning trays. They come with a motor and a power supply. There are several smaller ones in one tray. Each rotates separately after a user-set time.
How to make a device for hatching chicks from a refrigerator or plywood
 Before you start making an incubator with your own hands, you need to draw up a drawing and a diagram for connecting all the elements. All shelves are pulled out of the refrigerator, including the freezer.
Step-by-step instruction:
- In the ceiling, holes are drilled from the inside for incandescent lamps and one through for ventilation.
- It is recommended to finish the walls of a home-made incubator from the refrigerator with sheets of expanded polystyrene, then it will retain heat longer.
- Old racks for shelves can be converted into trays or put new ones on them.
- A thermostat is mounted on top of the outside of the refrigerator, and the sensor is installed inside.
- Closer to the bottom, at least 3 holes are drilled for air ventilation, 1.5x1.5 cm in size.
- For better circulation, you can install 1 or 2 fans on top near the lamps and the same number below on the floor.
To make it easier to monitor the temperature and eggs, it is necessary to cut a hole in the door for a viewing window. It is closed with glass or transparent plastic, the slots are carefully smeared, for example, with a sealant.
The video shows a do-it-yourself incubator made from a refrigerator.
If there is no refrigerator, then the frame is made of wooden beams and plywood walls. Moreover, they should be two-layer, and a heater is laid between them. Bulb holders are attached to the ceiling, bars are mounted in the middle of the two walls for installing the tray. At the bottom, another additional bulb is placed for better evaporation of water. The distance between it and the tray should be at least 15-17 cm. A viewing window with a sliding glass for ventilation is made in the lid. Closer to the floor, holes are drilled along the long walls for air circulation.
By the same principle, incubators are often made from TV cases for a small number of eggs. The process of turning eggs in them is most often carried out manually, as it takes a little time. Trays can be made from rounded rails. Such an incubator does not need fans, since ventilation occurs every time the lid is opened to turn the eggs. 
A container of water is placed at the bottom of any incubator to create optimal level humidity required for eggs.
To hatch a very small batch of chicks (10 chicks), 2 inverted basins can be used. To do this, one of them is turned over to the second one and fastened with a furniture canopy from one edge. The main thing is that they cannot move out of each other. A lamp holder is attached to the ceiling from the inside. Sand is poured at the bottom, which is covered with foil and hay. The foil should have many holes with a diameter of 3 mm in order for moisture to pass through it. To adjust the temperature, a bar with steps is used, which is inserted between the basins.
In order for the chicks to hatch in any incubator at the same time, the eggs must be of the same size, and uniform heating of the entire space of the apparatus is also necessary.
Two-chamber homemade incubator - video
In practice, incubator buildings use several types of devices for turning eggs. In principle, there are two types of turning, this is a direct turning of the egg, when the hatching egg itself is turned in some way in the tray. And the second type, when the entire tray is rotated along with the eggs. Turning the egg itself has not found wide application and is used mainly in small incubators for 6 to 50 eggs. But the rotation of trays with eggs is widely used both in relatively small incubators and in large industrial ones. It is the principle of turning trays with eggs that is of interest to most home-made people. it is easy enough to repeat.
Here, everything is clear without a description. The only thing that is required is to properly weight the trays so that there are no distortions. It is important to put all the rotary axes on which the trays are held in brass bushings or use special bearing supports for this purpose.

I must say that this tray rotation scheme is somewhat overloaded. In its practical implementation, two options are possible. Remove the two lower supports (1-1) or one of the trapezoid end rods (2-2). In this case, everything will work perfectly.
In practice, it looks like this:


Chain drive for turning trays in a homemade incubator.
I saw a very simple and reliable drive for turning trays in Chinese incubators. The drive is based on 6-20 watt reduction motors () and a chain. That's it, it's so simple and at the same time reliable, 500 eggs easily turns. Yes, in my homemade incubator with a similar tray rotation scheme, there is a 14 watt and 10 rpm reduction motor, as I said, an incubator for 500 eggs. Initially, there were fears that too fast “start” of the trays, that is, a jerk, was possible. But these fears were not justified, fully loaded trays with hatching eggs start moving quite gently and stop just as gently.
An interesting point, for this tray rotation scheme, I used a very old homemade incubator, which long years generally worked with manual rotation of the trays. There was very little space at the top of the incubator, so I fixed the engine on a simple bracket at the bottom of the incubator, under the trays. And not at the top and side, as in the photo below. At the same time, the lower location of the mechanism did not affect the performance of the structure, a package of five trays for one hundred hatching eggs in each, quietly worked for two seasons even without tightening the chain.
As best I could, I tried to depict it schematically, not very beautifully, but I hope it is understandable.


The photo shows that this drive scheme for turning the trays in the incubator is the simplest, at the same time it works great. The main thing in it is not any complicated turning work, everything can be done with your own hands .... Buy the rest: a reversible motor, an asterisk, a chain, two limit switches + a thermostat that controls everything and that's it, the incubator is ready. Of course, in the presence of a decent box with good thermal insulation and a mechanism for turning the trays.
The chain and sprocket are not simple (not bicycle), but specially made with a small step for reversible motors () The photo is somewhat enlarged, in fact the sprocket is smaller, the diameter of the hole for the motor shaft is 7mm.


Asterisks for engines of 6-14 watts cost: 350 rubles.
The chain for this sprocket is 0.5m. : 410 rubles. (0.5 meters is usually small. Measure carefully)
Chain 5 meters long, P=6.35: 2980 rubles.
There are sprockets and chains for a 20 watt motor, ask.
Now I am releasing a ready-made mechanism for turning trays, it is described
Imported incubators sometimes use a reliable, but somewhat time-consuming to repeat, tray rotation scheme. For example, the scheme for turning trays in a Chinese incubator.


Here is another example of using this scheme:


Same motorized tray frame, same engine, but quail egg trays are inserted.

According to this principle, I developed and manufactured a somewhat simplified rotary mechanism for mini trays. The task was to make an incubator of sufficient capacity, but with a minimum height.


Each tray shelf here holds 30 eggs, blunt end up. Shelf dimensions for trays: 50*15cm. From here, according to this scheme, you can make a small-sized incubator for 120-180 eggs, which is more than enough for a small farm. Moreover, it is not very difficult to “fasten” the second floor, while the engine (special reversible) will be used the same. 14 watt motor. In my opinion, despite the apparent laboriousness, this is a very promising scheme for building a home-made incubator.
I made trays from such pretty egg racks, it turned out not bad at all.

By the way, if anyone needs bearing units for tray drive mechanism in the incubator, then they are ...
For any shaft diameter, please inquire.
Left row:
The inner diameter for the shaft is from 4 to 30 mm.
Price: under the shaft 8 mm.-180 rubles.
Price: under the shaft 10 mm.-200 rubles.
for shaft 12 mm. - 230 rubles.
Right row:
Price: under the shaft 8 mm.-210 rubles.
Price: under the shaft 10 mm.-240 rubles.
for shaft 12 mm. - 280 rubles.
Hinges for driving trays in a homemade incubator.

What they serve for is visible from above in the photo. Without them, the tray drive (of any design) will not work !!!
The sizes under an axis from 5-16 mm.
The price of a hinge with a hole for the axle-8mm.: 320 rubles. Ask for other sizes.
Everyone involved in poultry has at least once observed how hens (and chickens, and ducks, and geese, and turkeys, and any other bird) turn eggs over with their beaks in the nest.
This is done for several reasons, including:
- When turned over, the eggs heat up more evenly, since the heat source is located on only one side.
- Eggs “breathe” better (in the case of an incubator, this is not as important as with natural incubation, but many farmers, even in incubators, arrange ventilation for the eggs, providing them with fresh air).
- Turning the eggs ensures the proper development of the chick (the embryo without moving the egg can stick to the shell membrane, the percentage of hatched eggs can be greatly reduced).
Allantois is the embryonic membrane that serves as the respiratory organ of the embryo. In birds, the allantois is formed along the walls of the shell around the embryo.
The time of closure of the embryonic membrane in all species of birds is different.
You can track the process using an ovoscope. When translucent, the eggs become dark from the sharp end, and an enlarged air chamber is observed in the blunt one.
The mechanism of turning eggs in an incubator - the choice of the optimal method
Eggs should be turned over at least 2 times a day when laying horizontally (180 ° - half a turn). Although some bird breeders recommend doing this more often - every 4 hours.
The modern range of incubators includes a large number of device models with different functionality.
The most inexpensive models are not equipped with an automatic flip mechanism. And therefore, the procedure will have to be performed manually according to a predetermined schedule with a timer. In order not to get confused, a special register is started, and marks are put on the eggs with a marker.
More functional models of incubators can be equipped with automatic overturning.
Mechanical turning of eggs in an incubator most often there are two types:
- Framework,
- Inclined.
The first type of mechanism works on the principle of rolling eggs. That is, the lower part of the egg is stopped by the supporting surface due to friction, and the special frame, moving, pushes the egg, thereby scrolling it about the axis.
With this type of flip, the eggs are only laid horizontally in the incubator. The frame can move by pushing to one of the sides, or it can rotate about the axis.
The second type of mechanism involves a design that works on the principle of a swing. Eggs in this version are loaded only vertically.
Benefits of a frame turn
- The device consumes little energy for turning and therefore can even use a backup current source for operation (in case of a power outage).
- The rotation mechanism is quite easy to maintain and functional to use.
- Such an incubator has small dimensions and does not take up much space.
disadvantages
- The shift mechanism assumes that the shell is perfectly clean, even a small amount of contamination can stop the egg, and it will not turn.
- The shear step directly affects the turning radius of the egg. If the eggs are larger or, conversely, smaller in diameter, laid down by the device manufacturers, then the angle of rotation will be significantly changed up or down (incubators with circular frame movement do not have such a drawback, all eggs will completely turn over).
- Some manufacturers of incubators do not take into account the dimensions of the eggs, they make low frames and therefore, when sheared, the eggs can beat against each other. With a sharp movement of the frame due to a malfunction of the equipment (backlash, incorrect adjustment, etc.), again, the eggs may suffer.
Advantages of inclined egg flippers
- Eggs are guaranteed to rotate by a given degree, no matter what diameter they are. That is, incubators with an inclined turning mechanism can be safely called universal. They are suitable for eggs of any poultry.
- Such a flip mechanism is the safest, in comparison with the frame ones, since the horizontal amplitude of movements is small, which means that the eggs will beat each other less.
disadvantages
- The swing mechanism is more difficult to maintain than the frame mechanism.
- The cost of incubators with such automatic egg turning is often high.
- Dimensions of end devices and power consumption are higher than frame counterparts.
The choice of the most optimal mechanism, as with the choice of any other device, depends on many factors (the final price of the device, other additional functionality, dimensions, power consumption, etc.), as well as the individual preferences of the breeder.
Egg flip tray in the incubator - nuances
The simplest and most functional variant of the mechanism for turning eggs in an incubator- sliding. Most often, the choice for incubators with such equipment falls due to the low final cost.
Below we will consider what to look for when buying such a unit.
- The tray has a certain amount of loading eggs. This indicator is the first thing you need to pay attention to. The capacity of the incubator should be chosen according to the planned population of the poultry house. It makes no sense to take a large supply, since an increase in the population directly affects the increase in the area of \u200b\u200bthe chicken coop (or room for growing other types of birds).
- Some models of trays are made in the form of thin frames. They are the most inexpensive, however, the most unsafe (the frames bend easily, which can cause the mechanism to fail, with a large diameter, the eggs can touch each other, hanging outside the cell, which is dangerous when moving, etc.). It is best to choose trays with fully insulated cells (on all 4 sides of the egg) with high sides.
- The size of the cell and the step of shifting the tray directly affect the angle of rotation of the egg. Therefore, the size of the cell should be selected based on the type of eggs. It is not recommended to lay eggs with a small diameter in large cells. For example, for quail eggs, the tray should have a smaller cell size, for turkey eggs, a larger one, etc.
- If you want a universal auto-rotate incubator for various kinds eggs, it is best to pay attention to models with trays with removable partitions. They allow you to choose the required size. In such incubators it is possible to lay different types eggs at the same time (there should be eggs of the same diameter in one row).
How to make a homemade chicken egg flipper in an incubator
In order to make an automatic egg flip mechanism for an incubator, you will need knowledge of mechanics and electrical engineering.
Below we consider a simple example of creating a mechanism with a horizontal displacement of the tray by an electric drive.
Due to the wide variety of engines and methods of technical implementation of the movement, it will not be difficult to find the necessary materials.
You can always purchase an auto-rotate incubator option, so creating a do-it-yourself mechanism is justified only when the price of the tools and materials used does not exceed the price of the finished device.

 Wiring diagram of the auto-rotate device
  Frame auto-rotate for eggs from simple materials
 Basic principles to follow:
- The circular motion of the motor rotor must be converted into a reciprocating horizontal motion. This is carried out with the help of a connecting rod mechanism, when the rod fixed at one of the points of the circle transfers the cyclic circular motion being made to the reciprocating motion of the other end.
- Due to the fact that many rotary engines have a large number of revolutions per unit time, in order to convert frequent rotations of the axis into rare ones, it is necessary to use a combination of gears with different gear ratios. The number of turns of the final gear must correspond to the time of turning the eggs (in finished models, the turn is carried out once every 4 hours). That is one turn approximately in 2-4 hours.
- The reciprocating movement of the rod in one direction should be the full diameter of the egg - this is about 4 cm, or 8 cm - the total length (turn in each direction will be 180 °, that is, for one full cycle of the last gear - 360 ° turn of the egg) . To put it simply, the radius of the rod attachment point on the last gear should be equal to the radius of the egg (or a little more).
VIDEO INSTRUCTION
The assembled mechanism will work as follows:
- The motor rotates at a high frequency.
- The gear system converts the high rotation speed of the motor shaft into a rare one (approximately 1 rotation in 4-8 hours).
- The rod connecting the last gear and the egg tray converts the circular movements into horizontal reciprocating movements of the tray (for a distance equal to the diameter of the egg).
In household plots, the use of large incubators industrial production may not be practical due to their large capacity. For rearing a small number of poultry, compact appliances, which you can do with your own hands, using available tools and materials.
We will give several ways to make incubators. However, even a homemade device must meet certain requirements, which you will learn about from this article.
How to make your own egg incubator
Breeding poultry is a fairly profitable occupation, but for the uninterrupted production of productive young animals, you need to buy or make a device with your own hands in which young animals will be bred.
How to make an incubator for chicken eggs or quails with your own hands, using improvised materials, you will learn from the sections below.
What to pay attention to
For the full breeding of young birds, certain recommendations and requirements regarding the use of the device and its manufacture should be followed:
- The temperature regime at a distance of two centimeters from the eggs should not exceed 38.6 degrees, and the minimum temperature is 37.3 degrees;
- Only fresh eggs are suitable for incubation, which should not be stored for more than ten days;
- In the chamber it is necessary to maintain an optimal level of humidity. Before pipping, it is 40-60%, and after the beginning of pipping - 80%. Humidity levels must be reduced before chicks are taken.
The breeding of young poultry also depends on the location of the eggs. They need to be placed vertically (sharp end down) or horizontally. If they are located vertically, they should be tilted to the right or left by 45 degrees (when laying goose or duck eggs, the degree of inclination is up to 90 degrees).
If the eggs are placed horizontally, they must be turned at least three times a day by 180 degrees. However, it is best to carry out a coup every hour. A few days before pecking, the turns are stopped.
rules
If you are interested in how to make a homemade incubator, you should know that this device is made according to certain rules.
To make you will need:
- Housing made of material, well retaining heat (wood or foam). This is necessary so that the temperature inside the device does not change during the hatching process. You can use an old refrigerator, microwave or even a TV as a case.
- For heating they use ordinary lamps (from 25 to 100 W, depending on the size of the camera), and to control the temperature, they put an ordinary thermometer inside the device.
- To keep fresh air inside need to provide ventilation. For small appliances, it is enough to drill holes in the side walls and bottom, and for large incubators (for example, made from a refrigerator), several fans are installed (under and above the grate for).
 Figure 1. Common types of incubators: 1 - with automatic rotation, 2 - mini-incubator, 3 - industrial model
 Trays or grills can be bought or made from metal mesh. It is important that there is space between the trays for free air circulation.
Peculiarities
The incubator must be well ventilated. Preference should be given forced ventilation, as the constant movement of air will maintain the required temperature and humidity inside.
Figure 1 shows the main types of incubators that can be used to breed young birds in a household plot.
How to auto-rotate eggs in an incubator
Models without manual turning are not very convenient, since a person needs to constantly monitor the process of hatching and manually turn all the eggs. It is much easier to immediately make a homemade incubator with auto-rotation (Figure 2).
Instruction
There are several options for arranging auto-rotate. For small appliances, you can simply equip a mobile grid, which is driven by a small roller. As a result, the eggs move slowly and gradually turn over.
Note: The disadvantage of this method is that you still have to control the coup, since the eggs can simply budge, but not roll over.
Roller rotation is considered more modern, for the arrangement of which special rotating rollers are installed under the grate. To prevent damage to the shell, all rollers are covered with a mosquito net. However, this method also has a significant drawback: for the manufacture of an auto-rotate system, you will have to take up free space in the chamber by installing rollers.
 Figure 2. Scheme of automatic egg turning
 The best method is considered to be a flip, in which the entire tray immediately tilts 45 degrees. The rotation is activated by a special mechanism located outside, and all eggs are guaranteed to warm up.
How to properly lay eggs in an incubator
The incubation of poultry should be carried out taking into account certain features and maintain the optimal mode of breeding young animals. The table in Figure 3 shows the basic requirements for breeding chickens, ducks and geese.
First of all, you should maintain the correct temperature (minimum 37.5 - maximum 37.8 degrees). It is also necessary to regularly check the humidity, determining it by the difference in temperatures on the “wet” and “dry” thermometers. If the "wet" thermometer shows a temperature of up to 29 degrees, then the humidity is about 60 percent.
 Figure 3. Optimal incubation modes
 The breeding regimen must also meet the following requirements:
- Turning must be done at least 8 times a day;
- When hatching young geese and ducks, the eggs must be periodically cooled in a combined way: the first half of their incubation is cooled with air for half an hour, and then irrigated with a weak solution of potassium permanganate;
- During the hatching of young animals, the air temperature on a “dry” thermometer should not exceed 34 degrees, and humidity should not exceed 78-90 degrees.
It is important that insufficient warming, regardless of the stage, can slow down the growth and development of embryos, since chicks absorb and use protein worse. As a result of insufficient warming, most chicks die before hatching, and the surviving chicks hatch later, their umbilical cord does not heal and their stomach grows.
Underheating, depending on the stage, may cause some disturbances. In the first stage they include:
- The intestines are filled with fluid with blood;
- The kidneys are enlarged and the liver is unevenly stained;
- Edema appears on the neck.
During the second stage, underheating can provoke:
- swelling of the umbilical ring;
- The intestines are filled with bile;
- Enlargement of the heart when underheated in the last few days of incubation.
Overheating can cause external deformities (eyes, jaws and head) and hatching starts prematurely. If the temperature regime has been elevated in the last few days, the chicks may be deformed internal organs(heart, liver and stomach) and the walls of the abdominal cavity do not grow together.
Strong and short-term overheating can cause the embryo to dry up to the inside of the shell, the chick will have swelling and hemorrhage on the skin, and the embryo itself is located with its head in the yolk, which is not normal.
 Figure 4. Normal development of the embryo (left) and possible defects in violation of the humidity regime (right)
 Prolonged exposure to high temperatures in the second half of incubation leads to early movement of the embryo in the air chamber, and unused protein can be seen under the shell. In addition, there are many chicks in the brood that hatched the shell, but died without drawing in the yolk.
Violations of the humidity regime can also provoke serious violations.(picture 4):
- High humidity causes delayed development of embryos, embryos do not use protein well and often die in the middle and end of incubation;
- If the humidity was increased at the time of pecking, the beak may begin to stick to the shell in the chicks, a goiter develops, and an excess of fluid is observed in the intestines and stomach. Swelling and hemorrhage may develop on the neck;
- Increased humidity often causes late hatching and hatching of sluggish young with bloated belly and too light down;
- If the humidity was low, pipping starts in the middle part, and the shells are dry and too strong;
- With low humidity, small and dry young hatch.
It is especially important to maintain optimal humidity (80-82%) during the pipping period. It should be noted that during all periods of breeding, one should strive to maintain such a temperature and humidity regime that exists during natural incubation.
 Figure 5. Possible defects during transillumination with an ovoscope
 The duration of incubation depends on the type of poultry. For example, for chickens of meat breeds, it is 21 days and 8 hours. If the normal mode was maintained, the beginning of pecking begins on the 19th day and 12 hours after laying, the chicks begin to hatch already on the 20th day, and after another 12 hours most of the young animals appear. During incubation, it is necessary to periodically check with an ovoscope in order to detect damage in time (Figure 5).
What is needed for this
To properly lay eggs, you need to warm up the device in advance and prepare the eggs.
Only eggs that have been stored for no longer than a week in a dark room with good ventilation at room temperature are suitable for breeding young poultry of any poultry. Before laying, they must be translucent with an ovoscope and specimens are selected without damage, cracks and growths on the shell.
Peculiarities
Only eggs of the correct shape and with a characteristic shell color for a certain type of bird can be laid in the incubator.
In addition, you need to choose the right lattice that will match the size of the eggs. For example, quails require a smaller grill, and turkeys require a larger one. It is also necessary to familiarize yourself in advance with the temperature and humidity regime of incubation for each type of bird.
How to make a homemade incubator from the refrigerator
Very often, home incubators are made from old refrigerators, since the body of this household appliance is quite roomy and allows you to simultaneously hatch large batches of young birds.
See how to make an incubator from the refrigerator with your own hands detailed instructions, you can in the video.
Instruction
Before starting manufacturing, you need to draw up a drawing and a plan for attaching all the necessary elements. You also need to wash the case and pull out all the shelves and the freezer from it.
The procedure for making an incubator from an old refrigerator includes the following steps(picture 6):
- Several holes are drilled in the ceiling for mounting lamps and arranging ventilation;
- The inner part of the walls is trimmed with thin sheets of polystyrene foam so that heat remains inside the device longer;
- Trays or lattices are installed on the shelves;
- A temperature sensor is placed inside, and the thermostat is brought out;
- Several ventilation holes are drilled in the lower part of the side walls, and in order to provide a higher level of air flow, fans are installed above and below.
 Figure 6. Scheme for manufacturing a household incubator from an old refrigerator
 It is also desirable to cut a small viewing window in the door so that it is more convenient to observe the incubation process without opening the door.
How to make a foam incubator step by step
Frame homemade device can be made from an old TV box or a foam box, reinforcing it with a frame of wooden slats. In the frame you need to fix four porcelain lampholders. Light bulbs for heating are screwed into three cartridges, and the fourth bulb is used to heat water in the bath. The power of all light bulbs should not exceed 25 watts. Examples and drawings for making simple models are shown in Figure 7.
Note: middle lamp often turn on only at certain times: from 17 to 23-00. A bath of water to maintain humidity can also be made from improvised materials. For example, using a jar of herring, cutting off part of the lid from it. From such a container, water will evaporate better, and the lid will prevent local overheating.
A grate is installed inside a homemade incubator. The surface of the eggs on the grill must be at least 17 centimeters from the light bulb, and for eggs under the grill - at least 15 centimeters.
To measure the temperature inside the chamber, a conventional thermometer is used. To make it convenient to use the device, its front wall must be made removable and covered with cardboard or other dense material. Screws are used for fastening. Such a removable wall allows you to put trays inside the incubator, put a bath and change the water in it, as well as carry out all other manipulations.
 Figure 7. Schemes for the manufacture of simple incubators from a refrigerator and a box
 In the lid you need to make a window that will serve for ventilation and temperature control. The window is 12 cm long and 8 cm wide. It is better to cover it with glass, leaving a small gap in width.
For additional ventilation, three small square holes should also be made along the long wall near the floor (each side is 1.5 centimeters). They must be kept open at all times for a constant supply of fresh air.
How to make a microwave incubator
A microwave incubator is made according to the same principle as a refrigerator device. But it should be borne in mind that many eggs will not fit in such a device, so at home it is used mainly for breeding quails.
When making an incubator from microwave oven some features need to be taken into account.(picture 8):
- Outside, the case must be sheathed with thin sheets of foam to stabilize the temperature inside;
- Ventilation holes are left in the upper part, and the door is not insulated and sealed for additional fresh air;
- A tray is installed inside, but since there is not enough space in the chamber for cans of water, a container of moisturizing liquid is placed directly under the tray.
 Figure 8. How to make a do-it-yourself microwave incubator
 It is also necessary to provide protection against overheating by installing barriers on incandescent lamps.
How to make ventilation in the incubator with your own hands
A homemade incubator also does not provide a special egg cooling system, as they are cooled for several minutes during the turning process. During the entire incubation, the temperature should be maintained at 39 degrees.
For ease of use, legs can be attached to the device. And since this equipment is very compact, and the incubation process is not accompanied by the release unpleasant odors, young poultry can be bred even in a city apartment (Figure 9). The procedure for making a simple homemade incubator is shown in the video.
How to make a humidifier in an incubator
For normal operation of a home-made incubator, half a glass of water per day should be poured into the bath. If you want to increase the level of humidity, you can put a rag in the bath, which is washed every two days.
For laying eggs, special slats are placed with gaps between them. Reiki should be made rounded on the sides. To make it easier to carry out the coup, you need to leave free space in the tray corresponding to one egg.
Note: Eggs in a homemade incubator are turned by hand 180 degrees. It is better if the coup is carried out up to 6 times a day with an equal time interval (after 2-4 hours).
 Figure 9. Drawings for making simple do-it-yourself incubators
 To maintain humidity, no devices are provided in a home-made incubator, and this mode is maintained approximately. To evaporate the liquid, it is recommended to install light bulbs of 25 or 15 watts. Before pecking, the evaporator is not turned on, and if it is turned off too early, then the eggs will have too hard a shell that the chicks will not be able to break.