Pipe style furniture. Simple and stylish water pipe shelf. Finishing stage - decoration
AT recent times the industrial style is becoming more and more fashionable: it goes well with modern style, giving it a rustic and rough flavor and at the same time introducing a certain stylistic gap into the appearance of the interior. Water pipes are a cheap material with which you can create an interior in the style of "industrial". There are pipes in all sizes and shapes, and this allows you to conceive and realize any project of your dreams using them. It is very easy for beginners to work with them; the most time-consuming part of the job is cutting the pipe (but don't be afraid, the guides will help you do it!). Try the homemade plumbing pipe projects we'll cover below!
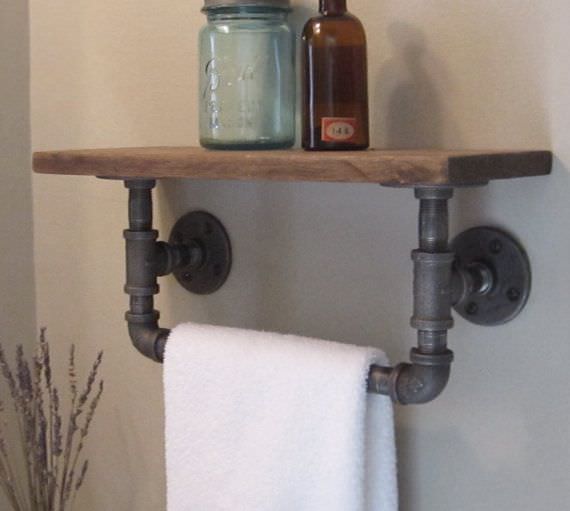
Pipe towel racks

This is a very simple project where you will also need to make a wooden hanger base.
Want more inspiration for your bathroom? Then pay attention to this shelf with a towel rack made from a water pipe. If you're creative enough, come up with your own similar shelf design!


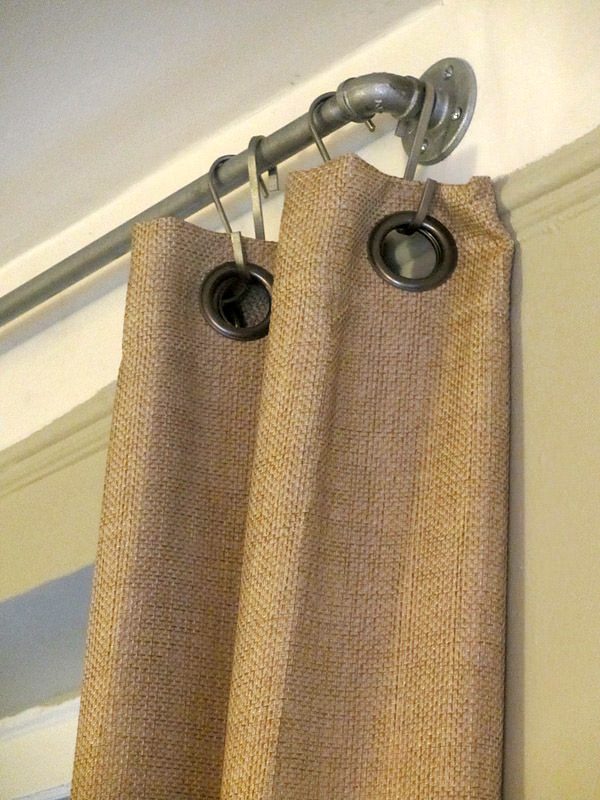
What do you think of the West Elm style plumbing cornice project? The fabrication guide can be found on this page.
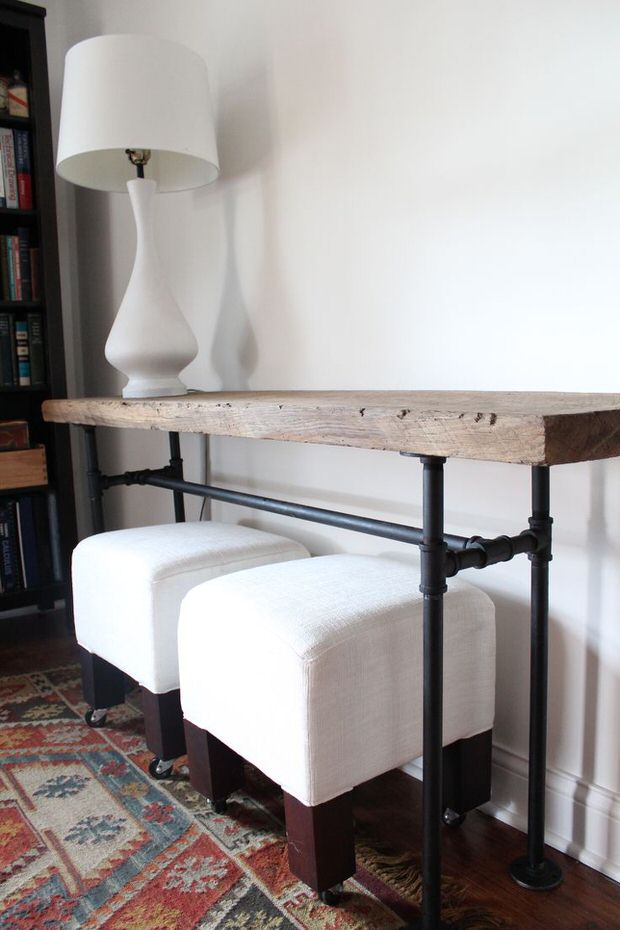
Great project - a bar table made of black water pipes. It combines industrial, raw wood and modern furniture which gives the interior an unusual, fresh look.
Do you need a coffee table? You might like this variant from The Golden Sycamore website. Just look at these two levels!

This firewood holder from The Cavender Diary is industrial in style but rustic. The wheels are especially good! For those of you with a fireplace, this can save you a lot of fetching firewood in the cold.

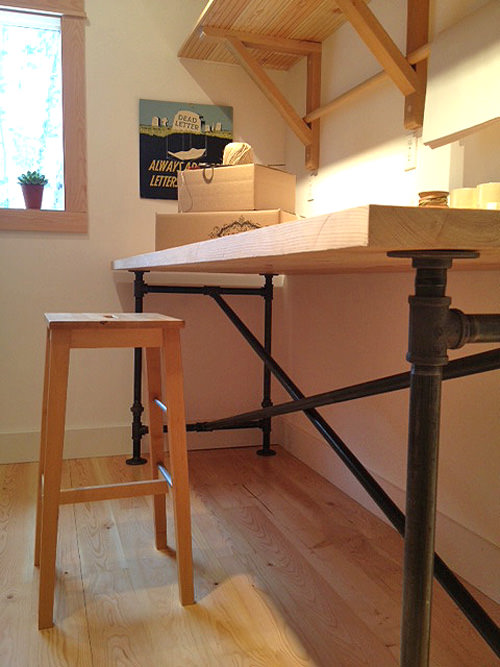
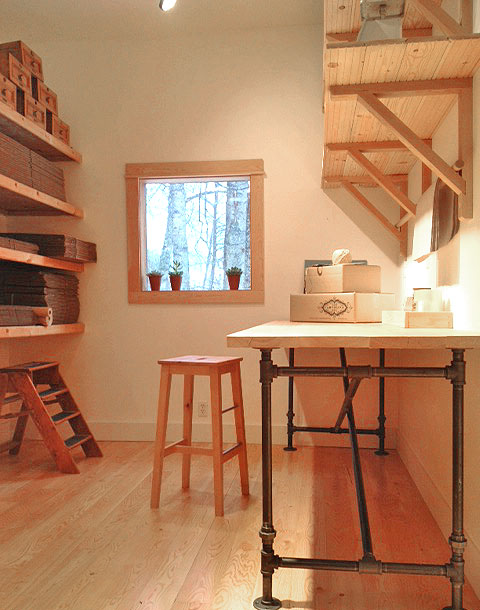
You will find complete plans and instructions for making this table on the Cafe Cartolina website. It will be your best office table!

Interesting fact:
The sconce style originated in the 17th century as a replacement for chandeliers in small spaces and as a means of highlighting other decorative objects.
Necessary materials
- Construction drawing (provided below, you can also use your own)
- Wire (plug on one end, lamp socket on the other)
- Threaded water pipes
- Sandpaper
- Valves
- Wrench
- Manometer
- Corner mounts
- brush
- Decorative paints (dark grey, red) for metal


Manufacturing
According to the drawing, pipes should be taken from 250 to 760 mm. The length of the entire structure is 1 m. And such pipes are fixed with the help of corner fasteners. This design uses two valves. The pressure gauge is connected next to the lamp. All you need is to assemble a diagram according to this drawing, or come up with your own, the flight of your imagination is not limited.


1. Before starting work, clean the pipes with sandpaper so that their surface is smoother.
2. Then apply a layer of dark gray paint. You can paint unevenly and carelessly. Thus, we will achieve the effect of antiquity. If your hands are used to uniform coloring, then just make small strokes (6-7 cm each), or ask your child to color the pipes. Also, don't forget to paint the screws and corner mounts.


3. After a layer of dark gray paint. We apply red paint in the area of \u200b\u200bthe valves, and a little through the pipes. This will give your shelf a rusty look. Again, we make careless strokes.


4. We pass the wire through the pipes so that it has an outlet to the outlet. In this drawing, the wire was passed from the lowest horizontal pipe (diameter 600 mm), to the end of the left vertical pipe (diameter 760 mm).


5. Then we insert the pressure gauge and the lamp holder, and the bulb itself into the lamp holder. This is necessary for illumination in the dark. This lamp can be made above the bed, that is, in this drawing, the pipe for the pressure gauge was larger (not 100 mm, but 400-500), and there would be a lamp in its place. Under this lamp was the bed. This design would allow reading at night, interesting detective stories. (the design of the described system is given below).
Via pvc pipes. But greenhouses and sheds are far from all that can be made from PVC and aluminum pipes with different diameters. Furniture, home decor items, organizers, shelving, even weapons are beautiful bows. different forms. People's fantasy is constantly being embodied in new PVC forms, and we have compiled a selection of the most interesting DIY projects for you.
Let's start with homemade furniture from aluminum and PVC pipes connected by fittings. There are children's furniture, and options for adults, cute designs that will fit into any interior, and racks with many shelves.
DIY pipe furniture
1. Low table made of pipes and wood
Table made of pipes and woodHere is a detailed video tutorial on how to make it.
2. Dining table
 Dinner table
This table of three boards and metal pipes can be used as a dining table. A note of industrial style in the design of the room. you can see the manufacturing technology.
3. Large rack made of pipes and wood
 Storage rack
 Shelving for a spacious pantry or garage is a great solution for storing all sorts of things. And durable and looks great. Read the assembly guide.
4. Shelving for the room
 hall rack
 TV, audio system, souvenirs and books - everything will fit on this homemade rack. Let's see how to make it.
5. Another rack
 Shelving made of metal and wood
 The shape of this rack is somewhat unusual, as if it was planned for specific items. Looks cool with paintings, figurines and other content. there is a list of building materials and a story about the manufacture.
6. Coffee table with glass top
 Coffee table
The legs of this table are made of bent and painted PVC pipes. As for the countertop, you don't have to make it out of glass, but it certainly looks cooler that way. you will find the manufacturing manual.
7. Aluminum tube bed
 Bed with aluminum tube frame
 Large bed frame with canopy made of aluminum pipes and fittings. Manufacturing guide.
8. A simpler bed made of pipes and wood
 Bed made of pipes and wood
 This bed looks simpler, and it's easier to make it. You will need pipes, fittings, wooden "ribs" and a fabrication manual.
9. Canopy over the crib
 Canopy over the bed
 Anyone can make this simple PVC pipe canopy. It turns out a children's bed with a canopy of tulle.
10. Simple towel rack
 Towel dryer
 A few PVC pipes and fittings, and the towel dryer is ready.
11. Cute chairs for kids
 Chairs for children
 These cute chairs are quite possible to make yourself. Frame made of PVC pipes and seat woven from threads. How to braid chairs, you can see.
12. Simple chairs for hiking
 Outdoor chairs
 Small comfortable chairs for the patio or outdoor trips. Bright furniture will surely appeal to children. How to make such chairs, see.
13. Place to play
 Place for games
 For kids, you can organize a place to play with a PVC frame.
14. Bar counter in the style of a beach holiday
 bar counter
 PVC pipes painted to look like bamboo, various attributes like exotic masks and a thatched roof - this bar counter will be a great reminder of exotic hot countries and beach holidays. Read detailed instructions for manufacturing.
15. Simple and convenient drawing tablet
 PVC tablet
 This lightweight drawing tablet is great for homework. You do not need to attach paper to it - the album is placed on a special stand along the bottom edge of the tablet. How to make it, read.
Organizers and shelves
16. Desk Organizer
 Simple Desk Organizer
 20. Creative wine shelf
 wine stand
 If you need a stand for a maximum of four or five bottles, you can make such a PVC creative. And it's easy to do and looks great.
21. Laptop stand
 Notebook Stand
 Simple and comfortable stand for working with a laptop.
Decorative interior elements and gifts
22. Cornice for curtains
 Curtain rod
 Nice cornice made of painted PVC pipes and decorative elements. More about manufacturing.
23. Dresser decoration
 dresser decoration
 PVC pipes, cut into thin rings, can serve as decoration for furniture.
24. Creative mirror frame
 mirror frame
 And again PVC pipes, cut into thin rings. Cut, arrange in the right order, glue together and admire the new frame.
25. Piggy bank
 Piggy bank
 This funny pig with a PVC pipe base can be given as a gift or kept at home as a souvenir. Here
Having once tried your skills in installing PVC water pipes, you will understand that working with the material and the way of connecting plastic elements open up a wide range of creative possibilities. From plastic segments and various elements for their connection, you can make almost any piece of furniture that has a frame base, useful device for giving. It can be a chair, armchair, stand, table, bed. Do-it-yourself PVC pipe shelves, perhaps, are included in separate group, as it presents a variety of purposes, sizes and appearance products.
To make a shelf of pipes, you do not need to have special skills and experience. If the planned product consists only of plastic, you only need a cutting tool and glue. Yes, and without the latter, you can do without, making a collapsible design.
Items made of polymer structures are neat, aesthetic even without additional decorative coating. Experts say that modern plastic is a durable, environmentally friendly material, it does not pose a danger to human health.
Creative shelf to place the collection
The simplest version of a shelf made of plastic elements is pieces of material assembled together. Such an original composition is best hung on the wall. The diameter of the pipe that you will use in the project, choose depending on the dimensions of the items placed on the shelf. If, as in our version, the cells are occupied by cars, then 15-20 cm will be enough.

Preparation for work
Prepare for work:
- a piece plastic pipe about 15 cm in diameter;
- a hacksaw for cutting material (we recommend using a vice so that the plastic does not slip while working with a hacksaw) or a pipe cutter;
- roulette;
- pencil;
- glue;
- clamps or large clothespins;
- sandpaper;
- blue paint in a jar or spray can;
- brush.
To hang the product on the wall, use a drill and 2-3 self-tapping screws with dowels.
Description of work
- Mark the length of the pipe in increments of 20-25 cm. The number of elements depends on the size of the shelf you need.
- Secure the material with a vise and cut the pieces according to the marks.
- Lightly sand the outer edges of the pieces.
- In order for the product to have an even color, staining must be done at this stage. Arrange the plastic pieces on a newspaper-covered or protective film flat surface. Paint them on one side. When the paint is completely dry, turn the parts over and paint again.
- Proceed to the formation of the shelf. The composition can be either completely symmetrical or randomly folded. When shaping the elements when connecting, consider the features of the interior in which the object will be located.
- Glue the parts, starting with the middle ones. After applying glue and connecting the pieces, fix them with clamps or large clothespins until the glue dries. Then move on to the next items.
- Attach the finished shelf to the wall, mark the places for screwing in the screws.
- Prepare holes in the wall.
- Place dowels in them.
- Screw in the screws.
Job done, hang up the shelf, help your son or daughter arrange their favorite toy collection.
Everything ingenious is simple! Using this idea, you can build a desktop shelf for wine bottles. The main thing is to choose the right size material and make sure that the base of the structure is stable. For originality, combine elements of different diameters.

Make a shoe rack in the same way. Of course, here you will need a large pipe, for example, such as is used when installing sewers. Take care of the proper decoration. And keep in mind that glue is unlikely to be able to hold a heavy large structure. Therefore, it is better to connect the elements with a screw-nut method, having previously drilled holes in the right places.
Floor shelf for books
DIY bookshelf made of plastic elements is an original and definitely cost-effective solution. Starting with a shelf, you can create an interior ensemble that will match your individual style. The work does not require a lot of money and time. Even a beginner can handle it.
Dark matte paint and wood details give the product an elegant and industrial look.
Materials and tools
- Roulette;
- PVC cutter;
- 1-inch (2.5 cm) PVC pipe with a total length of 30 feet (about 9 m);
- 1" polymer pipe, 30'
- pine board measuring 6x12 feet (1.8x3.66 m);
- a circular saw;
- glue for pvc;
- 1-inch three-way plastic connector - 12 pcs.;
- 1-inch 90-degree swivel brackets - 4 pcs.;
- 1.25x0.75-inch (3.2x1.9 cm) PVC sleeve - 4 pcs.;
- paint in a vacuum can;
- stain;
- latex gloves;
- 1-inch (2.5 cm) 2-hole galvanized hinges for attaching shelves - 12 pcs.;
- drill with drills;
- screwdriver;
- 0.5-inch (1.3 cm) metal screws x 24
Before proceeding with the assembly of the shelves, cut the PVC into pieces of the desired length using a special cutter:
- 12 pieces of 18 inches (45.7 cm);
- 6 pieces 12 inches (30.5 cm) long;
- 2 pieces 17 inches (43.2 cm) long;
- 4 pieces 2 inches long. (5.1 cm).
Now cut the wood with a circular saw into 3 pieces of 2 x 12 feet (0.6 x 3.66 m). Sand the edges and surface of the blanks for wooden shelves in advance.

Description of work
- Take an 18" piece and attach a 3-way connector to it. Use PVC glue to strengthen the connection. Now attach another 18" piece to the connector so that the pipe grows upwards. Attach another three-way connector to the other end of the 18" piece. Before the glue is completely dry, lay the resulting piece on a flat surface and make sure that all connectors are rotated the same way. Then attach the third element to the three-way connector in the same way. Finish by attaching another 3-way connector to the top of the last 18" piece. While the glue is still wet, place the pieces on a flat surface, making sure all the connectors are the same. Assemble three more legs in the same way.
Every time you connect a plastic piece to a 90 degree elbow or three way connector, apply PVC adhesive to the inner part connecting part, as well as on the outer side of the pipe, by about 1 cm. After connection, be sure to remove excess glue with a damp sponge.
- Fasten the two legs you just created together by placing a 12" piece of resin horizontally into the first row of 3-way connectors on each leg. Do the same for the remaining two levels. As a result, you will get one side of the bookshelf. Repeat the same steps with the other two legs - get the other side of the shelf.
- Start assembling the top connectors. Take two 17" pieces of PVC and attach 90-degree swivel pieces to each side at the ends. Lay the resulting structures on a flat surface before the glue dries - make sure that the curved elements are absolutely symmetrical.
- Connect the two sides. Attach a 2" piece of resin to the top of the three-way connectors at the top of the legs. Now attach both sides of the shelf together using the 17" pieces you cut off earlier. Attach grommets to the bottom of the legs to give the shelf extra support. You've got a solid construction with good rigidity.
- At this point, you can paint the frame of the shelf by spraying the paint evenly. We use matte black, but you can choose any other color that suits your interior.
To avoid uneven coloring, apply several coats. Each next layer of paint can be applied after the previous one has completely dried.

- Paint the blanks with a stain wooden shelf following the manufacturer's instructions on the label. If you want the wood to take on a darker color, cover the details with several layers of the substance. Make sure you give the same shade to each piece of wood.
- As soon as the stain is completely dry, it is necessary to pre-drill holes in the shelves to attach them to the plastic frame. Attach the shelf to its place on the frame, attach metal hinges from below, wrapping plastic with them, mark the holes to indicate the joints. Perform actions with all three shelves. Each board must be fastened with 4 loops and 8 euro screws.
- Drill all holes with a drill.
- Turn the bookshelf upside down to make it easier to screw in the screws. You may need an assistant to hold the wood pieces in place. Attach the shelves with hinges to the plastic bases. This can be done manually with a screwdriver. If you prefer to work with an electric drill, you run the risk of splitting the wood.
Shelf made of plastic and wood is ready.

Utility room organizer shelf
A large shelf-rack will allow you to put things in order in any utility room. Plastic containers are easy to store holiday decorations, clothes and other household items. At the same time, all things are stored within reach, and even a child can get them. The whole structure is made of high quality plastic. The material is ideal for wet basements or garages as it is waterproof and mold resistant.
Required for work
- 1.25" (3.8 cm) plastic length - 92 ft (28.04 m);
- 1.25 in. (3.8 cm) 4 way fittings - 12 pieces;
- 1.25-inch (3.8 cm) 5-way connectors - 18 pieces;
- 1.25-inch (3.8 cm) end caps for polymer parts - 10 pieces;
- 12 plastic containers, about 16x18 inches (40.6x45.7 cm);
- roulette;
- pencil;
- circular saw or pipe cutter;
- drill with drills;
- screws;
- a hammer;
- screwdriver.
Before assembly, use a circular saw or pipe cutter to cut plastic parts right size:
- 15 pieces of 13 inches (33 cm);
- 54 pieces of 16 inches (40.6 cm).

Description of how to assemble shelves for containers
- Take a 13" piece of plastic and attach a 1.25" 4-way connector to both ends so that its through hole is exactly vertical. When connecting, use glue. Wipe off excess material immediately. Make 6 such connections.
- Attach to each top hole, which is located at both ends of the obtained blanks, with a pipe 16 inches long. Apply glue to the edge (0.5-1 cm) of the parts to be joined. Do the same for all 6 fragments.
- Now connect 3 finished fragments into one rack. To do this, place the free ends of the 16" lengths into the bottom holes of the fittings. Use glue. As a result, you will get 2 side racks of the rack.
- On both ends of the 13" piece, install a 1.25" fitting that has 5 outlets as shown in the figure below (into the center hole). When working, use glue. Collect 9 similar knots in total.
- Attach 16-inch pieces to all free holes of the connecting parts (except for the lower and already occupied - central) as shown in the schematic diagram below. Use glue for secure fastening. There should be 3 such large nodes in total.
Attention! AT this project you can choose how to strengthen the connection of parts - with glue or with a screw connection. If you prefer the latter, use screws with a special anti-corrosion coating (galvanized).
- Assemble all three parts into one construction by inserting the free ends of the top 16-inch elements into the free bottom holes of the connecting parts. Strengthen the resulting node in the way you have chosen. ends vertical elements the top and all end pieces must remain free (see image). The interior of the rack is ready.
- Assemble the inside of the shelving unit with the side posts. To do this, place the ends of the 16-inch end pieces in the corresponding free holes in the side rack connectors. Fasten the structure with screws or glue.
- To complete the assembly of the structure, plug parts should be put on the free ends of the upper tubes. This will give a finished neat look to the product and prevent water, dust, insects from getting inside.
Install colored containers in the cells prepared for them. You can gladly fill useful and beautiful furniture. You have seen that it is easy to make both a small fixture and a fairly large structure out of plastic parts. Think about it, perhaps with the help of plastic products you can make your life even more convenient and organized without much cost and effort.


