garden arches. How to make a garden arch yourself (photo) Flower arches in the garden
If you want to give your site some charm and magic, then the arch is the perfect solution.
Despite the banality, the arch is an original design detail. It can be used as an addition to the overall design, as well as a separate design element.
To complement the main design and start climbing plants, various elements are used: lattices, pergolas, trellises. The arch, as a rule, has 2 walls and a roof over them.

Arch in the garden
To give the garden a certain aristocracy and grace, you can place an arch in it. A good solution would be to put climbing plants on it.

Such an arch will give the garden romance and natural beauty. The arch can be not only a decorative element, but also serve as a base for a hammock, support for other supports, you can place lanterns on it.

What should be the arch for the garden?
When choosing this decor element, you should understand what functionality it will perform. Depending on this, select the material and appearance. One thing is for sure.
The arch is located on the street, and, therefore, the material from which it is made must be resistant to any bad weather, and the arch must also be aesthetically beautiful, since plants will not always wrap around it.

Materials from which arches are made
In order for the arch to harmoniously complement the design of the garden, you should carefully choose its material and size.

The main materials that are used in the manufacture of arches are: metal, plastic, wood and brick.

Plastic
This is the easiest to install, inexpensive material. Plastic arches have a variety of shapes and colors. But this material has significant disadvantages.

Plastic is very short-lived, for the winter the arch will need to be removed so that it does not burst.

Arches made of this material cannot be used as a support for a hammock, swing or other poles, as this material is unstable. Such arches are suitable only as a design element.

Brick
This material is the most reliable and durable. It is not so easy to work with a brick, and if a non-professional can complete simple sketches, then it is better to contact a specialist for an unusual design.

Arches made of brick and stone look very good as independent elements, for example, as decoration of the entrance to the garden, over a small pond, or a flower bed.

wooden arches
As for wood, even a non-professional can make a beautiful arch out of it. A wooden arch will fit perfectly into any style of garden design.
Wood is a fairly durable material, but needs constant treatment with antiseptics.


metal arches
It's no secret that metal is the most durable material. Metal will allow you to create an elegant pattern, a bizarre shape and will be able to please with its appearance at any time of the year.

Metal arch can be supplemented wooden elements. In order for such an arch to last as long as possible, the metal should be looked after, treated with anti-corrosion substances, and covered with special paint.

You can make a metal arch yourself, if available necessary tool. This material allows you to realize the most sophisticated and bizarre design fantasies.

In some gardens, you can find arches made from PVC pipes using wire. Such an arch is suitable for placement on it. climbing plants and flowers.

To make such an arch, you will need pvc pipes, which, for example, remained after heating in the house, as well as several pieces of metal wire.

After assembling the arch, the structure should be primed and painted.

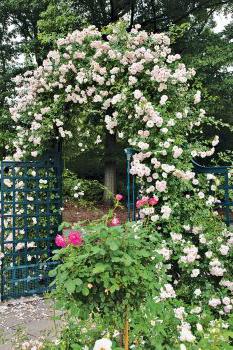
Wooden arch for roses
Climbing roses are best placed on a cedar or larch arch, as these are the most weather-resistant wood species. But, in their absence, you can use other types of wood, having previously treated them with antiseptics.

Climbing plants for arches
What plants can be placed on the arches? Most often, arches decorate arches with girlish grapes, clematis.
Climbing roses will delight you with flowers of incredible beauty, but once a year.

But this does not detract from their beauty, because the climbing rose has very beautiful leaves that will frame the arch in spring and autumn.


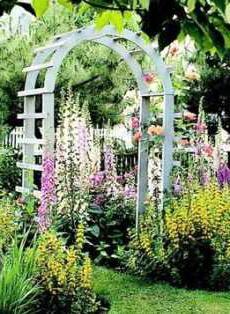
Photo arches in the garden


Each owner of the land wants to equip it in such a way that it is not only functional and convenient, but also beautiful and pleasant. One of the most successful decorative elements for decorating the backyard space, which gives the landscape originality and originality, is an arch for flowers. In the country, according to many, just like in the house, everything should be perfect and comfortable. Today's new design solutions create a great opportunity to easily decorate the site. And not the last place in the list of various options is occupied by arches for flowers.
In the country
Photos of these amazingly beautiful designs can be seen not only in the relevant literature, but also in many glamorous magazines. And this is not surprising. After all, it is the arch for flowers that creates a special holiday atmosphere at any event. Everyone has seen a photo of the newlyweds against her background in their lives. But in order to admire such beauty, it is not at all necessary to organize an event.
Arches for flowers in the country are quite a fashionable trend in landscape design today. Moreover, they not only have a truly perfect decorative effect. Such amazingly beautiful flower designs also allow you to create cozy places to relax on the plots, zoning the space.
Relevance
Free-standing arches, according to designers, are a spectacular accent in the garden area. A tunnel or an amazingly beautiful gallery, a wall of flowering trellises, gazebos, hidden places for relaxation and solitude - all this can be created with the help of an arch for flowers in the country. Photos of such landscape solutions is available in almost every specialized magazine. In addition, with the help of such flowering structures, you can also hide not very presentable outbuildings.

Species diversity
Arches for flowers in the country are two, and sometimes three or four vertical racks with a crossbar at the top. The form of the latter can be the most diverse. The main purpose of such structures on the site is to create a support for climbing plants, zoning space or creating places for recreation. Sometimes arches are arranged to decorate the entrance to the site.
The designs of these compositions have the most different forms. The most popular are vaulted and trellis arches connecting two lattices. There are also trellis options, which are most often used for decorating wedding events, as well as pergolas - three-dimensional structures with repeating details.
Very easy to manufacture rectangular arches create the effect of a deep perspective in space. Bright accents of such a composition can be given not only but also by lawns, gravel paths or flowers in a flower pot.
Sturdy structures with stone supports and a trellis vault braided with lianas make it possible to create original shady arbors, inside which you can comfortably relax on a bench.
Today on sale you can find various options already finished arches. These are the most varied wooden structures- from complex to simple, inexpensive plastic or forged blanks. The latter, although they have a higher cost, however, due to thin, elegant lines are especially beautiful. They are very effective even when the plant has not yet completely braided the arch.
Selection Requirements
When deciding to buy a ready-made product or making a pergola with your own hands, the owner of the site must keep in mind some nuances. Firstly, the structure must be as strong as possible, since the total weight of climbing plants that rely on the structure can be significant.
In addition, this landscape element must be made of durable material, since it all year round such natural factors like rain or snow, sunshine, etc. In addition, like any decorative element, the arch should fit well into the overall space.
In addition, there are size requirements. The arch should have a height higher than a person’s height, so that it is convenient to pass under it without bending over. The width must also be made at least one hundred and twenty centimeters. This is due to the fact that for the arches in the country they grow strongly, and with narrow sizes there is a feeling of sloppiness and crowding.
materials
Their choice today is very large. It can be wooden planks, bars and gratings, plastered brick or plastic, even a vine. In large spaces, stone structures will look advantageous. A very popular option today is for flowers. You can buy forged structures in many stores selling products for the garden. Almost all of them are made of materials resistant to aggressive environments and coated with varnishes or paints that protect the metal from corrosion.
Some designs from designers can combine various options for elements. Much when choosing a material depends not only on appearance and the type of construction, but also on which plants are supposed to be used for braiding.
Choice of colors for the arch
After the design is installed, it's time to decorate it. To do this, you need to decide in advance which flowers to plant. For an arch in the country, it is more profitable to use perennial curly chinese lemongrass, clematis or climbing rose. Wisteria, grapes or honeysuckle look good on the pergola.
Annuals such as sweet peas, hops, curly nasturtium and ordinary ivy are also quite suitable. You can choose other varieties. But at the same time, it is necessary that they be climbing plants with lush greenery and beautiful flowers, whose lashes can grow up to three or four meters. It is important to correlate the choice with the climatic conditions of the area. This is especially true when planting perennials, since some plants require special conditions for a successful growing season.

flower care
Some climbing varieties, such as climbing roses or garden grapes, should be covered for the winter, as they are very sensitive to winter frosts and temperature fluctuations. Plants are recommended to be planted as close as possible to the base of the arched structure.
At the same time, it must be remembered that perennials develop very slowly, therefore, in the first two years, their growth is slightly less noticeable. Therefore, you should not initially expect a special decorative effect. An arch for flowers in the country - made with your own hands or bought in a store - must be properly decorated with flowers. If the owner doubts his knowledge, then it is better to invite a specialist who will correctly select the plants and plant them. But if you have at least some gardening skills, decorating the arch with curly flowers will not be difficult. You just need to turn on the fantasy and arrange it to your liking, observing the agrotechnical requirements for the selected varieties.
You can, for example, plant annual climbing plants such as sweet peas or purple morning glory near perennials. Already in the first year they add brightness to the color of the elegant design of the arch. Another original version decoration of this garden structure are hanging planters or plants in pots - begonias, pelargoniums and petunias. So the structures will get a picturesque view, and, most importantly, the gardener will not need to wait until the planted clematis grow or. But when these plants are completely wrapped around the structure, the arch will become the most wonderful place on the site - beautiful and at the same time creating a shadow. When creating such a landscape structure, one should not forget about one important factor - the care and maintenance of an attractive type of plants that braid the flower arch in the country.
DIY

Photos of these amazing compositions, pleasing to the eye, can be seen in many prestigious magazines. But one should not think that a flowering pergola or a trellis structure is the lot of the elite. You can, of course, buy an arch for your garden or dacha in a store, but if you want, then you can build it with your own hands. And, it should be noted that often the design, assembled independently, looks no worse than the purchased one. The main thing is to know
In the country for flowers, many use the simplest building materials that are at hand. It can be metal pipes, wooden poles or bars.
Beauty in your area is always more pleasant to create on your own. The arch can be placed both along the path and in the corner, separating the seating area with it.
Sequence of work

It is easiest to make an arch from a wooden material. To do this, you will need four or six pillars or bars with a height of about two meters and a width of ten centimeters. Installed vertically, they will become supports for the future pergola. To them it will be necessary to attach the side cross beams, and to the latter - the crossbars from edged board 20x200 mm in size.
Pillars must be installed in pre-prepared pits with a depth of 0.5 to 1 meter. The depth must be chosen depending on the type of soil: for loose soil, it should be greater. Be sure to use the building level to check the verticality of the installation. In order for the plants on the arch to grow well and tightly braid it, twine can be pulled between the pillars. And if you stuff slats between them with a lattice, then such a pergola will look especially beautiful.
Photo: at the request of Yandex and Google
Garden arches for flowers are not as difficult as it might seem. Thanks to this simple architectural structure, the garden is instantly transformed: it becomes a little more well-groomed and nobler. However, this design has not only an aesthetic function: it can be both an element of decor and a help for creating hedges and vertical gardening. In this article we will tell you how to make a design for a garden arch, and which plants will definitely take root on it.
The main types, functions and features of the construction of garden arches
If you decide to decorate your site with a garden arch, then first read the basic rules for its construction:
- 01 No matter how beautiful the structure is, its main function is to grow plants, which means that all the nuances must be taken into account when constructing it.
- 02 The minimum height of the arch should be two meters. If the arch is lower, then not every person can easily pass through it.
- 03 As for the width, there is also a standard here: the arch must be at least 1.3 meters. This is important if climbing plants will grow on it. If this parameter is not observed, the effect of neglect of the structure may appear in the future.
- 04 The main requirement for the frame of a garden arch is not only strength, but also aesthetic appearance. Imagine that in the cold season there will be no plants on the arch, and if it is not very attractive in appearance, it will noticeably spoil the overall appearance of the territory.
- 05 It is equally important to fit the garden arch into the design of the dacha. It should be in harmony with the general color of the area around. The most functional option is considered a garden arch in the form of a gazebo.

Garden arches can be classified according to several parameters. They will help you make right choice in favor of one structure or another:
- Material: arches are made of plastic, stone, metal. The most popular option is wood. You can also make a combined arch;
- frame shape: there are pergolas, trellises and the arches themselves.
- Location: a so-called trellis "wall" is created, an isolated structure, a gazebo-shaped structure, or several arches are installed in a row at once.

And a few words about the important functions of the garden arch. We emphasize once again that this is not only a decoration of your site, but also:
- 01 Strong support for some types of plants.
- 02 Creating an atmosphere that suits architectural style site.
- 03 Maintaining load-bearing poles.
- 04 Efficient zoning garden plot.
- 05 A strong frame and a beautiful view of the garden arch can become the basis for a children's swing.
- 06 The arch can serve as lampposts on the site.

How to choose and prepare a place for a garden arch?
The arch can both decorate and violate the integrity of the site, which means you need to clearly know its correct location. A classic and almost win-win option is to install an arch over garden path. So it turns into a kind of tunnel connecting parts of the site.

On a note! If the area of \u200b\u200byour site is small, then in no case do not choose a bulky design that will immediately reduce the area. In this case, it is best to use a trellis. And if you add a small bench with soft pillows to it, you will get a cozy corner for relaxation.
The foundation for the arch can be anything: both laid out tiles or concrete, and soil. It is only important to properly prepare the area for the installation of the structure. The work platform must be carefully cleaned and leveled (if you are installing the arch on the ground). First, we recommend making markings on the ground or tiles, starting from the size of the structure.
How to make a wooden garden arch frame?
To make an arch frame, you will need:
- four beams (size - ten by ten centimeters). Of these, we can make supports and build walls for the arch:
- to create the roof of the arch, you will need two boards;
- also purchase four slats (the size of each is three meters). They are needed so that the void between the wall supports is filled.
On a note! It is very important that the wood you use in your work is thoroughly dried. Otherwise, the structure will deform in the future.
The photo below shows step technology manufacturing the forming profile of the arch. Note that the technology is extremely simple even for beginners. First we need to make a template for the upper edge of the arch. You can use ordinary cardboard at this stage:
- 01 Using simple pencil we make drawings.
- 02 Then we fix the bars with a template (if it is wooden).
- 03 Next, using an electric jigsaw, we begin to cut out the future arch.
- 04 By the same principle, we are working on the second half of the structure.


- 05 We attach the base of the bars to the arch and nail the wooden slats. Use a hammer and small nails. As for the base, it is attached with self-tapping screws.
- 06 Now about the side panel of the arch. It is also done with the help of wooden slats: this is how we fill the resulting void. In the future, it will beautifully close with climbing plants. Please note that each side wall of our arch must be made in the form of a lattice (this is also important so that the plant wraps around the arch beautifully).
- 07 The wooden horizontal arch is ready. All that's left is the installation step.
Installing the arch and attaching plants to the arch is the final stage of our work. If you are installing the arch into the ground, then dig small but rather deep holes in the place where the supports will be. Having set the arch level, fix them in the ground with metal corners. You can also put stones under the supports: this way the structure will last you longer.
Below in the photo, take a look at schematic examples of arches. Also, study the step-by-step instructions with a photo of how to make an arch with a gabion base with your own hands:


Plants for the garden arch: which ones are suitable?
The first selection criterion is the climatic conditions in your area. Some plants (for example, a climbing rose), although very beautiful, have a difficult winter and are unlikely to endure severe frosts. By the way, that is why it is so important to choose the right material of construction. If you have a metal arch installed, then the stems of some particularly sensitive plants during a period of severe frost may be damaged.

To create a beautiful composition, experts recommend planting climbing perennials: this is the above-mentioned climbing rose, Chinese magnolia vine, clematis, and also different varieties grapes. Kobeya and honeysuckle bushes (necessarily high-growing ones) are also perfect.


As for annuals, they are also suitable: choose hops, ivy, codonopsis from the bell family, sweet peas, morning glory or climbing nasturtium.

It is best to choose plants to cover the arch that will bloom very effectively and delight the eye not only with decorative fruits, but also with lush greenery. Keep in mind that the whips of some climbing plants can reach three to four meters. With the help of pergolas and arches, they can be given any shape, turning into a real landscape composition.
Stay tuned for updates to our regular section
The territory of a summer cottage or garden plot can be used not only for growing various plants and decorative flowers. Thanks to modern decorative structures, it can also serve as a place of relaxation and simply be an aesthetically perfect area of your home. It's about about garden arches for climbing plants, and other flowers. These are quite simple structures, which, nevertheless, perform a lot of functions. We will not only tell you which ones, but also teach you how to make arches for a summer house and a garden with your own hands according to our detailed instructions with photo.
Garden arch: main types, construction features and functions performed
garden arch is a decorative structure for garden plots. Most often, it is simple design of two vertical beams without a foundation and a horizontal crossbar of an arched or straight shape.
By itself, the arched structure is a fairly stable structure, which does not have a reinforced frame. Yes, this is not required, since the main function of the garden arch is to support a plant, flowers, or vine.
Although the construction of the arch does not require any complex technologies, nevertheless, some features must be taken into account:
- The design must be suitable for growing plants.
- The height of the arch should be from 2 meters, so that a person of average height can easily fit under it.
- The width of the arch should reach at least 1.2 m. This is necessary in case it is used as a support for the growth of climbing plants. If this parameter is not observed, then in the future the effect of neglect of the structure may be created.
- The frame must not only be durable, but also have an aesthetic appearance, so that in the absence of plants (in the cold season) it is also “pleasing to the eye”.
- Compliance of the selected type of construction with the general color of the garden plot.
Arched structures can be classified according to several criteria:
- According to the material used for the manufacture of the structure: arches made of wood, plastic, metal, stone, combined.
- According to the shape of the frame: arches; pergolas (three-dimensional structure consisting of similar elements fastened together); tapestries (vertically arranged lattices); complex structures.
- By location: isolated structure; several arches; tapestry "wall"; gazebo-shaped structure.
A garden structure is not only a separate decorative element for a site, but also a way to complement an existing composition. In addition, the garden arch performs a number of important functions:
- Serves as a reliable support for plants.
- Helps to create an appropriate architectural style.
- Supports load-bearing poles.
- Effectively zones the garden plot.
- Serves as an excellent basis for a children's swing.
- Performs the function of lampposts or is a place for relaxation.
Creating a garden arch with your own hands
The construction of a garden arch is a fairly simple job, but, like any other, it requires careful preparation and high-quality execution.
Dimensioning the structure and choosing the right material
There are no strict restrictions and no standards other than those described above (the arch should be about 2 meters high and about 1.2 meters wide). The maximum allowable width, which does not violate the general proportions of the structure, can be about one and a half meters. This will be enough. As for the height: the higher the design, the less graceful it becomes. Most often, garden arches are made no more than 3 meters high.
After the dimensions of the structure are determined, you can proceed to the choice of material. So, metallic the garden arch is a durable construction, it is very easy to install and quite durable. But it has one significant drawback - susceptibility to corrosion.
As a material for wooden arches are suitable for both timber and raw wood. Such structures are less reliable than arches made of metal.
plastic the arch has a very attractive price, easy to assemble. She is not afraid of corrosion, moisture, deformation. And to model the structure, you only need a soldering iron.
Choosing and preparing a place for the arch
Now you should think about where to place the structure so that it decorates the site and at the same time does not violate the overall integrity of the existing picture. It can be a great entrance to the site or to the territory of the house. Try setting the arch over so that it becomes a kind of tunnel on the way from one part of the site to another (a pergola is perfect for this).
Advice. For a garden plot of a small area, bulky structures are not suitable, since they can simply visually reduce the territory. The way out in this situation will be a trellis, it will perfectly decorate the territory of the garden and at the same time it can be used as a gazebo by adding a small bench with soft pillows to the arch.
An existing one (for example, a concrete or tiled platform) can serve as a foundation for an arch; ordinary soil will not be the worst option. The most important thing is to prepare the basis for installing the arched structure. The working platform must be carefully removed, leveled (if we are talking about earthen cover), transfer the dimensions of the structure to the site and apply markings.
We mount a wooden arch
The wooden arch is mounted very simply. For this we need: wooden beam about 4 cm thick (at least), glued wood about 10 cm, nails, gravel, glue.
Schematically, the order of work is as follows:
- We dig in the bars-racks in a pre-selected and prepared place.
- Crushed stone is poured into the base wooden racks, and the wood remaining above the soil surface should preferably be treated with resin or burned.
- We fasten the upper parts of the racks with a crossbar in the shape of the letter P, we connect the sides with jumpers like ladders using screws.
- On top of the resulting structure, we mount an arcuate crossbar, which we fasten in the same way as the previous one.
- We cover the finished structure with a primer and paint with a special composition for wooden surfaces.
- The final touch remains - we decorate the arch with plants, flowers, etc.
We mount a metal arch
Consider, as an example, the process of creating a garden arch of a simple model: from two arc reinforcing bars interconnected by metal rings. We will need the following materials: reinforcing bars (at least 10 cm in diameter), primer, flexible wire, rope. So, schematically, the order of work is as follows:
- To begin with, we will make an arched blank of reinforcement. You can use a simple template of metal pins a quarter of a meter long, driven into the ground along the desired contour.
- Now let's start creating connecting rings for the already prepared reinforcement racks. We cut 9 pieces of reinforcement 90 cm long and bend them into rings using a pipe bender.
Advice. If you do not have a special tool for bending metal at hand, simplify your task: use straight pieces of reinforcing bars as fasteners for racks. This option looks somewhat simpler, but it is no less attractive and practical.
- We deepen metal racks into the ground to a depth of at least 40 cm.
- We fix the reinforcing rings-fasteners for the racks with the help of a flexible wire, having risen from the ground level by at least half a meter. We observe the distance between the rings within 20 cm. The structure thus obtained will be sufficiently strong and stable.
- In order to protect the finished garden arch from corrosion, be sure to cover it with a primer and then a layer oil paint. This completes the process of creating an arched structure.
In the process of reading this material, you could be convinced that the creation of a garden arch is a simple process that even non-professionals can do. Use the information received wisely and you can create a high-quality decorative structure for your garden with your own hands. Good luck!
Rebar garden arch: video
Garden arch for climbing plants: photo


All gardeners know that it is almost impossible to grow climbing flowers without support. For this purpose, any props are chosen: stretched ropes, fences, posts, etc. But the use of such materials will not be enough to create a spectacular spectacle. To make your garden beautiful and fascinating look, use special architectural elements.
The most popular of them is an arched building on two supports or an arch. Despite the fact that it has the highest decorative qualities, the design itself is rather primitive. Therefore, it is within the power of everyone to build it. One has only to find out what types there are, how they differ and what is necessary for work. This article is about how to make a garden arch with your own hands from various materials(metal, wood, plastic pipes).
Selecting the type of structure
Today there is a wide range of different garden arches. All of them differ in their shape and material. Such designs can be:
- metal;
- wooden;
- plastic;
- trellis.
All of them are similar in purpose. There are special arches for grapes, decorative arches for climbing plants, as well as arches for a recreation area. There are many destinations - the choice is yours.
Making a metal structure

The classic and most popular is the metal arch. Let's look at a simple model that has a height of 2130 mm and a width of 1830 mm. It is made from two bars of reinforcement, which will be bent into arcs. Metal rings will connect them. A feature of this design is that it can be performed without using welding machine, all parts will be connected with a thin wire.
The distance between the arched sections is 31–32 cm. To keep the arch in place, it must be dug into the ground at least 40–50 cm. The connecting rings-crossbars should be 30 cm in diameter, and the distance between them should be 15 cm.
List of required materials

To perform the work, first prepare the following materials:
- reinforcement bar, diameter (hereinafter in the text this icon will be used - Ø) 10 mm, 6 m long - 2 pcs.;
- reinforcement bar (Ø mm), 0.94 m long - 9 pcs.;
- strong wire, soft;
- enamel for painting and primer;
- fittings (Ø 10 mm), 0.25 m long, like pins for a template - 10 pcs.;
- a rope 1 m long.
Step-by-step instruction
First you need to bend the reinforcement bars d = 10 mm so as to get the perfect arched opening. To do this, use a simple rebar pin template. Insert pins 0.25 m long into the ground so as to obtain the calculated contour of the arch.

The outline must be drawn directly on the ground. To complete a perfect circle, drive a rod into the ground and tie a rope to it. Take the free end in your hand and draw a semicircle with chalk or paint. Then drive the pins into the ground starting from the highest point of the semicircle. You now have a template that is easy to use. It remains to bend the reinforcement bars, giving them a semicircular shape. It will be difficult to do it yourself, so ask a friend or neighbor to help you. Directed efforts are needed on both sides to get an arched opening of an ideal shape.
Be especially careful when performing this step. The rebar could come off and cause injury to you or your helper.
For this arch model, metal rings will serve as a connection for the reinforcing sections. They are made of thin reinforcement Ø 6 mm. To do this, you need to cut 9 pieces of reinforcing bars 94 cm long. Using a pipe bender, you need to form rings from them.

If you do not have this tool or simply do not want to complicate the work, the design can be simplified: use straight rods instead of rings. Such an arch will look simpler, but in terms of functionality it will not be inferior to the original version.
The finished main sections must be installed in the ground. To do this, the ends of the reinforcement should be deepened inward by 40–50 cm. Measure 40 cm from the end of the reinforcement that will be deepened into the ground and wrap this place with electrical tape. Do this with all 4 ends. So, you will know when to stop.
We connect the main frames with rings. From the bottom of the arch, measure 61 cm and secure the first ring. To hold it, you can use a construction clamp. Now wrap the connections with flexible wire so that the ring is securely fixed and holds the structure. We fix the following rings according to the same method, maintaining a distance of 15–20 cm.
After finishing work, coat all metal parts with a primer. After it dries, apply a layer of oil paint. That's it, your arch is ready to use.
Other types of arches

Other arches are made according to exactly the same principle. For example, wooden arches are made from timber. This is a simple and inexpensive building. Due to the natural material, it fits well into the design of any garden. To build such an arch, you need 2 vertical frames, 2 inclined and 1 horizontal part. All this is connected with wooden crossbars using nails. The finished structure is dug into the ground, primed and varnished.
Plastic arches are a structure made of plastic pipes. Such arches are considered the easiest to manufacture, they are easy to assemble and disassemble. If you want to make yourself a structure of this type, then you need to consider that plastic is not able to withstand low temperatures, so such structures are often made collapsible. Decorate such an arch with annual plants.
Forged arched structures and pergolas are very popular. Such arches look very elegant and will decorate your country cottage area all year round. Moreover, they are durable and resistant to different weather conditions. To make your stay in the garden more comfortable, you can make an arch with a bench. In this case, you can enjoy the beauty of your garden while sitting under the arch. As you can see, there are a lot of options, you just need to make an effort and imagination, then your garden will look like a real embodiment of your ideas.
You may be interested in answers to other questions that are discussed on our site:
Video
You can learn how to make a strong arch for a rose by watching the video material we have proposed:
A photo