How beautiful to glue kitchen cabinets. How to restore a kitchen set with your own hands: tips and tricks. Lacquering and stain treatment
The kitchen is a place where it is pleasant not only to cook, but also to gather with the whole family. Therefore, it must certainly be cozy and attractive. If some of its parts become unusable and deteriorate badly externally, then something definitely needs to be done about it.

Peculiarities
If the purchase of a new headset or its individual parts does not fit into your budget, then you can try to restore it. To do this, you need to either take the furniture to the masters, or call specialists at home, or try to cope with this task with your own hands. This option is not only the cheapest, but also quite original, because it will be quite difficult to repeat the design you came up with.


DIY
Almost anyone can update the furniture in the kitchen with their own hands, regardless of any of their skills. There are many ways to return old furniture. new life at home. You can restore the main set, it individual parts or even simple accessories.


Kitchen set
Restoring an old headset can be done without even having any special materials available. Restoration of facades can be carried out using molding, decoupage or vinyl film.

The most common option is to stick a vinyl film on the surface of the furniture. It can be smooth or textured. Surfaces stylized as wood, marble, etc. are also common. This is especially true for the restoration of furniture made of similar material.


To restore kitchen furniture, you will first need to clean it and completely degrease its surface. On a dry and clean surface, you can already stick the vinyl film. You need to glue it, starting from the bottom and moving up. Then the reverse layer of paper is also slowly and gradually removed. When the film is pasted, it must be leveled with a special rubber roller.

If you removed the fittings for work, then you need to attach them back after that.

You can decorate furniture in another way. For the restoration of cabinets made of MDF or other wooden furniture often used decoupage technique. surface of solid wood, processed in this way, looks like new. For decoupage, you can use napkins, paper clippings or special cards.


This process is very simple. Before proceeding to work, clean the surface and make it perfectly flat and smooth. For sanding, it is best to use sandpaper. For fixing individual elements, simple PVA glue is most often used. For reliability, glued parts should be covered with several layers of varnish or transparent acrylic paint. Decoupage technique is suitable for the restoration of not only cabinets, but also shelves or tables.


Another cheap way to restore old furniture- just paint it. Here you can either simply tint individual places with paint of the same color, or completely repaint. The highest quality type of paint for this purpose is car enamel. It is resistant to sudden changes in temperature, which is very good for the kitchen.


Finally, it is worth noting also such a way of restoring old cabinets as molding. To do this, separate overhead parts made of plastic or wood are attached to the old base.

accessories
In some cases, you may not need to restore the entire headset, but only the fittings. Even changing such small details already helps to update the style of the room. If your suite is made in modern style, it can be supplemented with antique handles for vintage, and the appearance of the room will immediately change. Such kitchen set will look very unusual, even if you bought it for a low price in the mass market.

Another interesting way to restore your old locker is to update the hinges on the doors. New loops can be placed both in the same places and in new points. If you need to close up unnecessary holes, use a dense acrylic-based putty. It needs to be applied in several layers.


Dinner Zone
You can also put in order the kitchen table and chairs. As for the table, most often attention is paid to the countertop. Over time, it can get scratched or covered with small defects. Decoupage and painting techniques are also used to restore the tabletop.


But there is another interesting way to restore countertops - finishing ceramic tiles. This method is quite popular due to the fact that the tile is a durable coating. Having restored the table in this way, you can be sure that the updated surface will serve you for a long time.

Tile is also a fairly unpretentious option in terms of cleaning. It can be easily wiped off with a damp cloth.

The advantages of covering from decorative tiles include the fact that it is easy to install. You don't need to be an expert to do this. The installation process is extremely simple - clean the countertop, cover it with special tile adhesive. Then lay tiles on it, making up the desired composition. After the tile is laid and the whole composition is completely dry, it is advisable to wipe the seams with a special mixture. Such a mixture can be found in almost any building materials store.
Sometimes old interior get bored and want to update the situation with new ones interesting elements. The question is how to update the kitchen set, in this case becomes very relevant. Especially if the old kitchen furniture functions quite well, and there is no desire to change the set to similar analogues. There is no point in contacting restoration specialists when you can remake kitchen furniture with your own hands at minimal cost. Designers will reveal the secrets of a unique headset upgrade.

accessories
Repair of kitchen sets, first of all, should be started with an inspection of hinges, guides, handles - all fittings that are responsible for ease of use and functionality. It often happens that at the junctions of the mechanisms with the facade, the holes have become wider than necessary, or part of the canvas is completely missing. Then the headset door becomes loose and lopsided. Dismantling and moving the fittings to a new location will help correct the situation. For work you will need:
- putty;
- screwdriver or screwdriver;
- putty knife;
- sandpaper;
- new fittings;
- varnish or paint to match the color of the headset.

Updating the kitchen set begins with the dismantling of old mechanisms. It is better to remove the doors altogether for ease of repair. Old holes are no longer suitable for fixing fittings, so they must be sealed with putty in 2-3 layers. It is better to choose an acrylic-based substance that matches the color of the facade for good camouflage. After the material settles a little, it must be sanded with sandpaper so that there are no bumps and bulges and opened with varnish or paint.
Next, you need to drill new holes and install the appropriate fittings. It is not difficult to pick it up yourself: just show the old part to a sales assistant in a hardware store - and he will immediately offer a suitable analogue. In drawers, when the guides fail, it is recommended to update the roller mechanism with a new ball mechanism, because. it is more reliable. If you need to update the handle, it is advisable to choose it according to style and material. For example, a plastic product looks out of place on a wooden kitchen facade, so it is better to stop at a metal handle with wooden or glass inserts.

Perhaps someone will like the mortise handles, ideal for a modern kitchen
Vinyl film
Pasting kitchen facades with self-adhesive film is the most budget option on how to update an old kitchen set with your own hands. Manufacturers offer a wide range of self-adhesives different colors and textures: matte or glossy, textured and even, with or without patterns. The service life of such a coating is on average 3-4 years. The material is characterized by good moisture resistance, resistance to temperature extremes. It is noteworthy that you can update the facade of the kitchen with this method even on plastic coatings. In order to transform old furniture, you will need:
- scissors;
- plastic spatula or scraper;
- vinyl film;
- soft centimeter and ruler.

Before you restore a kitchen set, you should measure all doors and cabinets in order to understand how much vinyl film you need to purchase in order to update the kitchen set. It is advisable to purchase a little more self-adhesive tape so that you can correct possible errors. Next, you should disassemble the facade, number each part to facilitate the final assembly of the headset. Using a ruler, you need to measure the desired pieces on paper and cut them out with scissors. For ease of use, there are usually markings in the form of 1x1 cm squares on the reverse side. When cutting out parts, it is recommended to leave a margin of 2 cm on the sides and be sure to take into account bends.

Before you update the facades of the old kitchen, you should thoroughly wash the surfaces of the headset from grease and soot, otherwise the film simply will not stick. After washing, the parts should be degreased and allowed to dry completely. The next stage of work is directly pasting with a film. It is necessary to remove a part of the protective layer from the wrong side of 5-10 cm and press it to the surface. The film must be immediately straightened and smoothed with a spatula or scraper so that there are no bumps and bends. The formed bubbles can be pierced with a needle. It is necessary to glue in the direction from top to bottom, gradually removing the protective layer and at the same time smoothing the self-adhesive. If something went wrong, the film can be removed and re-glued, but not more than twice, since the adhesive will quickly lose its properties. The film is strongly attracted to the surface after 5-6 hours, so there is a chance to correct errors and update the headset at the proper level.

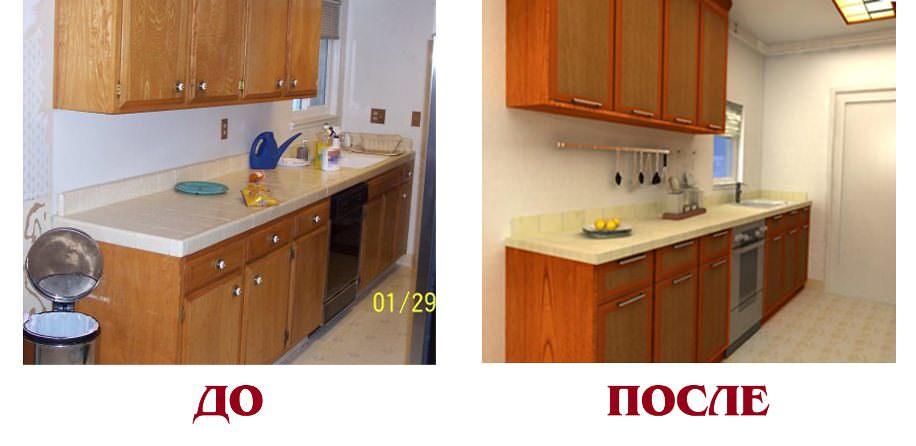
After work, kitchen facades can be installed back and fastened with fittings. A bright stylish set will certainly refresh the interior, bring a touch of originality and style. You can take a pattern with imitation of wood or marble, or you can choose just a plain coating. Designers recommend combining 2 colors when pasting a headset: for example, white hanging drawers and a brown lower tier. Photos of the updated kitchen furniture with their own hands are presented on the site.
Decoupage
For an interior in an ethnic country style, Provence, the restoration of a kitchen set can be based on the decoupage method, which is widely used by modern designers. Hand-made items are in special demand because they reflect inner world hostess, her talent and skills. As a material, you can use fabric or oilcloth with a pattern or ornament you like, for example, “Gzhel” or “Petrikovskaya painting”. For work you will also need:
- spatula and paint brush with a long narrow brush;
- sandpaper;
- putty;
- PVA glue;
- solvent.

Before updating the facade of a kitchen set, the surface should be sanded first with coarse-grained and then fine-grained sandpaper. Significantly lighten manual labor will help Sander. If there are cracks in the headset, they should be repaired with putty. After applying a thin layer, it is necessary to wait until it dries completely and grind again so that the surface becomes smooth and even, without depressions and bumps. The solvent will help degrease the facade so that the future material is well attached to the panel. By the way, the decoupage technique can be used not only for wooden, but also for plastic and glass kitchen sets. It is necessary to process only those parts of the surface where the new material will be attached.

After drying, glue the fabric on ordinary PVA glue, and then open the surface with acrylic varnish. For this, a narrow and flexible brush with long bristles is suitable so that there are no gaps and pale spots on the facades. The varnish is applied to the headset in 3-4 thin layers. Each layer dries in about 1-2 hours, and the headset will be ready in a day.

The rattan fabric on the facades looks very interesting. To work, you need to measure and cut off the desired piece and soak the material in cold water. After half an hour, it will swell and increase slightly in size, so it will be easier to update the product. Wet rattan must be applied to the surface, smoothed, stretched and fixed along the edges with a furniture stapler. This fastening is more reliable, however, if desired, you can use superglue or PVA. After that, you should attach the planks around the perimeter, join them to each other at an angle of 45 degrees and nail them with nails without hats. Such moldings will close the visible fasteners and give the headset a coherent and harmonious appearance. After drying, the rattan will look like a stretched string.

There is another interesting way to update the kitchen set with your own hands. If there are no doors in the hanging cabinets or they are transparent, you can upholster the inside of the kitchen furniture with fabric. The material should be selected from the overall concept of the interior so that it is in harmony with other elements. First you need to measure the cabinet and cut the fabric into the desired pieces, leaving a small gap. Next, the fabric is strongly stretched at the corners of the niche and fixed with self-tapping screws or a furniture stapler. Such restoration of kitchen furniture will make the room more comfortable and homely. In addition, dishes and decor items on decorated shelves look very elegant than on a plain background, especially in a Provence or country interior.
Painting and moldings
Peeling paint, cracks, chips - all these are the consequences of long-term operation of the kitchen set. You can eliminate them and update the furniture yourself with the help of ordinary staining. Designers recommend choosing auto enamel, which, in terms of properties and characteristics, significantly outperforms acrylic paint. The substance makes the surface more durable, moisture resistant, wear-resistant and resistant to mechanical damage. The advantage of acrylic paint is its low price (100-400 rubles per 1 liter), while car enamel costs 2-3 times more. However, the acrylic surface will become unusable much faster, so before restoring the old kitchen set with your own hands, you should carefully weigh the pros and cons.

For work you will need:
- grinder or sandpaper;
- putty;
- primer;
- solvent;
- wooden planks;
- paint or enamel matching the color of the original product;
- brush or roller.

Before starting work, it is necessary to dismantle the facades and number each part of the headset for the convenience of subsequent assembly. It is desirable to comfortably equip workplace, covering it with newspapers or oilcloth so that the paint does not get on the floor or other furniture. If there are decorative elements on the facades, it is worth sticking them with masking tape, like other fittings, including hinges. Then the surface should be sanded with a machine or sandpaper to remove old varnish or paint. If the headset is covered with PVC film, it is recommended to use a building hair dryer. It will melt the coating and make it easier to remove. In the process of work, it is necessary to wear a respirator, since the smell from the film will be very caustic and toxic. Next, putty and primed the surface in two layers, leave to dry.

During this time, you can prepare the moldings. They can be smooth, textured, with imitation of stucco - it all depends on the desire and ability of the owner. Wooden panels it is necessary to grind and dock to each other at an angle of 45 degrees to get an even rectangle or square. After that, they should be applied to the dried surface and glued to the construction adhesive or fixed with nails without caps. The facade is degreased with a solvent, and the staining process begins.
Paint or car enamel is recommended to be applied with a brush in one direction, or you can use a soft roller if the surface is large enough. To update the headset, you can use an aerosol, but in the process, be sure to wear a respirator and goggles. After the layer has completely dried, repeat the procedure 1-2 more times. After a day, the parts can be installed in place.

Varnishing, glisal or stain treatment
Sometimes ordinary staining seems very banal - then glisal comes to the rescue. This is a thick translucent paint with a glossy finish. It must be diluted with water in the proportion indicated in the instructions. The technology of work is the same as conventional painting, however, until the layer is dry, the surface of the headset can be given an unusual texture. With the help of polyethylene or a damp sponge, it is necessary to draw chaotic movements along the facade, leaving behind bizarre patterns and lines. If you don’t like some drawings, you can remove them with a roller. This way, how to update the facades of the kitchen with your own hands, will appeal to lovers of decoupage and ethnic style.

For a wooden headset, ordinary varnishing is suitable. Such restoration will help to preserve the original appearance of the product without violating its structure and design. Opening with varnish is desirable to do on the street or in non-residential premises, since the substance has a sharp and pungent odor. The same applies to stains. This is the coating with which the headset takes on a retro look. Furniture aging is also suitable for Provence or country interiors. Both stain and varnish are applied to a previously cleaned and sanded surface. After work, you need to leave the headset to dry for a day.

Table top restoration
The question of how to update the countertop of a kitchen set is most common, since the surface is systematically subjected to mechanical damage and quickly becomes unusable. To the most budget options staining and opening with varnish can be attributed, however, decoupage and finishing the headset with ceramic tiles will become a more practical way. Well, if the material is combined with the finish of the apron - then the interior will look stylish and harmonious. The tile is glued to the base with a special adhesive that firmly fixes the parts and dries quickly.
As for the restoration kitchen table, varnishing and staining are also suitable here. If the product is made of fiberboard, you can apply film pasting and decoupage technique.


Chair renovation
Knowing how to update the kitchen with your own hands, you should not forget about the chairs, which also wear out quickly and become less attractive. If these are ordinary wooden stools, you can simply paint and varnish them like the rest of the set, after sanding and treating them with a degreaser. If there is fabric upholstery, it is recommended to replace it. For seat upholstery you will need:
- the cloth;
- scissors;
- cardboard;
- pencil;
- foam rubber or batting;
- Super glue;
- construction gun.

Before starting work, you should dismantle the old upholstery, worn foam rubber. If the legs are loose, the fittings must be tightened to give stability or replaced with a new one. Next, you need to attach the cardboard to the seat and circle around the contour, leaving a gap of 3 cm. Using the pattern, the desired piece of batting or foam rubber is cut out, which is glued to the seat with superglue. Next, the template is applied to the fabric and outlined along the contour, but with a gap of 12 cm, which are necessary to wrap around the fabric of the chair. When cutting fabric, it is recommended to pay attention to the pattern so that it is not skewed or displaced. Next, the material should be applied to the seat, stretched, smoothed and fixed with a construction gun or staples from the bottom of the chair, under the base. It is desirable that there are no large folds. The new chair is ready.


Another practical option is the sewing of chair covers. Firstly, the frame is not visible, so there is no need to repaint the base, back and legs. Secondly, if necessary, the cover can be removed and washed, so the furniture will always have a neat and clean look. When choosing a material, pay attention to the quality and color so that the fabric is easily washed off stains and does not absorb odors so much.
There are many ways to update old furniture yourself at home. It’s good if household members join the process - this way the work will go easier and more fun. The main thing is a creative non-standard approach, creativity and a little imagination. Then the updated set will become the real pride of the owners and the decoration of any interior.

Video: how to independently paste over the headset with vinyl film.
You can do without an office or library in the house. But it is difficult to imagine a kitchen without a headset. If it is old and looks too boring, then the mood from being in the kitchen will be appropriate. The restoration of the kitchen set will help to solve the problem. You can do it in various ways and without any problems.
Due to the variety of vinyl film, you can stop at various options– under a tree, a tile, skin, a natural stone. A few rolls are enough and the kitchen will be transformed. This is one of the most simple options, allowing you not to think for a long time about how to update the kitchen set with your own hands.

Materials needed for work:
- Good quality film
- A plastic spatula or a thick cloth (you can also simply smooth the film with your own hands);
- Solvent or alcohol;
- Centimeter;
- Scissors or stationery knife;
- Pencil and ruler.
Sticking film on furniture

.jpg)
In order to paste over the old furniture in the kitchen with a film, you first need to mark the facades. When pasting the headset with a self-adhesive film with your own hands, you can completely change the interior of the kitchen. And you will learn how to carry out the venture correctly by familiarizing yourself with the main stages:
- Then you have to remove the doors and twist the fittings. In this case, it is better to replace it, so the headset will look completely updated.
- Before pasting furniture with a film, wipe all surfaces with water and soda. Wipe dry. All this is necessary, since the surfaces must be degreased.
- Cutting films for furniture is easy. Looking at the back of the material, you will realize that it has markings in centimeters. It remains to measure the cabinets and cut out segments of the required size from the film.
- Lay the film face up on the facade. Peel off at one end, remove the paper by leveling the film with a spatula or with your own hands. If bubbles appear, pierce them with a needle and smooth them out.
- When working with film, if any segment is uneven, it is better to remove it immediately. If this is not done in a timely manner, the film will stick strongly, and it will have to be removed with a knife.
It is easiest to work with a homogeneous film. But it is important to ensure that the pattern of marble or wood does not overlap.
If the decor looks boring, you can add vinyl stickers or place patterned inserts made of a film of a different color on the front of the furniture. Stickers can be made independently by cutting out a pattern from a self-adhesive film.
Headset painting

Painting will help restore the former charm of furniture. At the same time, the front covering of the facade must be kept in good condition. If there are cracks, the veneer has lagged behind, or other defects are present, paint will not help.
Required materials and tools:
- Screwdriver;
- Dye;
- Fittings;
- Solvent;
- Sandpaper.
Working process


Doing all the actions with your own hands, in comparison with the first option, will be much easier:
- Remove the doors.
- Unscrew the hinges and handles.
- Degrease the surface of the facades.
- Clean the surfaces of the furniture with abrasive paper.
- Wipe with solvent.
- Next is painting, which you can do with your own hands. First of all, hard-to-reach places are painted. The paint is applied to all parts of the furniture in several layers. It is best to paint with automotive spray.
- After the painting is completed, you can make interesting ornaments through the stencil. Then comes the moment of screwing the fittings. Next, the doors are installed in place.
Use of varnish
Countertops and facades made of natural wood can be restored using varnish. The presented method is simple, and the result will please you.
Lacquering goes like this:
- Remove fronts and countertop.
- Prepare the elements for the fact that they will be varnished - by analogy with preparatory work before painting.
- Sand down wooden elements and remove the old varnish.
- Apply primer and new varnish.
It is best to use varnishes with high wear resistance. They will protect surfaces from damage in the future.
Replacing old facades with new ones
The cardinal way is to replace the facades of furniture with new ones. It is worth noting that this option will be more expensive than restoration, but in any case cheaper than buying a new headset. Many firms will agree to make facades according to your dimensions.
It will be possible to pick original decor and choose the best, based on financial capabilities, material for the production of facades. Of the economy options, it is worth noting: pine, plastic and chipboard. More expensive solutions: facades made of precious wood and MDF.
For out-of-fashion and exclusive facades, which cannot be restored, you will have to purchase new facades on an individual order. The decor is also worth giving into the hands of specialists.
The variety of kitchen facades is great, which means that everyone will find an option to their liking.
You can change the facades with your own hands, it's not difficult. If modular elements are purchased, you will have to take a drill and drill holes for hinges and fasteners. New facades are attached with screws.
Installation of moldings
Updating furniture can occur with the help of moldings. Molding is an overhead decorative element widely used for decoration. In order to decorate the headset, you will need semicircular slats.


Necessary materials:
- Glue;
- Marker;
- moldings;
- Screwdriver;
- Miter saw;
- Furniture fittings;
- Airbrush;
- Dye;
- Drill.
Instructions for installing moldings with your own hands:
- Preparation of furniture facades. Dismantle facades. Remove fasteners and accessories.
- We install the decor, which will be used as moldings. Using a saw, cut the molding. The outer edges must be cut at an angle equal to 45 degrees. Glue the finished planks to the facade.
- After installing the molding with your own hands, you need to put the fasteners and fittings in place. Holes for them are drilled with a puncher or drill.
- The next step is priming the surface.
- Then painting is done and decor is applied. You can decoupage on the surface or use special stencils to apply the ornament.
Furniture decoupage: do it yourself
You can use such simple decor as decoupage. Its essence is simple: cut out beautiful pictures from napkins, fabric or leather and glued to the surface. This allows you to effectively decorate the headset, breathing new life into it!

Materials and tools:
- Clippings from magazines or napkins;
- Glue;
- tassel;
- Acrylic varnish.
Such decor as decoupage is applied as follows:
- If there are cracks or scratches on the façade surface, they should be filled with filler.
- Next, the surface is treated with sandpaper.
- Lacquer is first applied to the place where decoupage will be pasted. If the sheet of paper with the image is large, there should be no ugly joints.
- Apply glue to the places where the decoupage will be glued.
- Put the image on the facade and smooth it with a brush. You should not smooth the picture applied using the decoupage technique by hand, otherwise tears may appear.
- After the paper dries, varnish is applied in 3 layers. Each layer is applied after an hour. Varnish can be matte or glossy.
DIY furniture decoupage (video)
So, now you know the many ways to decorate furniture in the kitchen. What to choose - decoupage, film restoration, moldings or painting - it's up to you! You can achieve excellent results by using other various techniques. Good luck!
When it comes time to make another repair, it may turn out that the former favorite and comfortable headset does not fit in style, color, or has long gone out of fashion. What to do if its body is still strong, and nothing suitable can be found in stores and furniture stores? There is an exit. You can always update your kitchen furniture with your own hands, creating the set that you like.
In order to understand what can be replaced by spending the minimum amount, consider what elements kitchen furniture consists of.
- Frame. This is a frame made of chipboard or MDF. In some cases, a frame made of timber is used, on which filling parts are sewn.
- facades. Front details of drawers, doors, blind panels covering the voids between the wall and furniture.
- boxes. They have a variety of shapes and sizes. Depending on the guides, they leave completely or by 70-80%.
- Shelves. They can be open or closed behind facade doors.
- Retractable mechanisms for hard-to-reach places. These are a variety of designs that make it easy to organize access to the most inconvenient places, expanding the amount of storage.
- table top.
So what can be done?
Frame
Restoration or replacement of the hull is not easy and quite expensive. However, in the presence of skillful hands, there are no unsolvable problems.

In the case when the case is assembled exclusively from sheet material, restoration may be required from time to time with the replacement of elements damaged by steam, moisture or mechanical stress. To do this, it is enough to cut a new part from the MDF sheet and attach it in place. If necessary, a self-adhesive film with a suitable pattern can mask the new element, giving it the necessary texture.
For a built-in headset with a frame made of timber, sometimes it may be necessary to replace or restore the skin. With a radical alteration, you can add or subtract cargo, boxes, shelves.
In order for the hostess to always have full control over the stored items, it is desirable to provide for the ability to change the height of the shelves. To do this, holes are drilled in the side walls at a certain interval. Provide an opportunity to put an additional shelf if necessary.
facades
When replacing or restoring facades, designers have complete freedom of action.
- Replacing old facades with new ones. It is justified when the old parts have really served their time, or there is no desire to spend time on restoration or alteration. As a rule, furniture stores offer facades standard sizes, suitable for factory headsets. Uniform parts are interchangeable.


- Painting. Used for expensive furniture, when acquiring a new facade is more expensive than a trip to the paint shop. The advantage of this method is that you can invite an artist who can turn a boring headset into a work of art. If you have a large-format photo printing service in your city, feel free to choose the image you like. At the same time, remember that the presence of perspective can visually push the walls and blur the boundaries between reality and illusion.
- Film pasting. Carefully done work will refresh the look of your headset and extend its life for several more years.


Drawers and shelves
The convenience of kitchen furniture lies in how comfortable it is to store items in it, take them out and put them back, and maintain order in the kitchen. Telescopic guides for sliding shelves are a revolution in kitchen ergonomics. Because now you don’t have “grey areas” where it’s hard to get to, where forgotten items are stored for years.


Install heavy-duty runners that can fully extend shelves and drawers, and you'll always have complete control over all your stocks and kitchen utensils.
The space between shelves and drawers is often used irrationally. In this case, it is worth adding an inner drawer/shelf without adding a new front. Beneath the standard appearance of the headset may be a modern, highly functional storage system.
table top
Unite the mosaic of cabinets into one unit with a single countertop. In this case, when removing or adding lower cabinets, the headset will remain unity. In what cases is this true? For example, when installing built-in appliances. For washing machine you can free up space by removing a wardrobe that is suitable for the width. And the work surface will not suffer from this at all.


Retractable elements for hard-to-reach places
Tall cabinets, pencil cases and corner pieces of suites are usually quite difficult to keep in order. Special devices allow you to organize storage so that order in the kitchen is easy to restore and maintain.

Do not rush to spend money on a new headset. Take a closer look, it may be enough to change the handles on the facades, replace the guides on the drawers and add functionality to the corner elements.
And finally, an interesting video:
May 23, 2016 Werri
So let's update the kitchen! This room is one of the most used in any apartment or house. We are sure that in your kitchen there are also a couple of points that can be improved or refreshed.
1. How to update the kitchen: replace the doors
Hanging new doors on kitchen cabinets is an economical alternative to completely replacing furniture. The appearance of the kitchen will change beyond recognition if you change their color or texture. However, there is important point, especially for "older" kitchens: when hanging new doors, you often have to change fasteners, and this can weaken the design of the kitchen, lead to sagging and shorten the life of the entire set.
2. Paint the facades
This method will help to achieve the same strong effect as when replacing the doors, and there are fewer risks. Arm yourself with your favorite paint and update old doors. The spray can do better than the brush: there will be less streaks, it is easier to achieve an even coverage. If you want to use liquid paint left over from the last repair, it is best to apply it with a sponge in a dabbing motion. And don't forget to apply a couple of coats of varnish on top.


3. Install new handles
It's amazing what role such a small detail as a handle plays in the perception of the entire kitchen. While replacing them is simple and inexpensive. If you're repainting the cabinets at the same time, you can patch and paint the old handle holes so there's no limit to the choice of new parts. If you only change handles, you will have to find a similar format.

4. Cunning with the countertop
If the surface of your countertop is completely worn out or just already annoying you, you can replace it. However, if it is glued to the cabinets, it may be difficult for you to mask the damage from dismantling later. There is a simpler option and, if we are talking about a countertop made of natural materials, cheaper: invite a specialist home who will mount a thin layer of wood veneer or stone on top of your countertop.


5. Upgrade light
Buying new fixtures or at least changing the shade of a pendant lamp will give you a boost of novelty. Think original pendants, they look more elegant than just hanging cord.


If your kitchen has only one common light source, you are guaranteed to add comfort and improve the atmosphere in the room by hanging a lamp above the work surface and a couple of sconces in the table area. If you don't want to hire an electrician to mount the fixtures on the wall, those that simply plug into a wall outlet will do.
6. Switch to energy efficient lighting
So much is said about it for a reason - they are more expensive than other light bulbs (although the price decreases over time), but at the same time they work for a very long time, are extremely energy efficient and you can’t get burned about them. Changing light bulbs is perhaps the easiest change you can make to your kitchen, but brighter light will do the trick. appearance and feel of space, and energy savings - on your budget. LEDs are sold with a wide variety of base types, so even built-in halogens can be easily replaced.

7. Paint the ceiling
Paint or re-whitewash the ceiling. Even if this is the only thing you will do to update the kitchen, you will be surprised how much lighter and brighter the surroundings will become. Kitchen ceilings are under a lot of pressure due to steam, smoke, dust and grease splashes, and you may not notice this until you compare the "before" and "after".

8. Update your kitchen apron
If the wall covering behind the kitchen worktop is outdated or, moreover, was not initially adapted to kitchen everyday life, it's time to make a beautiful and practical kitchen apron. Many interesting ideas in our articles:
- Rating of materials for kitchen apron: all advantages and disadvantages

Fast and inexpensive solution: redeem or, if you're lucky, pick up for free the remains of various tiles in warehouses or from friends who have recently completed repairs. Combine tiles of different sizes, colors and textures to create a unique and vibrant backsplash that will become a real highlight of your kitchen. If you want a mosaic apron, then broken tiles are also suitable for these purposes. By the way, if the state old tiles still normal, it can also be simply spray-painted and varnished.
9. Change the flooring
Are the floors in need of updating? On a budget, this problem can be solved by doing the work yourself and choosing flooring that feels good on top of the old floor (as long as it's not too crooked). Vinyl tile, cork, laminate or linoleum is easy enough to install that you can do it yourself with a little diligence.

10. Get rid of junk
Whatever changes you make to your kitchen, clutter and excessive visual “garbage” can ruin everything. Perhaps not all the accessories on the kitchen shelves and magnets on the refrigerator are so dear to you. In the vacated space, you can put a few new carefully selected items: vases or bowls, vintage bottles or commemorative photographs. Or just leave more free space.


Photos: apartmenttherapy.com, einteriors.design, pinterest.com, lifeschic.com, styleathome.com, nicolefranzen.com


