We make a drywall arch with our own hands. How to close the arch: installing an accordion-type folding door and other arch options in the doorway
Most interior designers think interior arches an established classic of the genre, the arched vaults of doorways have long and seriously pressed the slightly angular rectangle of the classic door. Passages and openings between the rooms remain a kind of bridges that unite islands of living quarters, different in meaning and content, with no less important kitchen, bathroom and toilet. If possible, why not make interior openings no less beautiful and comfortable.
How practical are interior arches
Often, everyone who wants to build interior arches has a doubt about how practical and convenient such designs are in everyday use. The idea of building arcuate arched openings has existed for several hundred years, back in the 50s of the last century, many interior and corridor openings with arches of various configurations were built, until the fashion for savings and a utilitarian approach to interior design finally buried a wonderful idea.
The manufacture of interior arches will require certain financial and time costs in connection with the alteration of part of the doorway. But most often, the owners decide to remake, since the end result fully justifies the costs:
Significantly improved appearance, even the simplest interior arch looks much more attractive and interesting than the official version of a rectangular door hatch;
The space of an apartment or house visually becomes more spacious, even in small apartments with miniature kitchens and tiny corridors, the room becomes brighter;
An order of magnitude improves heat transfer and air movement between rooms. Fresh air does not seep through ventilation ducts, moves without interference and restrictions along the shortest path.
In most cases, the owners decide to change the shape and size of the interior opening, equipping the arch above the doorway in order to improve the appearance of the interior space of living rooms. Only a few years later, it is discovered that the installation of an arch and the modification of an interior opening can improve the conditions for distributing heat throughout the house in winter and coolness in summer heat. And most importantly - without laying an additional complex pipe system.
Types of arches
One of the most valuable qualities of the interior arch is the good adaptability of the updated doorway to any interior of rooms and corridors. Door arches are made in the form of frames from a steel profile and wooden slats, bricks and gypsum blocks. For external finishing of the surface of the walls and ceiling adjacent to the arch and the box of the interior opening, plasterboard sheets, panels, mounting foam, plywood and fiberboard sheets are used.
For doorways and interior aisles of standard width, up to 90 cm inclusive, an arch with a support frame can be bought at a specialized salon. Such standard arched vaults are most often cast from polypropylene or hand-assembled from wooden blanks.
round arches
Most often, the arched vault above the interior doorway is associated with the classic round arch, the most common in the architecture of stone buildings and structures. It is the round arch that is most often chosen for the doorway.
Artists-designers and interior designers of residential premises use about a dozen basic configurations of round interior arches with supports on the frame of the doorway.
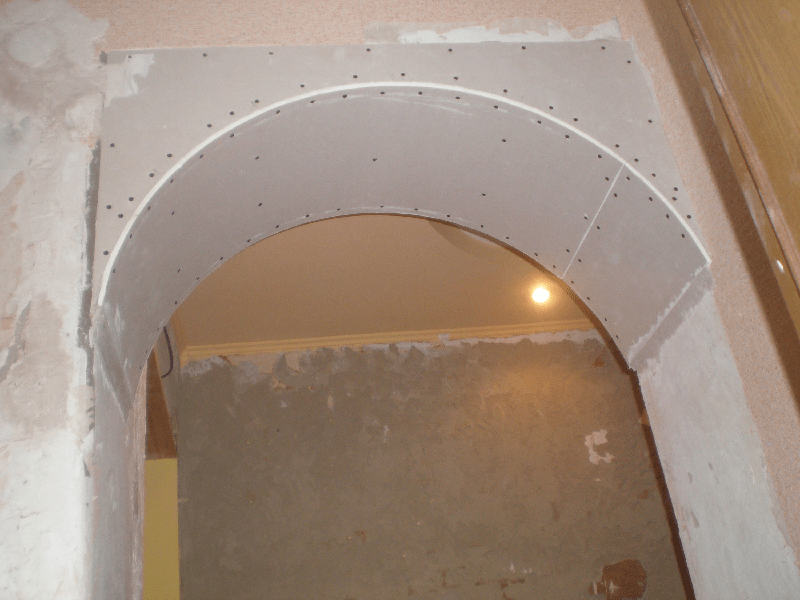
To get the perfect arc of the interior arch, the galvanized profile is divided into sectors, the side shelf is cut and the metal bar is bent according to a pre-planned pattern.
Note! The round arch is very popular, primarily because of the simple installation technology.
In the classic version, a round interior arch is made in the form of a sector in ¾ of a circle or ½ of a circle, often the shape and curvature of its arc can be supplemented with side elements of arbitrary shape and configuration, but always symmetrical.
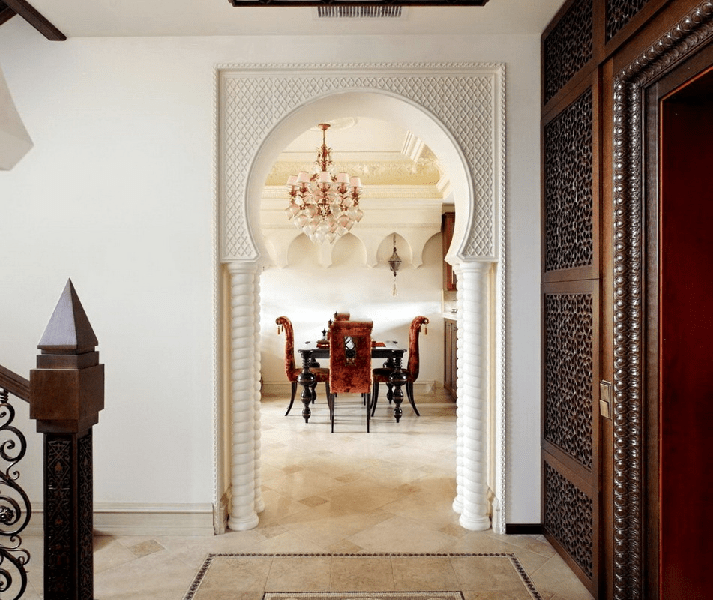
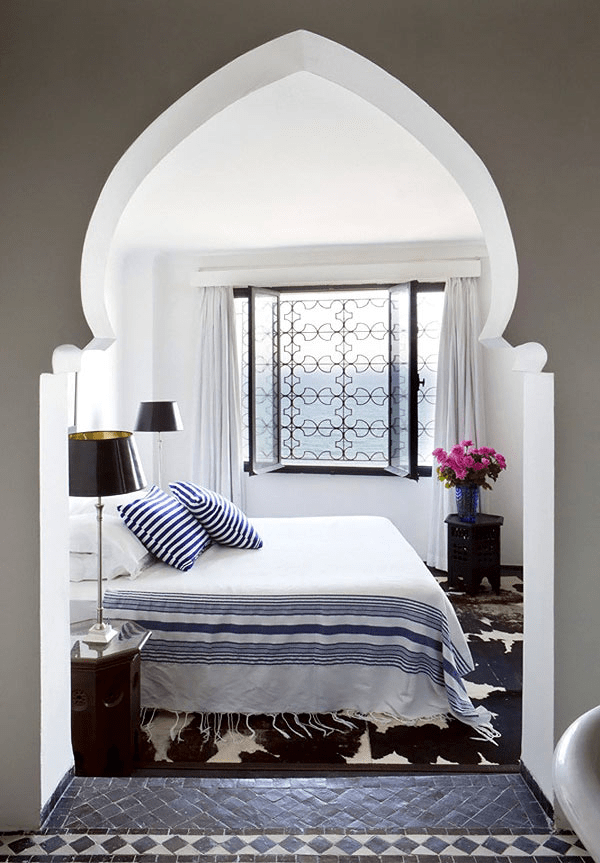
If it is necessary to add oriental motifs to the design of the interior arch, then the profile of the arched ceiling of the span is made in the form of two intersecting arcs. In this design, the interior arch acquires an almond-shaped profile.
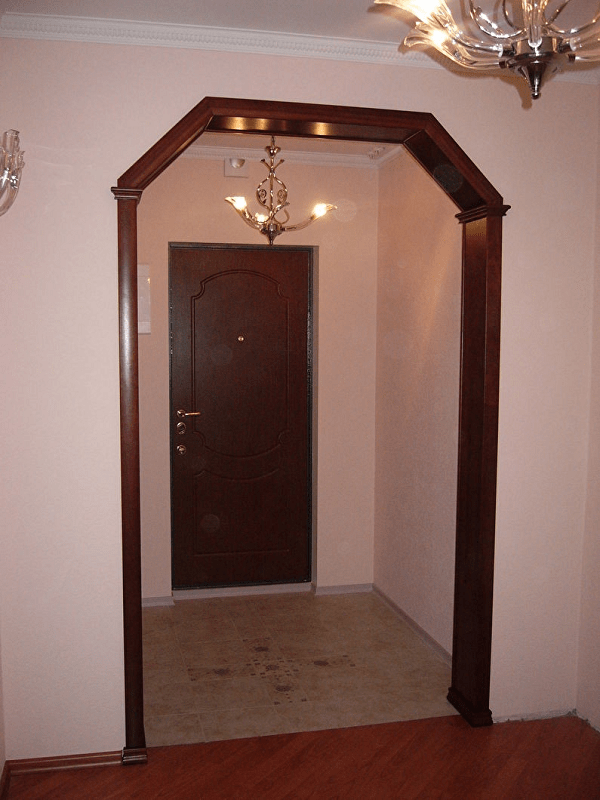
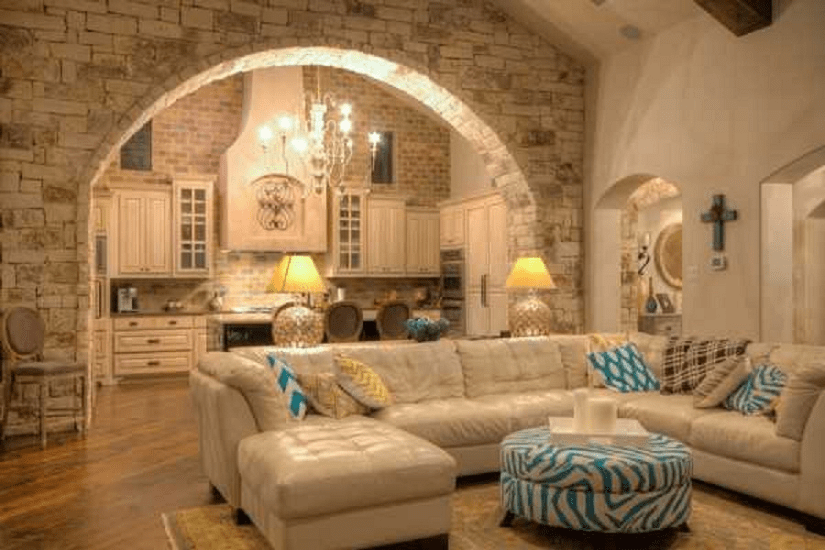
The interior arch can be combined with supporting columns, most often with stucco elements or imitation of the Victorian era style.
If necessary, for example, if the size of the doorway is relatively small, the arch can be decorated without any columns and unnecessary decor. It is enough to emphasize the line of the arched arc and close the transition plane to the walls with decorative overlays.
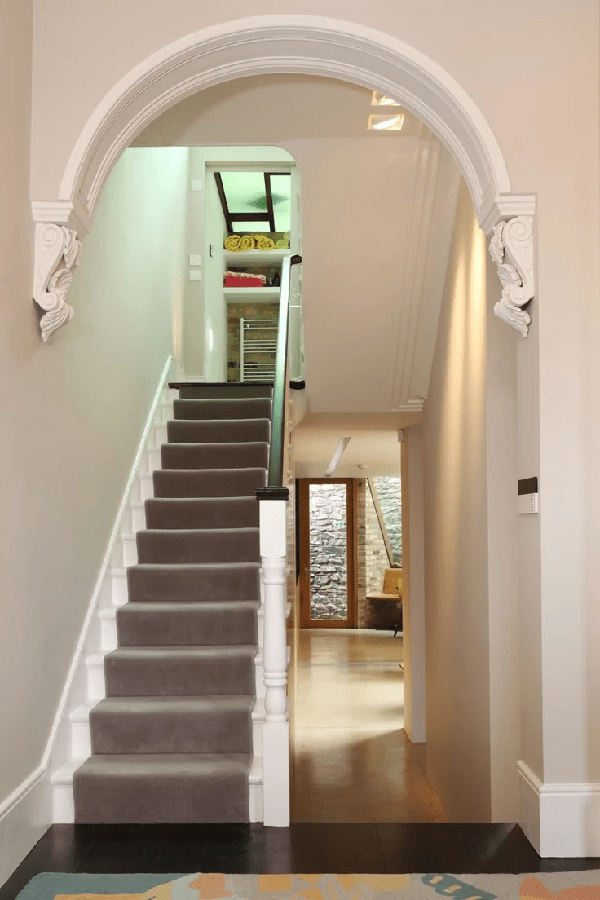
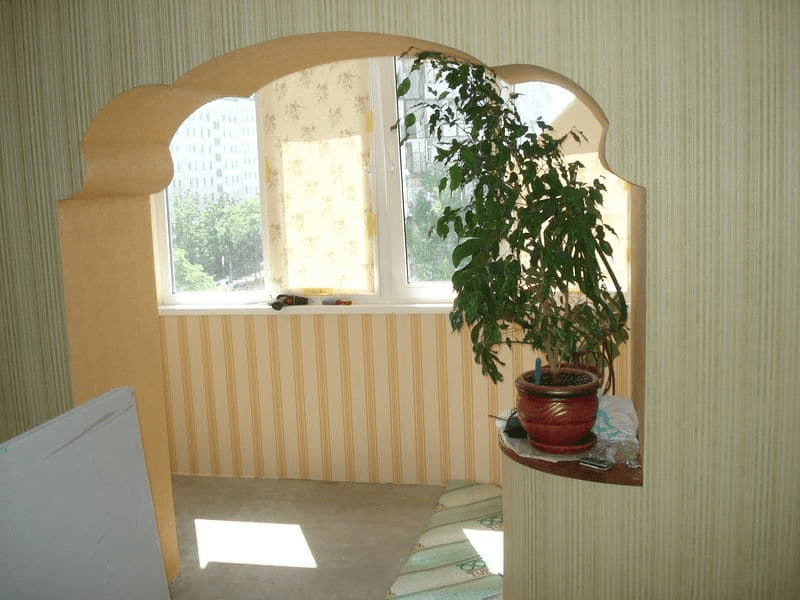
In the event that the dimensions of the corridor allow, the design of the interior doorway can be arranged in the form of one round arch. Instead of a standard rectangular door frame, only a small rounded outline remains, marking the border between the kitchen, living rooms and corridor.
Round arches are used in cases where the apartment or living space of a private house is built in the form of several small rooms. Full-sized rounded arches very successfully visually combine the rooms into one studio apartment. To keep behind the bedroom, kitchen or personal account private character, the interior opening with an arch is closed with double doors or a light sliding canvas.
Enough interesting solution shown in the photo below.

In one design of the interior opening, a round or annular arch and a rectangular box are used. A stylish doorway makes it possible to add some very necessary details to the interior of the room and open an adjacent room or corridor for light and air.
If the ceiling height is more than 2.5 m, and the dimensions of the interior passage are more than two meters, you can use the widespread technique of dividing the space into several sectors.
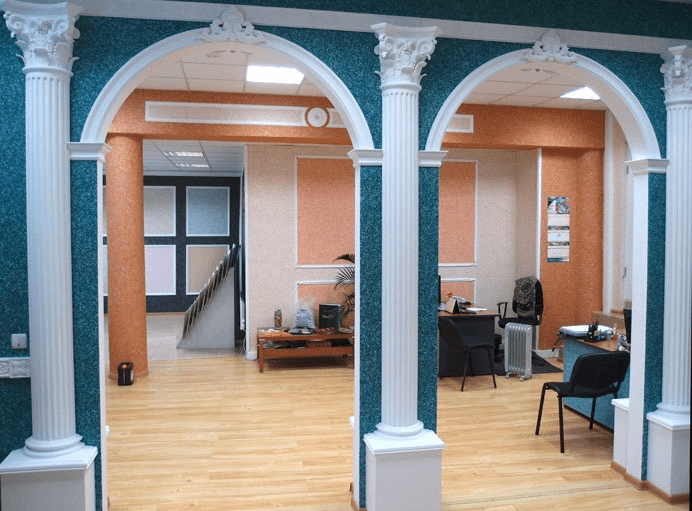
AT this case the design of the interior opening in the form of two small-sized arches of a classical shape with an intermediate column provides best quality ventilation and lighting.
For low ceilings, a round arch is broken into several elements or replaced with a rectangular doorway.
Rectangular arches
Arched structures of a rectangular or square shape in their characteristics and functions are no different from the classic round arch. A rectangular shape is resorted to if the interior of the apartment contains a significant number of objects and details with straight lines.
In the vast majority of cases, a rectangular shape for an interior arch is chosen in a situation where precious woods, plastic and a monotonous rectilinear design are actively used in interior decoration.
For example, an interior doorway between the corridor and the living room can be designed as wooden panels assembled in one arched structure. On the one hand, there is enough air and light, on the other hand, the boundary between two rooms that are completely different in meaning and functions is clearly marked.
Rectangular arches are simpler and more technologically advanced to manufacture; installation does not require the use of special marking devices, as in the case of semicircular and round arched structures.
Ellipse arches
It is not always possible to build a doorway with an arch in the form of an ideal semicircle or circle segment. There are certain restrictions on the distance from the ceiling to the top point of the arched arc; for the premises of the apartment, this distance should be at least 40 cm.
In such cases, the arch arch is made in the form of a horizontal semi-ellipse. The excess of the arched arc turns out to be less, and the entire design of the fashionable interior opening fits freely in the dimensions of the rooms and the height of the ceilings of a standard-plan apartment.
According to the scheme with a horizontal ellipse, it is possible to build a fairly wide passage between adjacent rooms according to the scheme shown in the photo.

The ellipse is ideal as a profile for building an interior passage. For example, you can form an opening in the form of a vertical ellipse with truncated edges.
The passage itself turns out to be wide enough to use it, but due to the narrowing of the sidewalls to the top and bottom, the section is smaller than that of a standard rectangular profile or arch of a classical shape. Therefore, in order to increase the amount of air and light through the interior opening, the passage contour is supplemented with side windows.
Trapezoidal arches
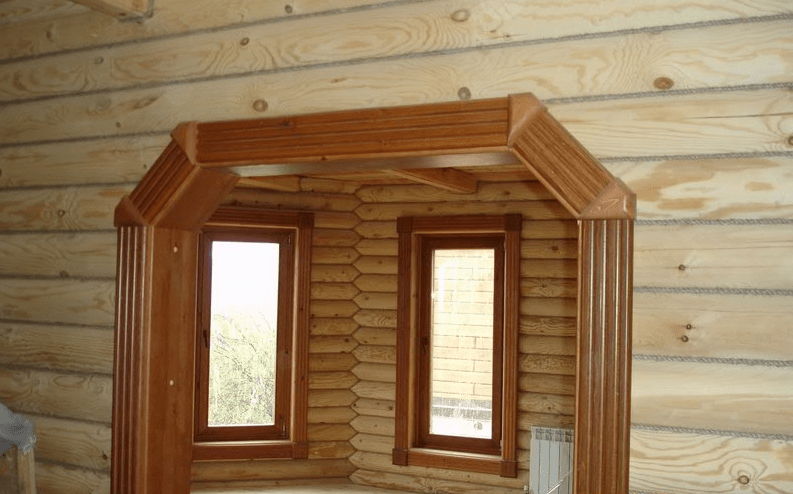
The device of the arch in the form of a trapezoid can be considered a natural continuation of the rectangular scheme. Traditionally, door and interior openings with a trapezoidal top are used in attic rooms, especially if the ceiling of the room is made with side bevels.
The shape of the trapezoid provides increased stability of the upper transverse beam of the opening, so such structures are widely used in houses made of timber and logs.
The decorative qualities of the trapezoid are lower than those of interior openings with an arch in the form of an ellipse or a rectangle. However, there is a demand for a trapezoid arch passage, especially in panel projects for suburban and country houses. In any case, an interior doorway with a trapezoid-shaped arch looks much more interesting than a boring rectangular design.
curly arches
The manufacture of an arched vault of complex shape is in a good way show the talents of an interior designer, imagination and fiction. by the most in a simple way build original arch non-standard form remains the addition of several curved lines and surfaces to the classic arched arc.
For example, if you add a couple of side arches to a simple symmetrical arch, you can get a fairly expressive line of the arched vault for an interior wall.
A small addition to the standard arc or semi-ellipse of several asymmetric elements turns the arch into a stylish interior opening.
Figured arches, as a rule, are made according to complex curvilinear patterns, for example:


The process of designing and manufacturing a figured interior arch is quite complicated for an amateur level, so even the simplest multi-level openings, as a rule, require the knowledge and skills of a professional artist-designer.

Drywall interior arches
In the process of planning a curly arch, you always have to look for suitable way assemblies and material from which it is easiest to assemble a rather complex arched structure.
Most of the home arched interior openings are built of wood and drywall. Sheets of pressed gypsum are perfectly processed, cut, drilled, painted and puttied.
The basis of the plasterboard arch is assembled in the form of a galvanized profile frame. A strong corner and a U-shaped profile made of thin sheet metal can be used as a supporting element of a strong frame or bent into an arc of any curvature.

The manufacturing process of the interior arch is as follows:
- The frame is assembled with rivets and attached to the walls and ceiling of the interior opening;
- The base is sewn up with sheets of drywall;
- Seams and cracks are rubbed with gypsum putty;
- Curved surfaces are sanded, painted and finished.
The arched interior opening turns out to be light, durable and of arbitrarily complex construction and design.
Interior arches made of wood
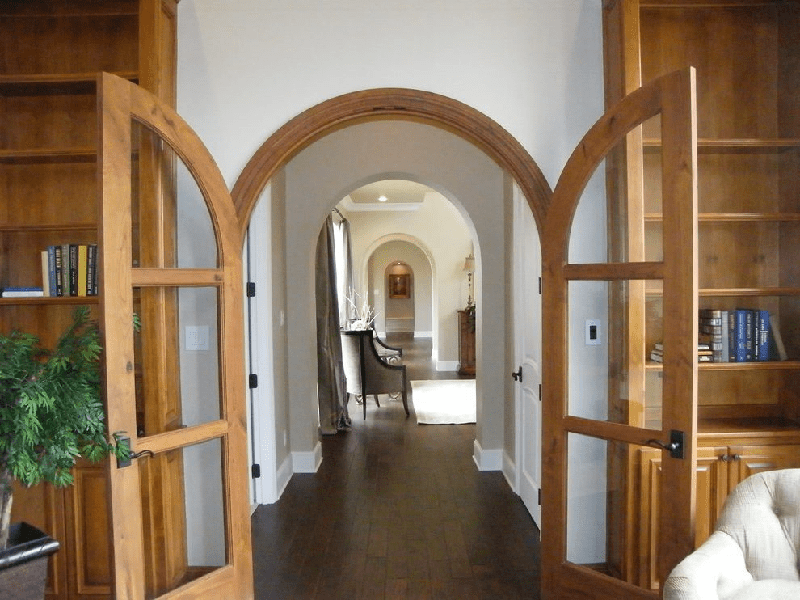
Arched interior openings made of wood and its imitations firmly occupy the second place in popularity of the design. It is very difficult to technologically bend a beam and a lath made of valuable species of wood with the desired radius, therefore almost all interior arched openings made of wood are built in a rectangular shape.
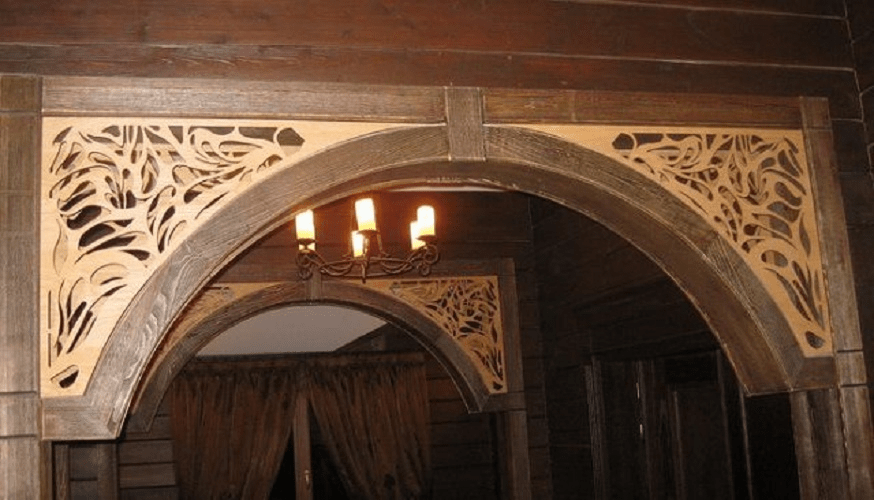
The exception is wooden arches. handmade, very beautiful, with carvings and elements of furniture decor. Often, the arc is cut from a solid array of wood and veneered with fine wood veneer.

Note! A handmade arch is easy to distinguish by surface microdefects and a characteristic veneer texture, while cheap interior arches made of polypropylene look perfectly smooth and one-color.

Arches
Depending on the materials used to build the frame of the interior opening, choose the most appropriate type of finish. Drywall constructions must be primed and puttied, after which the surface of the arch can be pasted over with PVC film with a texture like wood, red brick or natural stone.

An easier way to finish involved the use decorative plaster or wall graphics. Corner joints of interior arches can be pasted over with polyurethane tiles under an artificial stone.
Wooden arches are finished using furniture technology:
- The surface of the wood is primed, tinted and varnished;
- The final coating is applied to match the colors of the walls and ceiling of the rooms adjacent to the interior opening;
- Veneered surfaces of doorways with arches are always varnished with subsequent polishing of the decorative layer of wood.
If the finishing operations are performed in accordance with polishing standards, the decorative layer of wood can last at least 20 years, while the plasterboard finish will last a maximum of 10-15 years.
Illuminated arch
Installing lanterns and lighting remains one of the most popular ways to enhance the decorative effect of the arch.

Lanterns can be installed along the contour of the arch, or placed at the top of the arched arc and covered with translucent polycarbonate.
Instead of spotlights, you can use LED strips, monochrome or color.
Interior of interior arches
The most difficult stage in planning an interior arch is the development of a common style, because the doorway must correspond to at least two rooms at the same time. For example, the passage from the living room to the kitchen is best done in light colors. White, cream and beige shades are considered universal, able to be combined with almost any style of the interior of the hall and kitchen.
Arch in the living room
All other interior arches leading from the living room to other rooms are designed in the style of the interior of the main space of the apartment.
Before planning the shape and dimensions of the arched structure, you will need to take into account the color and texture of the furniture in the living room, the pattern of the flooring.
The concept of designing an arch in the living room is extremely simple - interior openings should visually expand the size of the room, even if this requires removing half of the internal adjacent wall.
Arch in the hallway and corridor
A similar technique is used when planning arched openings in the hallway. The corridor room experiences the greatest load from dust and dirt brought into the apartment from the street or entrance.

Therefore, the entrance part of the apartment is planned in more muted colors, respectively, arched structures are made with minimal space absorption.

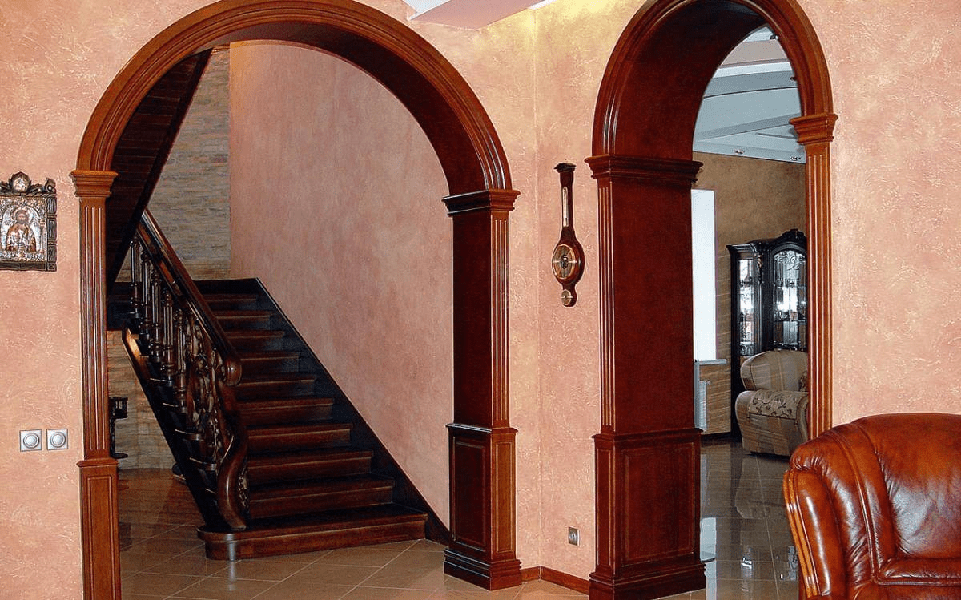
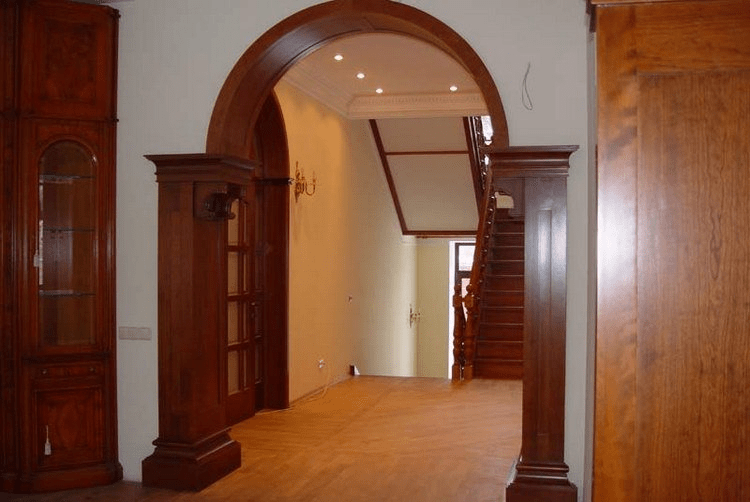
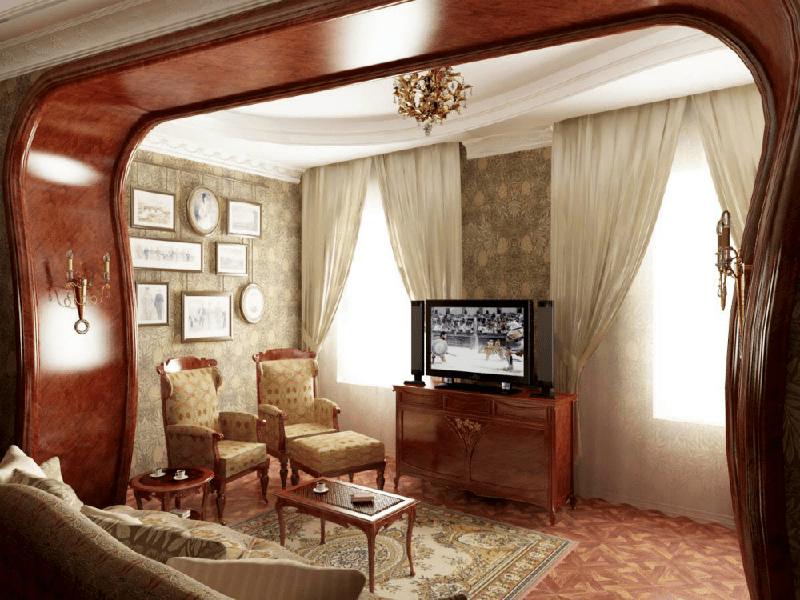
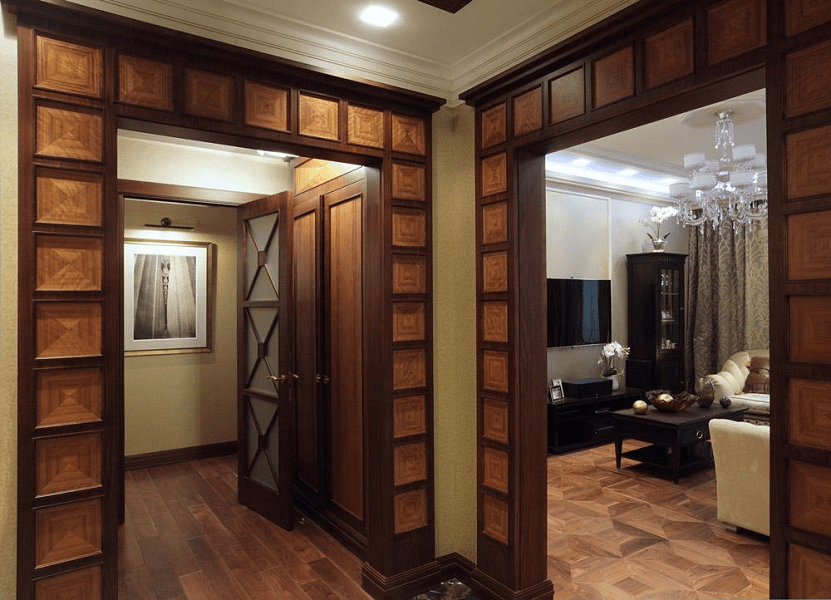
An exception may be interiors with extensive use of wood paneling, parquet and fine wood finishes. In this case, a massive interior arch, decorated in mahogany, can serve as a kind of bridge from a more utilitarian and stuffed hallway to the central part of an apartment or house.

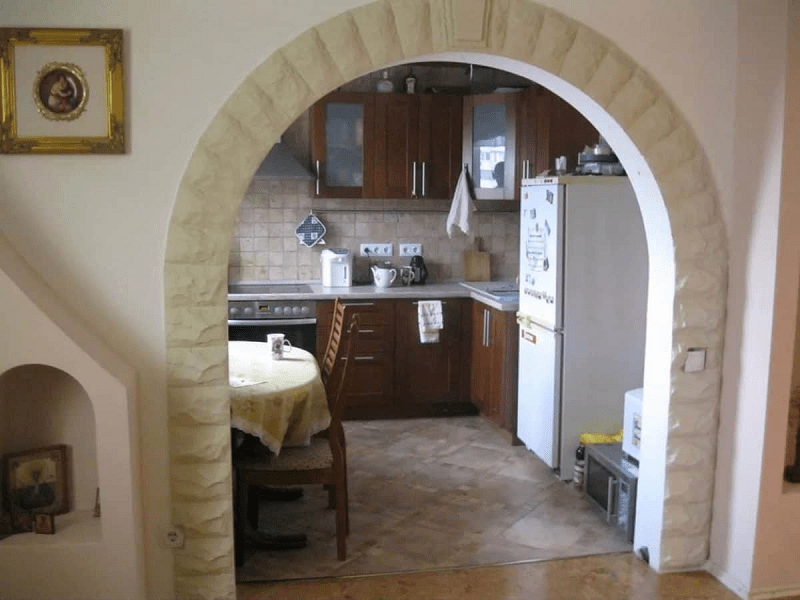
Arch to the kitchen instead of a door
To date, interior openings between the kitchen and the living room firmly occupy the first place in the list of the most popular solutions for redevelopment of old apartments. It so happened that in the vast majority of apartments of the old building, the hall is connected to the kitchen by a long and narrow corridor.

It is very inconvenient, so the hall is connected to the kitchen by a wide and spacious opening with a round arch. AT budget option the interior arch can be made of plasterboard sheets finished with decorative plaster.
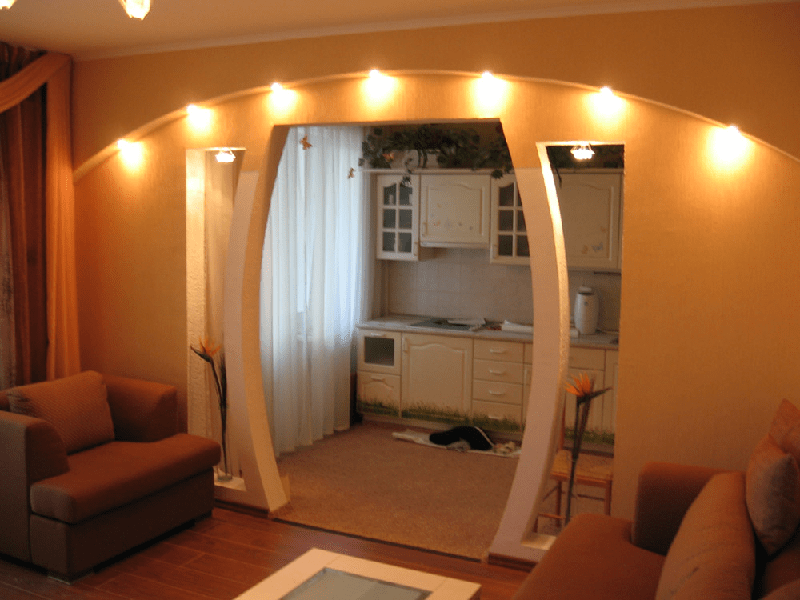
A more complex and at the same time non-standard option for arranging an interior opening is shown in the photo below.
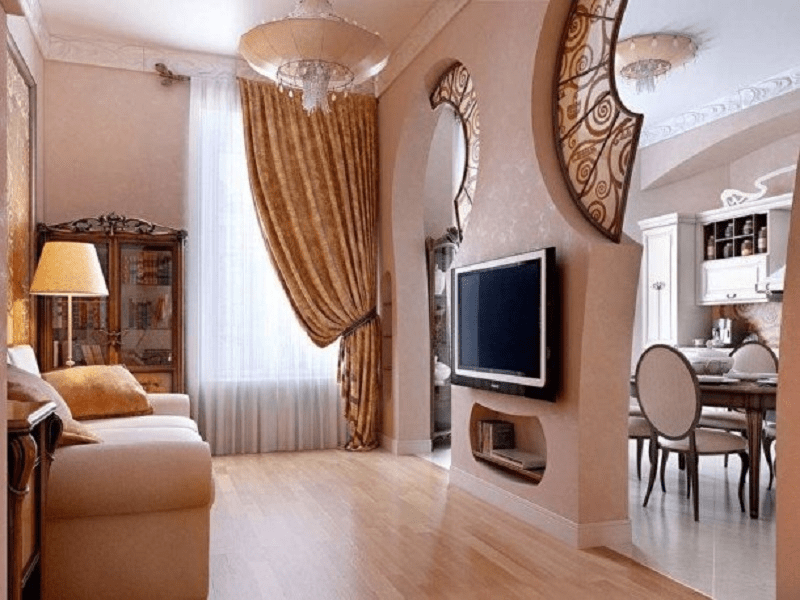
Instead of one passage in the adjacent wall, two symmetrical figured passages with round arches and an asymmetric shape of the opening were built. High ceilings allow you to make the arched part with a certain degree of broadening. As a result, the central part of the wall remains used for the installation of a TV and furniture, while the side sectors are “donated” for arranging the arch.
Arch in the children's room
In apartments with a small living area, with the help of an interior arch, the problem of dividing and delimiting space into the territory of adults and children is solved.
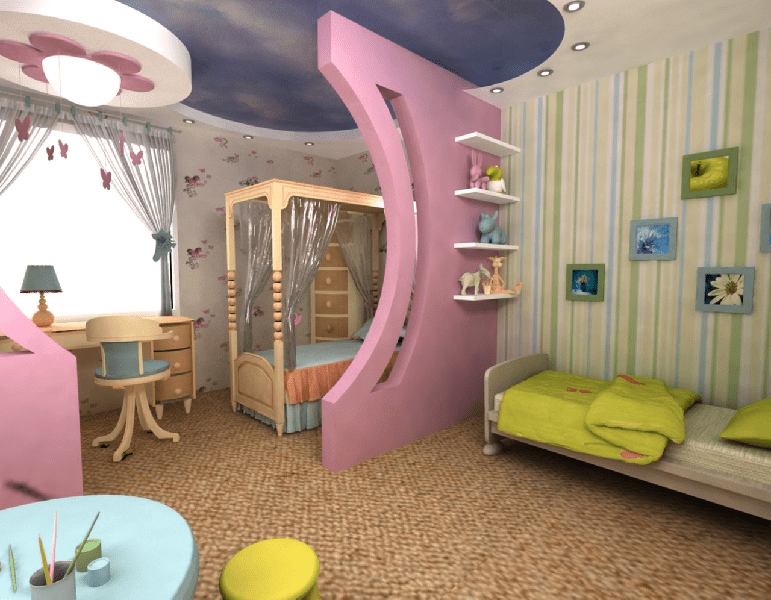
If the room is allocated for several children, then with the help of the arch it is possible to resolve most of the disputes related to the division of the territory. For arranging a doorway, arched structures are used quite rarely.
Arch in the bedroom
For the rest room and bedroom, the color of the walls, the shape and style of the arch are chosen in strict adherence interior decoration and interior space.

As a rule, double doors with an arched vault or small-sized interior arches with a monotonous decoration of the walls and the ceiling space are used for the bedroom.
Conclusion
Arched structures have long won the hearts of apartment and house owners seeking to improve and improve the layout and interior of their home. The interior arch remains one of the most affordable, simple and at the same time very effective ways make the interior of the rooms brighter and fresher. Moreover, the manufacturing process is not so complicated and intricate, and most of the work can be done at minimal cost. Only a small skill of an artist-designer is required, the rest must be entrusted to design professionals.
10710 0 0
How to make a drywall arch - 5 steps for making an arched doorway
When performing a major overhaul in your apartment, for sure every homeowner has a desire to radically change the bored long years interior design for the better. From my own experience, I can say that just a banal plywood wallpaper or painting the ceiling and walls is unlikely to radically change the environment.
As an original addition to the visual redecoration, I propose to completely remove the interior doors, and instead leave an open arched doorway of an asymmetric or classic semicircular shape. To help the reader cope with this simple job, later in this article I will talk about how to make a drywall arch with my own hands for a short time without significant financial outlay.
The choice of the shape of the arched opening
The integration of a semicircular or figured arch into an existing doorway does not imply a violation of the integrity of the interior walls, and does not require redevelopment of the apartment, therefore it does not have any effect on the bearing capacity of building structures, and the whole house as a whole.
At the same time, such a solution will allow you to get rid of annoying rectangular doors, help to visually increase the usable area of \u200b\u200bhousing, and get an updated visual perception of the surrounding space.
Starting with the next section, this will describe step-by-step instruction for the manufacture of arches, but first I want to offer a choice of several options for the size and shape of the arch for an interior doorway:
- The classic symmetrical arch with a semicircular vault is considered a universal option.. It is quite simple to manufacture, and is well suited for opening any narrow single-leaf interior door;

- The arched opening in the Art Nouveau style has a similar shape, but it has a large arc radius, since it is based not on a circle, but on an oval or ellipse. Due to the low height of the arch, this form is well suited for wide openings from double doors in the living room, in the hall or hallway;
- Gothic interior plasterboard arches have the same design, however, differ from the two previous options by the presence of a sharp top in an oval or semicircular vault;
- A semi-arch of an irregular asymmetric shape can have almost any arch configuration, and is most often used for narrow doorways in the kitchen or in the hallway. This option is considered the most economical, since its manufacture will require the least amount of materials;

- The openwork arch is a complex structure in which, in addition to the entrance opening itself, there are small decorative through or blind openings designed exclusively for decoration. This option is usually set to doorway in place of double-leaf or four-leaf entrance doors to the living room or bedroom;
- A multi-level arch most often has an original author's design, which is developed strictly individually, in accordance with the conceptual style of the apartment and the personal preferences of the homeowners. Most often, this option is distinguished by smooth curved lines and the presence of curly decorative elements that can be located at different levels relative to each other.

When choosing an arch shape for self-manufacturing, you should be guided not only by your imagination or beautiful pictures from interior design magazines. To get a high-quality end result, for the first time, I advise you to choose an option that will match your practical skills and financial capabilities.
Stage 1. Preparation and marking of the doorway
First of all, you need to draw a preliminary sketch of the doorway on paper or on a computer, on which the shape of the future arch should be clearly drawn. To facilitate further work, in addition to the general sketch, I recommend depicting the projection of the finished arch in three planes, indicating all the necessary dimensions.
You need to take measurements from a clean doorway in the light, therefore, to begin with, you will have to perform simple preparatory work:
- Before you make an arch from drywall yourself, you must completely dismantle the old interior door, together with decorative platbands and wooden box;

- If, after removing the platbands and the box, significant potholes, large chips, cracks or other construction defects are found on the end surface of the wall or door slopes, they must be leveled and puttied with a cement-sand mortar or putty mortar for interior work;
- If the doorway after the construction of the house has an irregular shape, crooked slopes or indirect littered internal corners, they also need to be leveled with a cement-sand mortar;

- After the putty mortar has dried, it is necessary to measure the width of the doorway in two places: one measurement is made at the very top, and the second is 500-600 mm lower;
- At the beginning of the rounding of the arch of the future arch, put a mark on the end of the wall, and measure the distance from it to the horizontal upper plane of the opening. This size will be considered its height;
- Before making an oblique arch, the marks on the right and left sides must be placed at different distances from the top of the opening, because in this case, the height of the arch on the right and left sides will not be the same;
- On the vertical side ends of the wall, and on the horizontal upper slope, at a distance of 13-14 mm from the edge of the wall, two parallel lines must be drawn on each side. They will serve as marks for installing a metal frame.

All drywall sheets are produced according to a single standard, according to which they can have a thickness of 9 mm or 13 mm. For sheathing the frontal planes of the door arch, I advise using sheets with a thickness of 13 mm, so all markings for installing the supporting frame must be performed based on this value.
Stage 2. Installation of the supporting frame
The supporting frame for interior plasterboard construction is usually made of galvanized metal profile or wooden bars with a cross section of at least 50x50 mm. Given that our drywall arch will have rounding and radius shapes, a metal profile is best suited for its manufacture, although wooden blocks can be dispensed with in straight sections.

For single-leaf doorways with thin interior walls I recommend using a galvanized "CD" type frame profile, which is 27mm high, 62mm wide, and has a whip length of 3000mm. If the arch will have a width of more than 1500 mm, then for its manufacture it is better to use a more powerful rack profile of the “CW” type, the dimensions of which are 40x75x3000 mm.
- Regardless of the option chosen, the manufacture of arches must begin with the installation of upper horizontal guides. To do this, two profiles must be cut off from a whole whip, the length of which must be equal to the width of the doorway;

- Next, you need to cut four more profiles, the length of which should be equal to the height of the arch. They must be fixed vertically, one on each side of the end of the doorway;
- Each vertical profile should be fixed on the inside of the drawn vertical marking line. After installation, you need to check that the distance between the front plane of each profile and the frontal plane of the wall is strictly equal to 13-14 mm;
- For attaching straight profiles to concrete or brick wall it is best to use plastic dowels 6x30 mm in size and galvanized self-tapping screws with a wide hat 4.2x25 mm in size;
- To make a curly arch, I advise you to prepare a template in advance. It can be cut from a large sheet of rigid packaging corrugated cardboard, an unnecessary piece of fiberboard or thin;

- The width of the template should be equal to the width of the doorway, and the upper part should exactly repeat the semicircle, semi-oval, or other curly configuration of the vault of the future arch;
- To make the frame of the radius part of the arch with your own hands, you need to take two identical pieces of drywall profile. They must be cut with a small margin in length.(300-500 mm more than the length of the arc on the template), and after bending and final fitting, precisely cut to the desired size;
- The straightness and rigidity of the plasterboard metal profile is ensured by two longitudinal side ribs. In order to bend the lower profiles along the desired radius, and give them the correct arcuate shape, many radial cuts must be made on the side ribs to the very base;

- Profiles with cut side ribs must be bent to a given radius, and then cut to length exactly to the size of the doorway. It is convenient to do this by attaching them to the template, while you need to make sure that both profiles have exactly the same bending configuration;
- After that, each curved profile must be fixed at two points to the lowest part of the vertical guides that are installed at the end of the doorway;
- To combine the entire frame into a single integral structure, the radius profiles can be interconnected with short transverse jumpers. In addition, it is necessary to install several vertical jumpers between the upper horizontal and lower arcuate profile;
- To connect the profiles to each other, three types of fasteners are used: short self-tapping screws for metal with a hat in a sweat, steel rivets, or a special punching tool that punches a hole in the walls of two profiles, and then wraps the punched metal in different directions.

In the shops building materials you can find a ready-made metal profile for curved drywall structures. It is a conventional frame profile with cutouts and notches on the side stiffeners, due to which it can easily bend along the desired radius or take any curvilinear shape.
Its price slightly exceeds the cost of a straight frame profile, so if there is such an opportunity, it is better to buy such a profile for the manufacture of a radius arch.
Stage 3. Cutting and preparing drywall
The appearance and aesthetic properties of the finished arch will largely depend on how well the radius parts of the front plasterboard panels are cut. To cut a symmetrical semi-circle, semi-oval, or non-symmetrical arc, I recommend using one of three methods. Regardless of the method chosen, the first thing to do on a sheet of drywall is to draw a rectangle.
Its width should correspond to the width of the opening, and its height should be equal to the height of the future arch.
- If we make a drywall arch of a symmetrical semicircular shape, then to draw the correct semicircle, you will need to make a simple impromptu compass.
- To do this, you need to find the center of the bottom side of the drawn rectangle, and tighten a small self-tapping screw at this point;
- Tie a thin nylon thread to the self-tapping screw, and tie a pencil or a thin marker to the other end of the thread;
- The distance from the center of the self-tapping screw to the writing unit of the marker should be equal to half the width of the arch minus 14 mm;
- After making sure that the length of the thread strictly corresponds to the calculated size, you need to attach the marker to the bottom line on one side of the rectangle;
- After that, pull the thread slightly, and draw the marker in an arc to the bottom line on the other side of the rectangle. As a result, a symmetrical semicircular arch will be drawn on the drywall sheet.

- In order to draw a symmetrical semi-oval or part of an ellipse of the correct shape, it is most convenient to use a flexible elastic guide. It can be a long metal ruler, a thin wooden rail, a narrow plastic profile or water pipe:
- On both sides of the drawn rectangle, on the bottom side, you need to put marks at a distance of 14 mm from each edge;
- Attach one end of the guide to one mark, bend it along the desired radius, and also attach the second end to the other mark;
- In this position, it must be fixed motionless, so I recommend doing this work with one, and even better with two assistants;
- While two people hold the guide on both sides, a third person must make sure that it describes a symmetrical regular arc, and draw a line along it from one edge to the other of the bottom side of the rectangle.

- For those who are interested in how to make a semi-arc arbitrary irregular shape to draw an asymmetrical curvilinear line on a drywall sheet, I advise you to use the existing template.
- As in the previous case, one mark must be placed on the underside of the drawn rectangle at a distance of 14 mm from its edges;
- Attach the arched side of the template to the set marks, and draw a curved line along it with a thin marker.

Gypsum board can be cut with a sharp construction knife, however, for accurate cutting along a radius line, it is best to use electric jigsaw and a saw on a tree with a small divorce of teeth. In order to prevent the edge of the sheet from chipping, before cutting any part out of drywall, I advise you to stick a wide strip of paper masking tape on the cut line.
Stage 4. Assembly of the arched structure
After both front panels are cut, they need to be combined with each other, and check how they fit together. Ideally they should be exactly the same., therefore, if there is any discrepancy between them, then it is better to immediately eliminate it with a knife, a coarse file or a coarse-grained emery cloth. After leveling the front panels, you can start sewing the supporting frame with drywall.
- Each front panel must be installed at the same level in its place in the doorway, and fixed along the entire perimeter and in the middle to the metal profile using self-tapping screws in the recess, in increments of 100-120 mm;
- When installing, make sure that the front plane of each panel is flush with the plane of the wall. If the front panel is slightly recessed, then there is nothing to worry about, it can then be leveled with putty. The main thing is that she does not come forward anywhere, beyond the dimensions of the doorway;

- Further instructions will help you make a curly arch from a drywall strip, in one of two ways. In both cases, first you need to cut off a strip of drywall. Its length must necessarily be 100-200 mm longer than maximum length arches of the arch, and the width should be equal to the distance between the front panels;
- In the first case, the strip must be laid on a flat surface, bottom side up., and roll with a certain force with a spiked roller so that the needles pierce the top layer of thick cardboard. If there is no such roller, you can evenly apply many small, barely noticeable notches to the lower plane with a sharp knife;
- The perforated side of the drywall should be moistened with plenty of water using a foam sponge, and leaned against a vertical wall at an angle of 50-45 °. Under the action of water, the gypsum filler will begin to soften, and the strip will gradually take on a curved shape;

- After some time (20-25 minutes), when the water is absorbed, the strip must be carefully placed on the floor, moisten the top layer again with water, then lean against the wall again and leave it alone for another 40-60 minutes;
- After the strip becomes sufficiently plastic, it must be carefully attached with self-tapping screws to the sweat on both sides to the arcuate metal profiles;
- You need to start fastening from the middle, and gradually move towards the edges, mirroring the screws, then from the right, then from the left side of the arch. To prevent the formation of creases and edges, the pitch between the screws should be no more than 80 mm;
- The second method makes it easy to bend the drywall dry, but in this case, small chopped edges form on the surface of the strip, which will later need to be additionally puttied;

- Before installation, the strip must be laid on a flat hard surface with the front side down, and on the reverse side with a sharp knife, make deep transverse cuts approximately to the middle of the drywall thickness;
- In order to achieve uniform bending, the notches must be located strictly perpendicular to the center line of the strip, strictly parallel to each other, and at the same distance between them;
- The finished strip must be applied to the arch of the arch with cuts upwards, and, just as in the first case, starting from the middle, fasten it to the arcuate profiles with the help of self-tapping screws.

Despite the fact that the wet method of bending drywall may seem more complicated at first glance, I recommend using it, because in this case you immediately get a uniform arc without creases, a regular rounded shape that requires almost no further refinement.
Stage 5. Preparation for finishing
Immediately after the do-it-yourself plasterboard door arch is made, it may seem ridiculous and scary, but do not be upset, because after completing the preparatory and finishing work, it will take on a completely different appearance.
- First of all, it is necessary to cut off with a sharp knife all the protruding corners and irregularities at the ends of the drywall parts, and then process them with coarse-grained emery cloth, fixed in a special holder or on a flat wooden block;

- In those places where drywall parts are joined together at right angles, it is necessary to fix perforated metal or plastic corners. They cover all the bumps and cracks, allow you to get the perfect right angle, and also provide additional strength of the corner joint;
- At the junctions of two adjacent parts that are in the same plane, as well as at the junctions of the front panels with the plane of the main wall, you need to stick fiberglass reinforcing mesh, which is also called sickle in another way;

- All self-tapping screws, joints, corners and cracks must be puttied in such a way that no reinforcing mesh, no corners, no joints, no fixing screws are visible on the surface. I recommend using acrylic for this. finishing putty for drywall, which is sold completely ready for use;
- After the first layer of putty has hardened, the arch must be sanded with a medium-grained emery cloth. At this stage, some irregularities or other defects will definitely appear, so after preliminary grinding it will have to be puttied again;
- After the final drying of the second layer of putty, the surface must be sanded with a finer sandpaper, and after making sure that there are no defects, cover with one layer of a penetrating primer for drywall.

If you bent drywall in a dry way, then to eliminate broken edges, the upper bent vault of the arch will need to be covered with a continuous layer of starting drywall putty. After drying, it will need to be sanded, and topped with another layer of finishing putty.
Conclusion
In this article, I fully talked about how to make a drywall arch in a doorway with my own hands, and deliberately did not mention a word about finishing. The thing is that the appearance and design of the arch should generally correspond to the concept of interior design. Therefore, the materials and method decorative finishes, the landlord must choose for himself, based on his own tastes and personal preferences. To consolidate the knowledge gained, I suggest watching the video in this article, and if readers have questions, I will be happy to answer them in the comment form.
October 1, 2016If you want to express gratitude, add a clarification or objection, ask the author something - add a comment or say thanks!
The arch in the interior is an architectural technique that allows you to divide the space of neighboring rooms. Arched vaults allow you to give the layout of a typical apartment an individuality. Before delving into the technological intricacies of how to make an arch in a doorway, you should decide on its configuration and finish option. Only the right form and design will give the interior of both rooms the necessary coziness and comfort.
Forms
There are several options for the shape of the doorway. When choosing, you should take into account the features of both rooms - the height of the ceiling, the width of the doorway, etc. Some designs look good only in high rooms, others require widening the doorway.
- Classic arch - suitable only for rooms with high ceilings (from 3 m). The correct bend radius is half the width of the doorway. Those. with a door leaf width of 90 cm, at least 45 cm upwards from it will be occupied by an arch. If we take into account that during the execution of work the width of the opening, therefore, the bending radius will increase, then 2.5 m of the ceiling height may simply not be enough.

- Modern - used to design a doorway inside standard apartments. The radius of curvature exceeds the width of the door. Corners can be rounded or sharp-edged.

- Romance - a good option for a wide opening, a straight insert is made between the rounded corners, either horizontally or at an angle.

- Portal - the usual processing of a doorway in the shape of the letter "P".
The configuration can be undulating, polygonal - it all depends on the imagination, the taste of the homeowner, the properties of building materials.
Material
The arched system can be made of concrete monolith, brick, wood, metal, plastic. They can also be made from chipboard, plasterboard, fiberboard, plywood, etc.

In addition, an infinite number of options for combinations of building materials and finishes, the installation of lighting, metal, glass stained-glass windows are possible. There are also options for finished products.
Process

First of all, you should decide on the configuration and method of finishing. This can be done in two ways:

The appearance is chosen according to the interior design, and it must match the interior of both rooms. From different sides, the arched system can be decorated in different styles.
First, the old one is dismantled. door frame. The hole expands to the required size. The easiest option is to install a finished structure.
Note! If the building material is stone, brick, concrete, then you should take care of the foundation for their installation, as well as tying the masonry to the wall using reinforcing elements.

Sheet materials. The best option is to make a full-length template before you start making an arch in the doorway. In this case, it is necessary to provide for the installation of a lighting system, a stained-glass window, and other built-in elements.
- Attached aluminum rails.
- Before bending the metal profile, it is necessary to cut it every 5-7 cm.
- Next, the frame parts are made according to the template.

- The finished frame is mounted using self-tapping screws.
- Then a strip of the required dimensions is cut in order to close the structure. Its length should be 10 cm more, and its width - 3 cm.
- To bend the GKL, it must be moistened. Plywood, fiberboard are bent with water and a hot iron.

Note! Finishing work begins only after the complete drying of all modules.
Theoretically, it is not difficult to independently install an arched structure. Installation work does not require expensive professional tools. Enough drill, hammer, hacksaw, scissors for metal - available to almost everyone home master. In the absence of experience in dealing with such tools, it is better to turn to the services of professionals.
Video
If you want to know how to make a drywall arch, watch the following video:
And so they install a finished wooden arch with decorative weighting elements:
A photo

One way to increase living space is to remove doors. But it is not always possible or willing to destroy the walls. Then the former doorway is made out in the form of an arch. Another option for using arched openings is to divide a long corridor into zones, breaking up too simple geometry. When repairing on their own, drywall arches are most often made: they are the easiest to do with your own hands.
Types of arches
Interior or corridor arches can have a different shape. They differ mainly in the shape of the upper part and sometimes in the way they are connected to the vertical parts. Their main types are shown in the photo.
This group is missing one of the most popular in recent times- semi-arch. They have a rounded corner on one side only, on the other it remains straight. Hence the name - semi-arc. It looks good in modern interiors: minimalism, hi-tech, maybe in art deco.

The classic is distinguished by the correct shape of the top. This is strictly a semicircle, the radius of which is equal to half the width of the doorway. This view looks good with an opening height of at least 2.5 m. It fits well into any interior, but looks best in a long corridor, or instead front door to the kitchen.

The arched opening in the Modern style is distinguished by a small radius of curvature and a sharp transition at the junction with the vertical components of the opening. It looks good if the walls and ceiling have more or less simple design. Looks great in place of the former balcony door, good at the entrance to the office.

The arch of the “Romance” style is rather just rounded corners (mostly masters call it that). It looks good with a large width and not the greatest height.

The "romantic" shape is good with a large width and small height
The shape of the "ellipse" is very close to the "romantic". It differs only in greater curvature in the middle part. Also suitable for low and wide openings. It just looks a little softer.

A trapezoid is a non-standard design consisting of broken lines. It is hard to play up in the interior, therefore it is used infrequently: for some non-standard designs.

One of the design options is a trapezoid
It is very similar to a regular opening, but in fact it is, only without a door leaf. For greater originality, it is often accompanied by wooden carved elements in the form of columns on the sides. In this form, it is good for classic interiors, as well as ethnic style - Greek or Roman, depending on the type of columns.

For decoration in modern styles use another prim - next to the main arch, they have smaller portals. This technique allows you to "beat" a simple form.

Another version of the arch "portal"
Before you start making an arch, you need to decide on its parameters. select the type, and then the options: where it will start from, and what the radius of curvature will be. It can be a really sharp bend, or it can just be some rounding of the corners.

To understand how your chosen shape will look, you can cut a template out of cardboard and attach it to the doorway. Rate the effect. If everything suits you, you can make a blank according to this template. But only one - for one of the sides of the opening. The second must be done in place, otherwise it will turn out crooked.
Step-by-step instructions with photos: the fastest way
Do-it-yourself drywall arches are made in different ways. This takes the minimum amount of time. Having decided on the form, we proceed to installation. On the prepared opening - cleaned of peeling plaster and relatively leveled, we fix the frame according to the size of the future arch. It is made from a profile for drywall or a dry wooden block of a suitable size. Sometimes, if the wall is narrow, you can only pick up wood.

To begin with, we cut out a rectangle from drywall according to the size of the future arch, find its middle, mark it, and then temporarily screw it into place. We retreat from the edge of 12.5 mm - the thickness of the drywall sheet. If the adjacent walls are already plastered, add a couple more millimeters to the putty so that the surface can be leveled.

Now we take a piece of a profile or a hard corner, set aside half the width of the opening from one edge. At this place in the corner we make a hole, insert a carnation into it. We stick this nail into the middle of the doorway marked by us earlier on the sheet. It turns out a kind of compass, with which it is easy to draw a perfect line.

Arc delineator
By changing the height of the mount, you can get a more or less high arch. If you need a flatter curve, increase the length of the "compass".

Having removed the sheet, we cut out the arc along the outlined contour. This can be done with a special drywall file, a metal saw with a fine tooth for a smoother edge, a jigsaw (there will be a lot of dust). If the cut is not very even, we level it with sandpaper fixed on a grater. With this device we achieve a perfectly even curve of the shape we need. The cut out fragment of the arch - the side wall - is again fixed in place.

If everything is smooth, there are no distortions or irregularities, on the other side of the opening we attach the same drywall sheet as a few steps earlier - a rectangle or a square - depending on the shape. It must be fixed strictly vertically. Now transfer the shape of the arch to it. We take a square, at a right angle and with one side we press against the drywall, on which we transfer the arch, with the other side - to the arch. Having set the square perpendicularly, we mark a point with a pencil. We make such points along the entire arc. The more often they are made, the easier it will be to draw a line and the match will be more accurate - there will be less grinding.

Why is it so difficult and not just to make a copy of the first sheet? Because few openings are symmetrical. As a result, it is very problematic to install the second sheet so that the lines of the arch coincide.
Having noted all the points, we remove the sheet, draw a line, cut it out along it. We mount in place. Now again we take a trowel with sandpaper and now we level both edges until they completely match. One point - the trowel should be wider than the opening so that both walls of the arch are captured in one pass.

We measure the length of the arc, cut out a piece of the profile of the same length, make notches on the walls every 3-4 cm. This tape will need to be fixed along the arch of the arch from one side and the other.

We fasten it to self-tapping screws, carefully, pressing the profile and holding it with a bar, and not with your fingers: it is elementary to get into your fingers with a self-tapping screw. By the way, you need to work with a cut profile with gloves. If not, you will cut your hands for sure.

By the way, the back of the profile can be set along the edge - it’s easier to work, and then the joint will still have to be sealed. Screw the strip to the other side in the same way.

This is a bottom view - profiles are attached to the sides
There is a second way to attach the profile - put it on a quick-setting universal glue, like liquid nails. This method is acceptable if the width of the opening is small. With a large thickness of the arch, the adhesive may not withstand the mass of drywall, which will be attached from below.
The next step is to attach the jumpers. First, the depth of the arch is lost, 1-1.5 cm is subtracted from it. This will be the length of the jumpers. Cut pieces of a profile of this length.

Jumpers are cut from the same profile
In the places where the jumpers are attached, the “petals” are cut off, the prepared fragment is installed and fixed. It should not rest against the walls, it is located approximately 5 mm from the back. Jumpers are needed to make the design more rigid, otherwise it “walks” when pressed.

Next, from the drywall, you need to cut a rectangle that will cover the structure from below. Its width is determined simply - from the outer edge of one sheet of plasterboard, to the outer edge of the second sheet. The length is measured with a flexible tape (it can be tailor-made) or a tape measure with an assistant. We fasten this sheet with screws to the arch frame. The sheet has to be bent, and how to do this, read a little lower - towards the end of the article.

Arched opening made of drywall: the second method (photo report)
This method is good if the thickness of the partition is small: try attaching the profiles if the gap between them is several centimeters, and then attach the jumpers. It all starts the same way: the first wall of the arch is cut out, fastened and transferred to the second sheet.

After the width of the gap between the two sheets, wooden crossbars are cut out, which are attached along the edge of the arch to self-tapping screws.

The cut-out strip of drywall is fixed, starting from one side. To make it more convenient, you can fix it with clamps, since the thickness of the wall is small. When attaching the strip, you can focus on the screws with which the bars were screwed. That way you'll hit the crossbar for sure.

Then it remains only to fix a special perforated corner along the corner and level the irregularities.

A corner is attached along the vault of the arch, everything is puttied

It is also more convenient to level the dried putty along the arch of the arch with the entire plane of sandpaper fixed on a grater. It is unpleasant that dust falls into the eyes, so it is almost impossible to work without glasses.

How to make an arch instead of a door: the third method - typesetting
Another way to make drywall arches with your own hands is stacking. The vault is broken into segments and assembled from pieces that create close to the required curvature.

They are attached to putty, diluted with a mixture of PVA and water. Such a batch dries quickly, so first we cut the plates and try them on. It can be folded on the table, only the vault will turn upside down, but it will allow you to evaluate how correctly the plates are assembled.

Then the plates begin to be attached to the opening, for reliability, periodically reinforcing with self-tapping screws. Washers are placed under the heads - so as not to push through the cardboard. Remove excess putty immediately. If it gets stuck, it's impossible to tear it off. The finished surface is primed to improve adhesion (adhesion), and then puttied, leveling the arch. To make it easier to display, you can use a template attached on both sides.

Making sharp bends using this technology is not easy, and for rounded corners and semi-arches it is a great way to do without profiles.
How to bend drywall
One important detail: standard wall drywall bends poorly. For curved surfaces, a thin one was specially invented - 6 and 6 mm thick. This bent part is easier to make from it. With a slight curvature, such a thin sheet can be bent easily and without tricks. If there is no desire to buy thin GVL, there are two ways to bend the standard one.
First- take a needle roller and roll the cut segment well on one side. You need to roll with effort so that the plaster breaks. Then the leaf is wetted with water and left for two to three hours. After such procedures, it should bend well. Take it, fix it on one side, and gradually pressing it against the arch frame, bend it, screwing it gradually along the edges with self-tapping screws. The method is not bad, only with a lack of experience and insufficient processing of gypsum, the sheet may burst. You will either have to mask the gap later, or start over.

Second way to bend drywall: on one side, make notches with a knife about every 4-5 cm. The notches should cut the paper. Such a strip is also gradually fixed, breaking the gypsum as necessary. It bursts along the incision lines from a light pressure.

Related videos
Starting a large-scale cosmetic or even overhaul with a complete change in the interior, the owners often want to bring to life many interior design ideas. One of them may be the transformation of an ordinary rectangular doorway into an arched one. If you figure out how to make a drywall arch, then it is quite possible to install it yourself.
The arch can affect the structure of everything design solution interior, and an additional decorative overlay of a certain style will set the design of the entire room.
Having studied detailed instructions for the installation of the arch, having prepared in the necessary materials and tools, it is quite possible to make an arch from a rectangular doorway in just one day.
It should be noted that an arch made using the same technology can transform not only a doorway, but also wider passages that divide large rooms into zones.
Materials and tools for the manufacture and installation of arches
In order to bring a bored doorway to a new state and get a neat aesthetic arch, you need to prepare the following materials:
- Gypsum board GKL with a thickness of 9 ÷ 12 mm.

- Metal galvanized profile or wooden beam for making a frame.
- Perforated metal corner for strengthening the joints of drywall planes. A fiberglass mesh is also quite suitable for this process.

- Self-tapping screws for fastening drywall and perforated corners to metal profiles.
- Gypsum-based putty - rough (starting) and finishing.
For installation, the following tools must be available:
- Electric jigsaw and drill.
- Ruler, construction square, tape measure and pencil.
- Grinder or metal shears .
- Screwdriver.
- Construction knife.
- Roller with metal spikes.
- A flexible bar that will help create a smooth arch shape.
- Spatula and grater for working with putty.
- Sponge, water container, thick soft cloth (you can use an old terry towel).
Prices for drywall and sheet materials
Drywall and sheet materials
Taking measurements and preparing structural elements
- Before starting the manufacture of arched elements, it is necessary to measure the opening, where the arch will be mounted. Its width and the desired vertical distance are measured, from top to bottom, on the side walls of the opening. These parameters will determine how rounded the arch will be.
In addition, it is necessary, starting from the thickness of the drywall, to determine the depth of its installation, since it must be fixed at the same level with the plane of the wall - it must be drowned deep into the doorway.
- From the corners of the doorway, you need to retreat deep into a distance that will be equal to the thickness of the drywall and make the appropriate markings by drawing the lines for installing frame profiles.
- According to the obtained parameters of the size of the opening, with the help of a grinder or scissors for metal, segments of a metal profile are cut - two for fixing horizontally and four for fixing on the side walls of the doorway. They are installed along the previously marked lines, leaving room for drywall.

- If the walls of the opening are made of brick or built of concrete, holes are drilled directly through the metal profile in the wall with a drill (perforator), where plastic dowels are hammered into which the fixing screws will be screwed.

On this structural element - the frame, drywall parts will be attached.
- The next step is to mark and cut two drywall panels according to the previously obtained dimensions. They must fit exactly into the doorway between the walls.
- Further, on these panels it is necessary to draw and then cut out two arched details from them. In this case, you need to act very precisely, since by making the wrong markup of the arc, you can easily get an ugly arch skewed to the side.
- Curvilinear "trajectory" cutting, that is, the arcuate part of the arch itself can be marked in different ways, and all of them are equally accessible.
First way
The markup is done as follows:
- First, the panel is laid on a flat horizontal surface.

- Then, on the upper horizontal and on both vertical sides, the thickness of the metal profile, already fixed in the opening on the walls, is marked. Usually it is 50 mm. These points are used to draw straight lines parallel to the edges of the panel;
- To draw a semicircle, a pencil is taken and a piece of inelastic cord, which is tied to the pencil so that it rotates freely in this loop.
 Homemade "compass" applies the necessary arc of the arch
 A self-tapping screw is screwed in the center of the circle. Then a cord is attached to it, so that the sharpened pencil lead falls on the intersection point of the lines drawn earlier, parallel to the left and right edges with the bottom edge of the panel. It turns out a kind of compass, capable of drawing circles of the diameter required in this case.

The markup can be transferred to the second panel simply by copying from the first.
Second way
For the second method of marking the line of the arched arc, you will need a flexible plastic bar, a pencil and two pairs of hands.

- First you need to determine what height the curvilinear part of the arc will have at the highest point. To do this, the bar is applied to the door opening between the profiles fixed on it. One end of the bar must be attached to bottom edge of the profile, fixed on the left side wall of the opening, its highest point on the bend should touch the midpoint of the horizontally fixed profile, and the third touch point of the bar will be bottom edge of the profile on the right wall.
- At the last point of contact with the profile, a mark is made on the bar - it will determine the length of the very arc that will determine the curvilinear cut section.
- Further, the same is done on the drywall panel, where, just as in the first version, 50 mm are already marked along the edges. One of the masters holds the bar so as to align its beginning and the mark made with the lines, and the second one draws the border of the arched semicircle along it.
- Then, the marked area is cut with a jigsaw.
Third option
The third option is a template of an arched section made on hard cardboard according to the dimensions taken from the door. It can also be marked with a homemade "compass" made of cord and pencil.
- The finished template is placed on a drywall panel, its contour is outlined with a pencil, and then the part to be removed is cut out with a jigsaw.
- The template will not allow you to make a mistake and the semicircle will be perfectly even.
The next step is preparing a metal profile for the curved parts of the frame, on which the lower part of the cut plasterboard panels will be fixed. To cut off the profile segment of the desired length, you can use the very flexible bar on which the mark of the length of the arc forming the arched vault is made.

You need to prepare two such segments of the profile. Then, cuts are made on them with metal scissors or a grinder, thanks to which it will be easy to bend the profile into an arc with the desired bending radius.

It should be especially noted that if the arch will have a small thickness, then sometimes one wide metal profile with made on German notches to secure German two panels on both sides. The profile must be recessed inside the arch to the thickness of the drywall used, since later the lower arch bar will be attached to this particular curvilinear part of the frame.
The rest of the elements will be in the course of the event. installation work- usually there are no special difficulties with them.
Installation of the frame base of the arch
Metal frame made of galvanized profile
- Installation of the arch begins with the installation of drywall elements with cut out semicircles, which are fixed in the doorway on metal profiles screwed into it.

To fix drywall use special screws and a screwdriver.
These elements are fixed on both sides of the doorway.
- Further, a notched and bent metal profile is screwed from the inside of the cut out arched opening. When carrying out work, it is necessary to hold the profile with one hand, pressing it exactly in the shape of an arch.

This part is screwed first to one side, and then to the second.
- The frame will not have the proper rigidity and completeness of the structure if it is not installed between the metal arched elements of perpendicular sections of the profile. They will connect the plasterboard walls of the arch to each other. These jumpers are installed in several places of the arched structure.

To fix the jumpers on the profile, self-tapping screws with wide caps and a sharper nose are used.
Installation of a wooden frame arch
If the manufacture of a frame from a metal profile seemed too complicated, then you can mount it from wood.
- To do this, you need to prepare bars measuring 20 × 20 mm - to fix on drywall, and 30 × 30 mm - to fix on opening walls.
- Further, an arch is marked on the drywall, sawn out, and then wooden bars with ends arranged in a semicircle are screwed onto the inner surface of the element.

- A free space of 30 mm is left along the edges of the part, which will be occupied by bars installed in the doorway.
- The walls of the doorway are marked in the same way as when attaching a metal profile, only instead of it bars 30 × 30 mm are fixed along the markings
- Then, the prepared arched panel is applied to its “regular place” and screwed into the opening, to the wooden bars installed in it.
You can do it differently - fix the bars on the edges of the drywall, and then screw the finished stasis panel to the wall. But in this case, it will not be very convenient to work, especially when the second panel with the arch is fixed, since it will be difficult to climb between the two arched elements with a hand with a screwdriver.
Cable routing
Before proceeding to the manufacture and installation of the lower part of the arch, an electric cable is laid if the opening is provided with lighting.

The contact ends of the cable are fixed to the metal profile approximately in the place where spotlights should be installed. It is best if the cable is enclosed in a plastic corrugated pipe– to avoid accidental damage to the insulation on the sharp edges of galvanized profiles.
When the prepared bottom strip of drywall is installed, it will perfectly cover all the ugliness of the wires.
Fabrication and installation of the lower plasterboard arch panel
When the frame and the front parts of the arch are installed, you can proceed to the manufacture of the lower strip, which will cover the entire unsightly appearance of the frame.
First, the full length of the arcuate bend of the arch and the width of the distance between the installed arched frame parts are measured with a tape measure.
The dimensions are transferred to drywall, and a rectangular strip of the required dimensions is cut out of it.
Next, the drywall strip needs to be bent into an arch, however, the material is hard and brittle, so it can easily be broken, ruining the part. In order for the process etc went smoothly, you can use two methods to bend this material:
1. The prepared part is marked along its entire length into transverse strips 50 mm wide.

- Further, cuts are made along the marked lines, about half the depth of the drywall.
- Then the part is carefully bent and immediately, without delay, is screwed to the metal profile, which is located inside the arched structure.

Video: simple drywall arch
2. The second method of bending drywall, in principle, is even simpler than the first, but it will take a little longer, since you have to wait for the material to take the desired shape.
First, a spiked roller is forcefully passed along the drywall strip, which pierces the top layer of cardboard with its sharp spikes.

If there is no such roller in the master’s arsenal, you can use a sharp construction knife - with it, cuts of 20 ÷ 30 mm in size are made on the drywall surface, at a distance of 15 ÷ 20 mm from each other, both in length and in width.
In the next step, the panel, on the side of the punctures, must be moistened with a sponge with water and leaned against the wall, setting the long side vertically.

After about 15 ÷ 20 minutes, the first results can be seen - the panel will begin to bend under its own weight. Then the part is wetted again and left for another 40 minutes.
It is possible, especially for the ideal bend of the arch, to knock down a structure from three boards with the letter P (a kind of conductor) with the dimensions of the place of the doorway where the arch will be installed. Then turn it over, setting it on the horizontal part.
Further, in the same way, having moistened the drywall part with water, it is laid on the legs of an inverted letter P, moistened side up. After 20 minutes, its middle will begin to sag inside the structure. Then, it is moistened again and left for 40 ÷ 60 minutes for complete subsidence to the horizontal bridge of the structure.
By the way, a similar method of bending a drywall strip sometimes allows you to make an arch without a frame at all, as shown in the attached video clip:
Video : giving bending drywall arch
Still wet drywall on a metal profile with self-tapping screws, which are screwed in at a distance of no more than 100 mm from each other.
The next step is to cut holes in the designated places on this part of the arch, into which, after finishing, it will be possible to install spotlights (if their installation is provided).
Having made holes, you need to pull the cables inside the structure to them, but they should not be completely pulled out of the holes, as the protruding ends of the wires will interfere with the finishing.
arch decoration
Having completed the installation of the frame and sheathing, you can proceed to finishing the arch with putty. Only by closing all the seams and recesses from the heads of the screws with a putty mixture and leveling it, you can get a neat arch.
The puttying process is carried out in three stages:
- the first layer evens out deep flaws;
- the second - displays even forms of the arch;
- the third layer is the finishing one, and with its help the ideal smoothness of the surface is achieved.
- However, before taking on the putty, it is recommended to strengthen the corners of the arched openingspecial perforated corner, which will easily take any curvilinear shape.

Fiberglass mesh can be used in place of corners, but it will not give the sharp, even, and reinforced edge that corners can. The installation of the corner is carried out using self-tapping screws, which are screwed in at a distance of 150 ÷ 200 mm from each other.
- Next, you can proceed to work with.
For work with drywall, an acrylic or gypsum-based putty is used, designed for interior work.
The acrylic composition can be purchased in ready-made pasty form, while the gypsum mixture is sold as a dry mortar. Mix it immediately before use. The best way to do this is with a mixer attachment, which is attached to a drill.
You need to know that you can not immediately knead a large number of putty, as it sets very quickly, so it must be prepared in small portions. There is always an instruction on the packaging of the building material, which must be carefully studied in order to find out the exact “life” time of the prepared composition and the complete drying of the plastered surface.
- The first step is to finish the drywall joints and the main walls of the doorway.

The work is carried out with the help of wide and medium-width spatulas. One of them putty putty on the joint, and, as far as possible, smooth it out, comparing the surfaces of drywall and doorway.

- Having closed the joints between the drywall and the wall in the doorway, you can immediately close the self-tapping caps on this part of the structure with putty. Carrying out this process, you need to remember that the surface must be perfectly flat, so it is necessary to achieve this particular effect. For this stage of work, you can use a metal trowel, which will immediately cover a large area.

- The first layer closes the deep joints of drywall with the wall. Here it is very important to distribute the putty into all the recesses and chips, since it is necessary to bring the seams on the same level with the wall and the arched structure.
Do not apply too thick layers of material, as raw putty can quickly separate from the wall surface. It's okay, if necessary, instead of three, you can put four layers of putty - they will hold on much more reliably than two or three very thick ones.
- Applying putty to all wide joints, before it dries, a reinforcing fiberglass mesh should be applied on top. This easy-to-use material can be purchased in any desired width, so strengthening wide gaps will not be a problem.
From the coil, the required length of the mesh is measured, and with the help of a spatula, this tape is then pressed into the putty, stretched and leveled.
- The arched bend, trimmed on both sides with a perforated corner, must also be treated with a layer of putty, comparing the surfaces.

If the junction of two drywall planes on the arched opening is reinforced with a fiberglass mesh, then if necessary, it can be cut in some places, since it should lie on the surface perfectly evenly, without waves and folds.
- When all seams are sealed and reinforced with reinforcing materials, the first layer is left to dry.
- After it dries, it is necessary to go over the surfaces with medium grit sandpaper to level the dried putty. By doing this, you need to try to “knock down” all the sharp protrusions so that they do not interfere with further work. But, at the same time, the structure must be handled very carefully so as not to expose the reinforcing elements.
Aligned joints should be well cleaned of dust with a damp sponge.

- Next, you can move on to the second thin layer of finishing putty, which should cover and level all surfaces.
- After it dries, the entire structure is cleaned with fine sandpaper (with a grain of about 220).
Before applying the third layer, it is necessary to again carry out measures to clean all joints and smooth surfaces from putty dust.
 The final layer should make the arch "clean"
 - The final coat should make the finish smooth. The putty is applied in a very thin layer, and in this case, a ready-made paste-like material made on an acrylic basis is best suited.
In the process of work, it is necessary to smooth out all the traces left by the spatula.
- When finished, the structure is left to dry for at least 8 ÷ 12 hours. The level of dryness of the material can be determined by its color - it should brighten to pure white.
- Next, there is a grinding process, and it is better to carry it out with a special grinder, on which fine-grained sandpaper (grain 280 ÷ 400) is fixed, and then a soft polishing cloth.

Grinding is carried out until the surface is perfectly smooth.
- After the arch has been sanded, you can paint it if it was planned. After painting in the doorway, special built-in

Making and installing an arch is not such a complicated process. The main thing is to figure out the little things, how each of the stages of work goes, and having understood all the nuances, you can purchase materials and get down to business.
Prices for popular types of putty
Putties
And for those who have already filled their hands, we can offer a more difficult task:
Video: monumental arch with columns


